

 03-03-2015, 12:54 PM
Last edit by: IB Advertising
See related guides and technical advice from our community experts:
Browse all: Cleaning and Detailing
- How to restore your headlights
Step by step instructions for do-it-yourselfers.
Browse all: Cleaning and Detailing

No Low Beam Headlights
07-20-2014, 10:06 PM
#261
Race Director


Those washers are a bitch to get off and your are right, it feels like you are messing up the box.
If you notice down in SenseofTouch's photos, he added a second jumper wire as a backup on the other side (backside is what he called it, but it is the top of the block where you are trying to get the washers out).
If you don't want to rip those washer out, you can just do the Backup Wire on the side you are looking at and not worry about the original wire underneath. The original wire is not hurting any other circuit and the backup wire connects to the same posts, so you should be good to go. I did this mod to my wife's 2005 C6. The problem was in the exact spot as shown in SenseofTouch's photos.
If I had to do it over, I would just do the backup jumper on the easy side of the block. I bet you that is what the Dealer will do in Recall #13146.
 No, that is bad information. The fusebox consists of three layers. Both the failure point and the "back side" where the additional wire is added are on the middle layer. Only that middle layer has the channels that hold the wire in place. You can't just install the wire without taking the box apart. I've repaired three of these now.
 07-21-2014, 10:41 AM
#262
Intermediate


Member Since: Mar 2013
Location: Texas
Posts: 25
Likes: 0
Received 0 Likes
on
0 Posts
You are right that you have to remove the top cover, fuses and such, unplug stuff, and etc just to get to it. I believe that was covered in SenseofTouch's post.
I was just referring to the layer or board on which the Wire in Question is located. It has wire circuits on the top and bottom. The Wire in Question is on the bottom (as you are looking down onto the fuse block) of that layer or board and that is why the removal of the washers are necessary to get to that wire or you can just run a new jumper on the top of that layer and leave the Wire in Question on the bottom alone without removing the washers.
It actually takes longer to remove everything above and put back everything proper than it does to run the new jumper for that circuit.
08-15-2014, 03:08 PM
#264
Safety Car


Member Since: Jan 2006
Location: Miami FL
Posts: 4,598
Received 69 Likes
on
45 Posts
2020 C6 of the Year Finalist - Unmodified
St. Jude Donor '08-'09-'10-'11-'12-'13-'14-'15-'16,'17,'18-'19-'20-'21-'22


Mine is a 2006 that I bought new from McMulkin and immediately titled here in Florida.
GM Customer Service: would you like to look into this? I will send you a PM.
GM Customer Service: would you like to look into this? I will send you a PM.
09-15-2014, 02:06 PM
#265
Heel & Toe

Member Since: Feb 2011
Location: Hollywood Florida
Posts: 17
Likes: 0
Received 0 Likes
on
0 Posts
Just started experiencing this issue. Came on the forum....and Boom! There it was..the answer. Thanks Tom(racerxr) & SenseofTouch. Great write up and pictures. Repair was a piece of cake! Nothing like saving $894.00
09-15-2014, 03:13 PM
#266
Cruising

Member Since: Jan 2012
Posts: 11
Likes: 0
Received 0 Likes
on
0 Posts
I obtained a replacement Fuse block from FH daily Chevrolet in San Leandro their parts discount pricing was great took about 20 minutes
As of September 15 I have not seen a recall letter on my 2007 Z06
QUOTE=doje;1587407183] No, that is bad information. The fusebox consists of three layers. Both the failure point and the "back side" where the additional wire is added are on the middle layer. Only that middle layer has the channels that hold the wire in place. You can't just install the wire without taking the box apart. I've repaired three of these now.[/QUOTE]
As of September 15 I have not seen a recall letter on my 2007 Z06
QUOTE=doje;1587407183]
No, that is bad information. The fusebox consists of three layers. Both the failure point and the "back side" where the additional wire is added are on the middle layer. Only that middle layer has the channels that hold the wire in place. You can't just install the wire without taking the box apart. I've repaired three of these now.[/QUOTE]
09-22-2014, 09:18 AM
#267
Heel & Toe

Member Since: Feb 2012
Location: Decatur GA
Posts: 19
Likes: 0
Received 0 Likes
on
0 Posts
Thank you for the write up and pictures. Lights stopped working about a month ago. Did a vin recall search on GM, printed off the letter and scheduled an appointment. They inspected it, agreed with the recall, and said they could not do anything for at least 2-3 weeks. The new "parts" have been sent to a manufacturer to be made and GM is "waiting".
Obviously driving without lights isn't fun. The fix took about 1.5 hours. Thanks again.
Obviously driving without lights isn't fun. The fix took about 1.5 hours. Thanks again.
09-22-2014, 11:21 AM
#268

You might want to consider the GM recall #13146 concerning the UBEC (underhood based electrical housing) It will expand causing the wire to fracture which results in the loos of low beam headlights. check the recalls section in the forum for a further explanation of this problem. It affects 2005-2007 model year Vettes.
09-22-2014, 11:24 AM
#269
Heel & Toe
Member Since: Feb 2012
Location: Decatur GA
Posts: 19
Likes: 0
Received 0 Likes
on
0 Posts
You might want to consider the GM recall #13146 concerning the UBEC (underhood based electrical housing) It will expand causing the wire to fracture which results in the loos of low beam headlights. check the recalls section in the forum for a further explanation of this problem. It affects 2005-2007 model year Vettes.
09-22-2014, 12:58 PM
#270
Team Owner

If you are just driving around a city, it's easy to use the fog lights...they don't blind people and they will provide enough light for you to see. You can turn them on and then not worry whether the low beams go on and off at times. If you are handy, it would probably be better to fix that wire yourself, rather than let a dealer do it...the DIY here is better than anything the dealer has access to.
09-22-2014, 05:47 PM
#271
Team Owner

Member Since: Sep 2000
Location: Far NW 'burbs of Chicago
Posts: 23,927
Received 2,045 Likes
on
1,358 Posts
St. Jude Donor '13

Do the fogs stay on if the wire breaks and shuts down the low beams?
Trying to figure this out in advance, just in case...
It would annoy other drivers, but it sounds like the "Immediate Action" for any headlight failure would be to simply push the stalk forward to get high beams. If it works, great. If not, you've only lost about a second. Then try the fogs if they were not on.
Headlight failure in the city is not a big deal except that other drivers have trouble seeing you. Out in the boonies on a dark night at high speed, not so good.
09-22-2014, 08:06 PM
#272
Racer
Member Since: Dec 2008
Location: Knoxville TN
Posts: 255
Likes: 0
Received 0 Likes
on
0 Posts
 09-22-2014, 08:20 PM
#273
Team Owner
Do the fogs stay on if the wire breaks and shuts down the low beams?
Trying to figure this out in advance, just in case...
It would annoy other drivers, but it sounds like the "Immediate Action" for any headlight failure would be to simply push the stalk forward to get high beams. If it works, great. If not, you've only lost about a second. Then try the fogs if they were not on.
Headlight failure in the city is not a big deal except that other drivers have trouble seeing you. Out in the boonies on a dark night at high speed, not so good.
Trying to figure this out in advance, just in case...
It would annoy other drivers, but it sounds like the "Immediate Action" for any headlight failure would be to simply push the stalk forward to get high beams. If it works, great. If not, you've only lost about a second. Then try the fogs if they were not on.
Headlight failure in the city is not a big deal except that other drivers have trouble seeing you. Out in the boonies on a dark night at high speed, not so good.
09-22-2014, 09:21 PM
#274
Safety Car
Member Since: Jan 2006
Location: Miami FL
Posts: 4,598
Received 69 Likes
on
45 Posts
2020 C6 of the Year Finalist - Unmodified
St. Jude Donor '08-'09-'10-'11-'12-'13-'14-'15-'16,'17,'18-'19-'20-'21-'22
 .
09-22-2014, 09:30 PM
.
09-22-2014, 09:30 PM
#275
Team Owner
Member Since: Sep 2000
Location: Far NW 'burbs of Chicago
Posts: 23,927
Received 2,045 Likes
on
1,358 Posts
St. Jude Donor '13
But a real enthusiast would take one for the team, and cut his wire to see for sure what would happen.
 09-23-2014, 12:09 AM
#276
Team Owner
09-23-2014, 06:12 PM
#277

https://www.corvetteforum.com/forums...s/thumbsup.gif
09-28-2014, 11:32 AM
#278
Racer
Hi everyone!
I have had a low beam problem on my car since I bought it. Dealer tried to fix it before shipping it to me (by replacing a relay) and that did of course not work. After much back and forth arguing who's paying for what I decided to fix it myself.
First, a huuuuuge thank you to racerxr (Tom) here on the forum. Thanks for locating the problem and figuring out how to fix it as well as providing excellent descriptions and pictures via email! The wire was broken in EXACTLY the spot that you pointed out!
Yesterday me and my awesome girlfriend set out to fix the fuse box! We ended up following Tom's instructions for the most part with a few modifications. I have written a short step-by-step guide for how we fixed the problem. This is to further clarify how this CAN be done (this is by NO means the perfect solution) to those who are still wondering to fix it yourself or not. It was a pretty straight forward job, and absolutely well worth 1000 $
Take the fuse box out of the car. Very simple:
1. Disconnect the battery and the power cable that connects to the fuse box
2. Press the plastic clips that attaches the main part of the fuse box and pop it out
3. Unscrew the four metal bolts and knock on them so that each of the four blocks fall out
4. You're DONE
Disassemble the fuse box
1. Pull out all fuses and relays
2. Use a needle nose plier and un-swedge the metal sleeves that hold the two layers together.
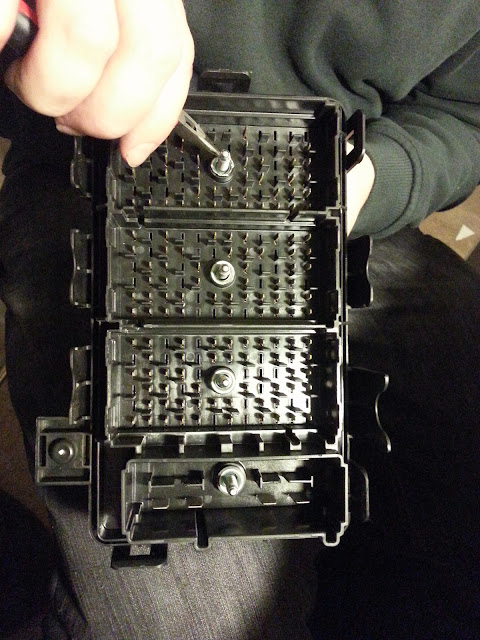

3. When un-swedged enoug, knock the bolts through the box so that it can be disassembled. I messed up the bolts so badly (bad needle nose pliers) during the un-swedging that I decided to cut the metal sleeves surrounding the bolts (see picture) so that they don't interfere. The sleeves are not needed as their only purpose is to keep you from opening the fusebox. When the box is in the car, it is held in place by the four bolts and the four block modules.

Replacing the broken wire
1. Get some 20 gauge copper wire. I bought some at Homedepot for 7 $

2. Find the broken broken wire and remove it. When you manage to open the fusebox, the broken wire is on the other side.

Very bad conductivity.
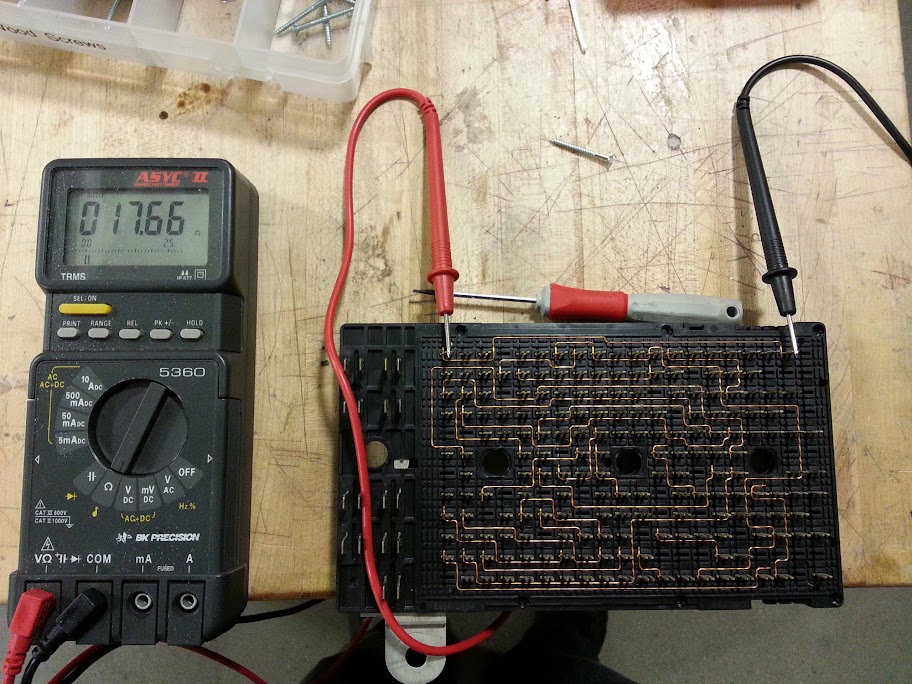
3. Replace the wire. As Tom suggested, I added a backup wire on the other side as well. So in case the wire breaks again there is a backup on the other side. I also removed some of the plastic guiding with a razor so that the copper wire can have nicer bends.

Backup wire on the back side

Put everything back together and drive after dark!
When putting the fusebox back together, simply align the four block modules and place the box on top of them (without the bolts in place). Then see through the bolt holes so that you make sure that they are sentered. Enter the bolts and screw in place each of the modules till each bolt is tightened. Check visually afterwards if all the blocks are in place.

edit: Link to the picasa album: https://picasaweb.google.com/1062290...FixCorvetteC6#
Thanks Tom!
I have had a low beam problem on my car since I bought it. Dealer tried to fix it before shipping it to me (by replacing a relay) and that did of course not work. After much back and forth arguing who's paying for what I decided to fix it myself.
First, a huuuuuge thank you to racerxr (Tom) here on the forum. Thanks for locating the problem and figuring out how to fix it as well as providing excellent descriptions and pictures via email! The wire was broken in EXACTLY the spot that you pointed out!
Yesterday me and my awesome girlfriend set out to fix the fuse box! We ended up following Tom's instructions for the most part with a few modifications. I have written a short step-by-step guide for how we fixed the problem. This is to further clarify how this CAN be done (this is by NO means the perfect solution) to those who are still wondering to fix it yourself or not. It was a pretty straight forward job, and absolutely well worth 1000 $
Take the fuse box out of the car. Very simple:
1. Disconnect the battery and the power cable that connects to the fuse box
2. Press the plastic clips that attaches the main part of the fuse box and pop it out
3. Unscrew the four metal bolts and knock on them so that each of the four blocks fall out
4. You're DONE
Disassemble the fuse box
1. Pull out all fuses and relays
2. Use a needle nose plier and un-swedge the metal sleeves that hold the two layers together.
3. When un-swedged enoug, knock the bolts through the box so that it can be disassembled. I messed up the bolts so badly (bad needle nose pliers) during the un-swedging that I decided to cut the metal sleeves surrounding the bolts (see picture) so that they don't interfere. The sleeves are not needed as their only purpose is to keep you from opening the fusebox. When the box is in the car, it is held in place by the four bolts and the four block modules.
Replacing the broken wire
1. Get some 20 gauge copper wire. I bought some at Homedepot for 7 $
2. Find the broken broken wire and remove it. When you manage to open the fusebox, the broken wire is on the other side.
Very bad conductivity.
3. Replace the wire. As Tom suggested, I added a backup wire on the other side as well. So in case the wire breaks again there is a backup on the other side. I also removed some of the plastic guiding with a razor so that the copper wire can have nicer bends.
Backup wire on the back side
Put everything back together and drive after dark!
When putting the fusebox back together, simply align the four block modules and place the box on top of them (without the bolts in place). Then see through the bolt holes so that you make sure that they are sentered. Enter the bolts and screw in place each of the modules till each bolt is tightened. Check visually afterwards if all the blocks are in place.
edit: Link to the picasa album: https://picasaweb.google.com/1062290...FixCorvetteC6#
Thanks Tom!
2007 Z51 headlights went out 8/16/14. GM has a recall but no solution. Did the fix yesterday (broken wire).Thank you Tom. Wired both sides. You think GM would figure it out. I just hope this doesn't happen to anyone it night and on a mountian road. Mine when out on my way to work in the morning. Thanks all you guys that posted.
Mark
The following users liked this post:
Rogers 07 (02-04-2017)
11-09-2014, 09:12 AM
#279
Instructor

Member Since: Feb 2006
Location: Middletown CT
Posts: 221
Likes: 0
Received 0 Likes
on
0 Posts
2008 with the low beam deal, fogs have gotten me around for awhile.
Went to one dealer after I read this forum and diagnostic said my battery had low amps and the relays weren't working correctly. Bought a $250 optima and cured nothing with an $85 diagnostic charge. I told them what the problem was but dealers know everything.
I called GM and opened a case and got a service guy assigned to me and it seems only certain 08"s,probably early vins are included in the customer satisfaction deal. Mine is not in that group but has the identical problem. I raised hell, had them talk to my different local dealer and I dropped it off for another diagnostic.$111 later, everyone agreed that I have the problem but no offer to fix it.
I took it apart yesterday and changed the wire, 2 hours,easier than I thought.Didn't work.
Noticed that the relay looks browned so I'll change that and I'm thinkin that the on off wire deal smoked it.
Earlier guy was right,08 fuse block pattern was different than the ones pictured.
Take a silver sharpie and draw a line over the route before you take out the wire. Takes the scary{what if I screw this up) part out of the equation.
The washers,I took a small skinny flat screwdriver and went around them making pry marks for the pliers to grab. Needle nose have no business in there. Pliers with a good sharp edge grabbed the bent parts well, no need to be hammering electrical parts. Do the 3 big bays first so you're good at it when you get to the small compartment that was tighter and alot harder to fight with.
I couldn't identify my break even with a magnifying glass, I followed the line from the relay over and used the dental tool to loosen the wire at the bend and it popped right out broken.
I didn't put in a back up. I'm thinkin since the washers are fixed, it would be a half hour fix if it happened again.
$85 diagnostic
$111 diagnostic
$200 at a Marriot the first time I didn't have lights and didn't know what to do
$396
11-13-2014, 04:27 PM
#280

I took my 2005 C6 to get it's yearly safety inspection and found the low beam headlights were not working. I do not drive at night much so I don't know how long they had been non-functional. I went home and searched this forum and found this thread. The pictures and information in post #85 helped me take my fuse box apart and fix the broken wire. Mine had failed in the same exact spot in the wire shown in the pictures. I put in a new wire and also added the second wire on the other side of the wiring board. Low beams are working good now! The only cost was a buck or so for some 20 gage (.032 diameter) solid wire.
