
Vararam DIY improvement and fix
 05-17-2009, 01:21 PM
#1
Drifting

Thread Starter
DIY Vararam Improvement.
Product Vararam VR-SC1 Gen2 Snakecharger:
I bought this intake one week ago from kentucky-speed.com. Bobby was great to deal with and has A+ costumer service.
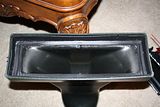
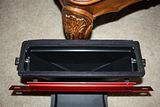
I installed the system into my 2006 C6. The install went smoothly. I did notice the middle sides of the top half of the intake was bowed out a bit. You could see a small gap between the filter and the sides of the intake.
The intake came with a sponge like strip of foam that had a peal back sticky side to it. The green filter is squeezed in-between two of these foam strips. One on top of the filter and one below it.
After seeing multiple posts about the strips adhesive giving out and causing the foam to dislodge and move around causing debris to enter the engine, I decided to take mine apart and take a look. Mind you this has only been installed on my car for about 100 miles. Here is one such post. http://forums.corvetteforum.com/c6-t...oing-back.html
To my surprise the adhesive had already started to get hot and melt.
Not wanting to give up on this intake I decided to try to fix this situation. (Click on any picture for a large image.)
1. First you want to take the foam strip off your Vararam. There are two rectangular pieces of foam. One on the lower part of the intake and one right under where the green filter sits. Be careful not to rip it. If your Vararam is older the adhesive will probably already be dead and the foam strip will be easy to remove.
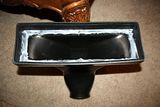
2. Now you want to peel off the clear glue strip adhesive that was attached to the foam. Your might be a brown color by now. Take your time.
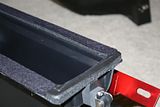
3. Take a strong water tight glue and generously apply it to the intake. Top and bottom. See picture.


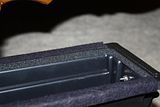
4. Place the foam back on the intake and make sure it’s all the way to the corners.
5. Let it dry overnight
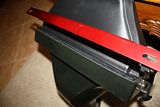
6. I noticed the center part of the filter wasn’t getting enough pressure to seal it correctly against the foam. I bought some of this great Moleskin Felt from Tint Protector http://www.tintprotector.com/strips and placed it on top of the foam in the center to give it more pressure to seal. The Moleskin felt has an acrylic adhesive that won’t break down and melt in the heat or when it gets wet.
7. When installing the Moleskin, fold it down the outside of the bottom part of the intake. This will make the moleskin seal the bowing gap in the Vararam.

8. Put the Vararam together taking your time and making sure everything is placed where it should be. The lower half of the intake fits into the upper part. Now that the moleskin is installed, it will make the fit tighter and help push the green filter harder against the foam that you just glued in.
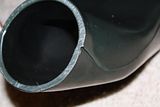
9. When you install the Vararam into the car, make sure there are no leaks where the top part of the intake fits into the rubber silicone hose that attaches to the mass airflow sensor. I had to shave the corner of mine down a bit and then seal it with some of the glue once the hose was attached and tightened down. (See Picture)
10. Seal it all back up together and you will sleep better at night.
Product Vararam VR-SC1 Gen2 Snakecharger:
I bought this intake one week ago from kentucky-speed.com. Bobby was great to deal with and has A+ costumer service.
I installed the system into my 2006 C6. The install went smoothly. I did notice the middle sides of the top half of the intake was bowed out a bit. You could see a small gap between the filter and the sides of the intake.
The intake came with a sponge like strip of foam that had a peal back sticky side to it. The green filter is squeezed in-between two of these foam strips. One on top of the filter and one below it.
After seeing multiple posts about the strips adhesive giving out and causing the foam to dislodge and move around causing debris to enter the engine, I decided to take mine apart and take a look. Mind you this has only been installed on my car for about 100 miles. Here is one such post. http://forums.corvetteforum.com/c6-t...oing-back.html
To my surprise the adhesive had already started to get hot and melt.
Not wanting to give up on this intake I decided to try to fix this situation. (Click on any picture for a large image.)
1. First you want to take the foam strip off your Vararam. There are two rectangular pieces of foam. One on the lower part of the intake and one right under where the green filter sits. Be careful not to rip it. If your Vararam is older the adhesive will probably already be dead and the foam strip will be easy to remove.
2. Now you want to peel off the clear glue strip adhesive that was attached to the foam. Your might be a brown color by now. Take your time.
3. Take a strong water tight glue and generously apply it to the intake. Top and bottom. See picture.


4. Place the foam back on the intake and make sure it’s all the way to the corners.


5. Let it dry overnight
6. I noticed the center part of the filter wasn’t getting enough pressure to seal it correctly against the foam. I bought some of this great Moleskin Felt from Tint Protector http://www.tintprotector.com/strips and placed it on top of the foam in the center to give it more pressure to seal. The Moleskin felt has an acrylic adhesive that won’t break down and melt in the heat or when it gets wet.
7. When installing the Moleskin, fold it down the outside of the bottom part of the intake. This will make the moleskin seal the bowing gap in the Vararam.


8. Put the Vararam together taking your time and making sure everything is placed where it should be. The lower half of the intake fits into the upper part. Now that the moleskin is installed, it will make the fit tighter and help push the green filter harder against the foam that you just glued in.
9. When you install the Vararam into the car, make sure there are no leaks where the top part of the intake fits into the rubber silicone hose that attaches to the mass airflow sensor. I had to shave the corner of mine down a bit and then seal it with some of the glue once the hose was attached and tightened down. (See Picture)

10. Seal it all back up together and you will sleep better at night.
Last edited by FLC6; 05-17-2009 at 09:49 PM.
 05-17-2009, 01:43 PM
#2
Race Director


Nice DYI fix! 
IMHO, and not to be ungrateful of your sharing the DYI fix, but,.....it costs a few hundred bucks to begin with and you have to spend a few days fixing/correcting the product?

IMHO, and not to be ungrateful of your sharing the DYI fix, but,.....it costs a few hundred bucks to begin with and you have to spend a few days fixing/correcting the product?
Last edited by RadarP3C; 05-17-2009 at 02:18 PM.
05-17-2009, 01:51 PM
#3
Race Director
I'll look into that.
05-17-2009, 02:12 PM
#5
Team Owner

Member Since: Jun 2005
Location: Northern, VA
Posts: 46,106
Received 2,481 Likes
on
1,944 Posts
St. Jude Donor '15
"In honor of jpee"

 05-17-2009, 05:07 PM
#7
Drifting
Member Since: Feb 2006
Location: Lake Delton (WI Dells) WI
Posts: 1,339
Likes: 0
Received 1 Like
on
1 Post
I must have a newer design, as my bottom piece overlaps the top piece 
Last edited by JRHAWK9; 05-17-2009 at 09:50 PM. Reason: .....because I can't type to save my arse.......
05-17-2009, 05:28 PM
#8
Race Director
To bad Vararam doesn't correct the problem. I like the DIY idea though, after all the product does make more power. This way it is safer to use. I am still looking into what I need to do. Good idea.
05-17-2009, 05:35 PM
#9


If he bought a week ago, and you have a newer design, how come they have not initiated a recall of the defective product and dealt with the issue before a consumer trashes his engine with the product that has an issue? (ie..You have an updated design. So there must be something wrong with the design that FLC6 has)
05-17-2009, 05:37 PM
#10
Safety Car

05-17-2009, 06:16 PM
#11
Drifting
Thread Starter
jrhawk,
Are you sure you have a different design? I JUST bought this unit and it shipped directly from Vararam. It's the Gen2 with the thicker plastic.
Are you sure you have a different design? I JUST bought this unit and it shipped directly from Vararam. It's the Gen2 with the thicker plastic.
05-17-2009, 09:52 PM
#12
Drifting
Member Since: Feb 2006
Location: Lake Delton (WI Dells) WI
Posts: 1,339
Likes: 0
Received 1 Like
on
1 Post
I don't know......maybe mines the older design then....lol It seems to look a bit different though. Maybe it's just the pictures making it look like it's different. 
Last edited by JRHAWK9; 05-17-2009 at 09:58 PM.
05-17-2009, 10:33 PM
#13
Team Owner


I don't know......maybe mines the older design then....lol It seems to look a bit different though. Maybe it's just the pictures making it look like it's different.
05-17-2009, 10:47 PM
#14
Team Owner
I am absolutely amazed anyone would still buy one of these. Vararam themselves have been on this forum and have seen all these problems, yet it seems they haven't even changed the type of adhesive used to seal the gaskets. A one week old brand new unit is having these problems.  Yet people keep buying them, basically supporting this. Unreal.
05-17-2009, 11:13 PM
Yet people keep buying them, basically supporting this. Unreal.
05-17-2009, 11:13 PM
#15
Drifting

Member Since: May 2007
Location: Canton/Detroit Michigan
Posts: 1,407
Likes: 0
Received 0 Likes
on
0 Posts
I'd buy that piece of plastic for 100 bucks and then do the fixup mods. For 400 bucks, no way. Extra power is great, but not at the cost of the part not doing it's job better than the factory airbox, and that is filtering particles from getting to the engine.
There is a reason the stock airbox is setup the way it is.
There is a reason the stock airbox is setup the way it is.
 06-01-2009, 05:38 PM
#19
Safety Car
Member Since: Jan 2008
Location: Middle of No where AK
Posts: 4,711
Likes: 0
Received 2 Likes
on
2 Posts
