
NEW-Control your C6 bi-mode exhaust from the Dash D.I.C Reset button! See the Videos!
 01-01-2009, 04:51 AM
#1
Melting Slicks

Thread Starter

Member Since: Dec 2006
Location: Exhaust Commander Wireless Bi-Mode Exhaust Controllers, Innovative and advanced technology! --- Check out our website @ www.sunsetorangecreations.com
Posts: 2,887
Likes: 0
Received 2 Likes
on
2 Posts
St. Jude Donor '13
This is the revolutionary new Exhaust Commander D.A.S.H. NPP/Z06/ZR1 Bi-mode exhaust controller.
This new controller allows you to control your bi-mode exhaust with your dash D.I.C. Reset button and also control your exhaust with a wireless remote!

The Exhaust Commander D.A.S.H. is the first bi-mode exhaust controller to allow both wireless and dash button control of your Corvette bi-mode exhaust! Get the latest cutting edge technology, get the best exhaust controller for your Corvette.
This controller has a Zero Battery Drain Remembers last setting feature so you dont have to choose the remembers last setting mode OR Zero Drain, it does both at the same time !
On Sale now! Only $125 plus shipping! -----> Order Link
This product is a brand new design I have developed and is now the most advanced bi-mode exhaust controller that you can buy. Be the first on your block to control your bi-mode exhaust from your dash D.I.C. Reset button.
With this plug and play controller you get the revolutionary new feature of being able to open and close your bi-mode exhaust butterflies right from your dash D.I.C Reset button! The D.I.C. reset button still functions as your reset button, but has the added feature of controlling your bi-mode NPP exhaust!
Using the dash D.I.C. Reset button means that while driving and changing your exhaust back and forth from Quiet to Loud you dont have to look for a remote to do it. The D.I.C. button is 2 inches from your finger!
This controller also comes with a wireless remote so you can operate your exhaust from outside the car to show all of your friends how sweet it is to have total control of you bi-mode exhaust, both inside and outside your car!
This product is 100% ZERO Battery Drain when the car is turned off and has Remembers last setting mode!
Check out the video below of it in action on both a C6 and a ZR1!
On my 2005 C6 with retrofitted bi-mode exhaust !
The Very First 2009 ZR1 to have Dash D.I.C. button control !!!!!
Quick Dash Bezel Remove and Install Video
Here are the revolutionary new features of this controller:
You can control your NPP/Z06/ZR1 bi-mode exhaust from your dash D.I.C. Reset button, or use the supplied wireless remote to control your bi-mode exhaust.
This product is 100% Zero Battery drain and also has the Zero Battery drain remembers last setting feature built in so the mode you shut the car off in is the mode it starts up in.
This product is plug and play and no permanent modifications need to be made to the car to use it.
If you choose to remove it at a later time there will be no trace that it was ever there!
The D.A.S.H Commander requires a 1 second long button press to change modes on the exhaust. So a quick button press would not change the exhaust but would reset the trip odometer or other resettable DIC feature. To change the exhaust you hold the button for the specified number of seconds ( 1 second ) and then release to change the exhaust. That way you can reset the trip odometer or fuel economy and not change the exhaust until you want to.
The install is as follows: Plug in the power wire fuse adapter, plug the exhaust signal wire into the exhaust fuse location, bolt down the ground ring, Pop off the Dash D.I.C. bezel and hookup the D.I.C. Reset button sensor to the D.I.C. button connector and your done.
Typical install time is 10-15 minutes.
This controller system will come with a CD with a PDF file of the instructions on it so you can view them on any computer.
I build each one of these controllers personally and will be taking care of each and every order from start to finish.
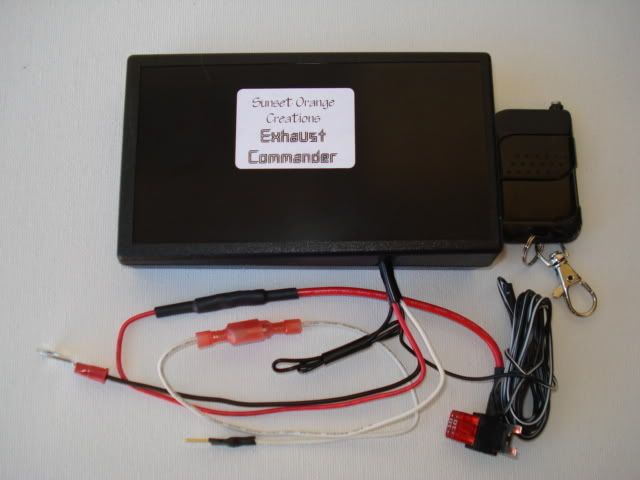
The Kit includes the Exhaust Commander D.A.S.H. main unit, a wireless keyfob remote with spare batteries, and a cd with the PDF file of the instructions.
On Sale now! Only $125 plus shipping! -----> Order Link
Please allow 7-10 working days from order to shipping.
Installation Process :
Step 1: Fold down the passenger footwell carpet to reveal the fuse panel area.
Step 2:Pull the two fuses that the arrows are pointing to.
In the photo the fuses are already pulled out.
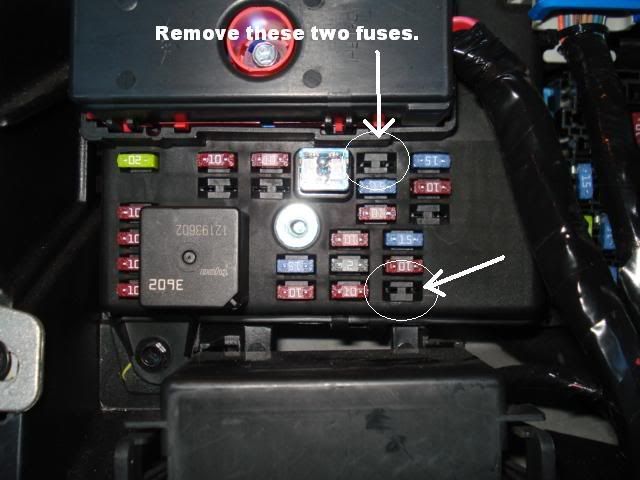
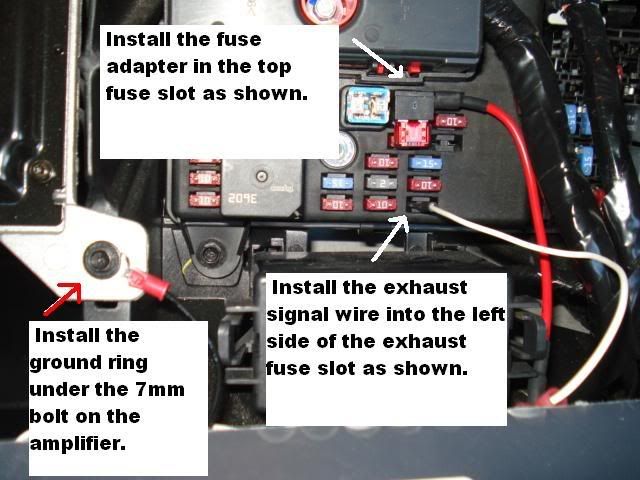
Step 3: Install the fuse adapter as shown in the top fuse slot.
Install the exhaust fuse signal wire into the left side of the exhaust fuse slot as shown,
and tie down the ground ring under the 7mm bolt on the amplifier as shown.
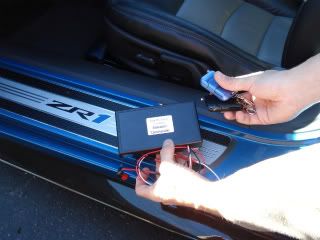
Step 4: Place the main unit underneath the amplifier.

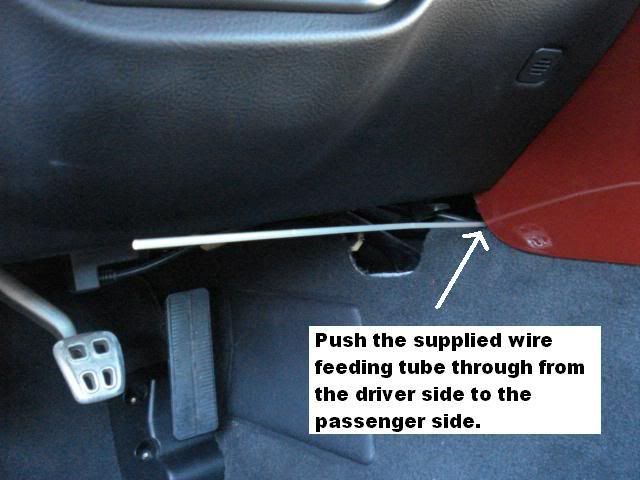
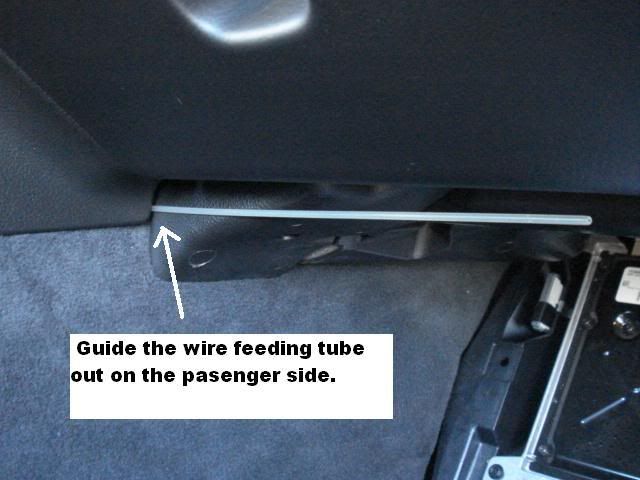
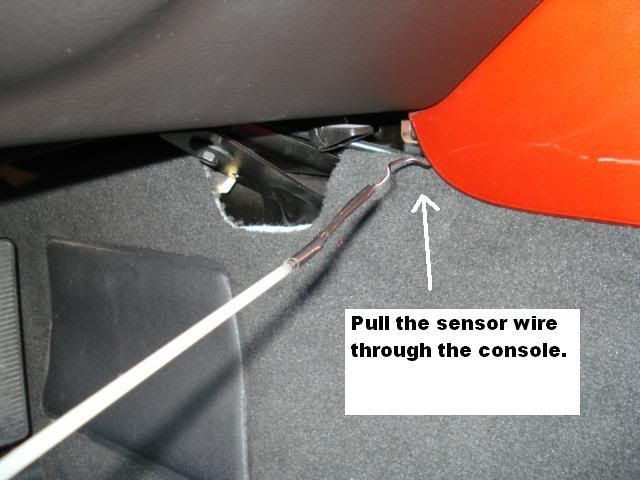
Step 5: Push the supplied wire feeding tube through the console area from the driver side
to the passenger side.
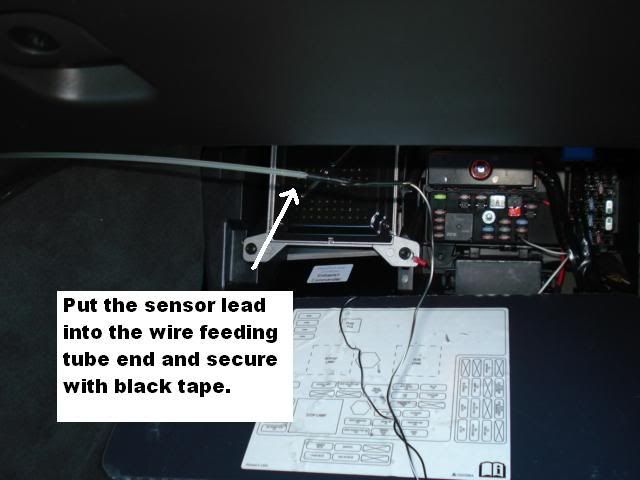
Step 6: Insert the sensor into the wire feeding tube and secure with electrical tape.
Step 7: Pull sensor wire through the console using the wire feeding tube.
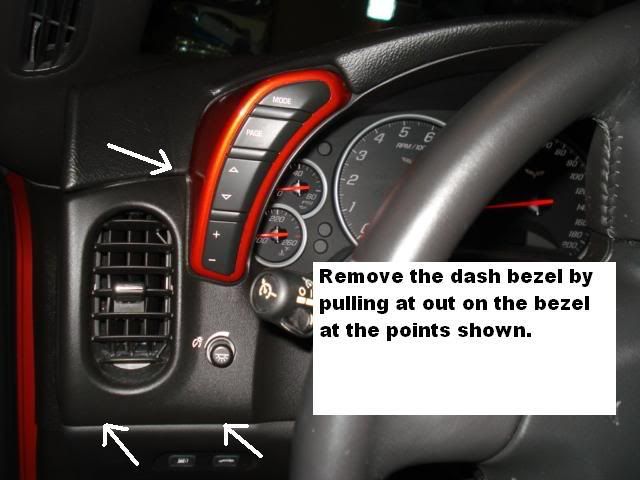
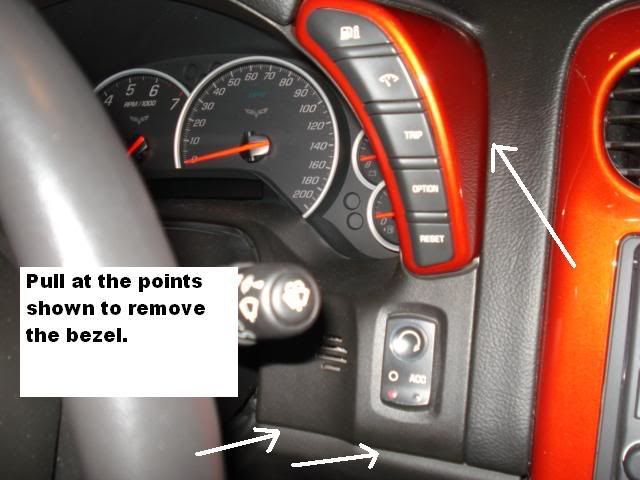
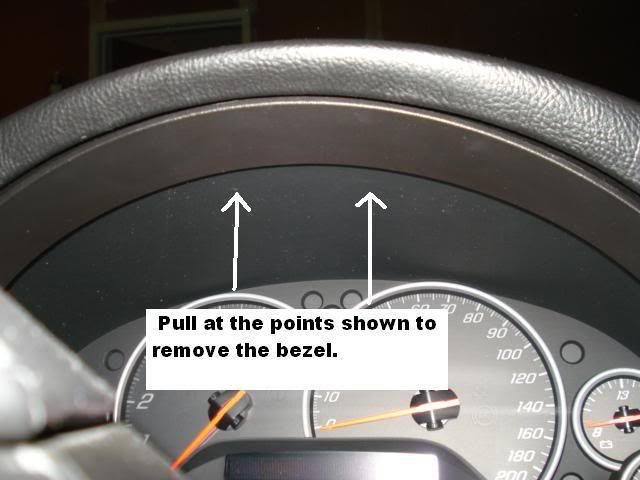
Step 8: Remove dash bezel by pulling out on it at the locations shown.
Step 9: Feed the senor wire up from the bottom of the dash to the D.I.C. button harness area.
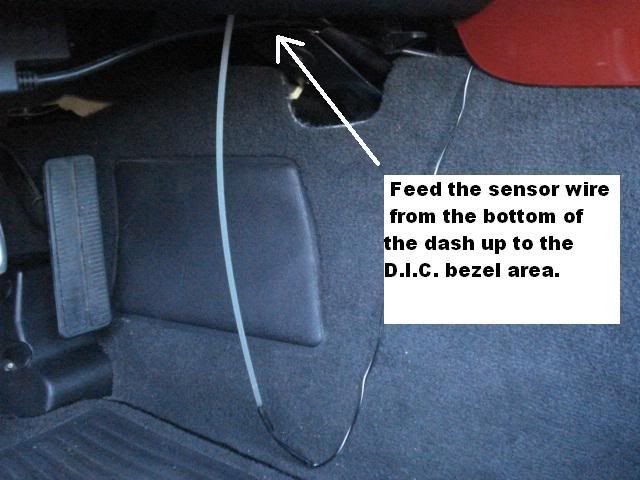
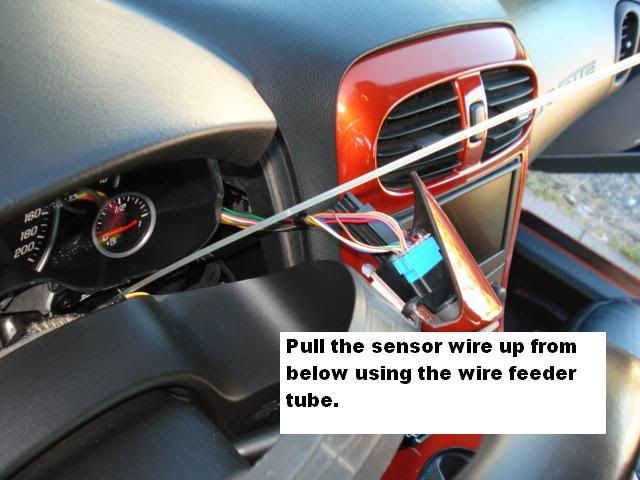
Step 10: Pull the sensor wire up to the D.I.C. button harness area from below.
Step 11: Remove the sensor from the wire feeding tube.

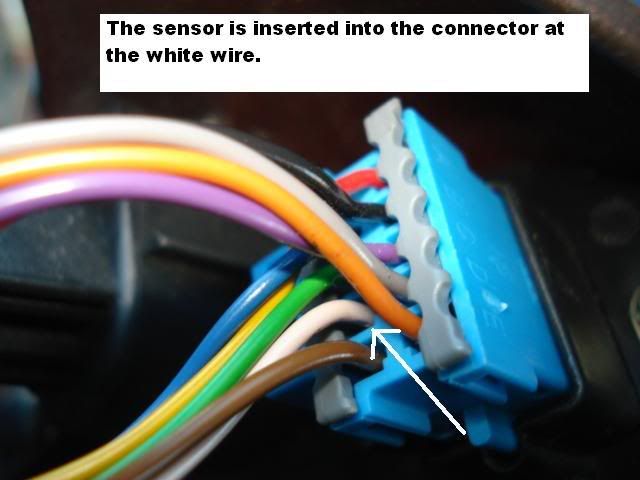
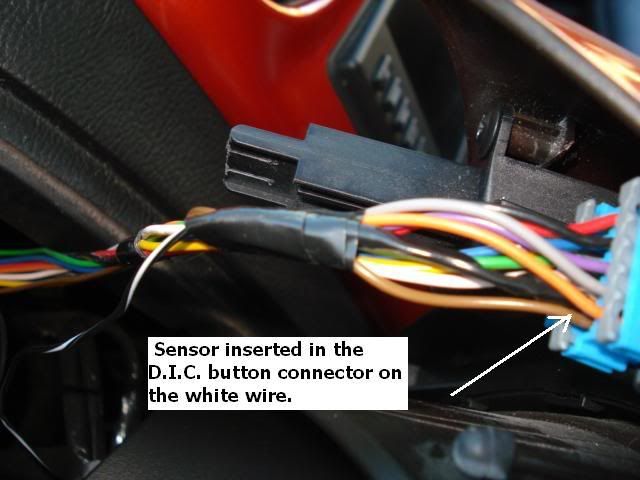
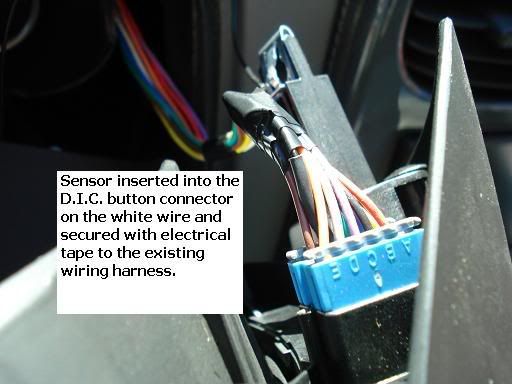
Step 12: The sensor is inserted into the rear of the D.I.C. button connector on the white wire.
Push the sensor in securely and then use electrical tape to secure it
to the existing wiring harness so that it doesn't come loose.
Step 13: Now that all the wiring has been hooked you will test the system to make sure it is working.
Start the car and verify with the wireless remote that the butterflies open and close.
Then test the Dash D.I.C. reset button to verify that the butterflies open and close.
If everything works properly, shutdown the car.
Step 14: If both the remote and the reset button work correctly then you are ready to put
the dash bezel back on.
Make sure the wiring is tucked back into the dash area and then snap the bezel back in place.
Step 15: Once the bezel is back in place securely, again re-test the system by starting the car and
verifying that the remote and reset button actuate the system to ensure that the sensor did not
come loose when you reinstalled the bezel.
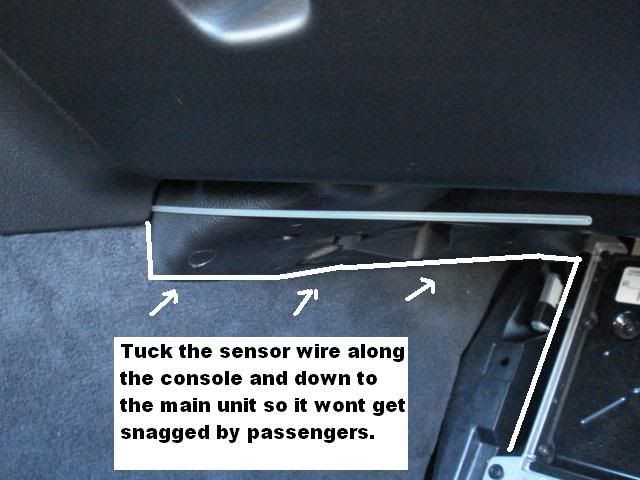
Step 16: Tuck the sensor wire along the console area to the main unit so that it is out of the way and
wont get snagged by passengers. Close the passenger footwell carpet.
You are all done!
Enjoy having control of your bi-mode exhaust
2 inches from your fingertips!
 Ben
Ben
This new controller allows you to control your bi-mode exhaust with your dash D.I.C. Reset button and also control your exhaust with a wireless remote!
The Exhaust Commander D.A.S.H. is the first bi-mode exhaust controller to allow both wireless and dash button control of your Corvette bi-mode exhaust! Get the latest cutting edge technology, get the best exhaust controller for your Corvette.
This controller has a Zero Battery Drain Remembers last setting feature so you dont have to choose the remembers last setting mode OR Zero Drain, it does both at the same time !
On Sale now! Only $125 plus shipping! -----> Order Link
This product is a brand new design I have developed and is now the most advanced bi-mode exhaust controller that you can buy. Be the first on your block to control your bi-mode exhaust from your dash D.I.C. Reset button.
With this plug and play controller you get the revolutionary new feature of being able to open and close your bi-mode exhaust butterflies right from your dash D.I.C Reset button! The D.I.C. reset button still functions as your reset button, but has the added feature of controlling your bi-mode NPP exhaust!
Using the dash D.I.C. Reset button means that while driving and changing your exhaust back and forth from Quiet to Loud you dont have to look for a remote to do it. The D.I.C. button is 2 inches from your finger!
This controller also comes with a wireless remote so you can operate your exhaust from outside the car to show all of your friends how sweet it is to have total control of you bi-mode exhaust, both inside and outside your car!
This product is 100% ZERO Battery Drain when the car is turned off and has Remembers last setting mode!
Check out the video below of it in action on both a C6 and a ZR1!
On my 2005 C6 with retrofitted bi-mode exhaust !
The Very First 2009 ZR1 to have Dash D.I.C. button control !!!!!
Quick Dash Bezel Remove and Install Video
Here are the revolutionary new features of this controller:
You can control your NPP/Z06/ZR1 bi-mode exhaust from your dash D.I.C. Reset button, or use the supplied wireless remote to control your bi-mode exhaust.
This product is 100% Zero Battery drain and also has the Zero Battery drain remembers last setting feature built in so the mode you shut the car off in is the mode it starts up in.
This product is plug and play and no permanent modifications need to be made to the car to use it.
If you choose to remove it at a later time there will be no trace that it was ever there!
The D.A.S.H Commander requires a 1 second long button press to change modes on the exhaust. So a quick button press would not change the exhaust but would reset the trip odometer or other resettable DIC feature. To change the exhaust you hold the button for the specified number of seconds ( 1 second ) and then release to change the exhaust. That way you can reset the trip odometer or fuel economy and not change the exhaust until you want to.
The install is as follows: Plug in the power wire fuse adapter, plug the exhaust signal wire into the exhaust fuse location, bolt down the ground ring, Pop off the Dash D.I.C. bezel and hookup the D.I.C. Reset button sensor to the D.I.C. button connector and your done.
Typical install time is 10-15 minutes.
This controller system will come with a CD with a PDF file of the instructions on it so you can view them on any computer.
I build each one of these controllers personally and will be taking care of each and every order from start to finish.
The Kit includes the Exhaust Commander D.A.S.H. main unit, a wireless keyfob remote with spare batteries, and a cd with the PDF file of the instructions.
On Sale now! Only $125 plus shipping! -----> Order Link
Please allow 7-10 working days from order to shipping.
Installation Process :
Step 1: Fold down the passenger footwell carpet to reveal the fuse panel area.
Step 2:Pull the two fuses that the arrows are pointing to.
In the photo the fuses are already pulled out.
Step 3: Install the fuse adapter as shown in the top fuse slot.
Install the exhaust fuse signal wire into the left side of the exhaust fuse slot as shown,
and tie down the ground ring under the 7mm bolt on the amplifier as shown.
Step 4: Place the main unit underneath the amplifier.
Step 5: Push the supplied wire feeding tube through the console area from the driver side
to the passenger side.
Step 6: Insert the sensor into the wire feeding tube and secure with electrical tape.
Step 7: Pull sensor wire through the console using the wire feeding tube.
Step 8: Remove dash bezel by pulling out on it at the locations shown.
Step 9: Feed the senor wire up from the bottom of the dash to the D.I.C. button harness area.
Step 10: Pull the sensor wire up to the D.I.C. button harness area from below.
Step 11: Remove the sensor from the wire feeding tube.
Step 12: The sensor is inserted into the rear of the D.I.C. button connector on the white wire.
Push the sensor in securely and then use electrical tape to secure it
to the existing wiring harness so that it doesn't come loose.
Step 13: Now that all the wiring has been hooked you will test the system to make sure it is working.
Start the car and verify with the wireless remote that the butterflies open and close.
Then test the Dash D.I.C. reset button to verify that the butterflies open and close.
If everything works properly, shutdown the car.
Step 14: If both the remote and the reset button work correctly then you are ready to put
the dash bezel back on.
Make sure the wiring is tucked back into the dash area and then snap the bezel back in place.
Step 15: Once the bezel is back in place securely, again re-test the system by starting the car and
verifying that the remote and reset button actuate the system to ensure that the sensor did not
come loose when you reinstalled the bezel.
Step 16: Tuck the sensor wire along the console area to the main unit so that it is out of the way and
wont get snagged by passengers. Close the passenger footwell carpet.
You are all done!
Enjoy having control of your bi-mode exhaust
2 inches from your fingertips!
Ben
Last edited by SunsetOrangeCreations; 07-23-2009 at 08:13 PM.
 01-01-2009, 05:52 AM
#2
Drifting


Ben, Great new item. Now I know what the replacement for the Lear controller is. I can't wait to see what you come up with next. I will pass news about this item to my Vette buddies. Norm
01-01-2009, 07:25 AM
#3
Melting Slicks


Very innovative and  . Now, what kind of upgrade program do you offer. I have the wireless exhaust commander already or is a whole new system required now?
Jim
. Now, what kind of upgrade program do you offer. I have the wireless exhaust commander already or is a whole new system required now?Jim
 01-01-2009, 02:35 PM
#5
Melting Slicks
Thread Starter
Member Since: Dec 2006
Location: Exhaust Commander Wireless Bi-Mode Exhaust Controllers, Innovative and advanced technology! --- Check out our website @ www.sunsetorangecreations.com
Posts: 2,887
Likes: 0
Received 2 Likes
on
2 Posts
St. Jude Donor '13
01-01-2009, 02:35 PM
#6
Melting Slicks
Thread Starter
Member Since: Dec 2006
Location: Exhaust Commander Wireless Bi-Mode Exhaust Controllers, Innovative and advanced technology! --- Check out our website @ www.sunsetorangecreations.com
Posts: 2,887
Likes: 0
Received 2 Likes
on
2 Posts
St. Jude Donor '13
If you need any other info, let me know.
Ben


 01-01-2009, 08:27 PM
#10
Melting Slicks
Thread Starter
Member Since: Dec 2006
Location: Exhaust Commander Wireless Bi-Mode Exhaust Controllers, Innovative and advanced technology! --- Check out our website @ www.sunsetorangecreations.com
Posts: 2,887
Likes: 0
Received 2 Likes
on
2 Posts
St. Jude Donor '13
Stay tuned for the video.
Ben
Last edited by SunsetOrangeCreations; 01-01-2009 at 08:47 PM.
01-02-2009, 12:45 AM
#11
Melting Slicks
Thread Starter
Member Since: Dec 2006
Location: Exhaust Commander Wireless Bi-Mode Exhaust Controllers, Innovative and advanced technology! --- Check out our website @ www.sunsetorangecreations.com
Posts: 2,887
Likes: 0
Received 2 Likes
on
2 Posts
St. Jude Donor '13
01-02-2009, 09:55 AM
#12
Safety Car


I certainly like the idea. But I do have a couple questions.
Exactly how do you use the Reset button to control the unit? You just push it, push and hold, push when the DIC is displaying a certain setting, what?
Also, you say:
Just what is involved here? What is the Reset button sensor, how big is it, etc? How does the signal get from the sensor to the unit? Is there a wire that has to be run down through the dash, a radio control, or?
Thanks!
Exactly how do you use the Reset button to control the unit? You just push it, push and hold, push when the DIC is displaying a certain setting, what?
Also, you say:
Thanks!
01-02-2009, 06:31 PM
#13
Melting Slicks
Thread Starter
Member Since: Dec 2006
Location: Exhaust Commander Wireless Bi-Mode Exhaust Controllers, Innovative and advanced technology! --- Check out our website @ www.sunsetorangecreations.com
Posts: 2,887
Likes: 0
Received 2 Likes
on
2 Posts
St. Jude Donor '13
I certainly like the idea. But I do have a couple questions.
Exactly how do you use the Reset button to control the unit? You just push it, push and hold, push when the DIC is displaying a certain setting, what?
Also, you say:
Just what is involved here? What is the Reset button sensor, how big is it, etc? How does the signal get from the sensor to the unit? Is there a wire that has to be run down through the dash, a radio control, or?
Thanks!
Exactly how do you use the Reset button to control the unit? You just push it, push and hold, push when the DIC is displaying a certain setting, what?
Also, you say:
Just what is involved here? What is the Reset button sensor, how big is it, etc? How does the signal get from the sensor to the unit? Is there a wire that has to be run down through the dash, a radio control, or?
Thanks!
Thanks for the questions.
I am going to be putting up a tutorial that details the entire install so that most questions can be answered by looking at the install.
Here are the answers:
The reset button sensor is a gold plated lead that is inserted into the reset button wiring harness connector behind the D.I.C. button. It is about the thickness of a toothpick and is about 1/4 inch long.
The signal gets from the sensor lead to the main unit via a wire. The wire is run from the back of the D.I.C. harness to the passenger fuse box area where it hooks up to the main unit. I supply the needed wire feeding tool ( a small plastic tube) that makes it a 2 minute job to route the wire correctly.
All will become a lot clearer when I post the tutorial and a video detailing the entire install start to finish.
If you need any other info, let me know.
Ben
Last edited by SunsetOrangeCreations; 01-02-2009 at 06:33 PM.
01-03-2009, 10:32 AM
#14
Safety Car
This is a great approach. I look forward to seeing the tutorial. I will be adding the NPP Exhaust to my 07 Coupe in the spring (once its out of storage) and will probably go in this direction.
Last edited by j_digi454; 01-03-2009 at 12:57 PM.
01-05-2009, 03:14 AM
#17
Melting Slicks
Thread Starter
Member Since: Dec 2006
Location: Exhaust Commander Wireless Bi-Mode Exhaust Controllers, Innovative and advanced technology! --- Check out our website @ www.sunsetorangecreations.com
Posts: 2,887
Likes: 0
Received 2 Likes
on
2 Posts
St. Jude Donor '13
Dash Bezel remove and install video added.
Full install tutorial with pictures coming tomorrow.
Ben
Full install tutorial with pictures coming tomorrow.
Ben
Last edited by SunsetOrangeCreations; 01-05-2009 at 04:25 AM.
01-05-2009, 02:48 PM
#20
Instructor

 with the question anyway. Just got my system installed over the holidays and now yet another thing to spend on