

 02-23-2015, 03:14 PM
Last edit by: IB Advertising
See related guides and technical advice from our community experts:
Browse all: Exterior How-Tos
Browse all: Engine and Powertrain
- Exhaust Modifications
Overview of popular modifications to customize your Corvette
- Muffler Modifications
Reviews and comparisons of top products
Browse all: Exterior How-Tos
Browse all: Engine and Powertrain

Stock muffler mod...
 11-10-2011, 02:01 AM
#422
Race Car Tech

 [/IMG]
If you drill a 3/4 hole, you need a 1/2 plug to fit after slight filing
If you drill a 1 hole, you need a 3/4 plug
I welded the plugs after I was happy with the sound. I used a 3/4 hole
Last edited by 4SUMERZ; 02-26-2013 at 12:19 AM.
11-10-2011, 04:09 AM
#423
 11-11-2011, 11:04 PM
#425
Pro

Member Since: Jul 2011
Location: Griffin GA
Posts: 531
Likes: 0
Received 0 Likes
on
0 Posts
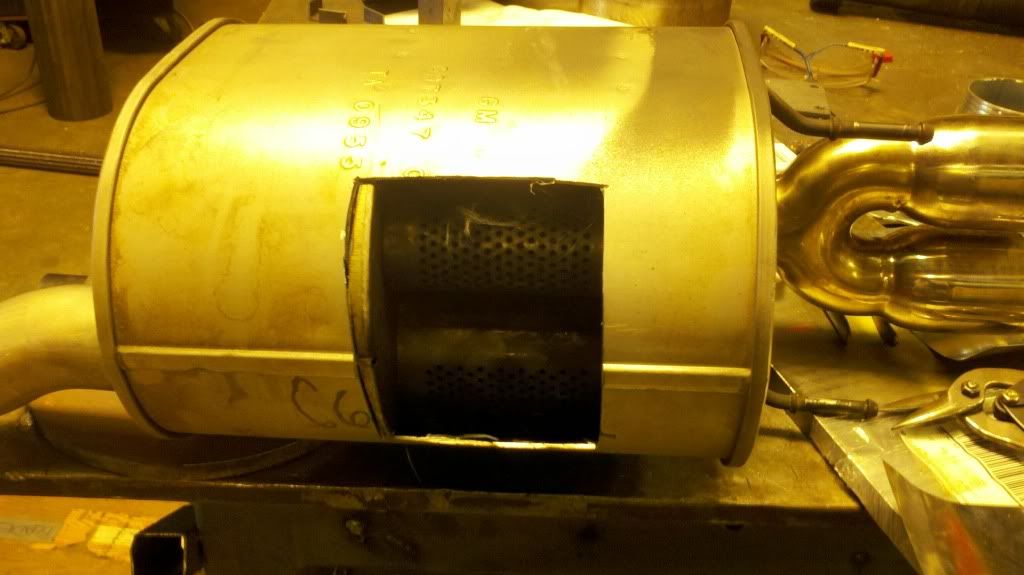
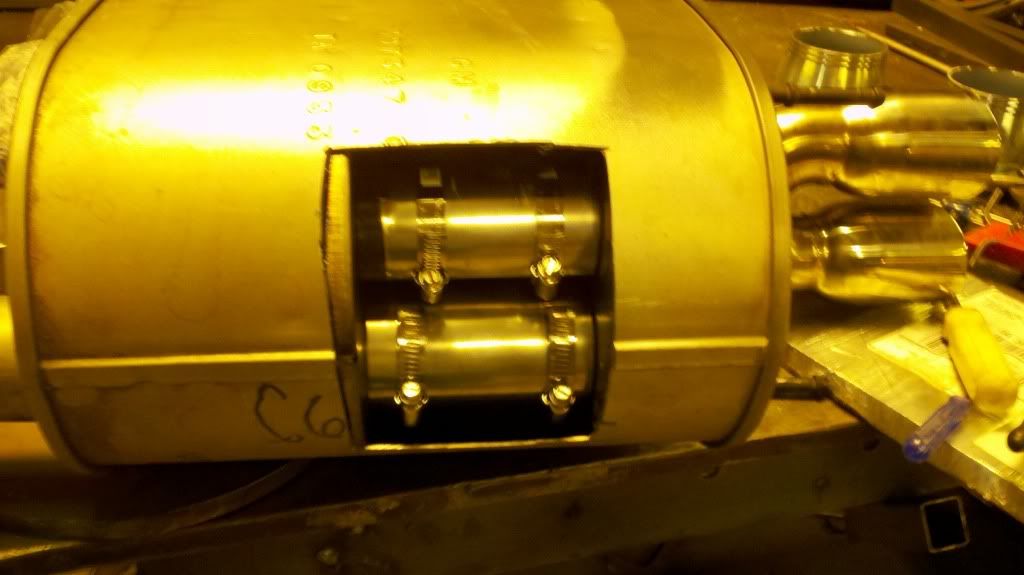
I just finished so tomorrow I will upload a video. I didn't drill. I cut a top section between the two inner support panels to access the pipes with the hole. Then I took a thin strip of stainless steel and wrapped it around each pipe. Then installed two hose clamps on each pipe. Then welded the muffler back together. 1000 times better. I will never buy an axleback system. I will do a video of the interior and from the exterior. :-)
Last edited by chriscable34; 11-11-2011 at 11:28 PM.
11-11-2011, 11:23 PM
#427
Pro
Member Since: Jul 2011
Location: Griffin GA
Posts: 531
Likes: 0
Received 0 Likes
on
0 Posts
First step cut the hole.

Here is the stainless steel I used.

Then you wrap the stainless around each pipe and secure them with hose clamps. Make sure you snug them down.

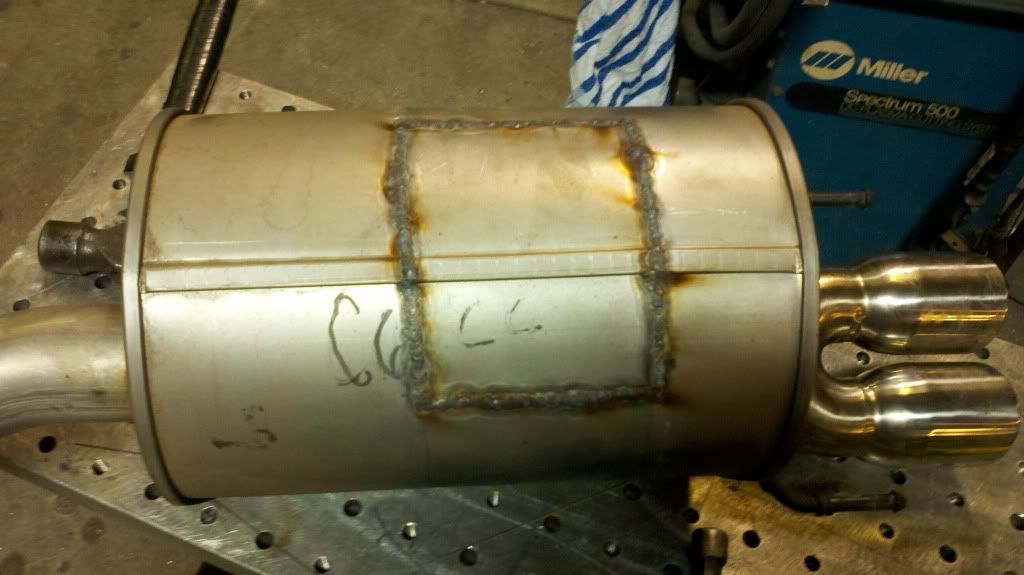
the final step was to weld the muffler back up. This took the longest. Really everything else took less than 30 minutes but welding took 1 hour for each muffler.

Here is the stainless steel I used.
Then you wrap the stainless around each pipe and secure them with hose clamps. Make sure you snug them down.
the final step was to weld the muffler back up. This took the longest. Really everything else took less than 30 minutes but welding took 1 hour for each muffler.
Last edited by chriscable34; 11-11-2011 at 11:27 PM.
11-12-2011, 06:55 PM
#429
First step cut the hole.
Here is the stainless steel I used.

Then you wrap the stainless around each pipe and secure them with hose clamps. Make sure you snug them down.
the final step was to weld the muffler back up. This took the longest. Really everything else took less than 30 minutes but welding took 1 hour for each muffler.
Here is the stainless steel I used.
Then you wrap the stainless around each pipe and secure them with hose clamps. Make sure you snug them down.
the final step was to weld the muffler back up. This took the longest. Really everything else took less than 30 minutes but welding took 1 hour for each muffler.
11-12-2011, 07:05 PM
#430
Pro
Member Since: Jul 2011
Location: Griffin GA
Posts: 531
Likes: 0
Received 0 Likes
on
0 Posts
No this is a 2005 stock exhaust. I know what this mod is about but this is another way of modding it. You can easily do this by just dropping the exhaust down off the hanger to access the top. I took mine out. You dont have to weld, you can just use a sealer and screws for a top plate. Take a look at the pictures. The two pipes in the middle chamber is the same ones I covered. This forces most of the air to the back chamber. Then that air gets forced into the exit pipe. It bypasses the middle chamber but still leaves the front and rear chambers.
11-12-2011, 07:17 PM
#431

i have dual mode exhaust.i bought mild to wild on off.the thing is neat.you pull the exhause fuse.you plug in the mild to wild plug which goes in the fuse holder you just pulled.little box sits in a empty space.job done.you get 2 remotes with it.push the button and the flaps stay closed and operate normally.went more noise,push the remote button and the flaps open.powe and noise on demand.
http://www.youtube.com/watch?v=BCuZY3XfxgE

http://www.youtube.com/watch?v=BCuZY3XfxgE
11-12-2011, 07:55 PM
#432
Race Director


Member Since: Mar 2010
Location: T-Town WA
Posts: 15,123
Received 3,658 Likes
on
2,361 Posts
2016 C6 of Year Finalist

Mod the stock exhaust and ya still have the weenie tips...size matters!
Just sayin...
Just sayin...
11-12-2011, 07:58 PM
#433
Pro
Member Since: Jul 2011
Location: Griffin GA
Posts: 531
Likes: 0
Received 0 Likes
on
0 Posts
 11-13-2011, 07:41 AM
#434
No this is a 2005 stock exhaust. I know what this mod is about but this is another way of modding it. You can easily do this by just dropping the exhaust down off the hanger to access the top. I took mine out. You dont have to weld, you can just use a sealer and screws for a top plate. Take a look at the pictures. The two pipes in the middle chamber is the same ones I covered. This forces most of the air to the back chamber. Then that air gets forced into the exit pipe. It bypasses the middle chamber but still leaves the front and rear chambers.
thanks, now you have me thinking even more.

http://forums.corvetteforum.com/c6-c...ffler-mod.html
11-13-2011, 07:50 AM
#435
Pro
Member Since: Jul 2011
Location: Griffin GA
Posts: 531
Likes: 0
Received 0 Likes
on
0 Posts
Okay, I gotcha now. these are the pipe up top. like it this pic.
thanks, now you have me thinking even more.
http://forums.corvetteforum.com/c6-c...ffler-mod.html
thanks, now you have me thinking even more.
http://forums.corvetteforum.com/c6-c...ffler-mod.html
11-13-2011, 01:46 PM
#436
Cruising


Member Since: Oct 2008
Location: Fremont Ca
Posts: 14
Likes: 0
Received 0 Likes
on
0 Posts
It has been more than 2.5 years since I've the done the mod and the exhaust still sounds good - the same since day 1 of the mod. I did not use a ramp and I remember my drill but getting stuck and I have to use pliers to take it out.
Anyway, for those that have done the mod and went through Ca inspection - was there a problem passing?
Anyway, for those that have done the mod and went through Ca inspection - was there a problem passing?
11-15-2011, 03:23 PM
#437
Burning Brakes

I did this recently. (Not the way Chriscable34 did it with the big cut-out and the sleeves covering the perforations - still not quite understanding what this does) 3/4" hole through the inner pipe and a simple plug on the outside. I like it! Sound aggressive, but yet refined. Was originally thinking what two 3/4" holes would sound like, but I think I'm fine. Gotta know when to quit.
11-20-2011, 02:08 PM
#438
Burning Brakes
The wife is out of town and I was bored, so I did this exhaust mod. Very easy, about 20 seconds to cut through each muffler (3 cuts). It does take some time to dremel the holes large enough to accept the 1/2 inch electrical box plugs.
Question:
Did you guys seal the electrical box plugs with high temp silicone?
If you did, did you apply the silicone before installation of the plugs, or after?
Thanks,
Lew
Question:
Did you guys seal the electrical box plugs with high temp silicone?
If you did, did you apply the silicone before installation of the plugs, or after?
Thanks,
Lew
11-30-2011, 02:35 PM
#439
Burning Brakes

I just used a 1.5" hole saw for my exhaust and there is drone without the hole closed. Car is a C6 with A6, heads, cam and lt's with cats. I'm about to patch the holes with a 3x3" steel rectangle using self taping screws. I'll post my report in 10 mins after I patch the holes and take it for a test drive.
REPORT: It a LITTLE louder and has a little bit more bass/drone in the cab than stock. I have a heads/cam car so the sound already is louder than average. Would I do it again? Probably not. But... it was fun drilling the holes into my exhaust!
REPORT: It a LITTLE louder and has a little bit more bass/drone in the cab than stock. I have a heads/cam car so the sound already is louder than average. Would I do it again? Probably not. But... it was fun drilling the holes into my exhaust!
Last edited by firefighter813x; 11-30-2011 at 03:00 PM.
11-30-2011, 05:55 PM
#440
Team Owner

The wife is out of town and I was bored, so I did this exhaust mod. Very easy, about 20 seconds to cut through each muffler (3 cuts). It does take some time to dremel the holes large enough to accept the 1/2 inch electrical box plugs.
Question:
Did you guys seal the electrical box plugs with high temp silicone?
If you did, did you apply the silicone before installation of the plugs, or after?
Thanks,
Lew
Question:
Did you guys seal the electrical box plugs with high temp silicone?
If you did, did you apply the silicone before installation of the plugs, or after?
Thanks,
Lew
