
My Cam & Supercharger Build Thread!
 07-13-2014, 07:58 AM
#101
Melting Slicks


If you don't find the issue on the outside, check the "sock filter" on the end of the pump. Mine did the same thing, and it turned out to be the sock filter folded under and not lying straight out 
 07-13-2014, 12:40 PM
#102
Supporting Vendor

this is my guess Rocco, this is Joe CPR btw.
__________________
Cordes Performance Racing aka "CPR"
Owner of AZ's premier LSX/LTX motorsports shop
http://cordesperformanceracing.com/
www.facebook.com/cordesperformanceracing.com
joe@cordesperformanceracing.com
480-359-5914
Cordes Performance Racing aka "CPR"
Owner of AZ's premier LSX/LTX motorsports shop
http://cordesperformanceracing.com/
www.facebook.com/cordesperformanceracing.com
joe@cordesperformanceracing.com
480-359-5914
07-14-2014, 12:50 PM
#103
Burning Brakes

Thread Starter
Rocco do you recall the issues I am having with my Fp issues? Same thing dropping into the teens if I let it. Can be several things. Before you go into the tank check to see if you lost your ground path to the hat. Its in one of my thread but you check the voltage with the car in the on position you should only see less then a couple hundredth of a volt anymore no bueno. Pm me if you have any questions
07-14-2014, 04:08 PM
#104
Race Director

not sure where it's buried in the thread but Just hit it with a volt meter on the lowest seeting to read dc. Have the key in the on position. take one end of the leads to the pump hat(anywhere on it) and the other to the chasis..Make sure the paint is sanded off I would just test it where you sanded down for your hotwire kit. It should read less than a few tenths of a volt. If it reads more, you lost your ground path in the plug. make a 10 gauge ground strap and ground the pump head to shiny metal on the frame to solve that problem.
07-17-2014, 01:19 PM
#105
Burning Brakes
Thread Starter
I think I sorted out the fuel issues. Removed the pump and it did look like the filter sock was folded on top of itself and one of the two grounds on the underside of the pump hat was loose (not sure if the ground had anything to do with it, but I fixed it nonetheless). I replaced the sock and was careful to be sure it was positioned correctly this time. I also swapped the fuel filter.
Afterward I made a few pulls past 6K and the fuel pressure stayed above 50 psi. The AFR looks much better now, too. On the dyno we were seeing the AFR shoot up from mid 11's to the 12's at around 5500 RPM, and now I'm seeing high 10's and low 11's. Here's an export of my AFR/RPM/Boost data log of the last run:
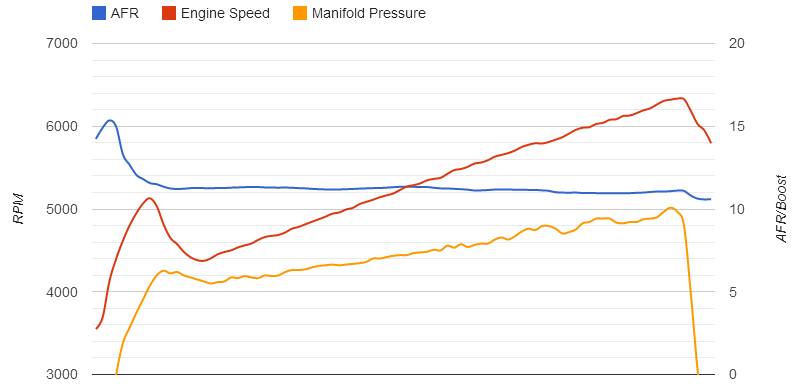
(As a side-note, I wonder if those dips in boost are indicative of belt slip?)
My tuner says I've pretty much maxed out the MAF tables at 10 lbs of boost and suggests I convert to an SD tune. Now I'm just waiting on my 2 bar MAP sensor and then will schedule with the tuner to do the SD tune and get it back on the dyno. Any thoughts on whether I should delete the MAF entirely, or just leave it be?
Afterward I made a few pulls past 6K and the fuel pressure stayed above 50 psi. The AFR looks much better now, too. On the dyno we were seeing the AFR shoot up from mid 11's to the 12's at around 5500 RPM, and now I'm seeing high 10's and low 11's. Here's an export of my AFR/RPM/Boost data log of the last run:
(As a side-note, I wonder if those dips in boost are indicative of belt slip?)
My tuner says I've pretty much maxed out the MAF tables at 10 lbs of boost and suggests I convert to an SD tune. Now I'm just waiting on my 2 bar MAP sensor and then will schedule with the tuner to do the SD tune and get it back on the dyno. Any thoughts on whether I should delete the MAF entirely, or just leave it be?
Last edited by RoccoC5; 04-27-2017 at 04:44 AM.
 08-08-2014, 07:13 PM
#108
Burning Brakes
Thread Starter
Latest update:
Met with the tuner yesterday to switch over to the speed-density tune after swapping in the 2 BAR MAP sensor. Made a few pulls on the dyno and then the MAP reading started getting all screwy. On the last pull the sensor was reporting only a couple pounds of max boost when in fact there was much more, so it was running way too lean. It didn't look like the sensor blew out of the manifold, but maybe I screwed up the seal when I installed it. I didn't pull the manifold to swap the sensors, so I don't know. Going to pull my manifold this weekend to see what's up with the MAP and go from there. I may have to ziptie that thing in there. :thumbs
Anyway, the good news is that it made 565 whp in 104* temps on one of the earlier pulls. I'll be back at the dyno as soon as I get this sorted!
08-16-2014, 02:17 PM
#109
Intermediate


Member Since: Jun 2014
Posts: 45
Likes: 0
Received 0 Likes
on
0 Posts
DAY SIXTEEN - GAUGES (4 hours)
I wired up my AEM fuel pressure and wideband/boost gauges over the weekend. Working inside the car was a welcome change from crawling around under the hood.
I started by drilling a hole into the engine compartment on the driver's side just below the hood release cables. This was for the vacuum hose for the boost gauge and the wire harnesses for the fuel pressure and wideband.
From inside the car:

And from outside the car, behind the fender liner:

I tapped into existing wires under the dash for switched 12 volts, ground, and dimmer. The AEM wideband failsafe gauge also wires into the tach signal (this gauge is pretty cool...it can log up to 2.5 hours of data, plotting engine speed against boost and A/F ratio). The tach signal wire can be found in the gauge cluster harness. I was able to reach my hand behind the cluster to remove the harness and then soldered in the connection to pin A17:

After that, I ran the wires for the fuel pressure sensor and wideband O2 sensor. Nothing too exciting here, so no pics.
My XS Power x-pipe already had an extra bung for a wideband, so no need to weld one in:

All done!

I wired up my AEM fuel pressure and wideband/boost gauges over the weekend. Working inside the car was a welcome change from crawling around under the hood.
I started by drilling a hole into the engine compartment on the driver's side just below the hood release cables. This was for the vacuum hose for the boost gauge and the wire harnesses for the fuel pressure and wideband.
From inside the car:
And from outside the car, behind the fender liner:
I tapped into existing wires under the dash for switched 12 volts, ground, and dimmer. The AEM wideband failsafe gauge also wires into the tach signal (this gauge is pretty cool...it can log up to 2.5 hours of data, plotting engine speed against boost and A/F ratio). The tach signal wire can be found in the gauge cluster harness. I was able to reach my hand behind the cluster to remove the harness and then soldered in the connection to pin A17:
After that, I ran the wires for the fuel pressure sensor and wideband O2 sensor. Nothing too exciting here, so no pics.
My XS Power x-pipe already had an extra bung for a wideband, so no need to weld one in:
All done!
Hey Rocco I am getting ready 2 hook up my gage , I had bought the same 2 gages as u did but am now just getting 2 the point to hook them up . Do you remember how many wires u hooked up under the dash from the gage harness ? looks like I need to hook up the green tach , the grey gage light and the red power wire from the gage harness . do you remember what color the factory wires were that these 3 hooked to ? also where do the yellow , white and brown wires go from the gage harness go ? thanks in advance for your help
 08-16-2014, 02:20 PM
#110
Intermediate
Member Since: Jun 2014
Posts: 45
Likes: 0
Received 0 Likes
on
0 Posts
Latest update:
Met with the tuner yesterday to switch over to the speed-density tune after swapping in the 2 BAR MAP sensor. Made a few pulls on the dyno and then the MAP reading started getting all screwy. On the last pull the sensor was reporting only a couple pounds of max boost when in fact there was much more, so it was running way too lean. It didn't look like the sensor blew out of the manifold, but maybe I screwed up the seal when I installed it. I didn't pull the manifold to swap the sensors, so I don't know. Going to pull my manifold this weekend to see what's up with the MAP and go from there. I may have to ziptie that thing in there. :thumbs
Anyway, the good news is that it made 565 whp in 104* temps on one of the earlier pulls. I'll be back at the dyno as soon as I get this sorted!
Met with the tuner yesterday to switch over to the speed-density tune after swapping in the 2 BAR MAP sensor. Made a few pulls on the dyno and then the MAP reading started getting all screwy. On the last pull the sensor was reporting only a couple pounds of max boost when in fact there was much more, so it was running way too lean. It didn't look like the sensor blew out of the manifold, but maybe I screwed up the seal when I installed it. I didn't pull the manifold to swap the sensors, so I don't know. Going to pull my manifold this weekend to see what's up with the MAP and go from there. I may have to ziptie that thing in there. :thumbs
Anyway, the good news is that it made 565 whp in 104* temps on one of the earlier pulls. I'll be back at the dyno as soon as I get this sorted!
 08-19-2014, 05:34 PM
#113
Burning Brakes
Thread Starter
Hey Rocco I am getting ready 2 hook up my gage , I had bought the same 2 gages as u did but am now just getting 2 the point to hook them up . Do you remember how many wires u hooked up under the dash from the gage harness ? looks like I need to hook up the green tach , the grey gage light and the red power wire from the gage harness . do you remember what color the factory wires were that these 3 hooked to ? also where do the yellow , white and brown wires go from the gage harness go ? thanks in advance for your help
08-19-2014, 05:36 PM
#114
Burning Brakes
Thread Starter
Thanks! Make sure to post up your results!
Thanks, Shant!
Thanks!
I've swapped in a new MAP sensor and removed the MAF since I no longer need it. I go back to the dyno to finish up my tune this Friday. I'll make sure and post up the dyno sheet.
Thanks, Shant!
Thanks!
I've swapped in a new MAP sensor and removed the MAF since I no longer need it. I go back to the dyno to finish up my tune this Friday. I'll make sure and post up the dyno sheet.
08-22-2014, 11:37 PM
#115
Burning Brakes
Thread Starter
Alright, so I guess the third time at the dyno was the charm. Finally got in a few clean runs so we could finish up the tune. First, a quick recap of the tuning fun:
At the first tuning session the fuel pressure kept dropping into the 40's. Turned out that I was a dumbass and folded the fuel filter sock over onto itself when I swapped the fuel pump. Second time around, things are going good until the third pull when my MAP sensor starts getting all screwy and reporting strange values. Again, I was the dumbass here and picked up a 2 BAR MAP on eBay. The "authentic AC Delco" sensor was actually some knockoff probably from China.
Sooooo...today, after swapping to a genuine GM MAP, all went well and we were able to make a few clean pulls (after we readjusted for the good MAP).
Ended up making 581/492 @ 95 degrees ambient.

I'm super happy with the results! I do wish the power came on a bit sooner, but I suppose that's the nature of a centri blower and maybe a bit less cam duration would have helped with that too (feel free to offer any thoughts on that). Anyway, I am going to do my best to not fiend for more anytime soon. Now it's just time for a car wash to get all this soot off of my car from my unfortunate parking choice at the dyno:
Thanks everyone for the advice along the way and for following my build!
Finally got in a few clean runs so we could finish up the tune. First, a quick recap of the tuning fun:At the first tuning session the fuel pressure kept dropping into the 40's. Turned out that I was a dumbass and folded the fuel filter sock over onto itself when I swapped the fuel pump. Second time around, things are going good until the third pull when my MAP sensor starts getting all screwy and reporting strange values. Again, I was the dumbass here and picked up a 2 BAR MAP on eBay. The "authentic AC Delco" sensor was actually some knockoff probably from China.
Sooooo...today, after swapping to a genuine GM MAP
, all went well and we were able to make a few clean pulls (after we readjusted for the good MAP).Ended up making 581/492 @ 95 degrees ambient.
I'm super happy with the results! I do wish the power came on a bit sooner, but I suppose that's the nature of a centri blower and maybe a bit less cam duration would have helped with that too (feel free to offer any thoughts on that). Anyway, I am going to do my best to not fiend for more anytime soon. Now it's just time for a car wash to get all this soot off of my car from my unfortunate parking choice at the dyno:
Thanks everyone for the advice along the way and for following my build!
08-26-2014, 09:12 AM
#116
Intermediate
Member Since: Jun 2014
Posts: 45
Likes: 0
Received 0 Likes
on
0 Posts
Hey Rocco do u have the part # of the new map sensor u ended up using . I am thinking i will go this rout as well
08-26-2014, 09:48 AM
#117
Race Director
Rocco I'm happy for you man it was a journey. You make great numbers!!! I was surprised about the centri also as I thought it was "laggy" but figured out I just needed to be in the correct gear. Maybe I missed it but what are you doing for traction?
08-26-2014, 07:26 PM
#118
Burning Brakes
Thread Starter
08-26-2014, 07:29 PM
#119
Burning Brakes
Thread Starter

Right now I have no traction.
The 305 Hankooks on it now break loose all of the time. I'm thinking about going widebody with 345's, but that's some $$ and then I should probably start thinking about the rest of the drivetrain. What are your plans?
08-26-2014, 10:10 PM
#120
Race Director
I know troy tcruse here made 700 and he raved about his mickey thompson et street. He makes alot more power and so do a few others and these guys are hooking with the 345 et. As soon as I can I am going with the Mickey et 305/35/18 I hear they will find a problem in your drivetrain first before they give up...basically nice and sticky but you give up some handling...I don't DD mine so I want something that sticks when its time to run some unexpecting fool. You car is beast mode now might as well get all that power to the ground