
Make your own C5 Oil Sender relocation kit for $50
 01-16-2013, 04:15 PM
#1

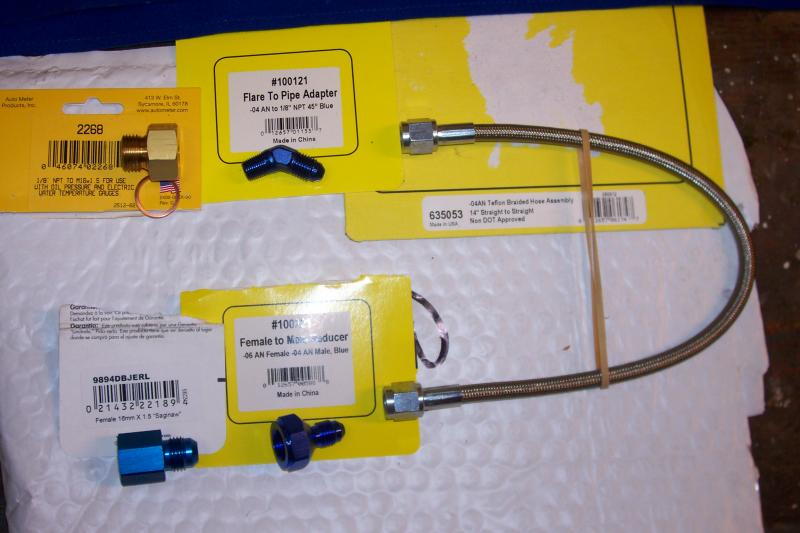
The sending unit on my 1999 quit, just like hundreds of others. After many frustrating hours of scouring the various Corvette forums for instructions, examination of the homemade relocation kits, and a close look at the only commercially available kit (Ecklers), I located a source for the parts in Columbus, Ohio called Jegs 800-345-4545. Call or email Jeff.Watkins@jegs.com and ask for the following parts: (the key to this whole mess is the Female M16x1.5)
- #2268 1/8" npt to M16x1.5 (goes into the block)
- #100121 04AN to 1/8" npt 45' blue (1/8" npt goes into #2268 above)
- #635053 04AN Teflon braided hose 14" straight to straight (attach on end to the 04AN 45' above)
- #100221 06AN female to 04AN Male/blue (insert 04AN male into the other end of the hose)
- #9894DBJERL Female 16mmx1.5 to 06AN male (insert the 06AN male into the 06AN female above. The new oil sensor threads into this part).
6/26/13 The "mode" control to which controls where air is sent (vents, defrost, floor, etc) was showing the change in mode, but airflow remained fixed in the current mode. There is a vacuum tube (VERY small-3/16" OD) coming out of the wiring harness that connects to an right-angle rubber boot on the back of the manifold. There is a sensor that will remove on top of the boot. When you slide the manifold forward in the process of changing the oil-sending unit, this LITTLE tube WILL disconnect, as there is no slack in the tube. To eliminate the problem, you will need about 5" of a 3/16 I.D. rubber tube. Push one end over the exposed tube about 3/4", and take a 1" piece of 3/16 OD copper tube (I used a 3/16 x 3/4" "pop" rivet-cut off the flange and remove the stud) to make up a splice between the extension tube and the right-angle boot. Feed the splice end into the boot, and you are ready to begin reinstall of the manifold.
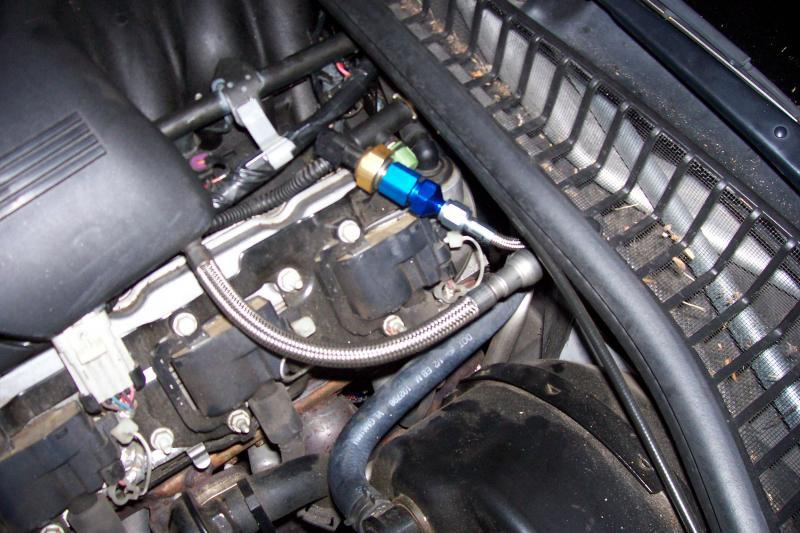
I completed the install in about 20 minutes, replaced the intake and required connections in about 30 minutes, and fired up the engine with no leaks. The new sensor location will hide neatly under the injector cover on the driver's side. Good luck!
- #2268 1/8" npt to M16x1.5 (goes into the block)
- #100121 04AN to 1/8" npt 45' blue (1/8" npt goes into #2268 above)
- #635053 04AN Teflon braided hose 14" straight to straight (attach on end to the 04AN 45' above)
- #100221 06AN female to 04AN Male/blue (insert 04AN male into the other end of the hose)
- #9894DBJERL Female 16mmx1.5 to 06AN male (insert the 06AN male into the 06AN female above. The new oil sensor threads into this part).
6/26/13 The "mode" control to which controls where air is sent (vents, defrost, floor, etc) was showing the change in mode, but airflow remained fixed in the current mode. There is a vacuum tube (VERY small-3/16" OD) coming out of the wiring harness that connects to an right-angle rubber boot on the back of the manifold. There is a sensor that will remove on top of the boot. When you slide the manifold forward in the process of changing the oil-sending unit, this LITTLE tube WILL disconnect, as there is no slack in the tube. To eliminate the problem, you will need about 5" of a 3/16 I.D. rubber tube. Push one end over the exposed tube about 3/4", and take a 1" piece of 3/16 OD copper tube (I used a 3/16 x 3/4" "pop" rivet-cut off the flange and remove the stud) to make up a splice between the extension tube and the right-angle boot. Feed the splice end into the boot, and you are ready to begin reinstall of the manifold.
I completed the install in about 20 minutes, replaced the intake and required connections in about 30 minutes, and fired up the engine with no leaks. The new sensor location will hide neatly under the injector cover on the driver's side. Good luck!
Last edited by Corvette1971; 06-26-2013 at 03:58 PM.

The following 2 users liked this post by Corvette1971:
Morrison158 (09-12-2020),
old stingray (09-28-2015)


 01-16-2013, 10:34 PM
#5
Melting Slicks

 01-17-2013, 12:57 AM
#6
Team Owner

01-17-2013, 10:21 AM
#7
Will be happy to post pics of the parts and location under the cover. As to the install pic, there is 3 wires, and a vacumn hose blocking the view of it so a picture didn't work. Now, how do I post the pictures?
01-17-2013, 05:59 PM
#8
Melting Slicks
01-18-2013, 09:22 AM
#9
Robb..thanks for the "how-to" link.
Why is it we can put a robot on Mars to tell us there is water there, take the heart out of a human being, put it in another and have them walking around in an hour, or can read graffitti on wall from hundreds of miles in space, but for some reason we have to use multiple steps to set up yet another account with more passwords to post some pictures?
Who administers this forum and what will it take to make all of our lives easier, avoid a lot of ridiculous arguments (you are a VERY patient person) by getting a simple programming change to a facilitate a direct picture upload. Humans wrote the platforms for this forum, humans can make the change.
Since I am trying to make my life simpler (hence the oil sender relocation), if anyone wants pictures, I will be happy to send them along. Just send me an email to bobbleslamps@comcast.net. If any of those people want to post the pics, feel free.
PS. if we can find a source for cheaper and better quality oil senders, (remember the Mars thing?) that would be a major step forward!!
Thanks again for your help.
01-18-2013, 02:04 PM
#10
6th Gear


Member Since: Oct 2012
Posts: 6
Likes: 0
Received 0 Likes
on
0 Posts
Thanks, for the info. I am ready to do an intake swap and wanted to do a relocation on the oil sender, but $200.00 is just nuts for the available kits ! The sender I have now is working fine, I will continue to use it till it fails, 5 minute swap, money in my pocket !
01-18-2013, 10:32 PM
#12
Melting Slicks

Robb..thanks for the "how-to" link.
Why is it we can put a robot on Mars to tell us there is water there, take the heart out of a human being, put it in another and have them walking around in an hour, or can read graffitti on wall from hundreds of miles in space, but for some reason we have to use multiple steps to set up yet another account with more passwords to post some pictures?
Who administers this forum and what will it take to make all of our lives easier, avoid a lot of ridiculous arguments (you are a VERY patient person) by getting a simple programming change to a facilitate a direct picture upload. Humans wrote the platforms for this forum, humans can make the change.
Since I am trying to make my life simpler (hence the oil sender relocation), if anyone wants pictures, I will be happy to send them along. Just send me an email to bobbleslamps@comcast.net. If any of those people want to post the pics, feel free.
PS. if we can find a source for cheaper and better quality oil senders, (remember the Mars thing?) that would be a major step forward!!
Thanks again for your help.
Why is it we can put a robot on Mars to tell us there is water there, take the heart out of a human being, put it in another and have them walking around in an hour, or can read graffitti on wall from hundreds of miles in space, but for some reason we have to use multiple steps to set up yet another account with more passwords to post some pictures?
Who administers this forum and what will it take to make all of our lives easier, avoid a lot of ridiculous arguments (you are a VERY patient person) by getting a simple programming change to a facilitate a direct picture upload. Humans wrote the platforms for this forum, humans can make the change.
Since I am trying to make my life simpler (hence the oil sender relocation), if anyone wants pictures, I will be happy to send them along. Just send me an email to bobbleslamps@comcast.net. If any of those people want to post the pics, feel free.
PS. if we can find a source for cheaper and better quality oil senders, (remember the Mars thing?) that would be a major step forward!!
Thanks again for your help.
01-19-2013, 02:26 PM
#13
Burning Brakes


OP-thanks for the parts list-$56.94 delivered and I've already got a spare (brass=good) sender. I'll be ready for when it goes bad, as they ALL do. Figure I'll zip tie it or fabricate a small angle bracket.


The following users liked this post:
old stingray (09-28-2015)
01-20-2013, 12:12 PM
#16
Melting Slicks
Thanks Dan and Corvette1971. Very nice and easy package to order from one source. Finally this has been made simple for those of use that want to relocate.
01-20-2013, 06:28 PM
#20
You are all welcome. I figure I put about 10+ hours on this, including visits to 2 different autoparts stores, and based on a 30 minute call to a custom hydraulic business, drove an hour each way to have the guy try to charge me $55 for the braided hose. The only change I would make is changing the 45' 1/8 npt to a swivel type..this makes the install much easier, but may a be few bucks of cost.
As to wire-tieing, I haven't figured out a good way to secure, but the wire-tie will probably be the easiest. (I was so happy to finally get the parts and install them, I buttoned up and got a beer to celebrate!!)
PS.. I routed the braided hose behind the big vacuum hose to come out where it does. If one of you routes it differently, or has other suggested enhancements, let us know!!
Last edited by Corvette1971; 01-20-2013 at 06:34 PM.