
Blown DRL

 04-04-2012, 01:40 AM
#2
Tech Contributor
Member Since: Dec 2003
Location: Horncastle Lincolnshire, England
Posts: 19,384
Likes: 0
Received 79 Likes
on
61 Posts
2023 C5 of the Year Finalist - Unmodified

Very straight forward. Just cut the existing wires and splice in the new socket.
There are 3 wires running to the bulbholder
a blue/white wire which is the hot feed for the turn signal
a brown wire which is the hot feed for the parking lights
a black wire which is the common ground.
the part #s are GM 12083689, AC Delco LS15 or Dorman 85882 (Thanks to UM Rebel)
Here's my How To for replacing the bulb but it shows all the detail of how to get to the holder.
Either go in through the brake ducts - not easy with a Z06 or if you have screens
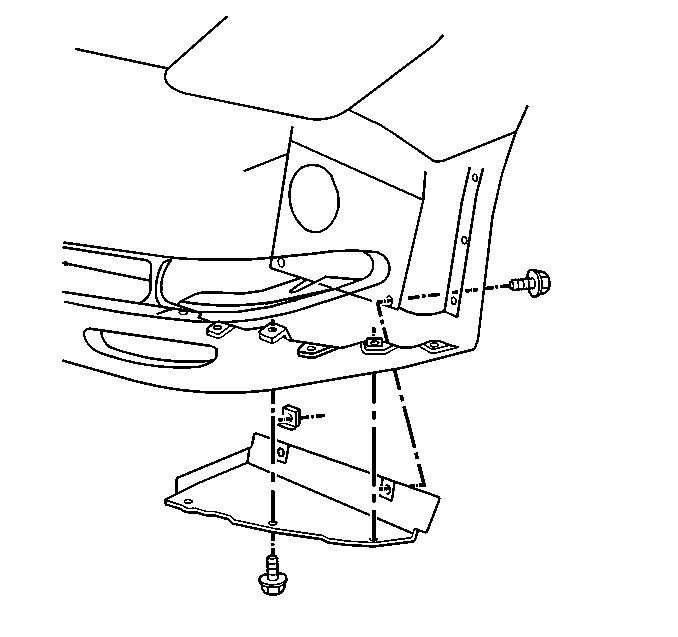
Go in through the bottom by taking out the bottom panel
The one that works for me is:
Turn on the headlights and back off one position to kill the lights.
Unscrew the 3 small screws on the black plastic housing around the headlight. Gently pull the housing clear. Reach down around the headlight unit and release the bulb holder. It comes out by turning the bulb holder a � turn counter clockwise but it has a plastic clip which you need to squeeze to release it. Here’s how the bulb fits into the lamp unit. The DRL bulb is the lower of the two.

Here’s the light socket. This one’s after market but it gives you the idea. You can see the clip you need to squeeze.

BTW, if you ever need to replace this socket the part #s are GM 12083689, AC Delco LS15 or Dorman 85882 (Thanks to UM Rebel)
Change the bulb. It’s a push fit into the lamp holder. Push it home firmly but don’t handle the glass. Use latex gloves if you have them. Reseat the bulb holder and turn clockwise until it clicks back in place. Put the plastic headlight housing back in place making sure to locate the small plastic tab in the bracket on the headlamp cover. Replace the 3 screws and close the lights.
It’s a 10 minute job. Some guys have had the lights close if they’ve taken a while to do the fix. If you’re worried about that, disconnect the battery once the lights are up.
The bulb is a 4157NA A 3157 will work but the 4157 is slightly brighter (28.5 vs 27 watts for the 3157).
Some guys with big arms remove the hood adjusting screw for better access. Guys with even bigger arms have had to take off the headlight cover. Four torx screws (2 back, 1 each side). Take the back ones off first with the lamps down. Raise the lights and take the side ones out.
There are 3 wires running to the bulbholder
a blue/white wire which is the hot feed for the turn signal
a brown wire which is the hot feed for the parking lights
a black wire which is the common ground.
the part #s are GM 12083689, AC Delco LS15 or Dorman 85882 (Thanks to UM Rebel)
Here's my How To for replacing the bulb but it shows all the detail of how to get to the holder.
Either go in through the brake ducts - not easy with a Z06 or if you have screens
Go in through the bottom by taking out the bottom panel
The one that works for me is:
Turn on the headlights and back off one position to kill the lights.
Unscrew the 3 small screws on the black plastic housing around the headlight. Gently pull the housing clear. Reach down around the headlight unit and release the bulb holder. It comes out by turning the bulb holder a � turn counter clockwise but it has a plastic clip which you need to squeeze to release it. Here’s how the bulb fits into the lamp unit. The DRL bulb is the lower of the two.
Here’s the light socket. This one’s after market but it gives you the idea. You can see the clip you need to squeeze.
BTW, if you ever need to replace this socket the part #s are GM 12083689, AC Delco LS15 or Dorman 85882 (Thanks to UM Rebel)
Change the bulb. It’s a push fit into the lamp holder. Push it home firmly but don’t handle the glass. Use latex gloves if you have them. Reseat the bulb holder and turn clockwise until it clicks back in place. Put the plastic headlight housing back in place making sure to locate the small plastic tab in the bracket on the headlamp cover. Replace the 3 screws and close the lights.
It’s a 10 minute job. Some guys have had the lights close if they’ve taken a while to do the fix. If you’re worried about that, disconnect the battery once the lights are up.
The bulb is a 4157NA A 3157 will work but the 4157 is slightly brighter (28.5 vs 27 watts for the 3157).
Some guys with big arms remove the hood adjusting screw for better access. Guys with even bigger arms have had to take off the headlight cover. Four torx screws (2 back, 1 each side). Take the back ones off first with the lamps down. Raise the lights and take the side ones out.
Last edited by DeeGee; 04-04-2012 at 01:50 AM.
04-05-2012, 06:49 PM
#5
Team Owner


Of the choices listed, I would recommend the Dorman 85882
It's much less expensive and has color-coded wiring that match (although the blue wire has no white tracer stripe - no biggie) the OEM.
Summit also sells a socket under the "Pico" brand name that is the equivalent to the Dorman as well. Also inexpensive.
04-05-2012, 08:46 PM
#6
Drifting

Thread Starter
Very good info from Dave, as usual.
Of the choices listed, I would recommend the Dorman 85882

It's much less expensive and has color-coded wiring that match (although the blue wire has no white tracer stripe - no biggie) the OEM.
Summit also sells a socket under the "Pico" brand name that is the equivalent to the Dorman as well. Also inexpensive.
Of the choices listed, I would recommend the Dorman 85882
It's much less expensive and has color-coded wiring that match (although the blue wire has no white tracer stripe - no biggie) the OEM.
Summit also sells a socket under the "Pico" brand name that is the equivalent to the Dorman as well. Also inexpensive.


 04-05-2012, 10:30 PM
#9
Drifting
I just replaced my corner lights and noticed that the stock lights had burned a hole through the top. My passenger side bulb wasn't working, and I had to clean it out with WD40 to get it working.
I ordered LEDs and the flasher fix, to stop more holes being burnt on the top.
I ordered LEDs and the flasher fix, to stop more holes being burnt on the top.
04-05-2012, 11:38 PM
#11
Drifting
Sorry, should have elaborated.
When you put LEDs in the front turn signal bulb (same bulb as the running lights) or the rear bulbs the turn signals will blink really quickly unless you add an electronic flasher.
When you put LEDs in the front turn signal bulb (same bulb as the running lights) or the rear bulbs the turn signals will blink really quickly unless you add an electronic flasher.
Last edited by Vette_DD; 04-06-2012 at 12:15 AM. Reason: Link to a non-supporting vendor
04-06-2012, 12:08 AM
#12
 04-09-2012, 11:07 AM
#13
Drifting
Thread Starter
Hey there Dave. I just came out of the garage,just installed the new flasher. Very straightforward. What i did was pull the car up on my Rhino Ramps, unbolted the trap door,which is what I usually do when I change the bulbs, but this time, once I unhooked the turn signalsocket and the DRL socket, I pulled the whole thing through the front brake cooling duct,just pulled it down, and snaked it through. MUCH EASIER that way than trying to splice wires from underneath. Got the Dorman unit at a great price. Dave, thanks again my friend.

 03-13-2013, 07:46 AM
#15
Intermediate


Member Since: Sep 2012
Posts: 47
Likes: 0
Received 0 Likes
on
0 Posts
I have it posted on another site and probably can't reference, but many years back I found almost the exact same issue with my trans am. the bulb had burned through the top allowing moisture the opportunity to get in there. this corroded the socket as well.
I pulled the housing, repaired using jb weld, put a bead of clear silicone where the front clear plastic meets the body of the housing and replaced flasher to support led bulbs.
also instead of cutting and rewiring the sockets, I found you can push in tabs ( kind of a pita) and remove the wires out of the socket. thus well then allow the wires to simply slide out.