
Got an auto trans? Watch out for this gremlin...


 02-17-2013, 03:55 PM
#82
Tech Contributor
Thread Starter
Member Since: Aug 1999
Location: Should this thoughtful, valuable contribution meet with no acknowledgement or 'thanks' this post----
Posts: 16,382
Received 399 Likes
on
257 Posts

wow! What a cool idea to open that up to even out the light....the ingenuity on this forum amazes me every day....never thought this thread would take such creative turns....well done my friend!
03-03-2013, 10:04 AM
#85
Drifting


Nice write up and well done
It definitely worth getting in there now before everything gets burnt out and brittle. I did mine as well, just used a Dremel with a grinding wheel which worked very well, just take your time.
And for anyone who does Red ( which looks awesome IMO) beware that it will make the Red indicator a bit difficult to see, but I only go by feel anyways and never look down
Last edited by BACNBLK; 03-03-2013 at 10:08 AM.
03-05-2013, 03:19 PM
#86
1st Gear


Member Since: Mar 2013
Posts: 1
Likes: 0
Received 0 Likes
on
0 Posts
Just got a 91 base coupe with 66k on the L98 runs great. I have had the car for a week and have noticed a "thump" noise coming from the rear, it does not sound mechanical and only happens sometimes. Any ideas? This is my first vette so sorry for my ignorance.
03-05-2013, 08:42 PM
#87


Create a thread in the C4 section, your car is a C4, not a C5.
03-12-2013, 10:57 PM
#88
Pro

Member Since: Oct 2008
Location: Lousyana
Posts: 513
Likes: 0
Received 0 Likes
on
0 Posts
Sounds like a nice little project to test a 3d printer on...
Edit: I like 3D printers, got a working shifting indicator now
Edit: I like 3D printers, got a working shifting indicator now
Last edited by bleeper; 05-15-2013 at 11:04 PM.
 ...all we need is some enterprising vendor to pick up on the new technology...and it could be made from a tougher material, like Delrin or Nylon.
03-16-2013, 01:29 PM
...all we need is some enterprising vendor to pick up on the new technology...and it could be made from a tougher material, like Delrin or Nylon.
03-16-2013, 01:29 PM
#90
Tech Contributor
Thread Starter
Member Since: Aug 1999
Location: Should this thoughtful, valuable contribution meet with no acknowledgement or 'thanks' this post----
Posts: 16,382
Received 399 Likes
on
257 Posts
Ok Mods...we are done....please move this to the DIY thread by pewter99...
03-19-2013, 10:40 AM
#91
6th Gear

Member Since: Nov 2012
Posts: 6
Likes: 0
Received 0 Likes
on
0 Posts
My bulb had been out for awhile now so I pried the cover up carefully--and I had the same heat damage as the first post. I bought the 194 LED replacement from NAPA for $11. 255,000 miles and going strong with my 2002.
03-22-2013, 01:32 PM
#92
Melting Slicks

OK, this is what I did, but first let me explain my approach to this problem. Not very often you find a perfect swap when you get yourself in this kind of project, so you are left with basically two options: modify the car to accept whatever you are trying to install, or modify the new item to make it fit in the car without touching the latter. Whenever possible, I try to follow the second route 
Keeping this in mind, this is the LED I used:
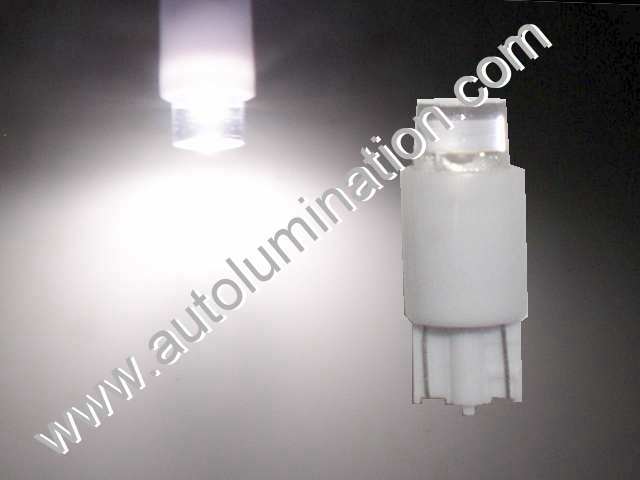
It is available in white, blue, red, amber and green and it's $5.99 here (scroll down until you find it).
According to its published dimensions it should be a direct swap for a 194 bulb:

But, although very close, that was not the case so I modified it slightly with a dremel as I'll show you below.
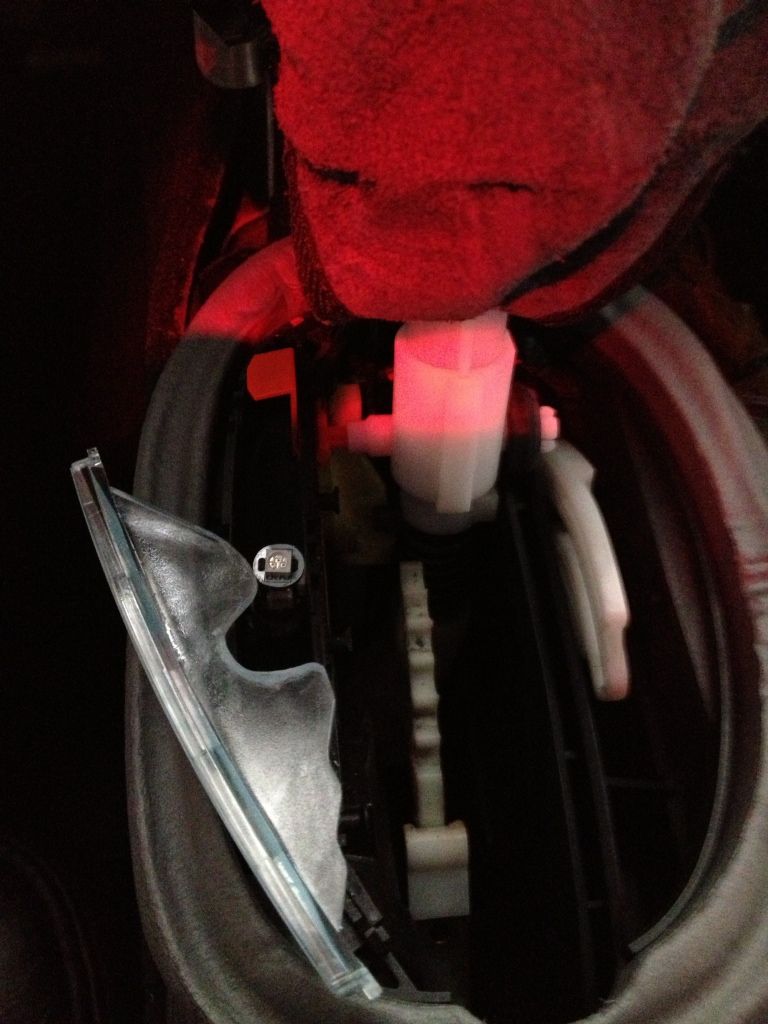
I did not take the console and radio bezel off to do this. Instead I followed these directions. It's a simple process where you only pry the PRND cover with a small flat tip screw driver. The only thing the original post did not have were pictures, but here they are:

This is where the 194 bulb was inserted:

Cover and Light-Guide with LED and 194 bulbs:

As I mentioned before, the LED was very close in dimensions to the 194 bulb, but when inserted in the socket it was not allowing the Light-Guide to fully seat in its place. Instead of modifying the Light-Guide, I took a dremel and went around the top edge of the LED bulb, rounding it off to approximate its shape to the 194 bulb as much as possible, as you can see in the following pictures (I polished it afterwards with the dremel to avoid any loss in light due to an opaque surface). I also reduced its bottom diameter to allow me to insert it in the socket a little further (you can see the "step" I created around its middle portion going all the way down to its bottom end).
The idea is to allow the Light-Guide to fully seat, but keeping the gap between the LED bulb and the light-guide as small as possible. This is needed in order to minimize propagation losses and to keep light distribution as homogeneous as we can, so the PRND321 characters could be illuminated with the same intensity.


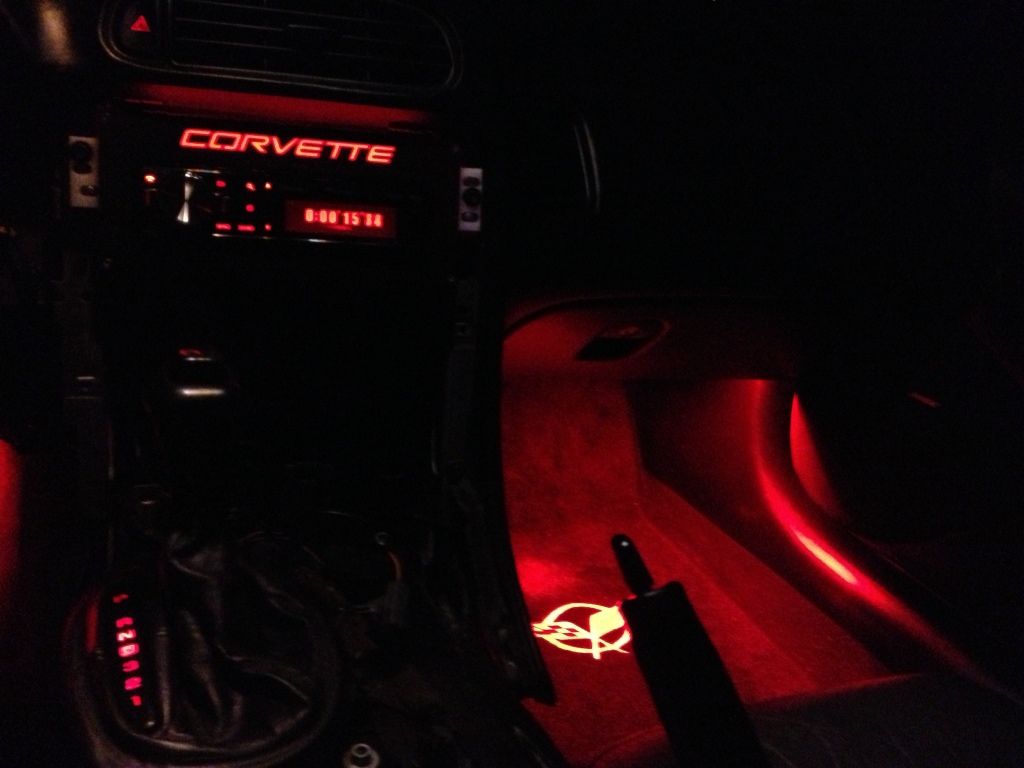
And this is the final result:

Keeping this in mind, this is the LED I used:
The Widest, 194 168 W5W 2825 Ever Made!
Outfitted with the latest Super Wide High-Flux low profile Leds
Designed especially for gauges, & applications requiring a super-wide large uniform field of bright light
Only 10mm diameter x 26mm overall
Outfitted with the latest Super Wide High-Flux low profile Leds
Designed especially for gauges, & applications requiring a super-wide large uniform field of bright light
Only 10mm diameter x 26mm overall
According to its published dimensions it should be a direct swap for a 194 bulb:
But, although very close, that was not the case so I modified it slightly with a dremel as I'll show you below.
I did not take the console and radio bezel off to do this. Instead I followed these directions. It's a simple process where you only pry the PRND cover with a small flat tip screw driver. The only thing the original post did not have were pictures, but here they are:
This is where the 194 bulb was inserted:
Cover and Light-Guide with LED and 194 bulbs:
As I mentioned before, the LED was very close in dimensions to the 194 bulb, but when inserted in the socket it was not allowing the Light-Guide to fully seat in its place. Instead of modifying the Light-Guide, I took a dremel and went around the top edge of the LED bulb, rounding it off to approximate its shape to the 194 bulb as much as possible, as you can see in the following pictures (I polished it afterwards with the dremel to avoid any loss in light due to an opaque surface). I also reduced its bottom diameter to allow me to insert it in the socket a little further (you can see the "step" I created around its middle portion going all the way down to its bottom end).
The idea is to allow the Light-Guide to fully seat, but keeping the gap between the LED bulb and the light-guide as small as possible. This is needed in order to minimize propagation losses and to keep light distribution as homogeneous as we can, so the PRND321 characters could be illuminated with the same intensity.
And this is the final result:
 11-03-2013, 08:03 AM
#95
Burning Brakes


Good Morning, World! So I'm a 'morning person' which puts me on-line here on the forum around 6am. Then after an hour of reading these threads, (great pix by the way), I'm out in the driveway around 7:30am popping out the selector cover and observing my worst fears. Previous owner broke the red indicator, and bulb socket is fallen down inside the console. ugh!!! So it looks like the console is about to come out.... (yay)
I did the oil sender yesterday using the *hole in cowl* method. Great Stuff.!!
I have quite a few bulbs out in my ride, so looks like I'm gonna be using a LOT of this stuff to bring her up to snuff. Thanks for all the great helpers.
I did the oil sender yesterday using the *hole in cowl* method. Great Stuff.!!
I have quite a few bulbs out in my ride, so looks like I'm gonna be using a LOT of this stuff to bring her up to snuff. Thanks for all the great helpers.
11-27-2013, 01:47 PM
#96
Heel & Toe

Just wanted to say, thanks for this thread! I just bought an '02 C5. I was fixing the dim Climate Control display, so since I had the dash off, I may as well replace the A4 bulb. My previous bulb popped out and immediately got lost somewhere under the seat. The replacement LED bulb I tried didn't seem to work, so I assumed the burnt socket was bad.
I removed the socket, and put on some connectors so my LED strip could be removed in the future if needed.
For my car, the Green wire was negative, and the Black wire was positive.
That is the opposite of what I expected. I used the LED strip as a template and re-did the wave guide with a Dremel so it fit. It still didn't work, turns out a wire tore the led strip when installing. I resoldered the wire, re-installed, test shifted, and my new wire promptly broke the red arrow! Make sure the flat side of the wave guide has plenty of clearance!!
I was able to Crazy glue the red arrow to have it hold in place while I Elmer's glued in excess to rebuild the broken area. A day later after the Elmer's dried it appears to be solid enough, and the red arrow works as expected. The LED lights look great!
Also, if you leave the door open and your foot on the brake out of paranoia as I did, you may unknowingly drain your battery twice as I did, and need a jump start. At least I didn't blow any fuses!
I also dropped the red arrow into the console a few times which I fished out with a screwdriver covered in two sided tape.
I just wanted to warn people considering this mod- Murphy's law applies, it may take you longer than you think even if you are expecting a simple bulb swap. I had almost everything go wrong, and it was quite an ordeal. (The Climate Control was a walk in the park compared to this. You never see the bullet with your name on it.)
But, it's back together, working fine, and I don't have to worry about a bulb melting the plastic any further. It looks great, and thanks again for bringing this potentially dangerous issue to our attention.
Last edited by axman; 11-27-2013 at 01:48 PM. Reason: typo
 05-24-2014, 08:30 PM
#98
Instructor
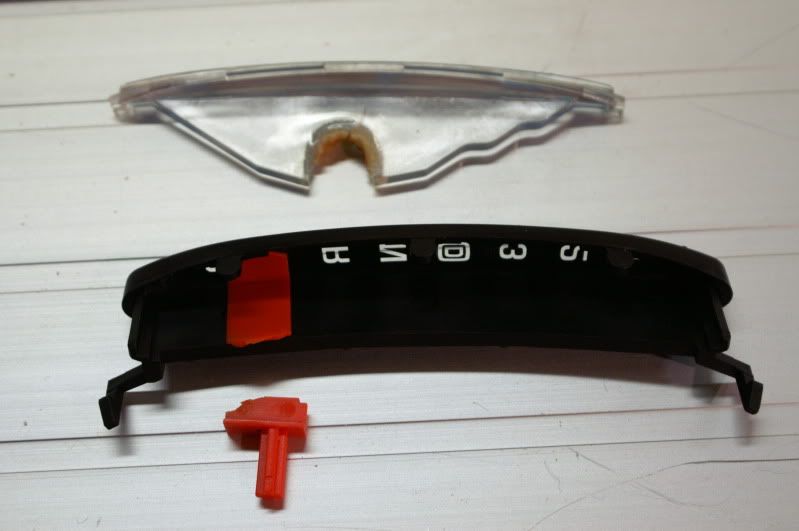
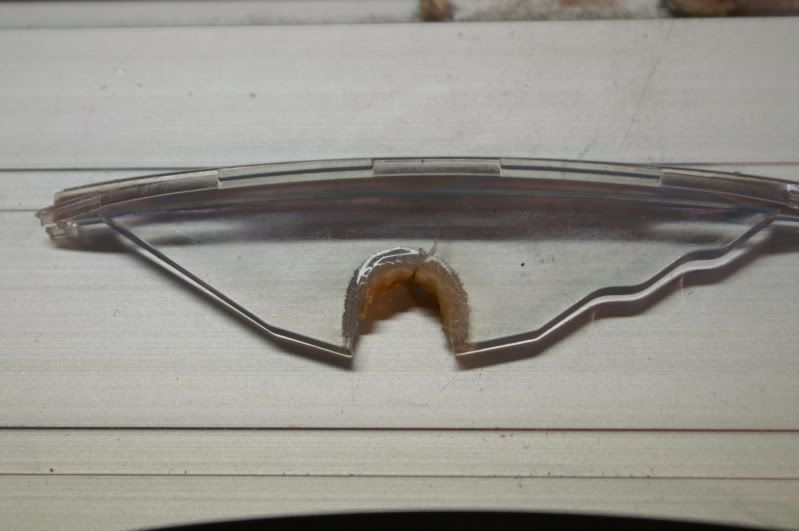
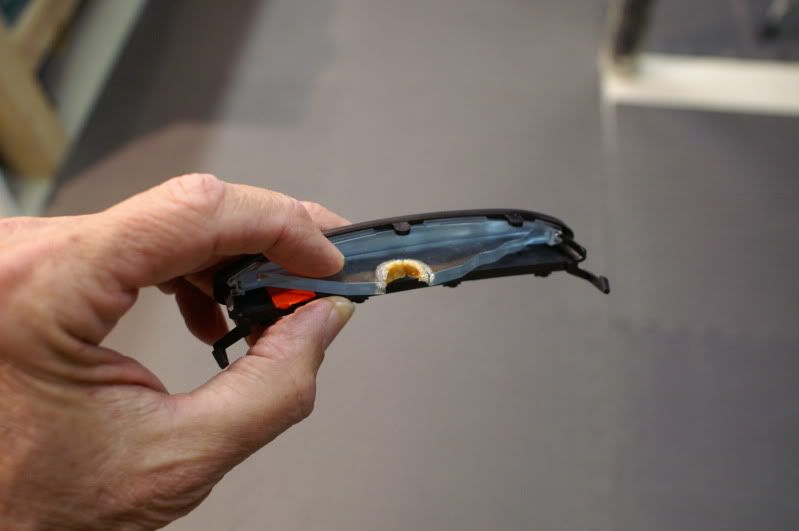
I thought I should continue contributing some technical aids to the forum, so I pulled together this little gem while repairing my shifter PRNDL. This is not a 'how to' for replacing the shifter as that has been covered many times elsewhere, but here you will see what can happen after years of service. In fact, I am on my 3rd 'little red plastic piece' (lrpp) in 56000 miles and 15 years of ownership. Obviously, GM missed the long term aging effects of heat from the standard bulb. A simple lab test for enviromental accelerated aging would have revealed this poor design. Anyway, be on the lookout for this condition and certainly convert your standard bulb in the shifter to an LED to prevent this. Furthermore, no one sells the lrpp as an individual item. The only way to get one is to buy the entire shifter assembly. New they are close to $200...used they can go for $50 to $100 easily. So, hopefully this information can spare you from this situation. The pictures tell the story....
I have a 97, and it has a butt-load of miles on it, and that part has never been replaced.
Although I have had to replace the shifter cable.
Just wondering if I got lucky or if it may be a certain yr model prob?
05-24-2014, 08:58 PM
#99
Instructor
Just wanted to say, thanks for this thread! I just bought an '02 C5. I was fixing the dim Climate Control display, so since I had the dash off, I may as well replace the A4 bulb. My previous bulb popped out and immediately got lost somewhere under the seat. The replacement LED bulb I tried didn't seem to work, so I assumed the burnt socket was bad.
I removed the socket, and put on some connectors so my LED strip could be removed in the future if needed.
For my car, the Green wire was negative, and the Black wire was positive.
That is the opposite of what I expected. I used the LED strip as a template and re-did the wave guide with a Dremel so it fit. It still didn't work, turns out a wire tore the led strip when installing. I resoldered the wire, re-installed, test shifted, and my new wire promptly broke the red arrow! Make sure the flat side of the wave guide has plenty of clearance!!
I was able to Crazy glue the red arrow to have it hold in place while I Elmer's glued in excess to rebuild the broken area. A day later after the Elmer's dried it appears to be solid enough, and the red arrow works as expected. The LED lights look great!
Also, if you leave the door open and your foot on the brake out of paranoia as I did, you may unknowingly drain your battery twice as I did, and need a jump start. At least I didn't blow any fuses!
I also dropped the red arrow into the console a few times which I fished out with a screwdriver covered in two sided tape.
I just wanted to warn people considering this mod- Murphy's law applies, it may take you longer than you think even if you are expecting a simple bulb swap. I had almost everything go wrong, and it was quite an ordeal. (The Climate Control was a walk in the park compared to this. You never see the bullet with your name on it.)
But, it's back together, working fine, and I don't have to worry about a bulb melting the plastic any further. It looks great, and thanks again for bringing this potentially dangerous issue to our attention.
I removed the socket, and put on some connectors so my LED strip could be removed in the future if needed.
For my car, the Green wire was negative, and the Black wire was positive.
That is the opposite of what I expected. I used the LED strip as a template and re-did the wave guide with a Dremel so it fit. It still didn't work, turns out a wire tore the led strip when installing. I resoldered the wire, re-installed, test shifted, and my new wire promptly broke the red arrow! Make sure the flat side of the wave guide has plenty of clearance!!
I was able to Crazy glue the red arrow to have it hold in place while I Elmer's glued in excess to rebuild the broken area. A day later after the Elmer's dried it appears to be solid enough, and the red arrow works as expected. The LED lights look great!
Also, if you leave the door open and your foot on the brake out of paranoia as I did, you may unknowingly drain your battery twice as I did, and need a jump start. At least I didn't blow any fuses!
I also dropped the red arrow into the console a few times which I fished out with a screwdriver covered in two sided tape.
I just wanted to warn people considering this mod- Murphy's law applies, it may take you longer than you think even if you are expecting a simple bulb swap. I had almost everything go wrong, and it was quite an ordeal. (The Climate Control was a walk in the park compared to this. You never see the bullet with your name on it.)
But, it's back together, working fine, and I don't have to worry about a bulb melting the plastic any further. It looks great, and thanks again for bringing this potentially dangerous issue to our attention.
But as for the battery, when you need a new one, get a Optima Yellow Top! It actually is a deep cycle battery. I use to have the problem with my 97 draining the battery down (even the Optima Red Top), just while it was sitting garaged for 3-4 days!
So I installed a trickle charger, but now with this OPtima, I don't even use the charger. I have a 360 watt amp, and can play some loud music for a long time, still don't hurt the charge!
Oh by the way, if your as tight as I am, the price is going to **** you off, but if your patient, and wait to catch the right deal at Advance Auto Parts, I wound up only paying 120 bucks out the door on mine, instead of the reg price of $240!
The following users liked this post:
willy g (09-20-2017)
08-27-2014, 02:39 PM
#100
Intermediate

Member Since: Jan 2012
Posts: 46
Likes: 0
Received 0 Likes
on
0 Posts
ATTENTION MOTOR HEADS & TECHS ....
I have a friend with a 2000 coupe & under normal acceleration it shifts ,runs & performs as normal ,but under 3/4 or more pedal ,it hits a wall at 5000 RPM & wont shift into the next gear until you let up on the gas a little .
Anyone with an automatic have this problem & if so ... what was the remedy ??
Thanks Vette brothers - [& sisters]

