
Thoughts on Installation of Vararam with Power Duct
 03-28-2011, 02:04 AM
#1
Burning Brakes


Thread Starter
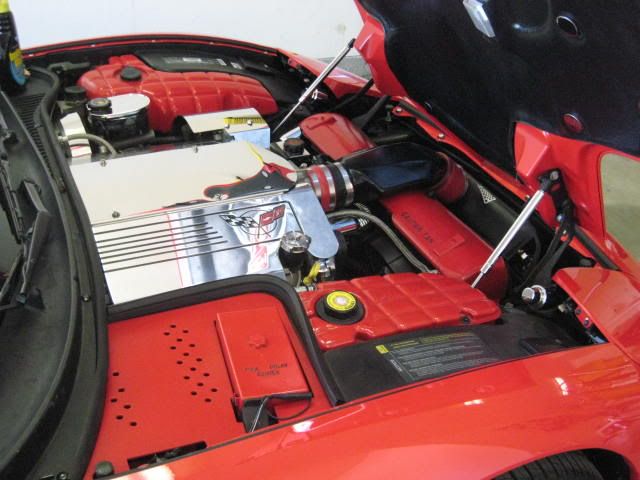
I believe I read every thread on this subject, and sent PMs to a few members with specific questions before I tackled the job. I won't be doing a how to here; that's already been done in the "cajun" thread, but I will pass on a couple thoughts.
It is a CHALLENGING install for someone who's not a mechanic but has been working on and modding Vettes for 40 years. BUT, anyone who follows the TAKE YOUR TIME and RESEARCH THE THREADS advice can do it. While some claim to have done the job in 1.5 hours (Mechanical Savants I guess); I set aside the whole weekend just in case. If I include the time spent running to Ace to pick up spacers and Loews for weatherstripping, and exclude the breaks to watch my visiting Grandson and the time to do other jobs (like removing about 1/4 pound of sand and gravel from the radiators), it took me about 6 hours---and I did not have to remove the stock airbridge as I was already running a Halltech Venom.
IMHO, the single most difficult thing about the installation is working on my back in very narrow spaces (I have large hands), and often needing to remove and reinstall bolts by feel rather than sight--especially the fog lights and original shrouds.
Though the "cajun" thread talks of removing & reinstalling the white connectors 3/4 of the way down the radiator, it's clear from other threads that these are temporary fasteners for assembly line purposes and DO NOT need to be reinstalled. Note that on my car these fasteners were secured by a metal retaining ring (the kind you see on
some of your wheel lugs, and seems unusual for a "temporary" fitting)---NO WAY were these coming apart by prying with a screw driver! Brute force pulling the shroud away from the A/C radiator finally pulled the entire fastener attached to the shroud.
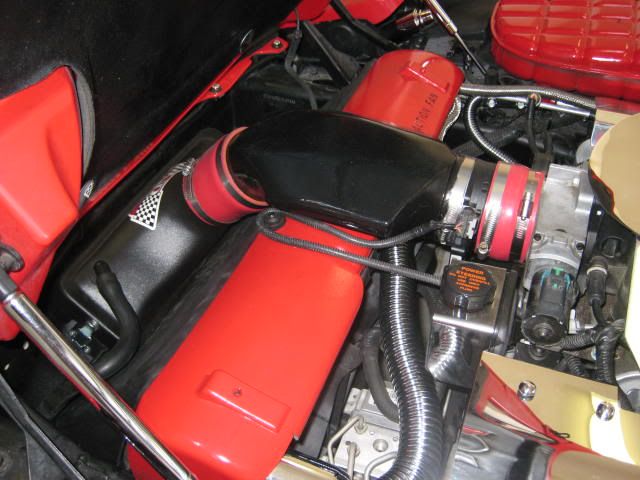
I'm paranoid about pulling unfiltered air into the engine and the fitment of the filter to the air box and the airbox to the air tubes was not at all to my liking. I spent a good hour carefully trimming in additional 3/4"x 5/16" foam weatherstriping around the filter element and adding 3/8"x 3/8" Rubber Weatherseal to the top of the air tubes to seal the airbox joint.
Even though I had the correct model of Power Duct for my year, I didnt think I'd ever get the MAF to slide in. What finally worked for me was to put the MAF in the freezer for 6 hours and bake the PD in the oven on a cookie sheet at 200deg for 20 minutes---still had to push like hell but it went in!
Getting the system to align properly so that the PD does not interfere with the hood took a long time---and frankly I was ready to give up several times. It requires getting the flexible hoses just right. Contrary to the directions, I finally got it by securing the throttle body first, then doing the connection to the airbox---and having someone else push down hard on the front of the PD when you secure that clamp to the airbox would really help! The tension at that point is what insures you have good hood clearance!
Hope this helps someone who's about to undertake a really Great Mod!!
Hopefully it won't cost you as much skin as it did me to get the result:
It is a CHALLENGING install for someone who's not a mechanic but has been working on and modding Vettes for 40 years. BUT, anyone who follows the TAKE YOUR TIME and RESEARCH THE THREADS advice can do it. While some claim to have done the job in 1.5 hours (Mechanical Savants I guess); I set aside the whole weekend just in case. If I include the time spent running to Ace to pick up spacers and Loews for weatherstripping, and exclude the breaks to watch my visiting Grandson and the time to do other jobs (like removing about 1/4 pound of sand and gravel from the radiators), it took me about 6 hours---and I did not have to remove the stock airbridge as I was already running a Halltech Venom.
IMHO, the single most difficult thing about the installation is working on my back in very narrow spaces (I have large hands), and often needing to remove and reinstall bolts by feel rather than sight--especially the fog lights and original shrouds.
Though the "cajun" thread talks of removing & reinstalling the white connectors 3/4 of the way down the radiator, it's clear from other threads that these are temporary fasteners for assembly line purposes and DO NOT need to be reinstalled. Note that on my car these fasteners were secured by a metal retaining ring (the kind you see on
some of your wheel lugs, and seems unusual for a "temporary" fitting)---NO WAY were these coming apart by prying with a screw driver! Brute force pulling the shroud away from the A/C radiator finally pulled the entire fastener attached to the shroud.
I'm paranoid about pulling unfiltered air into the engine and the fitment of the filter to the air box and the airbox to the air tubes was not at all to my liking. I spent a good hour carefully trimming in additional 3/4"x 5/16" foam weatherstriping around the filter element and adding 3/8"x 3/8" Rubber Weatherseal to the top of the air tubes to seal the airbox joint.
Even though I had the correct model of Power Duct for my year, I didnt think I'd ever get the MAF to slide in. What finally worked for me was to put the MAF in the freezer for 6 hours and bake the PD in the oven on a cookie sheet at 200deg for 20 minutes---still had to push like hell but it went in!
Getting the system to align properly so that the PD does not interfere with the hood took a long time---and frankly I was ready to give up several times. It requires getting the flexible hoses just right. Contrary to the directions, I finally got it by securing the throttle body first, then doing the connection to the airbox---and having someone else push down hard on the front of the PD when you secure that clamp to the airbox would really help! The tension at that point is what insures you have good hood clearance!
Hope this helps someone who's about to undertake a really Great Mod!!
Hopefully it won't cost you as much skin as it did me to get the result:
Last edited by J T; 03-28-2011 at 02:14 AM.
 03-28-2011, 12:09 PM
#2
Safety Car

Member Since: Aug 2009
Location: Chester County Pennsylvania
Posts: 4,993
Received 793 Likes
on
537 Posts
2020 C5 of the Year Finalist - Unmodified

Thanks for starting this thread. I had read some other comments about the difficulty of installing the Vararam PD. I sent an e-mail to Vararam tech lat week on this subject with no response, that made me even more suspicious. I am plannning to install the Vararam intake, but I don't think I am going to try the PD, especially after your very informative disclosure. Thanks again for an honest evaluation.  By the way, great engine compartment.
By the way, great engine compartment.
03-28-2011, 02:15 PM
#3
Le Mans Master


I did mine a couple of months ago and also found a few "didn't need to do that" things from the cajun install. That said, I'm still very happy with the cajun directions, but not NEARLY as happy as I am with the Vararam itself
How do you like it so far? The first time I got on it good at about 75 I was amazed at how the car took off compared to before.
How do you like it so far? The first time I got on it good at about 75 I was amazed at how the car took off compared to before.
 03-29-2011, 01:11 PM
#5
Burning Brakes
Thread Starter
I did mine a couple of months ago and also found a few "didn't need to do that" things from the cajun install. That said, I'm still very happy with the cajun directions, but not NEARLY as happy as I am with the Vararam itself
How do you like it so far? The first time I got on it good at about 75 I was amazed at how the car took off compared to before.
How do you like it so far? The first time I got on it good at about 75 I was amazed at how the car took off compared to before.
It has so much more G-force when I went WOT the first time from about 2800RPM in 3rd I could not believe! WOT in 4th from 70 was equally amazing!

I wasn't realizing the full potential of my 410 gears until now!
Clearly my gas expense is going to go through the roof due to the change in my driving habits!
 03-29-2011, 01:25 PM
#6
Burning Brakes
Thread Starter
Don't want to turn this into an argumentative thread, but, Yes & No.
I agree that the CAUSE of the overall alignment of the system is an installer issue that can be dealt with; and is simply a function of the design of the airtubes. I believe this is probably unavoidable given the tight space the designers had to work with and the variance in tolerances of our cars as they come off the assembly line---The later as Vararam recognizes in their installation instructions!
However, the CAUSE of the fitment issue I raised---gaps between the filter and the airbox, and gaps between the airbox and the airtube, are the result of design-engineering and manufacturing issues, and can hardly be attributed to the installer. Thankfully, these fitment issues can be inexpensively rectified in the field.
03-29-2011, 05:11 PM
#8
Melting Slicks


The first time.. Yes.. I can pull it and replace teh orginal OEM now in about an hour... Still a bitch.. I just know wht Im doing now!
Ely Minnesota! I was there in 1969.... Boy Scouts... beautiful lakes
Ely Minnesota! I was there in 1969.... Boy Scouts... beautiful lakes
Last edited by BitViper; 03-29-2011 at 05:14 PM.
03-30-2011, 05:26 PM
#9
Instructor

Member Since: Jul 2009
Location: Anchorage Ak
Posts: 234
Likes: 0
Received 0 Likes
on
0 Posts
I had ahellava time getting the proper angle from the TB to air bridge and over the radiator. After research and talking to techs for Vararam, in my year (2000) they used two different motor mounts, one being 1" lower than the other. Guess which one I had? So after some cutting of the flexible hose's everthing went together fine.
03-11-2012, 09:33 AM
#11
Race Director


All,
After reading a thread elsewhere reference a gentlemans C5 rpms dipping way too low at red lighys, stop signs, etc.....He stated the VR Power Duct solved that issue when he moved the MAF close to the TB using the VR Power Duct.
So, having this very same issue, I ordered the VR Power Duct and prior to shipment, we verified two things:
My C5 was a 2000 and
My MAF was Plastic one side / Metal the other (Stock MAF)
However, when I received my parts, my MAF would not fit the rear side of the power duct. Perhaps I need to bake it at 200 degrees and freeze my MAF? The second issue was discovered when I noticed the power duct had an opening for the Intake Air Temperature (IAT) sensor. My current set up is NOT using this. All wires for air are connected to the MAF directly. This is how I discovered that, most likely, my MAF was changed out to the newer 2001-2004 C5 MAF 5-Wire design, eliminating the IAT port sensor. Keep this in mind when stating your year vehicle. The parts sent for my year car were in fact, correct, however, my MAF was not a true stock MAF for a 2000.
The biggest tell-tale sign is if your MAF is plastic one side, metal the other, and if your IAT sensor port is being utilized or all wires connect via the MAF (5-Wire design).
Now I have to wait for the correct parts. Grrrrrrr.
12-29-2013, 06:35 AM
#12
Advanced

Member Since: Mar 2006
Posts: 92
Likes: 0
Received 0 Likes
on
0 Posts
I bought the VR Powerduct from a pal who chose to go a different intake route, it was unused so I got a good deal on a new bit of kit. However reading through the threads on the subject I was a bit concerned about the codes and the hood clearance.
Regarding fitment issues I found the fitting to be very tight but didn't need to use the freeze/heat treatment, just very strong persuasion. The unit looks good and relocating the MAF was no big deal, you can get the hoses and clips to look neat and the fitting to the Corvette Concepts ram air box was ok.
I've started the car but not done the advised 'heatsoak' yet but there are no codes showing. When the weather improves I'll give the car a run and see how it feels, as far as hood clearance goes the powerduct doesn't look any higher than the previous duct.
Last edited by CORKHILL & KELLETT; 12-29-2013 at 06:37 AM.