
Rockin' seat - additional issues
 05-23-2007, 02:03 PM
#1
Instructor

Thread Starter

O.k., so I did the mod that many have done (filled the aluminum block inside the seat tracks to take up slack). I actually filled the void with fibreglass as opposed to plastic washers. The interesting thing is that when I took it apart, both factory rubber spacers were still very intact and track movement was minimal.
It has tightened the tracks to where there is no movement in the tracks themselves.
The seat still rocks a lot though. When I poke my head under there and rock the seat, the tracks are rigid, and the movement seems to be more a factor of slop in the motor screw drives, torque arms, etc. Has anybody done other mods (bushings, etc.) to further eliminate the rocking tendency? Would really like to get it fixed, as it is very annoying.
Thanks all!
J
2000 Vert
84,000 miles

 05-24-2007, 12:04 AM
#3
Advanced

Member Since: Apr 2000
Location: San Ramon, Ca
Posts: 88
Likes: 0
Received 0 Likes
on
0 Posts

I have a November built 2000 Vette too with same problems. The dealer worked on it in mid 2000 after there was a TSB. I think the 2000 was the worst and they fixed it from 2001 on. You might try and find a TSB for this issue. It certainly took care of mine.
Good luck,
Highlander/Cam
Good luck,
Highlander/Cam
05-30-2007, 05:44 PM
#4
Advanced

Member Since: Jan 2007
Location: Fairfax VA
Posts: 80
Likes: 0
Received 0 Likes
on
0 Posts
I'm in the middle of doing this fix right now, my driver's seat was rocking bad, but when I took out the block the rubber washers looked perfectly normal, not destroyed like some other owners. I'm putting nylon washers in tonight, so I'm hoping I don't still have the problem, it is a 2001 however.

 10-05-2007, 01:48 PM
#6
Heel & Toe

Member Since: Feb 2005
Location: Brighton CO
Posts: 15
Likes: 0
Received 0 Likes
on
0 Posts
After doing the nylon washer fix, I still had a lot of rockin. I found the slop to be in the soft aluminum bushings of the adjuster transmissions. After pricing replacement seat racks, I decided to try and fix it myself.
I purchased some "S" hooks and turnbuckles from Lowes and found that by hooking a "S" hook on said transmissions and another on the solid frame with a turnbuckle between them, I was able to apply tension and eliminate the majority of the rockin. The adjusters still function and I've only had to tighten the turnbuckles once in the last 6mo. Sorry, I didn't have a camera to take pics.
I purchased some "S" hooks and turnbuckles from Lowes and found that by hooking a "S" hook on said transmissions and another on the solid frame with a turnbuckle between them, I was able to apply tension and eliminate the majority of the rockin. The adjusters still function and I've only had to tighten the turnbuckles once in the last 6mo. Sorry, I didn't have a camera to take pics.
10-05-2007, 01:55 PM
#7
Advanced
Member Since: Jan 2007
Location: Fairfax VA
Posts: 80
Likes: 0
Received 0 Likes
on
0 Posts
I did the spacer fix and it wasn't my problem, rocking is just as bad as always. I looked at my seat again and can't really figure out what's wrong.
10-05-2007, 08:05 PM
#8
Burning Brakes


I'm another guy with this problem. The fore-aft spacers are fine but the seat rocks sometimes when I accelerate. Looking for the solution.
10-05-2007, 08:21 PM
#9
Melting Slicks

10-05-2007, 08:49 PM
#10
Heel & Toe
Member Since: Feb 2005
Location: Brighton CO
Posts: 15
Likes: 0
Received 0 Likes
on
0 Posts
After doing the nylon washer fix, I still had a lot of rockin. I found the slop to be in the soft aluminum bushings of the adjuster transmissions. After pricing replacement seat racks, I decided to try and fix it myself.
I purchased some "S" hooks and turnbuckles from Lowes and found that by hooking a "S" hook on said transmissions and another on the solid frame with a turnbuckle between them, I was able to apply tension and eliminate the majority of the rockin. The adjusters still function and I've only had to tighten the turnbuckles once in the last 6mo. Sorry, I didn't have a camera to take pics.
I purchased some "S" hooks and turnbuckles from Lowes and found that by hooking a "S" hook on said transmissions and another on the solid frame with a turnbuckle between them, I was able to apply tension and eliminate the majority of the rockin. The adjusters still function and I've only had to tighten the turnbuckles once in the last 6mo. Sorry, I didn't have a camera to take pics.

 10-06-2007, 10:02 AM
#12
Melting Slicks
10-06-2007, 11:20 AM
#13
Le Mans Master

Going to see if I can go by HD (no.. the other HD) and see if I can find some sets of these. probably will not be till tomorrow, though as working today 
Thanks for the pics! I think even I might be able to try to set that up
Thanks for the pics! I think even I might be able to try to set that up
10-06-2007, 01:04 PM
#14
Heel & Toe
Member Since: Feb 2005
Location: Brighton CO
Posts: 15
Likes: 0
Received 0 Likes
on
0 Posts

Also, make sure you have all the settings were you want them before you remove the the seat. They have no effect on the forward backward movement, however, the turnbuckles will loosen if you do a lot of tilt adjustments. You can tighten the front one, but the rear one can only be tightened by seat removal. Maybe someone could improve on this fix.

Last edited by COFireFRuby; 10-07-2007 at 01:47 PM.
10-08-2007, 02:28 PM
#16
Racer
I am not an expert on this repair, but two years later and about 24,000 miles more wear, I have no play in my seats after putting in the salvaged tracks. I weigh 210 lbs., and I do consciously try to lower myself in carefully, instead of just dropping myself in and pounding the seats. This is the way to go so you have the benefit of memory seat adjustments, etc. Please read and enjoy. I tracked this thing down after months of research.........
Dear c5 seat Rockers and Sliders:
I purchased a new salvaged seat track, post 2003 model year type, non-memory from Dino's Corvette Salvage of Picyune, Miss. It was a salvage piece from a manfacturer who had bought entire Corvette seats from GM, and then was making executive office chairs out of them. Obviously, the seat tracks were not needed and Dino got a hold of them. Dino's attention to detail was fabulous; he would not send me a seat until he checked all the details of what I had in my car, etc. My car, a 2000 targa 6 speed, has had a rocking 1/4" -3/8"seat since I bought it one year ago with 15,000 miles.
The best price I could get from local Chevy dealers in the greater Boston, MA area was $500 for a memory seat track, $437 for w/o memory. The usual diference is $100+ more with memory but the dealer had a memory track on the shelf for too long - so I think he was trying to get rid of it at a bargain price.
Thanks to a thoughtful response form Matt Hathcock on the Corvette Mechanic Forum, I got hooked up with Dino. Keep in mind that I had already performed the Ken Robb Rocking seat fix twice ( the one with the washers) without really fixing the problem. The 1998-2002 (partial 2002 yr.) seat tracks have two nagging problems with wear: 1.) aluminum pivot points that wear out causing play with the foundation of, and the actual height adjusters for the seat, and 2.) black polyethelyne washers in the back and forth adjusting rods of the seat track. The latter disentegrate with use and then the seats slide on accelleration and braking. Bottom line is that you need to get a new track. Machining would be possible I guess but nobody in over a year came up with a referral, and that's after reaching out to 5 Corvette gear head sites.
The last hurdle was performed today in baking heat- sorry you guys in the South, we are just not used to it! The toughest part of the job was transferring the motors from the memory seat with the sloppy old tracks to the non-memory new tracks. I wasn't sure I could do it until it all fit together, but one thing for sure, the motors for the memory seat appear to be different and have more connections for electrical than the non-memory ones. It's not just case of moving the harness and memory module from one to the other -you must move the motors as well. If you try to do the job have a complete set of torx drivers!
BOTTOM LINE, the job was a success. You can transfer memory electronics to non- mem. seat tracks, Dino is a great part source, & the track he sent me was never used -( I know b/c the bluegreen grease that Lear pumped in at the end of adjusting rods was still down on the end- never being spread to the other end b/c it had never been adjusted!).
I had seen what a later model (past 2002) adjuster looks like, and Dino also came through on that issue as well, the silver box torx screws are replaced with "male" torx or reverse torx nuts on the newer part. These are located on the bottom of the tracks, 2 on each track. RESULTS - after all that work and research, well the seats are firmer, but they still have a slight spongy play if you push back on it, like the passenger seat feels. I did not replace the black washers in the silver box because I figured they had to have fixed that too! Well maybe they didn't. But I am not going in again until the weather gets a whole lot cooler!
Good luck guys- and remember- BUY AMERICAN!
GBWBook/Bluemill
10-10-2007, 10:32 AM
#17
Melting Slicks
I read a thread awhile back where another member disconnected one track, then moved the adjuster a hair, so the still-connected track's screw drive was in a very slightly different position than the disconnected track's screw drive, then put it back together. The result was a bit more torque because of the different positioning, hence, all slop was removed.
Maybe you guys might want to look into that and report back so the rest of us know whether there is something to this?
Maybe you guys might want to look into that and report back so the rest of us know whether there is something to this?
10-10-2007, 12:46 PM
#18
Melting Slicks
Seems the mn6 cars are the worst due to the constant clutch work and body motion on seat back.
I found that when I lowered the seat and the front down as much as possible it took out 80% of the rock due to an angle change, I guess.
I found that when I lowered the seat and the front down as much as possible it took out 80% of the rock due to an angle change, I guess.
10-11-2007, 10:00 PM
#19
Racer
The pivot points to the adjusters are small splined pins, only anchored on one side of the aluminum foundation. They would have had a chance at longevity if they were at least threaded or screwed pieces, not spilined, or more important, anchored on both ends of the aluminum frame. It's a horrible, easy and cheap to make, but not durable design. You really have to look at them, totally out of the seat, up close and personal to see the play that's created.
Bluemill
Bluemill
01-13-2008, 11:20 AM
#20
Instructor

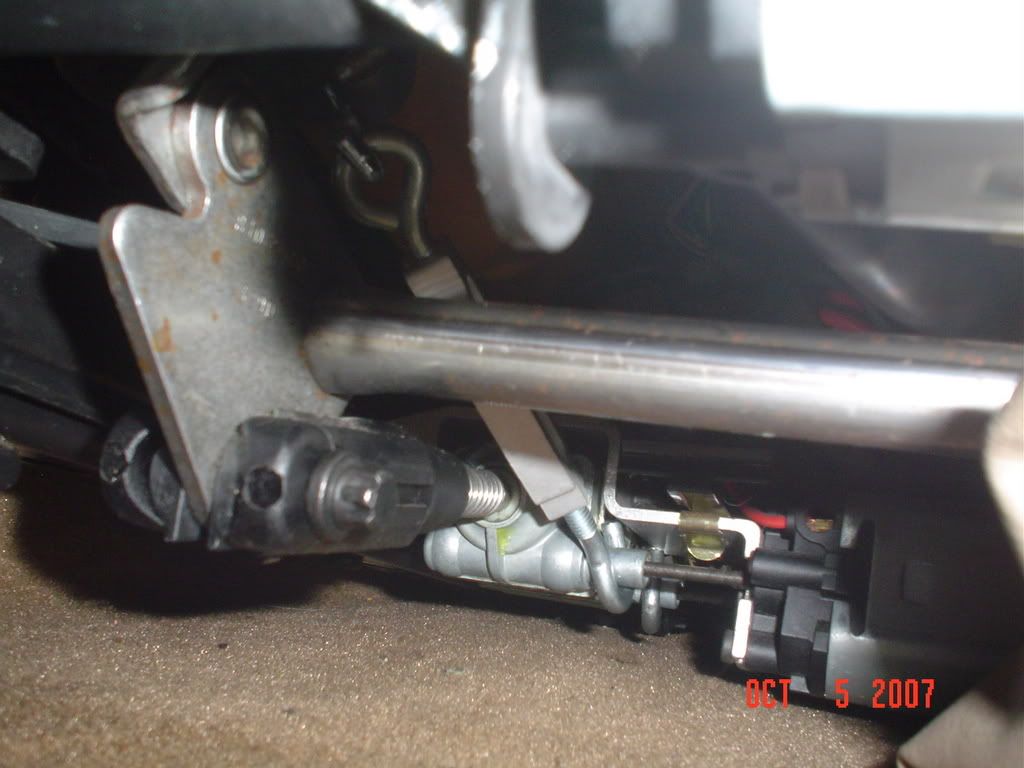
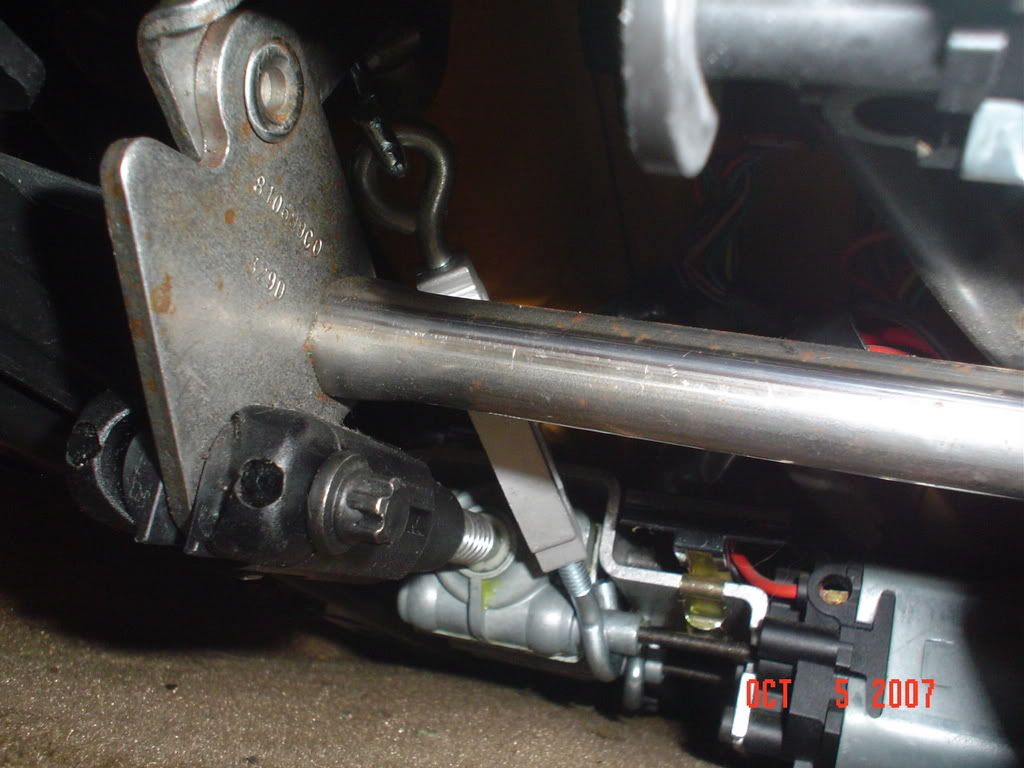
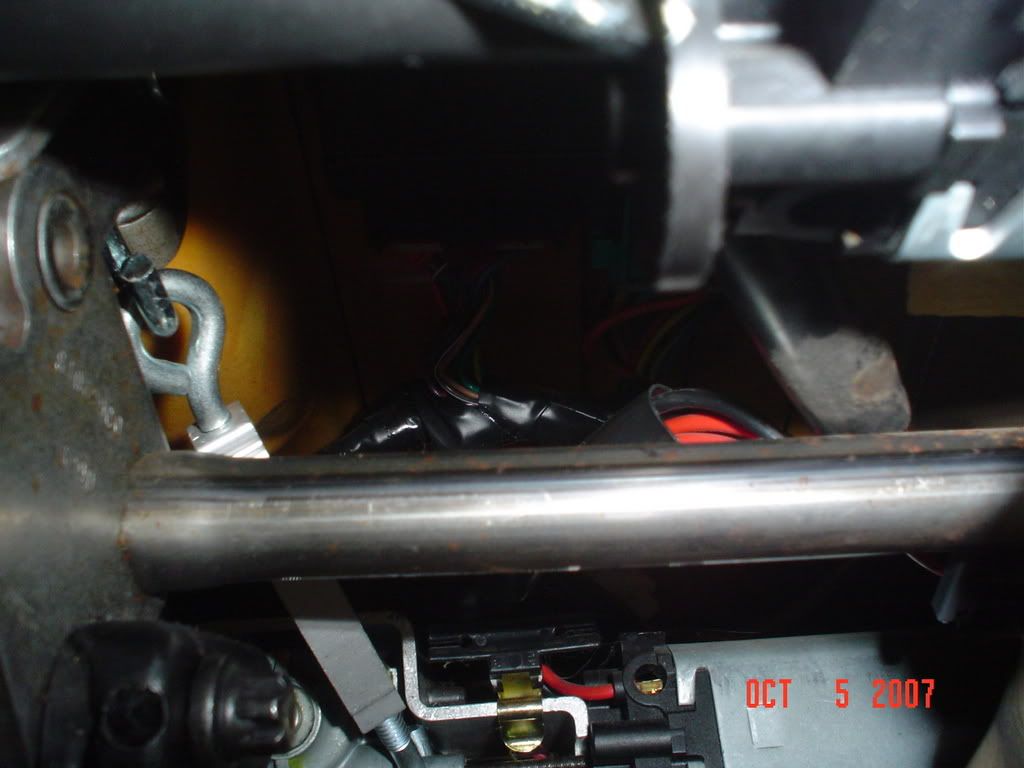
After fixing the "rocking chair" with nylon washers, I still had some movement. The cause was excessive play in the front pin and back pin of the shafts that adjust the up/down motion of the seat. I installed a bronze bushing (from Ace Hardware) in the forward location which substantially reduced this movement. I'm going to see if that is enough - or if I want to do the rear as well.
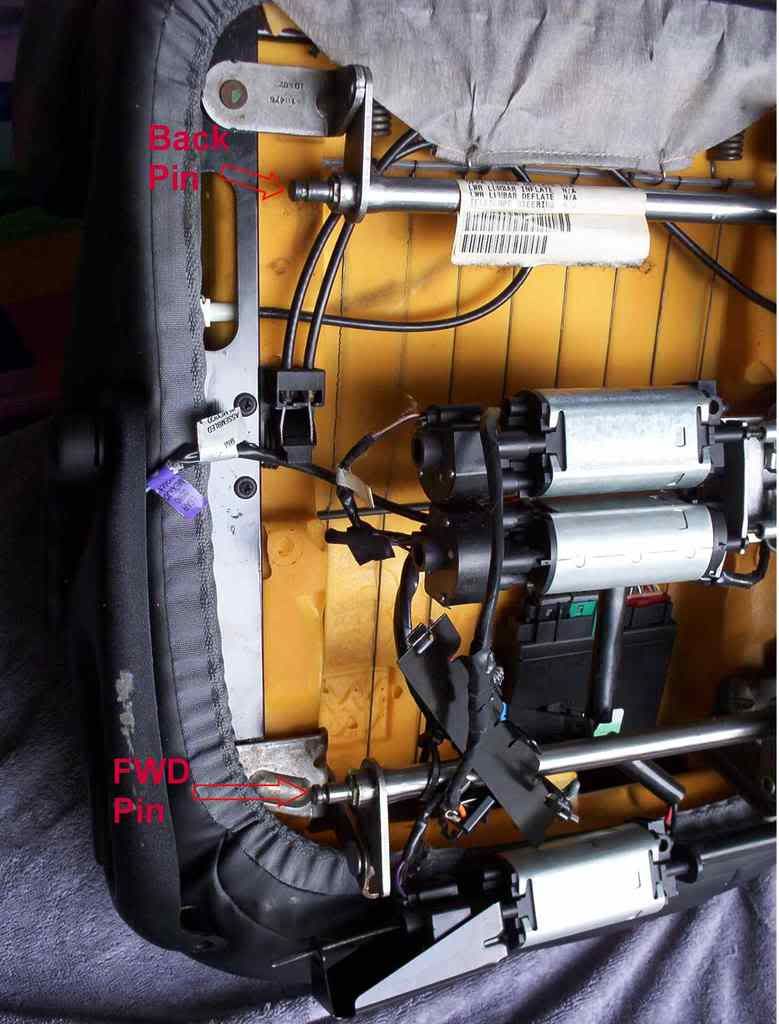
Below is a picture of the rail with one bushing in the forward location and the original, no bushing, in the rear location.
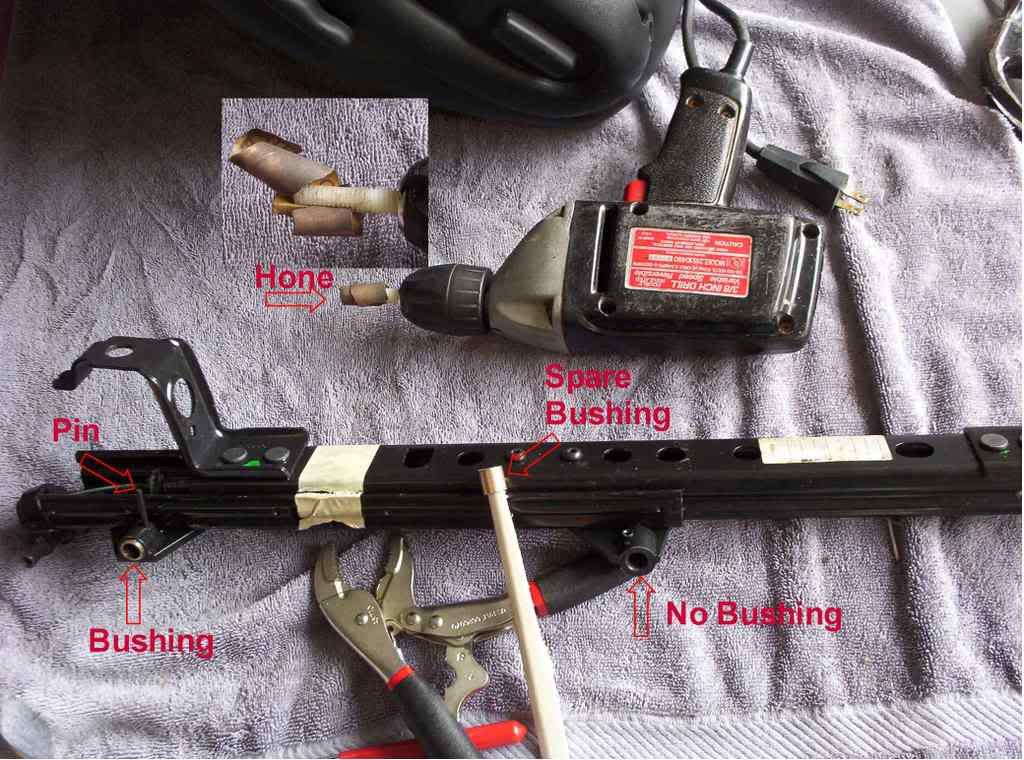
A few suggestions about this repair procedure. It is easy to get the seat out -- 4 nuts and a wire disconnect. After that, just use a small nail to punch out the two "slotted spring tension pins" that hold the rail to the shaft. Punch them toward the seat foam -- you can install them from the front later so not to worry. Next go to Ace Hardware and buy a bronze bushing 3/8" ID x 1/2" OD x ~1" long for $2.10. You only need one since it gets cut in two anyway to fit the depth of the hole. Next fashion a hone to make the inside diameter of the bushing exactly what the shaft diameter is on the seat. I didn't have a good technique other than create a hone from a 3/8" plastic bolt with a slot in it. I inserted sand paper and honed away for about 30 minutes -- switching sandpaper every minute or two (PITA). Finally when it fit just right, I drilled the hole in the forward seat rail with a 1/2" drill bit. The material being drilled is aluminum, so use a lot of oil, and the result will be a nice snug fit. Be careful to keep the drill in alignment with the original hole so the shaft inserts w/o binding. Don't drill the hole as deep as the tension pin --that way you can use the same pin w/o messing around with the hole. Another trick is to stick a dowell rod through the bushing before cutting it in half. I used a band saw, so having a dowell kept my fingers away from the blade.
Below is a picture of the rail with one bushing in the forward location and the original, no bushing, in the rear location.
A few suggestions about this repair procedure. It is easy to get the seat out -- 4 nuts and a wire disconnect. After that, just use a small nail to punch out the two "slotted spring tension pins" that hold the rail to the shaft. Punch them toward the seat foam -- you can install them from the front later so not to worry. Next go to Ace Hardware and buy a bronze bushing 3/8" ID x 1/2" OD x ~1" long for $2.10. You only need one since it gets cut in two anyway to fit the depth of the hole. Next fashion a hone to make the inside diameter of the bushing exactly what the shaft diameter is on the seat. I didn't have a good technique other than create a hone from a 3/8" plastic bolt with a slot in it. I inserted sand paper and honed away for about 30 minutes -- switching sandpaper every minute or two (PITA). Finally when it fit just right, I drilled the hole in the forward seat rail with a 1/2" drill bit. The material being drilled is aluminum, so use a lot of oil, and the result will be a nice snug fit. Be careful to keep the drill in alignment with the original hole so the shaft inserts w/o binding. Don't drill the hole as deep as the tension pin --that way you can use the same pin w/o messing around with the hole. Another trick is to stick a dowell rod through the bushing before cutting it in half. I used a band saw, so having a dowell kept my fingers away from the blade.
Last edited by FL_Dave; 10-11-2012 at 03:06 PM. Reason: photo link updated