How to replace the (p1416) air check valve??
 11-10-2009, 10:25 PM
#81

I think mine is fixed! It's been throwing the P1416 code every few days for 3 months now. I would clear it and it came back in a few days, towards the end it would come back in less than 20 miles! I tried the cleaner spray several times, no better. Finally broke down and bought TWO of the valves at NAPA (about $30). I went to install them, did the right one, it's REAL easy, I looked at doing the other one but couldn't figure out how to get back there and I didn't want to pull things apart to get there. However, since I changed out the RIGHT one there have been NO codes on the left one! I've gone hundreds of miles since then. I'm thinking maybe the right one was stuck OPEN which made the computer think the left one was stuck closed. Anyway, if you're getting the codes, try changing out just the easy one, might help! It's a 5 minute job!
DocOhm....
DocOhm....

The following users liked this post:
Clarkzo6 (12-24-2019)
11-11-2009, 04:11 PM
#82
Burning Brakes


When I did my passenger side valve I took off the intake manifold (LS1 tech has the torque order/specs for the bolts) Not too hard of a job, it just looks that way.
Sam
Sam
02-24-2010, 09:46 PM
#83
1st Gear


Member Since: Feb 2010
Location: Canton GA.
Posts: 1
Likes: 0
Received 0 Likes
on
0 Posts
I'm a newbie to the site, but Bill's tips and photos for cleaning the valve worked like a champ. No More P1416 code! Take his advice, and clean before you buy new. Thanks!
03-06-2010, 12:43 PM
#84
Le Mans Master


Storm
Why dont you just try to clean it instead of replacing it? The valve is very simple and usualy the seal just sticks shut or gets gunk on the seat and stucks open. If you disconnect the main air supply hose and you get exhaust out of the engine side of the hose, the valve is stuck open.
There is a "Y" that connects the main air supply hose to both check valves. It's located between the engine and the brake vacuum booster at the fire wall. You can either disconnect the hose for the specific defective valve or just spray carb cleaner in the main air hose and fog both valves. After the cleaning, I give it a good spray and doush of WD-40. This procedure works good for me and a bunch of guys on here.
Give it a try, hell,,its FREE! Cant beat that with a stick!
Let us know how you make out if you decide to clean it.
BC
Why dont you just try to clean it instead of replacing it? The valve is very simple and usualy the seal just sticks shut or gets gunk on the seat and stucks open. If you disconnect the main air supply hose and you get exhaust out of the engine side of the hose, the valve is stuck open.
There is a "Y" that connects the main air supply hose to both check valves. It's located between the engine and the brake vacuum booster at the fire wall. You can either disconnect the hose for the specific defective valve or just spray carb cleaner in the main air hose and fog both valves. After the cleaning, I give it a good spray and doush of WD-40. This procedure works good for me and a bunch of guys on here.
Give it a try, hell,,its FREE! Cant beat
that with a stick! Let us know how you make out if you decide to clean it.
BC
hey bill what kind of cost would i be looking st for dealer to replace ?
03-06-2010, 08:06 PM
#85
Tech Contributor


Member Since: Dec 1999
Location: Anthony TX
Posts: 32,736
Received 2,180 Likes
on
1,583 Posts
CI 6,7,8,9,11 Vet
St. Jude Donor '08

I do my best to stay away from STEALERSHIPS and don't have much experience with their prices BUT,,,,,Doing the job my self, they would charge you approx 1 hr labor and the price for the valve. Your also going to see hazardous waste fees and tax. Most STEALERSHIPS are getting close to $100/hr, Add that up and theres your price.
Find an outside mechanic with LESS hourly rate OR heir/seek a local forum member to help you do it. They usually charge pizza and beer.
BC
Find an outside mechanic with LESS hourly rate OR heir/seek a local forum member to help you do it. They usually charge pizza and beer.
BC
03-10-2010, 11:23 AM
#86
Le Mans Master
I do my best to stay away from STEALERSHIPS and don't have much experience with their prices BUT,,,,,Doing the job my self, they would charge you approx 1 hr labor and the price for the valve. Your also going to see hazardous waste fees and tax. Most STEALERSHIPS are getting close to $100/hr, Add that up and theres your price.
Find an outside mechanic with LESS hourly rate OR heir/seek a local forum member to help you do it. They usually charge pizza and beer.
BC
Find an outside mechanic with LESS hourly rate OR heir/seek a local forum member to help you do it. They usually charge pizza and beer.
BC
 03-21-2010, 08:57 PM
#88
Tech Contributor
Member Since: Dec 1999
Location: Anthony TX
Posts: 32,736
Received 2,180 Likes
on
1,583 Posts
CI 6,7,8,9,11 Vet
St. Jude Donor '08
Once the rubber disk gets hard and stiff, it will no longer flow the required "Air FLOW" to cause the O2 sensors to change the required amount for the test to run properly.
If you cleaned the valve and the code doesn't clear or clears and comes back in a short time,,,just change out the valve. Its not that difficult.
Bill
If you cleaned the valve and the code doesn't clear or clears and comes back in a short time,,,just change out the valve. Its not that difficult.
Bill
03-23-2010, 08:04 AM
#89
Pro


Member Since: Feb 2001
Location: FL
Posts: 606
Likes: 0
Received 0 Likes
on
0 Posts
Cruise-In II Veteran

I think mine is fixed! It's been throwing the P1416 code every few days for 3 months now. I would clear it and it came back in a few days, towards the end it would come back in less than 20 miles! I tried the cleaner spray several times, no better. Finally broke down and bought TWO of the valves at NAPA (about $30). I went to install them, did the right one, it's REAL easy, I looked at doing the other one but couldn't figure out how to get back there and I didn't want to pull things apart to get there. However, since I changed out the RIGHT one there have been NO codes on the left one! I've gone hundreds of miles since then. I'm thinking maybe the right one was stuck OPEN which made the computer think the left one was stuck closed. Anyway, if you're getting the codes, try changing out just the easy one, might help! It's a 5 minute job!
DocOhm....
DocOhm....
Pulling the intake sounds like a lot of work...
This is not as simple as my 1992 Jeep thats for sure...
 03-23-2010, 08:33 AM
#90
Tech Contributor
 05-09-2010, 11:37 AM
#92
Tech Contributor
Not likely. Both check valves would have to fail at the same time, as the P0410 is for both banks not responding. If you only had one check valve malfunction, it would be a P1415/1416....
05-09-2010, 01:01 PM
#94
Tech Contributor
Member Since: Dec 1999
Location: Anthony TX
Posts: 32,736
Received 2,180 Likes
on
1,583 Posts
CI 6,7,8,9,11 Vet
St. Jude Donor '08
The way that the PCM gets satisified with the A.I.R. Test is that the PCM see a specific amount of change in the O2 sensor readings when the pump injects cool fresh air in the exhaust manifolds. If the change isnt with in the range expected, it trips the DTC.
Your either NOT getting any air thru the system to the manifolds OR not enough. Disconnect the inspection fitting near the alternator and see if you get a good steady stream of air at cold start.
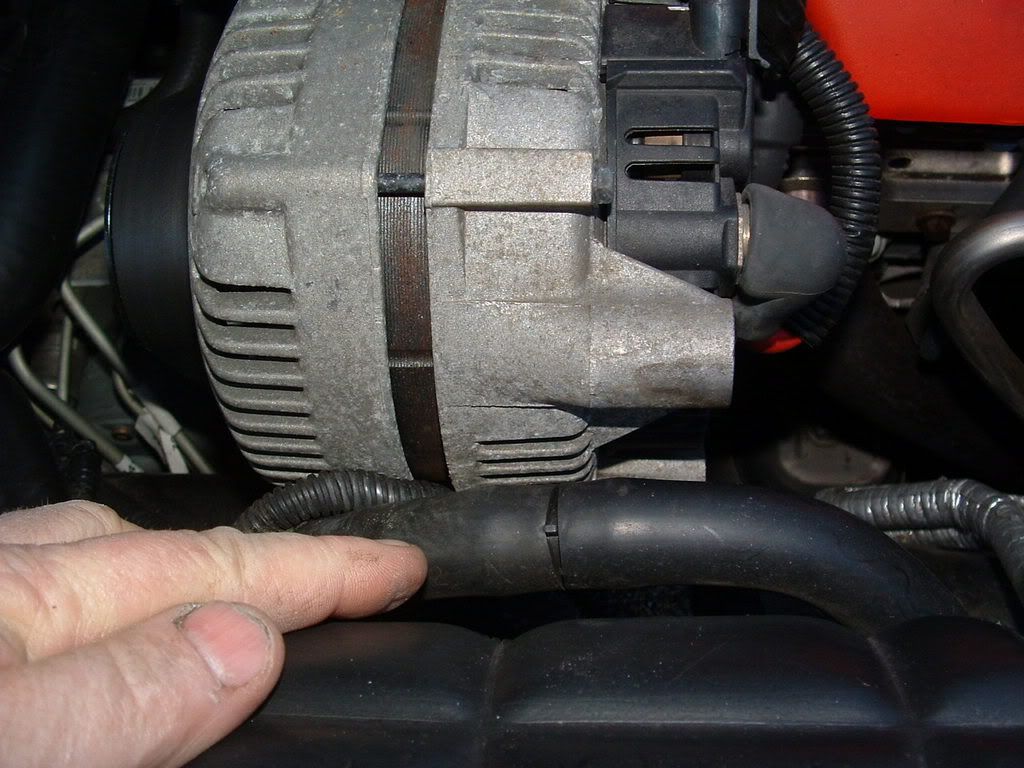
Cool fresh air should come out of the hose coming from the dront of the car:
Your either NOT getting any air thru the system to the manifolds OR not enough. Disconnect the inspection fitting near the alternator and see if you get a good steady stream of air at cold start.
Cool fresh air should come out of the hose coming from the dront of the car:
05-10-2010, 03:02 AM
#95
05-20-2010, 01:14 AM
#96
1st Gear

Member Since: May 2010
Posts: 1
Likes: 0
Received 0 Likes
on
0 Posts
Ok,,,,,I'm going to help put this check valve cleaning procedure in high gear and try to make it so anyone can under stand how to do it and where all the parts are:
The AIR Pump is an electric motor driven pump and is below the drivers side headlight:

The output pipe off the pump is vacuum controlled:
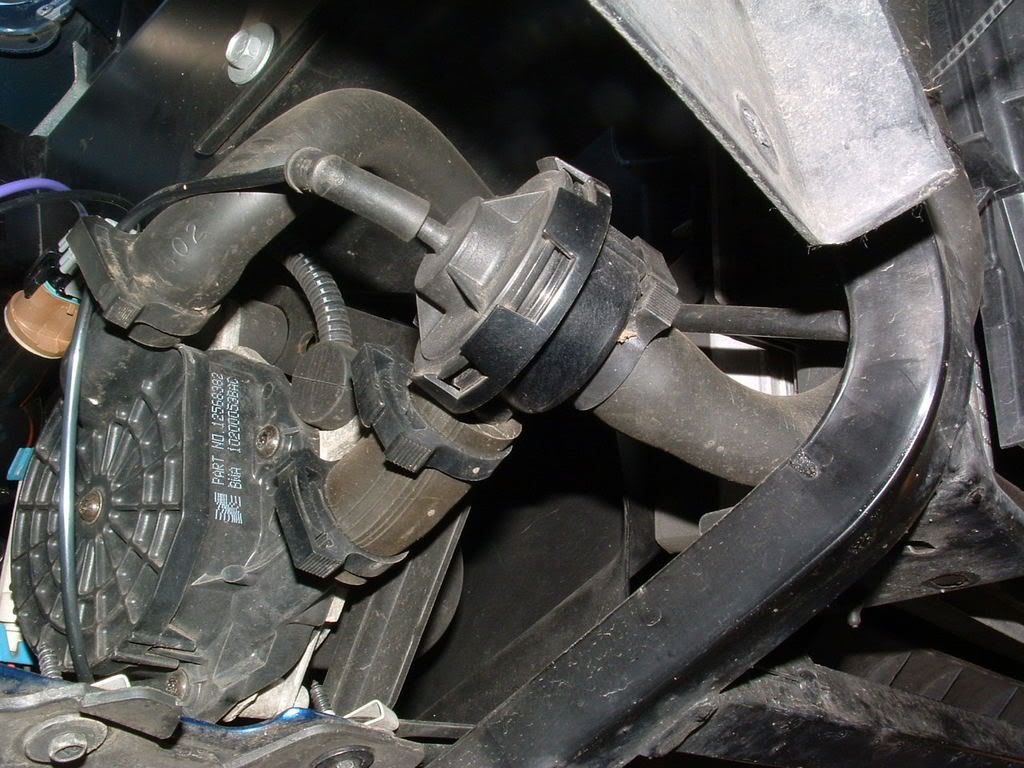
Here is the suction side of the pump. It get clean air from the air box:

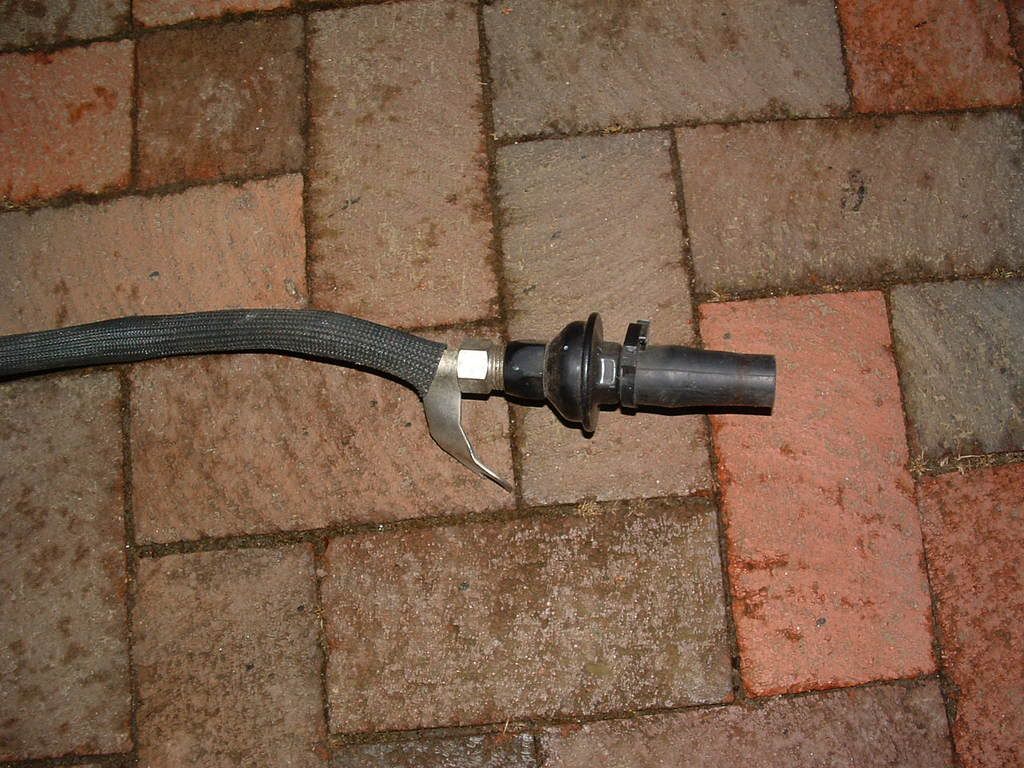
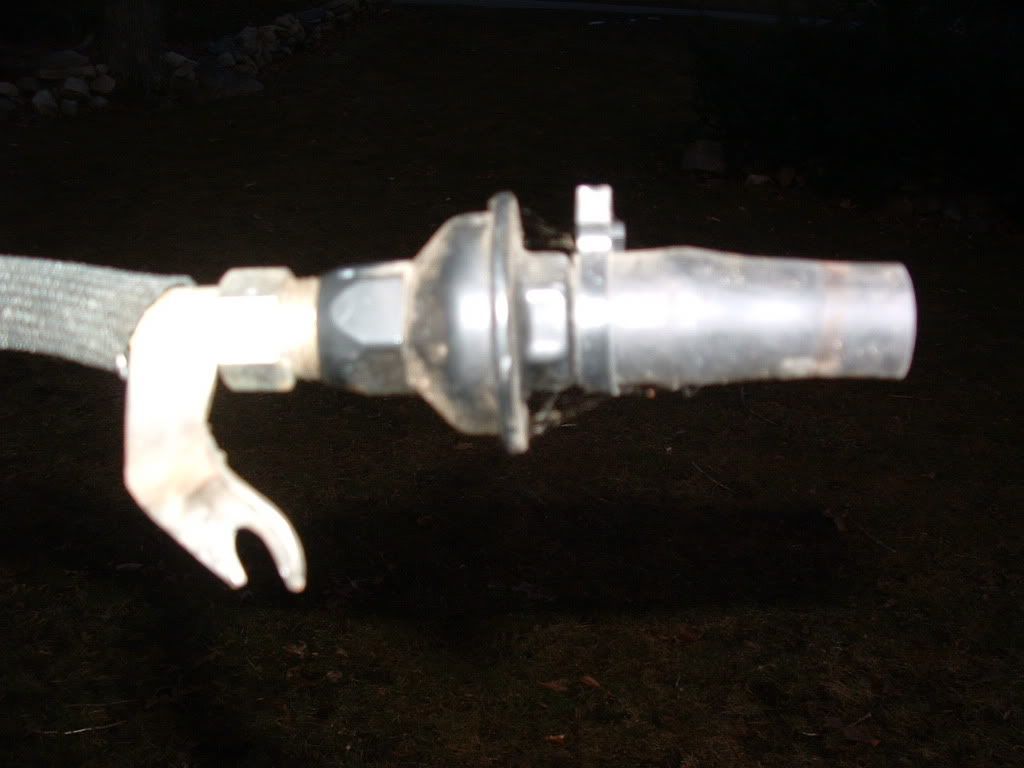
The output tube runs along the drivers side fender well. It has a connector in the center of the pipe that will allow you to disconnect the pump from the rest of the system:
Here is the rubber hose disconnected:
You can disconnect the hose here and conduct the cleaning from this location. Spray some carburetor cleaner in the rubber hose going to the "REAR" (the one pointing UP in the picture above). This will allow cleaner to reach BOTH check valves. Once you give the hose a GOOD shot of carb cleaner, use compressed air to force it through the system.
Once you have forced the cleaner thru, give the hose a good shot of WD-40 and force that through. The CHECK VALVES have a spring loaded disk that seats on a plastic seat. If it gets exhaust reside on the seat, moisture from the cold air will cause the seat to stick shut.
Cleaning it with carb cleaner and WD-40 should allow it to free up.
IF for some reason that the seat is stuck shut bad enough, you may need to remove the hose from the AIR side of the check valve and force chemicals in that individual valve.
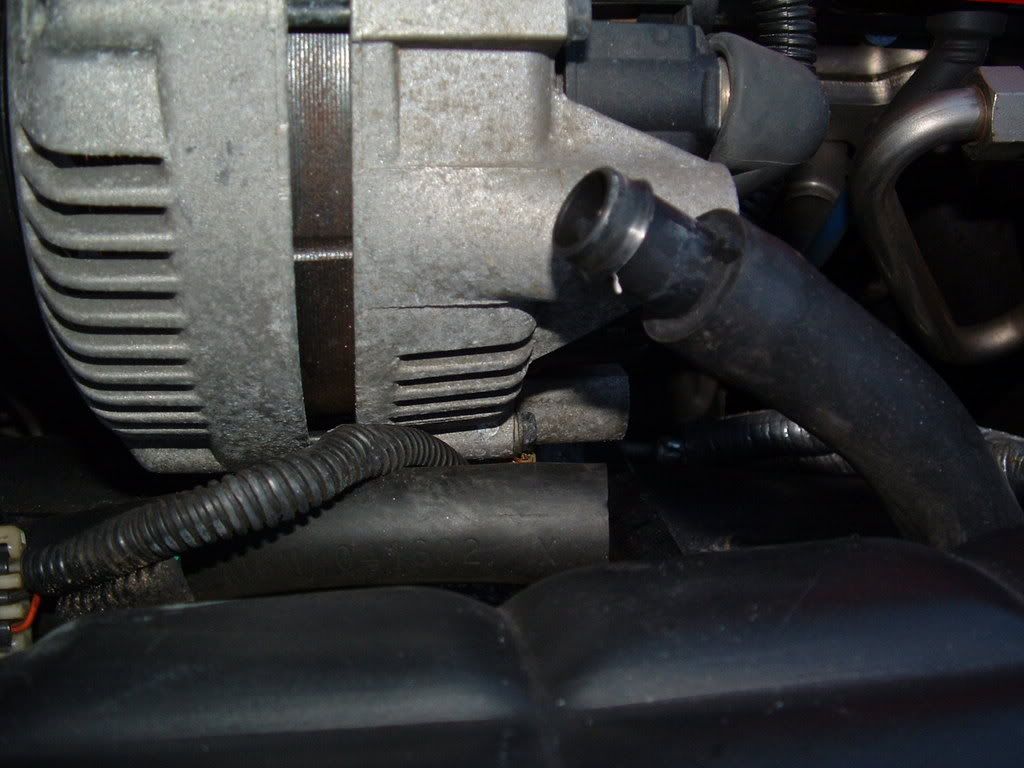
There are TWO check valves. One for the drivers side which is easily serviced and right out in the open:
The one for the passengers side is behind the engine!!!!

 Yep,,it's a royal BITCH to get to. It is possible to get a wrench back there and loosen the retaining bolt BUT,,, like I said,,,you will NOT enjoy the experience. I took some pictures of the passengers side valve at Bowling Green in the museum on the C5 chassis mock-up. You will NOT be able to see this on your car!
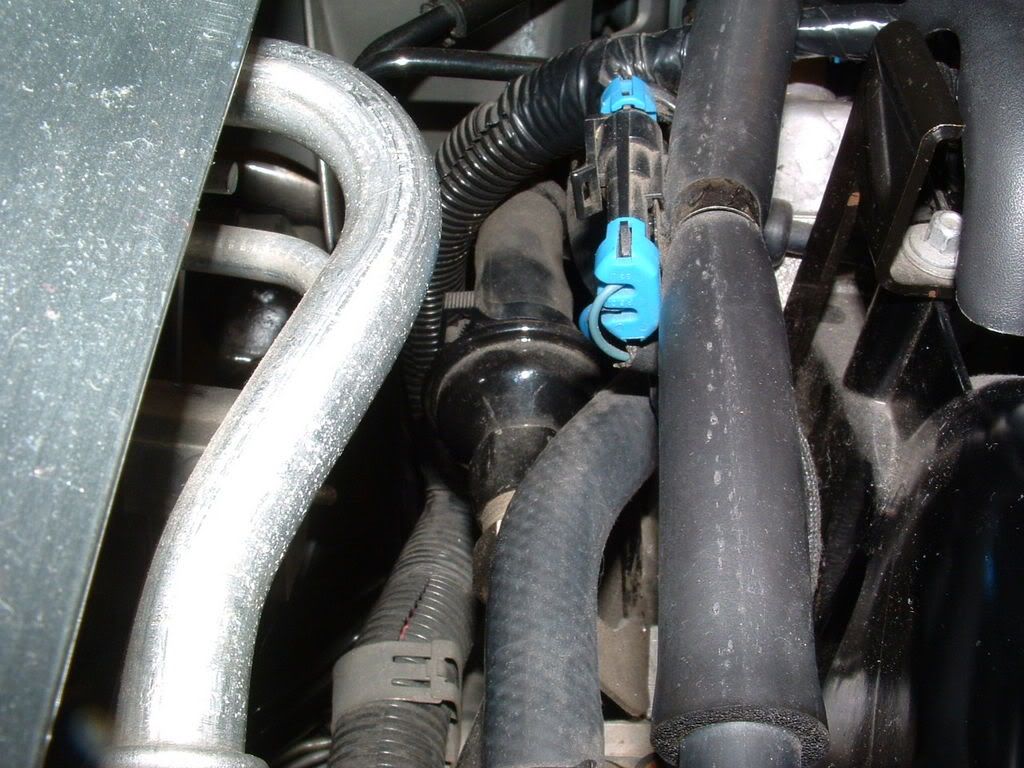

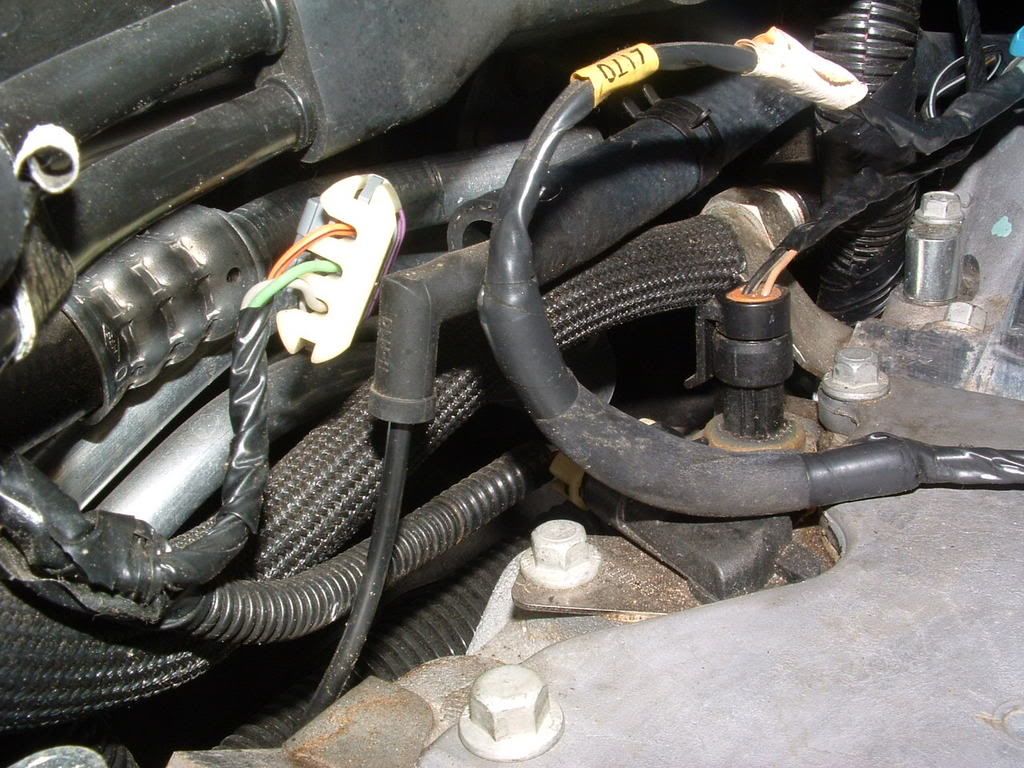
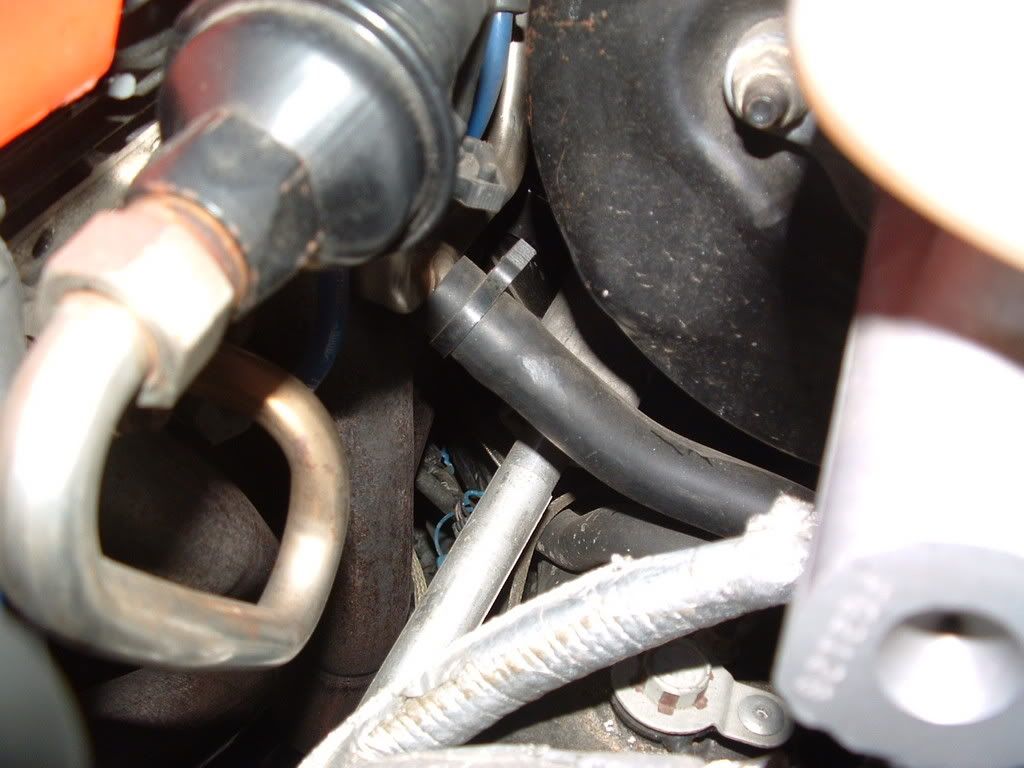
If you need to clean the passengers side valve, you can disconnect the pump air supply hose and the air supply hose from the Y connection at the rear of the engine. The next pics will show you where the Y connection is:
Here is where the AIR supply hose attach�s to the Y connection:
Look to the left of the power brake booster:
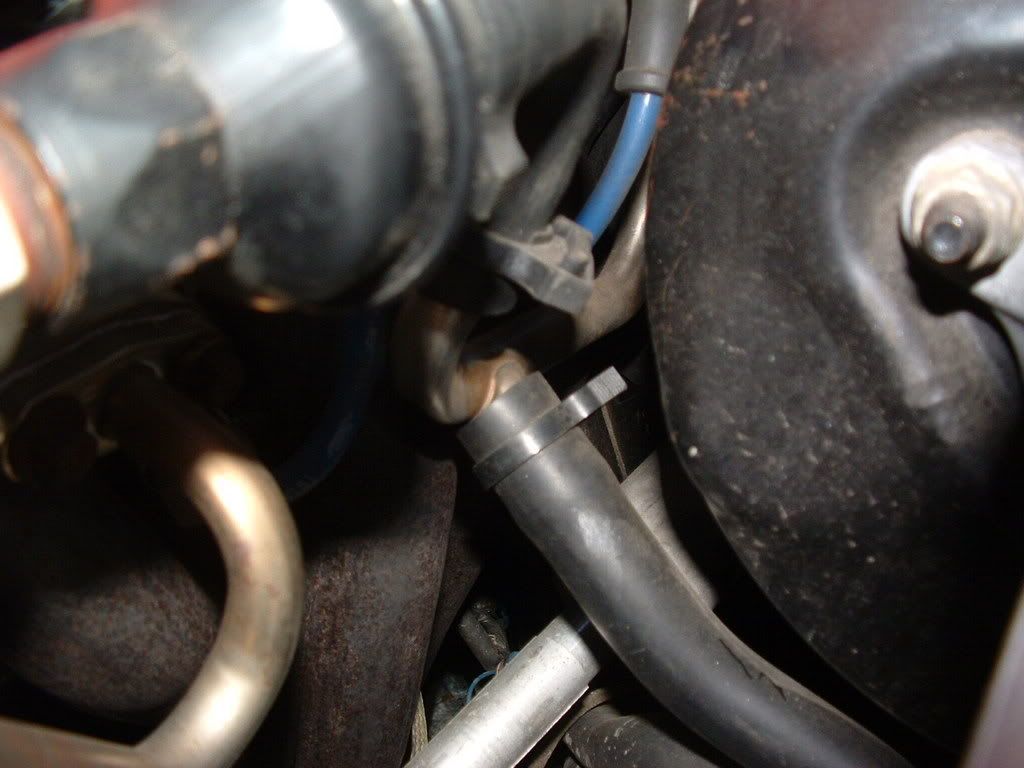

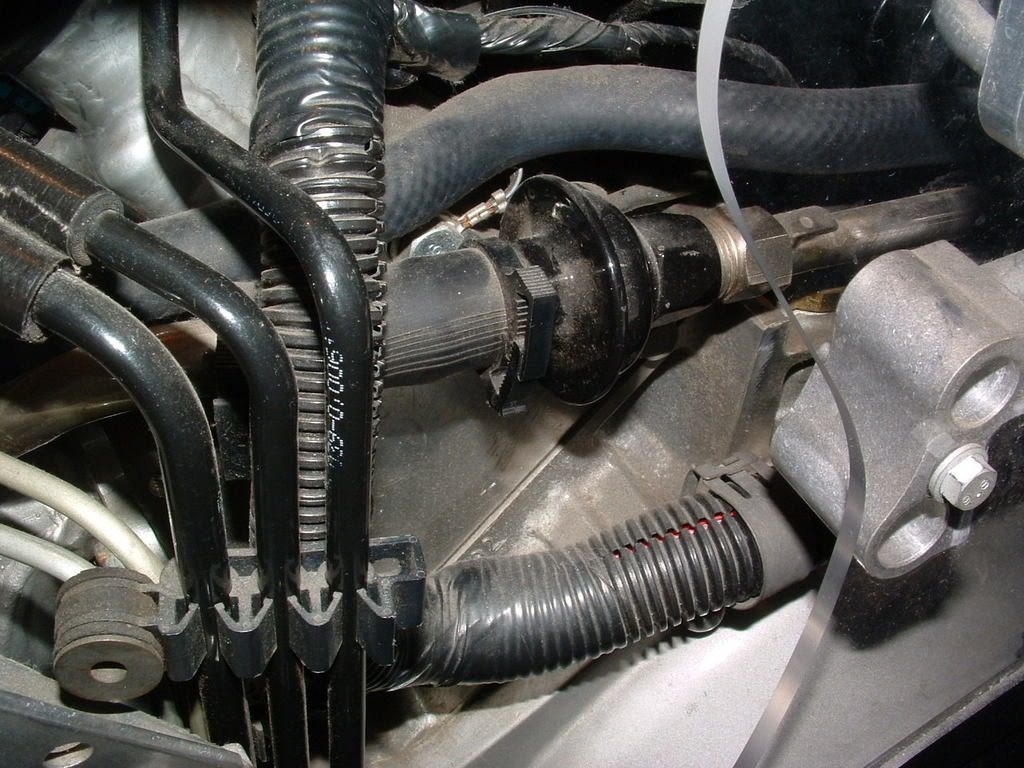
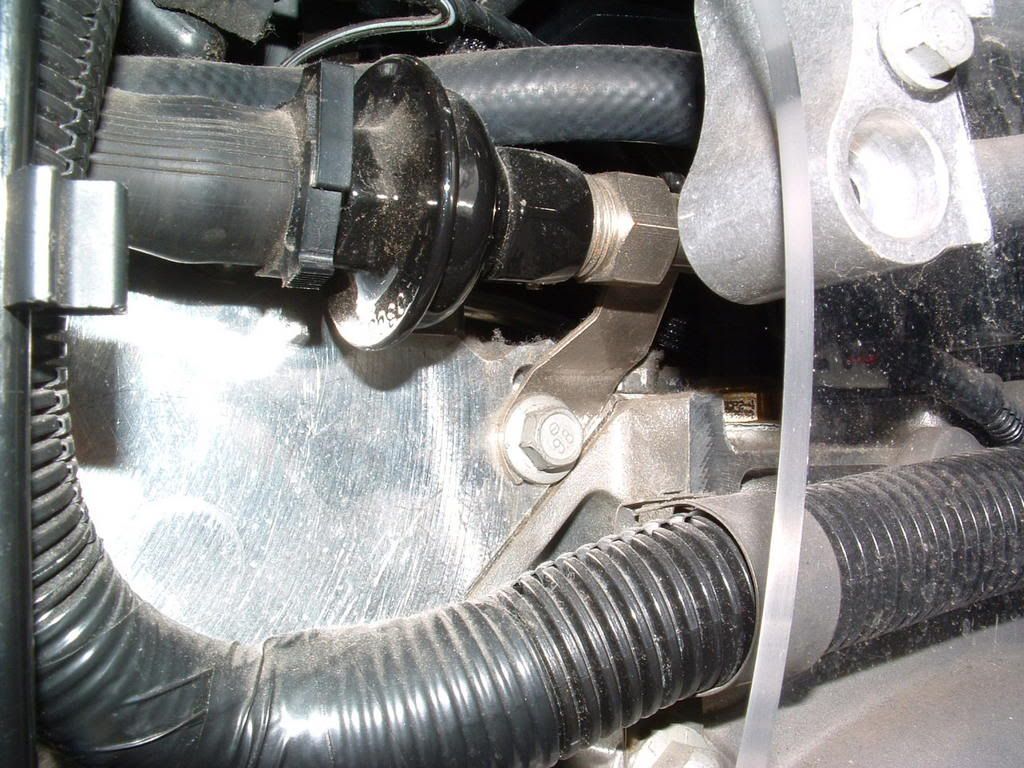
Here is the passenger side check valve, SS pipe and rubber hose fitting:

Hope this helps!
BC
The AIR Pump is an electric motor driven pump and is below the drivers side headlight:
The output pipe off the pump is vacuum controlled:
Here is the suction side of the pump. It get clean air from the air box:
The output tube runs along the drivers side fender well. It has a connector in the center of the pipe that will allow you to disconnect the pump from the rest of the system:
Here is the rubber hose disconnected:
You can disconnect the hose here and conduct the cleaning from this location. Spray some carburetor cleaner in the rubber hose going to the "REAR" (the one pointing UP in the picture above). This will allow cleaner to reach BOTH check valves. Once you give the hose a GOOD shot of carb cleaner, use compressed air to force it through the system.
Once you have forced the cleaner thru, give the hose a good shot of WD-40 and force that through. The CHECK VALVES have a spring loaded disk that seats on a plastic seat. If it gets exhaust reside on the seat, moisture from the cold air will cause the seat to stick shut.
Cleaning it with carb cleaner and WD-40 should allow it to free up.
IF for some reason that the seat is stuck shut bad enough, you may need to remove the hose from the AIR side of the check valve and force chemicals in that individual valve.
There are TWO check valves. One for the drivers side which is easily serviced and right out in the open:
The one for the passengers side is behind the engine!!!!
Yep,,it's a royal BITCH to get to. It is possible to get a wrench back there and loosen the retaining bolt BUT,,, like I said,,,you will NOT enjoy the experience. I took some pictures of the passengers side valve at Bowling Green in the museum on the C5 chassis mock-up. You will NOT be able to see this on your car! If you need to clean the passengers side valve, you can disconnect the pump air supply hose and the air supply hose from the Y connection at the rear of the engine. The next pics will show you where the Y connection is:
Here is where the AIR supply hose attach�s to the Y connection:
Look to the left of the power brake booster:
Here is the passenger side check valve, SS pipe and rubber hose fitting:
Hope this helps!
BC
05-20-2010, 03:08 PM
#97
Race Director

In case I hadn't mentioned this, previously, you should try not to send any petroleum-based liquids through the catalytic converters.
From Allied Muffler's website....
Failed CATs generally occur because of a gradual buildup of "contaminants". Always check the ingredients of any sprays before introducing them into your exhaust.
From Allied Muffler's website....
Oil or antifreeze entering the exhaust system can block the air passages by creating a heavy carbon soot that coats the ceramic catalyst. These heavy carbon deposits create two problems. First, the carbon deposits prevent the catalytic converter from reducing harmful emission in the exhaust flow. And second, the carbon deposits clog the pores in the ceramic catalyst and block exhaust flow, increasing backpressure and causing heat and exhaust to back up into the engine compartment. Your engine may actually draw burnt exhaust gasses back into the combustion chamber and dilute the efficiency of the next burn cycle. The result is a loss of power and overheated engine components. Possible causes are worn piston rings, faulty valve seals, failed gaskets or warped engine components.
05-20-2010, 06:27 PM
#98
Tech Contributor
Member Since: Dec 1999
Location: Anthony TX
Posts: 32,736
Received 2,180 Likes
on
1,583 Posts
CI 6,7,8,9,11 Vet
St. Jude Donor '08
05-20-2010, 09:07 PM
#99
Racer

Member Since: Mar 2010
Location: Houston Tx
Posts: 330
Likes: 0
Received 0 Likes
on
0 Posts
Thx! I'll try the carb cleaner/WD-40 technique to avoid bruised knuckles! I've noticed a weird thing when I run my A/C for a long road trip. Usually after about 1.5 hrs of running the a/c, all of a sudden the output of air drops down and even w/ the fan on max setting, there still isn't much air coming out the vents. I wonder if this valve is the cause of this problem? What does this air pump/valve thingy do anyway?
05-20-2010, 10:52 PM
#100
Tech Contributor
Member Since: Dec 1999
Location: Anthony TX
Posts: 32,736
Received 2,180 Likes
on
1,583 Posts
CI 6,7,8,9,11 Vet
St. Jude Donor '08