
Oil pressure sender relocate
 01-07-2007, 01:57 AM
#21
Le Mans Master


This is a great idea. When I replaced mine on my '98 I was amazed that GM would redesign the entire small block motor and keep the sender in the same location as when the motor had a distributor. Why they didn't figure out an accessible location in the front of the motor is beyond me, especially considering you have to make a several hour repair to accomplish a five minute job. In my street rod I have a Chevy 350 with the sender in the exact same location, but you can see the sender sitting exposed next to the distributor. It probably would even take less than five minutes to replace, except I've never had to since it's a VDO sender with VDO gauges. Why do these Vette senders keep failing so often?
 01-07-2007, 11:50 AM
#22
Burning Brakes


I am hoping that one of the Engineering Companys that manufacture
the Oil Catch Cans will pick up on this and sell it as a complete kit.
Sooner the better!
Maybe even Southern Car Parts.
the Oil Catch Cans will pick up on this and sell it as a complete kit.
Sooner the better!
Maybe even Southern Car Parts.
01-09-2007, 09:55 PM
#24
Burning Brakes

Member Since: Apr 2006
Location: Lincoln NE
Posts: 976
Likes: 0
Received 0 Likes
on
0 Posts
so... Like i said if i blow it again i'm going to relocate it.... well 6500 rpm's later... BLOWN!!!!!  I'm already working with my parts house to build something very very durable and a cake walk to replace... They also ordered my replacement.. should be here in a day or so..
oh an FYI... the idea of oil pressure sensor relocation has been around for sometime... after talking to my partshouse he is about 100% sure there are kits available for this and is lookilng into it for me.
Not trying to take away from the idea because i know many of use would have been stumped... This is a great idea without a doubt... but if anyone is spending money on a patent i say keep it... oh and just for the record i was kidding about patenting it..
I'm already working with my parts house to build something very very durable and a cake walk to replace... They also ordered my replacement.. should be here in a day or so.. oh an FYI... the idea of oil pressure sensor relocation has been around for sometime... after talking to my partshouse he is about 100% sure there are kits available for this and is lookilng into it for me.
Not trying to take away from the idea because i know many of use would have been stumped... This is a great idea without a doubt... but if anyone is spending money on a patent i say keep it...
oh and just for the record i was kidding about patenting it..
01-09-2007, 11:10 PM
#26
Burning Brakes
Member Since: Apr 2006
Location: Lincoln NE
Posts: 976
Likes: 0
Received 0 Likes
on
0 Posts
I'll gather part numbers and the details along with high resolution pics. Might have to wait a week as i'm moving this weekend but i'll see what i can whip up. 
01-10-2007, 08:19 AM
#27
Melting Slicks

 kewl
01-10-2007, 09:30 PM
kewl
01-10-2007, 09:30 PM
#28
Instructor

Member Since: Jan 2007
Location: Frisco Texas
Posts: 163
Likes: 0
Received 0 Likes
on
0 Posts

I just did mine the way Corvette tech did it. Making a small hole above the sensor. Piece of cake! It would take me less than 15 minutes to do it again. Thanks!
01-11-2007, 12:56 PM
#29
Safety Car

Thread Starter
Ok guys, I took one for the team and bought the Park Avenue sensor. Works great on the C5 and the most important part is it lets anyone do the relocate proceedure with common over the counter parts!!! Less the sensor it cost me $8.87.
What's needed:
1. GM part # 12584940 sensor. 97-05 Park Avenue, 00-05 Bonneville, and 00-05 Lesabre. $30.38 at GM Parts Direct. Also Standard # PS401 or Niehoff OP25351.
2. 1/8" pipe thread tap and 21/64" drill bit.
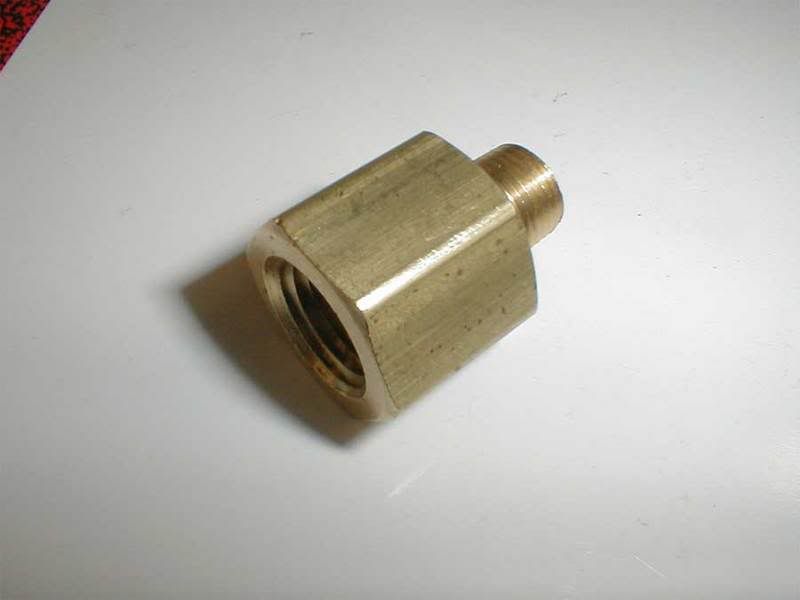
3. 1/4" to 1/8" brass fitting. Napa # 3200x4x2 (SAE# 130139) $3.29 ($4.56 retail).
4. Oil pressure hose kit. 3 choices here:
First you'll need to break out the guts of your defective vette sensor. Then drill out the center with an 21/64" drill then tap it out with your 1/8" pipe thread tap. Go a little at a time testing with the fitting----it's easy to go too deep with these tapered taps. Then thread tape and screw in the male 1/8" fitting from your gauge line/hose kit. Once done it should look like this:
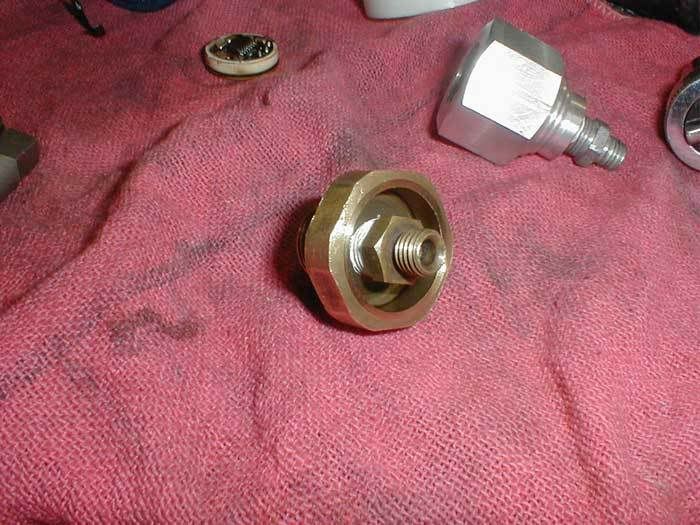
Next take your new Buick/Olds/Pontiac sensor, thread tape it and screw it into your brass adapter. Then thread tape the adapter and screw on the female 1/8" fitting from the gauge line/hose kit.
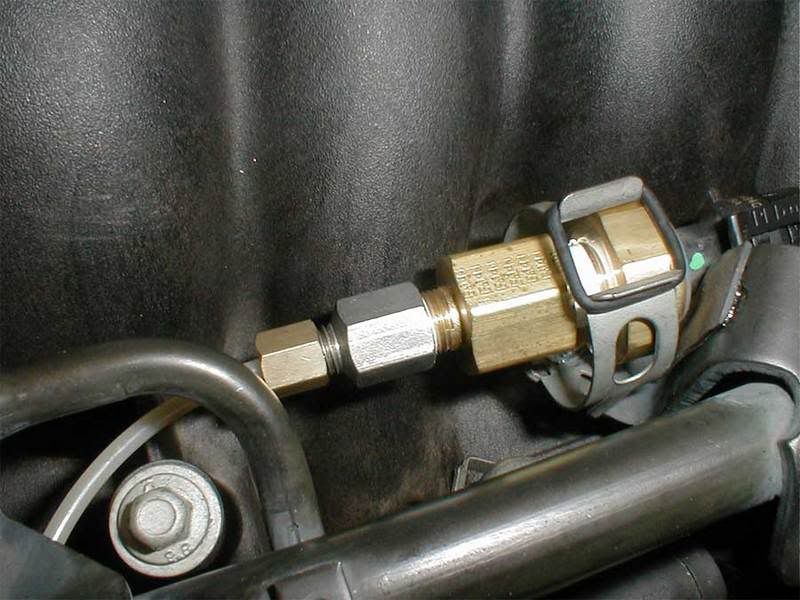
Now it's totally up to you where you put the sensor but I put mine up next to the LH fuel rail---making a little bracket. But I guess you could use zip ties also. Using this location I didn't have to extend the sensor connector wires.
However for the guys using the copper or stainless hose kit---the ends are fixed, i.e. you have to deal with the length (3 foot I think) of hose. Here's where a person can loop around or whatever---but watch for sources of heat and also chaffing.
Just for the heck of it here's a picture of the C5 sensor: http://info.rockauto.com/SMP/SMPDetail3.html?PS308.html
And the Buick sensor: http://info.rockauto.com/SMP/SMPDetail3.html?PS401.html
Who knows, maybe the Buick sensor won't crap out like the C5 replacements--they're brass, not aluminum. But at the very least using it enables one to easily relocate the sensor ----without having to make or find a funky 16 X 1.5mm to 1/8" pipe thread adapter.
Anyway I hope this helps----NOW GET TO PLUMBING!!!
Edit If you don't want to shell out the old sensor and tap it to 1/8" you might want to pick up part number ATM-2268 from here: http://www.egauges.com/vdo_acce.asp?...pters&Manf=All or from Summit Racing . I've not bought one but from the description it's spot on what we need: 1/8 NPT female x M16 X 1.5 male---making this a true bolt on/mail order/credit card/wait for the UPS truck mod! Is it me or am I the only one who gets excited when he hears that truck pull in the drive way?
Edit IIOne of the eagle eyed forum members pointed out a discrepancy. The correct number for the Napa brass fitting above should be3200x4x2, not 3400x4x2 as previously mentioned.
What's needed:
1. GM part # 12584940 sensor. 97-05 Park Avenue, 00-05 Bonneville, and 00-05 Lesabre. $30.38 at GM Parts Direct. Also Standard # PS401 or Niehoff OP25351.
2. 1/8" pipe thread tap and 21/64" drill bit.
3. 1/4" to 1/8" brass fitting. Napa # 3200x4x2 (SAE# 130139) $3.29 ($4.56 retail).
4. Oil pressure hose kit. 3 choices here:
a. Nylon--what I used. Napa # 7012109 $13.68. Seen them for less than $6 elsewhere.
b. Copper. Napa # 7012154 $10.99.
c. -3 Braided Stainless. SummitRacing # ATM-3234 $29.75
And that's it---now what to do. First you'll need to break out the guts of your defective vette sensor. Then drill out the center with an 21/64" drill then tap it out with your 1/8" pipe thread tap. Go a little at a time testing with the fitting----it's easy to go too deep with these tapered taps. Then thread tape and screw in the male 1/8" fitting from your gauge line/hose kit. Once done it should look like this:
Next take your new Buick/Olds/Pontiac sensor, thread tape it and screw it into your brass adapter. Then thread tape the adapter and screw on the female 1/8" fitting from the gauge line/hose kit.
Now it's totally up to you where you put the sensor but I put mine up next to the LH fuel rail---making a little bracket. But I guess you could use zip ties also. Using this location I didn't have to extend the sensor connector wires.
However for the guys using the copper or stainless hose kit---the ends are fixed, i.e. you have to deal with the length (3 foot I think) of hose. Here's where a person can loop around or whatever---but watch for sources of heat and also chaffing.
Just for the heck of it here's a picture of the C5 sensor: http://info.rockauto.com/SMP/SMPDetail3.html?PS308.html
And the Buick sensor: http://info.rockauto.com/SMP/SMPDetail3.html?PS401.html
Who knows, maybe the Buick sensor won't crap out like the C5 replacements--they're brass, not aluminum. But at the very least using it enables one to easily relocate the sensor ----without having to make or find a funky 16 X 1.5mm to 1/8" pipe thread adapter.
Anyway I hope this helps----NOW GET TO PLUMBING!!!
Edit If you don't want to shell out the old sensor and tap it to 1/8" you might want to pick up part number ATM-2268 from here: http://www.egauges.com/vdo_acce.asp?...pters&Manf=All or from Summit Racing . I've not bought one but from the description it's spot on what we need: 1/8 NPT female x M16 X 1.5 male---making this a true bolt on/mail order/credit card/wait for the UPS truck mod! Is it me or am I the only one who gets excited when he hears that truck pull in the drive way?
Edit IIOne of the eagle eyed forum members pointed out a discrepancy. The correct number for the Napa brass fitting above should be3200x4x2, not 3400x4x2 as previously mentioned.
Last edited by 426 Hemi; 07-04-2009 at 07:44 PM.
01-11-2007, 01:39 PM
#31
Team Owner


We don't do it to customers cars (unless they ask) but for our own cars we've just lifted the wiper cover (the 5 pins and wiper blades) and cut a hole in the plastic tray underneath (about 4-5 inches square). I've got a deep socket that I turned down to be thin enough to fit between the crossover plug bolt and the sensor. We were having some problems with sensors for a while also. With this method I can change a sensor in about 20-30 minutes.
I'm not saying it's an elequent solution, but I am saying it works and you can't see anything when you put the cover back on. Just mentioning it as another alternative.
I'm not saying it's an elequent solution, but I am saying it works and you can't see anything when you put the cover back on. Just mentioning it as another alternative.
01-11-2007, 01:49 PM
#32
6th Gear

Member Since: Sep 2005
Posts: 6
Likes: 0
Received 0 Likes
on
0 Posts
hey 426 hemi,did you get "your" patent registered yet?the buick sensor makes much more sense than relocating another piece of crap.it nice to have members giving out ideas w/ o trying to make money off of us end users.great job,now to figure out the small cup holder,right. what a gangsta idea....
 01-11-2007, 06:46 PM
#34
Burning Brakes
Looks well engineered!
Are you satisfied with the pressure readings you are getting from
sensor #12584940. Any drawbacks at all to this setup?
Thanks for all the information.
Are you satisfied with the pressure readings you are getting from
sensor #12584940. Any drawbacks at all to this setup?
Thanks for all the information.
01-11-2007, 07:29 PM
#35
Safety Car
Thread Starter
Draw backs? About the hardest part is tapping the hole in the old sensor---actually pretty easy. I'm sure anyone here can handle that. Positive most of us have done this at one time or another.
01-11-2007, 10:36 PM
#36
Team Owner
..........
Just for the heck of it here's a picture of the C5 sensor: http://info.rockauto.com/SMP/SMPDetail3.html?PS308.html
And the Buick sensor: http://info.rockauto.com/SMP/SMPDetail3.html?PS401.html
Who knows, maybe the Buick sensor won't crap out like the C5 replacements--they're brass, not aluminum. But at the very least using it enables one to easily relocate the sensor ----without having to make or find a funky 16 X 1.5mm to 1/8" pipe thread adapter.
Anyway I hope this helps----NOW GET TO PLUMBING!!!
 I'm bummed out that Standard (PS-308) has gone aluminum. Mine was still brass when I replaced my sender a few years ago. Still no leaks.
01-12-2007, 12:22 AM
I'm bummed out that Standard (PS-308) has gone aluminum. Mine was still brass when I replaced my sender a few years ago. Still no leaks.
01-12-2007, 12:22 AM
#37
Former Vendor
You could also install the sensor in the front of the block, drivers side, lower rail.
Remove the factory plug (same thread as the oil pressure sender) and lengthen the electrical connections.
Remove the factory plug (same thread as the oil pressure sender) and lengthen the electrical connections.
01-12-2007, 12:35 AM
#38
Team Owner
01-12-2007, 02:50 AM
#39
Former Vendor
Member Since: Feb 2004
Location: Las Vegas NV
Posts: 10,876
Likes: 0
Received 8 Likes
on
7 Posts
St. Jude Donor '06 & '12
Thats where I relocated mine to.
We tested the pressure with a mechanical guage before wrapping it up, and it worked perfectly.
I can change it in a matter of minutes.
We tested the pressure with a mechanical guage before wrapping it up, and it worked perfectly.
I can change it in a matter of minutes.
