
[PICS]-FUEL GAGE FIX IN <2 HOURS; SENDER REM'D AND CLEANED
 09-12-2005, 10:10 PM
#1
Le Mans Master

Thread Starter
Member Since: Sep 2003
Location: Farmington CT
Posts: 6,125
Received 160 Likes
on
125 Posts
Cruise-In VII Veteran

in june i rem'd my pass. side sending unit and cleaned the contacts-it's worked 100% since then; recently a local forum member spinedoc77 had the same prob(fuel gage working erratictly or not all)used the same cleaning technique as before and fixed the prob--i will edit and post picks shortly--btw, techron and switching brands of gas is a known fix for some, didn't work for me(please don't post about these topics)
it's a good idea to carry a 1 gallon gas can and let the car run out of gas completely(you'll know about 1/4 mile before the car is empty when it starts to cut out)then use the range compared to the mpg until you have time to pull the sender;
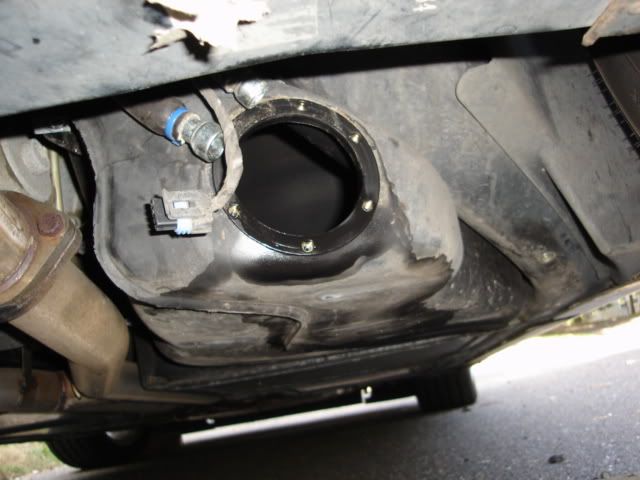
w/ the car on ramps or lift, rem the stamped steel shield(5 13mm bolts), rem elec plug, rem rubber hats on fuel lines, pry the 4 metal tabs or use fuel disco tool on the inside of the hose ends to clear the flare on sender supply and return lines(the lines will need to be twisted while being rem'd), rem plug, rem the screws holding the sender/jet pump, you will need to turn sender assy as req'd for removal, get some fresh air
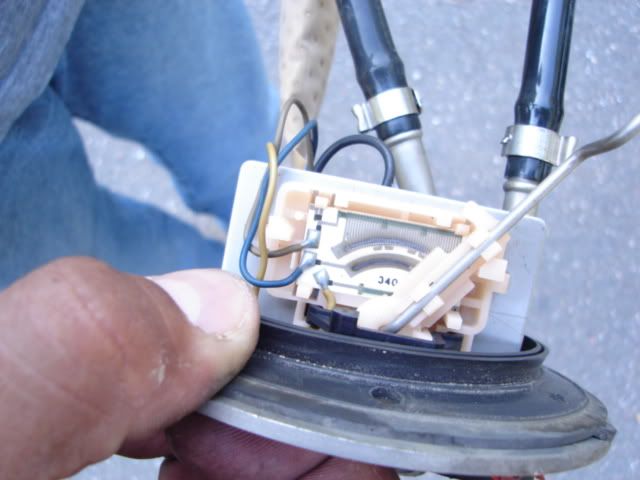
there it is, the contacts will look like they are 'welded' together at some points(the pic doesn't do this justice)macro mode? can't find
clean w/ contacts w/ brake/parts cleaner and q-tip, the cotton will turn black from the build-up of gunk
that's the fix, during re-assy note the index mark at 2o'clock for the sender,gasket and tank, also make sure the 4 tabs in each fuel line are bent back and once lines are installed give them a pull to make sure the tabs are past the flare, ck for leaks and be impressed that you actually have a fuel gage(cool feature) i tried to burn the fuel that was on the driveway, but it didn't work, park car far away first

spinedoc77's silver vert(notice how the carmine 98 looks w/out the front tire/fender gap in the background)
btw--if you let the fuel run dry and use the procedure i described there won't be a need to catch any gas from the pass. tank and this should take <1 hour to complete
it's a good idea to carry a 1 gallon gas can and let the car run out of gas completely(you'll know about 1/4 mile before the car is empty when it starts to cut out)then use the range compared to the mpg until you have time to pull the sender;
w/ the car on ramps or lift, rem the stamped steel shield(5 13mm bolts), rem elec plug, rem rubber hats on fuel lines, pry the 4 metal tabs or use fuel disco tool on the inside of the hose ends to clear the flare on sender supply and return lines(the lines will need to be twisted while being rem'd), rem plug, rem the screws holding the sender/jet pump, you will need to turn sender assy as req'd for removal, get some fresh air
there it is, the contacts will look like they are 'welded' together at some points(the pic doesn't do this justice)macro mode? can't find
clean w/ contacts w/ brake/parts cleaner and q-tip, the cotton will turn black from the build-up of gunk
that's the fix, during re-assy note the index mark at 2o'clock for the sender,gasket and tank, also make sure the 4 tabs in each fuel line are bent back and once lines are installed give them a pull to make sure the tabs are past the flare, ck for leaks and be impressed that you actually have a fuel gage(cool feature)
i tried to burn the fuel that was on the driveway, but it didn't work, park car far away first spinedoc77's silver vert(notice how
the carmine 98 looks w/out the front tire/fender gap in the background)btw--if you let the fuel run dry and use the procedure i described there won't be a need to catch any gas from the pass. tank and this should take <1 hour to complete

The following users liked this post:
HammerheadTed (06-19-2016)

 very cool!

 Good job.
09-12-2005, 10:43 PM
Good job.
09-12-2005, 10:43 PM
#6
Le Mans Master
Thread Starter
Member Since: Sep 2003
Location: Farmington CT
Posts: 6,125
Received 160 Likes
on
125 Posts
Cruise-In VII Veteran
if anyone is in the northeast that has the common fuel gage problem and needs a hand w/ the fix, let me know; i've fixed 2 cars w/ this process and my fuel gage has worked w/ no probs since the sender cleaning a few months ago
09-12-2005, 10:56 PM
#7
Melting Slicks


Great post...as my uncle always said...
If it is electrical and doesn't work, look first for corrosion on the contacts. This is from a guy that owns 11 classic British and German sports cars.
So true.
If it is electrical and doesn't work, look first for corrosion on the contacts. This is from a guy that owns 11 classic British and German sports cars.
So true.
09-13-2005, 09:20 PM
#9
Race Director

Originally Posted by connecticut
in june i rem'd my pass. side sending unit and cleaned the contacts-it's worked 100% since then; recently a local forum member spinedoc77 had the same prob(fuel gage working erratictly or not all)used the same cleaning technique as before and fixed the prob--i will edit and post picks shortly--btw, techron and switching brands of gas is a known fix for some, didn't work for me(please don't post about these topics)
it's a good idea to carry a 1 gallon gas can and let the car run out of gas completely(you'll know about 1/4 mile before the car is empty when it starts to cut out)then use the range compared to the mpg until you have time to pull the sender;
w/ the car on ramps or lift, rem the stamped steel shield(5 13mm bolts), rem elec plug, rem rubber hats on fuel lines, pry the 4 metal tabs or use fuel disco tool on the inside of the hose ends to clear the flare on sender supply and return lines(the lines will need to be twisted while being rem'd), rem plug, rem the screws holding the sender/jet pump, you will need to turn sender assy as req'd for removal, get some fresh air
there it is, the contacts will look like they are 'welded' together at some points(the pic doesn't do this justice)macro mode? can't find
clean w/ contacts w/ brake/parts cleaner and q-tip, the cotton will turn black from the build-up of gunk
that's the fix, during re-assy note the index mark at 2o'clock for the sender,gasket and tank, also make sure the 4 tabs in each fuel line are bent back and once lines are installed give them a pull to make sure the tabs are past the flare, ck for leaks and be impressed that you actually have a fuel gage(cool feature) i tried to burn the fuel that was on the driveway, but it didn't work, park car far away first
spinedoc77's silver vert(notice how the carmine 98 looks w/out the front tire/fender gap in the background)
btw--if you let the fuel run dry and use the procedure i described there won't be a need to catch any gas from the pass. tank and this should take <1 hour to complete
it's a good idea to carry a 1 gallon gas can and let the car run out of gas completely(you'll know about 1/4 mile before the car is empty when it starts to cut out)then use the range compared to the mpg until you have time to pull the sender;
w/ the car on ramps or lift, rem the stamped steel shield(5 13mm bolts), rem elec plug, rem rubber hats on fuel lines, pry the 4 metal tabs or use fuel disco tool on the inside of the hose ends to clear the flare on sender supply and return lines(the lines will need to be twisted while being rem'd), rem plug, rem the screws holding the sender/jet pump, you will need to turn sender assy as req'd for removal, get some fresh air
there it is, the contacts will look like they are 'welded' together at some points(the pic doesn't do this justice)macro mode? can't find
clean w/ contacts w/ brake/parts cleaner and q-tip, the cotton will turn black from the build-up of gunk
that's the fix, during re-assy note the index mark at 2o'clock for the sender,gasket and tank, also make sure the 4 tabs in each fuel line are bent back and once lines are installed give them a pull to make sure the tabs are past the flare, ck for leaks and be impressed that you actually have a fuel gage(cool feature)
i tried to burn the fuel that was on the driveway, but it didn't work, park car far away first spinedoc77's silver vert(notice how
the carmine 98 looks w/out the front tire/fender gap in the background)btw--if you let the fuel run dry and use the procedure i described there won't be a need to catch any gas from the pass. tank and this should take <1 hour to complete
I watched my mechanic at the dealership doing another car.. As soon as he pulled it out I saw the crap built upon the contacts..I said it only need to be cleaned.... The mechanic continued replacing the unit anyway..
I know when mine starts acting up where I can't get it to read anymore I will pull em and clean em..
I find it hard to believe a $50K car has such a crappy fuel gauge design.. I have a 1993 nissan altima with over 250,000 miles buring GOD knows what gas.... NEVER had a guage problem...
 09-13-2005, 10:08 PM
#11
Le Mans Master
Thread Starter
Member Since: Sep 2003
Location: Farmington CT
Posts: 6,125
Received 160 Likes
on
125 Posts
Cruise-In VII Veteran
dahm, use discretion and common sense, obviously this works if living in rural areas, let's get back on the topic of the thread as forum rules dictates, nuff said
 09-14-2005, 08:40 AM
#13
Advanced


Member Since: Apr 2003
Location: Greenville SC
Posts: 57
Likes: 0
Received 0 Likes
on
0 Posts

This is a great post as I too just found my gas gauge went from half full to empty. I heard that the gauges cost about $300 so I will also be trying to clean my unit. Did you reuse the same gasket and did you have any problems with leaking? Should some sealent be used with the gasket? The biggest problem is getting the gas out of the tank. I kind of hate to run the car out of gas to empty the tank. Can you drain the tank by catching the gas in a catch can when you start to remove the pump unit or will the tank drain when you disconnect the fuel lines?
09-14-2005, 07:17 PM
#14
Le Mans Master
Thread Starter
Member Since: Sep 2003
Location: Farmington CT
Posts: 6,125
Received 160 Likes
on
125 Posts
Cruise-In VII Veteran
no sealant, i reused gasket(rubber), getting the gas out of the tank is a pita, once the lines are disco, you can catch the gas in a bucket, but then you have to rem 4 or 5 of the sender screws and let the tank drain the rest of the way.
Ethanol--i think the change from mtbe to ethanol is giving us problems here in CT, i've seen some sensors that look like the contacts are welded together, if you can't clean them completely then time for a new sender
Ethanol--i think the change from mtbe to ethanol is giving us problems here in CT, i've seen some sensors that look like the contacts are welded together, if you can't clean them completely then time for a new sender
09-15-2005, 06:34 PM
#15
Drifting

Member Since: Jul 2002
Location: Spring Tx
Posts: 1,613
Likes: 0
Received 0 Likes
on
0 Posts
I am still trying to figure out why mine on its way to failing and on its way to working again[using the Berryman] would work perfectly for 30-50 miles then stop, only to start working again by simply turning the engine off and restarting.I suspect I will have the problem again as my guage is not showing 100% full on fill ups, which it did after three tankfuls using the Berrymans.
09-15-2005, 07:01 PM
#16
Le Mans Master
Thread Starter
Member Since: Sep 2003
Location: Farmington CT
Posts: 6,125
Received 160 Likes
on
125 Posts
Cruise-In VII Veteran
there's about 30 individual contacts, you're prolly getting 90%of them cleaned w/ the b.mans, the other few screw up the gage when the arm is swept in that area
09-20-2005, 07:48 PM
#17
Racer
Member Since: Feb 2004
Location: Sunny Melbourne FL
Posts: 251
Likes: 0
Received 0 Likes
on
0 Posts
Thanks for the write up.
Mine went smoothly, and i will post if the guage continues to work. So far so good. I put 500 miles a week on my 2000 6spd so I should know very soon if it works.
Additions to the write up.
1. Remove the float arm (two sets of plastic locks....easy)and inspect the contacts, mine were worse that the field of contacts you pictured. I hit mine with some 400 grit sand paper, amazing difference.
2. There is another sending unit on the drivers side as well, I could not tell if you did both in the write up.
3. Install EVERYTHING before going to the gas station to add your 19.55 gallons of fuel. I waited to put the metal covers over both sides only to find out that the tanks settle down about 1.5 inches when full. I had to use a floor jack help me align the bolts. Since the tanks weigh 120-140lbs together when full.
4. Ran out put in 2 gallons, drove 26 miles........and did not spill any gas. The way I can figure there was about 0.5-1.0 gallons left but lifting the rear 18" off the ground lets the fuel pool to the front of the tanks.
Even with my shinanigans (SP?) it took less that 2 hours to complete.
09-20-2005, 08:25 PM
#18
Le Mans Master
Thread Starter
Member Since: Sep 2003
Location: Farmington CT
Posts: 6,125
Received 160 Likes
on
125 Posts
Cruise-In VII Veteran
400 GRIT SANDPAPER!! i should try that next time, makes sense, just rem'ing the corrosion and leaving the contacts behind clean, that's the key--to seperate the contacts from the corrosion to get the sender to work again, and i only rem the pass side sender; on my car i used brake cleaner and some qtips--has been working fine for the past 5 months, on spinedoc77's car i did the same thing, but didn't work, the 400grit would prolly fix it, but looks like a new sender is on the way
 09-29-2005, 06:31 PM
#20
Burning Brakes


Member Since: Apr 2004
Location: Olympia WA
Posts: 857
Likes: 0
Received 0 Likes
on
0 Posts
Originally Posted by pgeorge33
Thanks for the great detail and pics. Once I figure out how to get the car on my lift, I'll give it a try!!! Can't seem to get the feet of the lift under the strap down points.
