

 03-06-2015, 05:34 PM
Last edit by: IB Advertising
See related guides and technical advice from our community experts:
Browse all: General How-Tos
- C5 Corvette: General Specifications and Information
Important information to help you understand your Corvette.
Browse all: General How-Tos

Weights, measurements, ratios, strengths, etc
12-24-2004, 06:45 PM
#1
Safety Car

Thread Starter

Member Since: Nov 2003
Location: San Diego, CA "leaf" "tee" "e"
Posts: 4,979
Likes: 0
Received 5 Likes
on
4 Posts

Common Problems
Leaking Battery
Many C5's came with AC Delco Freedom batteries that tend to have the case crack near the battery posts. The leaking battery acid would drip down the side of the battery, down the funnel-like battery support, straight down onto the PCM and the wiring loom. It can also get onto the A/C lines. I believe they are the vacuum lines that control the movement of the interior vents, and usually the system will default to blowing out the defroster vent. Sometimes car crippling damage would occur, sometimes not. It worst it would mean replacing the battery, the PCM, the wiring harness, grinding the rust off the frame to repaint it, changing the A/C lines and possibly swapping out another computer as well. This mostly happened on early C5�s because later C5�s used a gel-type battery that cannot leak, but I believe the problem resurfaced on �04 or �05 models again.
Check this out before buying a C5. Use a 8 mm monkey wrench, preferably a ratcheting closed-end version, to removed the battery cables. You also remove a holding block on the front side of the battery. You will need a long extension to reach it. The battery lifts out, then remove the black plastic battery tray. Look under the tray for rust or white powder--signs of evidence of battery acid damage. It would probably be best to move to the next Vette unless you don't mind possibly tackling this repair in the future. It's possible that the car will throw codes for no apparent reason.
No matter what Vette you buy, replace the battery with a gel-type battery, like the Optima Redtop, sold at CostCo for $100.
Grounding Problems aka CRAZY electrical gremlins!
Bill Curlee has a great thread on the problems that corroded ground connections can create, and how to clean out the grounds. The most problematic ground connections are behind the headlights on both sides. Check out Bill�s thread for detailed info: Go!
Here�s where all the grounds are: Go!
Water Intrusion
Water leaks have several ways of getting in the car, and none of them AFAIK are very difficult to fix. Proper adjustments and maintenance will prevent most leaks.
Bill Curlee�s thread abouting locating & cleaning the udders, and sealing the door hinges.
Here�s a few TSB�s from the CorvetteActionCenter.com:
1997-1998: Service Bulletin: Waterleak Above Door Glass (Reseal Blowout Clip)
1997-2002: Service Bulletin: General Waterleak Guide
1997: Service Bulletin: Water Drips into Rear Compartment After Hatch/Glass Has Been Opened
Seats
Corvette seats are delicate. Sliding hard across the bolster can break it, causing it to flap side-to-side. The leather is cheap, and there's little protection for it. It will wear out and form cracks, which is normal�for cheap leather.
The wire springs in the seat bottom, and the bars in the bolsters can also wear thru the foam and leather, but that can be fixed by placing layer of burlap between the springs and the foam.
Check the black plastic surround on the bottom of the seat to make sure it fits snugly against the leather, and isn't cracked. Older style plastic surrounds had a tendency to separate from the seat, but could be pushed back in. The newer style plastic surrounds can be used as a direct replacement, but one of the plastic studs may need to be ground off, or a hole will need to get punched into the leather.
The seats tend to rock back and forth by about a 1/4" during acceleration and braking. It can be fixed, but GM will not fix it. Some lucky owners can get the dealer to replace the frame under warranty. The seat backs swinging forward under braking is normal, and not considered a problem.
Here are a couple fixes:
Corvettemechanic.com --- must be a member
Rocking Seat Fix
Seat choice
Get the sport seats. The sport seats have a hole under the headrest. Some people put racing harness belts thru those loops. The seat frames and foam in both seats are interchangeable. Harness belt holes can be installed using Ford harness cutouts. Ask the dealership for them, they should know what it is without a part #. The foam in a standard seat will need to be cut, and sewing will have to be done, but it�s an easy job.
Headlight bezel plugs
There are 1-1/2" plugs that are located on the headlight bezels that would fall off on the older Vette's. The new style plugs, have a twist-lock to prevent them from falling out, but also requires new bezels. Only the new bezels & plugs are available now, and they are compatible with older C5�s.
Headlight gears
The gears in the headlight motor are plastic, and wear out over time. Ice, heavy Euro or projector headlights and twilight sentinal will cause the gears to wear out quickly. Fortunately a few years ago, Rodney started selling replacement brass gears, check out his website. Corvette America and probably a few other vendors now sell their own copy of his brass gears. Here�s a thread that shows how to replace the gears.
Replacement nylon gears are also available from Motormite Help!, part #42400 for $10-13. Src
To replace:
Torque Settings
All Data Diy
Headlamp Mounting Bolts 20 N.m (15 lb ft)
Headlamp Mounting Nuts 10 N.m (89 lb in)
Headlamp Bezel Retaining Screws 1.9 N.m (17 lb in)
Headlamp Capsule Retaining Screws 3.5 N.m (31 lb in)
Headlamp Intermediate Bracket Screws 1.9 N.m (17 lb in)
Headlamp Opening Door Screws 1.9 N.m (17 lb in)
Roof noises
If you buy a coupe with a removable roof, you can expect wind noise and some creaking. The wind noise will never totally go away, but if there's creaking, you can eliminate that by thinly applying dielectric silicone grease to the weather-stripping. It also prevents cracking, so do this to all weather-stripping, on any car.
Hood rattles
During cold weather the rubber hood stops can also rub and rattle against the hood. Adjust and lubricate the rubber stops so when you pull the corner of the hood up, it doesn�t pull up, but the hood still closes.
Drivetrain rattling
The valvetrain makes a significant amount of noise at idle. It may sound like sewing machine. Converting the valve rockers to true shaft-mounted adjustable roller rockers with may help eliminate the valvetrain noise if adjusted properly. Installing a big cam and stiffer valve springs will make the noise louder.
On manual transmission cars (M6 or M12), the transmission sounds like it is rattling when leaving the line. It is normal. It is the clutch throwout bearing rattling around. Sometimes you'll hear a horrible rattle if you shut off the engine. If you press the clutch pedal in while shutting off the car, you won't hear it.
Shaky breaking
The front brake rotors warp easily under heavy braking�or at least that�s what uneducated drivers think. I tend to believe StopTech: http://www.stoptech.com/whitepapers/...otors_myth.htm
I verified this by lightly grinding my rotors with steel wool. Garnet paper is recommended, but I haven�t tried it.
If you insist the problem is warping, don�t turn the rotors since thinner rotors warp more easily. Resurfacing the rotors is only a temporary fix, one that is less effective each time your resurface the rotors due to the reduced thermal capacity of the rotors. Rotors are available for $25 at Napa and RockAuto.
Scraped front ends and rocker panels
Checking for scrapes is an easy way to tell if the car was treated well. It's almost impossible not to scrape the front end, but there are two metal crash bar loops that should prevent the bumper from scraping. The bumper itself should not have scrape marks on it. Check the underside of the tip of the bumper, and the bottom corners of the bumper. If the crash bar gets scraped enough, eventually it will wear down to the point where it needs to get replaced. It costs about $220 for the crash bar, nut-serts, bolts and insulators, and can be replaced in a couple of hours, just be sure to hook the hoses and electric connector back to the A.I.R. pump.
Here�s a list of ALL the parts you�ll need to replace the impact bar and the side air deflectors:
Part #------Qty---Description
10188023---001---Insulator (goes to bottom of radiator)
10278679---001---Insulator (goes to bottom of radiator)
10278679---005---Nut
10400765---001---Plate (the actual impact bar, unpainted)
10419312---001---Panel (air deflector)
10419313---001---Panel (air deflector)
11515638---010---Nut-speci
11515757---010---Bolt-Metr
10281487---010---Nut
Not all of these parts need to get replaced, and there will be a few leftovers, but it will get the job done.
The rocker panels tend to get scraped on lifts and big speed bumps.
A & A Corvettes invented two products to prevent damage from both kinds of scraping. They have wheels that attach to the crash bar, allowing the car to roll on driveways instead of wearing down the crash bar. It will still scrape the spoiler, but the spoiler is a cheap wear item that takes only 2 minutes to replace without a lift or jack. They also make two aluminum strips that attached the frame next to the rocker panels, and they take the scrapes themselves instead of the rockers panels. Neither of the devices are visible unless looking under the car, and they are discreet enough to possibly be missed anyway. If you see these devices installed, you can be pretty sure the owner took good care of the car. Without this extra protection, you can expect to replace the crash bar and repair the rockers several times over the life of the car. WARNING: It won�t stop all scraping damage, just reduce the possibility of it happening, and reduce the damage when it does happen. Low hanging headers will probably still scrape.
Hood seal weather-strip
The sides and back of the hood compartment have weather-strip installed from the factory. The front is left open. Many owners install weather-strip along this front edge. You may not even notice it since it looks identical to rest of the weather-stripping. This extra weather-strip helps keep the engine compartment clean, and may also help the air intake system work better. This is another sign that the owner took good care of the car. The engine compartment stays pretty clean, but this the "extra step".
A/C System
There are two kinds of climate controls. One is manual with *****, and the other is a dual-zone electronic system. The dual-zone system did cost more, but is not as reliable as the manual system. A leaking battery can affect both systems; a symptom is when the vents cannot be switched.
Over time, and especially in humid climates, condensation can leak onto the passenger side carpet. There are 3 udders under the driver�s side cowl, and behind the battery. There are slits on the bottom--vigorously squeeze and massage the udders until free of debris.
If the vent settings cannot be changed, the vacuum line is probably loose, clogged or broken. Read more!
Squeaky steering wheel
When you turn the steering wheel, you may hear a squeak. It's just the plastic surfaces rubbing against each other. A shot of lubricant fixes this.
Squeaky/chirping/grinding wheel bearings
Drive slowly, better yet, coast along at low speeds with the windows open in a quiet location. Listen for a squeak from the wheels. Try turning in different directions. If you hear the rear wheels squeaking, you may have a worn wheel bearing. A replacement bearing costs $600 list, but you can usually find it for $400-450. I've heard that AutoZone has a better replacement for $126 by a company named Timken. The part is easy to replace if you can separate the ball joints; I bought the Kent-Moore tool to do mine. The problem may persist safely for a few months, but eventually will become annoying. It seems to be a common problem, and more so for the rear wheel bearing. I've never heard of it happening twice to the same car, so if you fix it once, you're probably good for life. Several racers replace their wheel bearing every year.
A broken emergency drum clip may cause a false diagnosis. Be careful when removing & replacing the rear rotors.
Oil woes
Many late 2000 thru 2001 Vette's burn a lot of oil when the engine is kept constantly over 4,000 rpm's. This is caused by ring flutter, which allows extra oil to seep past the oil control rings, but doesn't seem to cause any extra wear to the engine. Chevrolet has rebuilt and replaced engines for owners that complained about excessive oil consumption. Their policy is that while the engine isn't normally operated like that outside of racing, it is the owner's prerogative to drive around in second gear all the time if they want to. It is covered under the warranty.
The PCV system also has a tendency to suck oil back into the intake at high rpm's. It doesn't seem to cause any problems, other than a slight mess inside the intake manifold. The newer style PCV system can be installed, but this requires removing all the components in the top of the engine valley. Usually only racer's bother with the hassle. Several generations of PCV systems have had the problem, and at this time, December 2004, the PCV system still sucks oil into the intake.
The oil-sucking problem will cause carbon buildup in the cylinders. The dealership sells GM Top End Cleaner, and Napa sells SeaFoam. The Top End Cleaner is not available in some smog states like California. Run a tube from the bottle into the hole for the PCV system behind the throttle body on the passenger side. Start the car, then start slowly sucking the solution into the engine. Don�t go too fast or the engine could lockup. As soon as the solution is gone, stop the motor for >4 hours, but preferably 12 hours. Be aware that when the engine is restarted, there will be a LOT of smoke!
The oil-sucking can be prevented by installing a catch can. AMW and Greddy make catch cans, but a homebuilt catch can may be built using a Campbell-Hausfield air tool oil separator from most tool stores, including AutoZone. The AMW and Greddy cans are ~$100, but look great. The CH can is $15-25 for all the parts, and you can see how much oil is in it.
Overheating & burning smells
Even though the engine can heat up to 220, even 240 degrees Fahrenheit, this is normal. The radiator will keep the engine cool enough unless the radiator is blocked. Reprogramming the PCM can allow the fans to turn on earlier. If the fans also cool an aftermarket oil cooler, make sure the oil occasionally gets to 220 degrees to allow condensation and fuel to evaporate away. Fan settings and oil thermostats are two different ways to do this.
It's not uncommon for plastic bags to get sucked up under the front bumper, and cover the radiator, thus causing the car to truly overheat. If this happens, take a quick peek under the bumper, and remove anything under there. Sometimes bags get stuck to the exhaust pipes too, causing quite a stench as they burn away.
Locked steering column
All C5�s, particularly manual transmission C5�s, and early C6 steering columns have a tendency to lock and stay locked. Usually it can be unlocked once, but just once. Some owners claim that vigorously shaking the steering wheel can unlock the steering wheel. Dealer's are able to disable the locking mechanism with a modified locking plate. Currently this is the only real method to disable the locking mechanism. Basically the wheel will still try to lock, but there will be nothing for it to lock to. It�s like a door dead bolt with a slot cut into the door jamb. There is a $100 kit that disables the steering column lock, and can be installed easily, but enough car vibrations can cause the lock to fall into the locking plate, even while driving!
GM has a part (#88952428 or 88952428) that has a harness wiring jumper and different lock plate. Not sure what the difference in the kits are.
After reading a few posts, manual transmission C5�s & C6�s are still in danger, even if the lock is disabled. The lock can vibrate out over time and get trapped in the locking plate. Auto transmission cars that have undergone the recall and new auto�s will not have the locking plate at all, so they are safe. More information about COMPLETELY disabling the steering column lock will be forthcoming from other�s on the forum, and by my own personal project. Until then, here are a few links about the topic:
Column Lock Harness K Installation
A4 non locking column plate --- must be a member
Column-lock again even with CLB!
Has anyone ELSE beat column lock?
Faulty gas gauge
If you have bad gas (phew!), the fuel sender can be affected by the high sulfur content in the fuel, and cause the gauge to read empty. They car will still operate normally, and the gas gauge will work again if you use better gas, and will usually start again when you restart the car. It's just better to use good gas. Some people have had luck with running fuel filter cleaners thru the gas tank. New fuel senders sometimes fixes this problem. This thread has a LOT of ideas about what could be causing the problems, how to avoid problems, and how to fix it. It also points out how the late C5 fuel tanks and crossover tube is different.
Noisy fuel pump
There are two fuel tanks, and two fuel pumps. One fuel pump continually pumps gas from the passenger side tank into the driver side tank, and is quiet. The main fuel pump is directly behind the drivers seat, and can be annoying loud, especially on early C5�s. It's normal, and not a sign of a failing fuel pump. Chevrolet does have a bulletin out instructing how to better insulate against the sound of the fuel pump. This is merely an annoyance. A newer, quieter pump can also be installed.
Extremely high oil pressure reading
The oil pressure sensor can fail, but it is still okay to drive. Turn the car off, but with the key in the �on� position and check the oil pressure gauge. It should read �0�. If the oil pressure sensor is bad, it will show a positive reading. The oil pressure sender is located behind the intake manifold, and will require moving the intake manifold. The sender costs about $40 and part # 12573107 or 12562230.
How-to
Suspension squeaking
In cold weather you may hear the suspension creak when you go over speed bumps. To fix this, clean (optional) and lubricate the sway bar bushings. The adjustable metal sway bar end links on Hotchkis and T1 bars can also create loud clicking sounds. Most adjustable end links are quiet initially, but wear out and get noisy over time. Greasing and protecting the end links from dirt may prevent wear.
Tough shifting
The shifter in manually shifted Corvette's takes a strong arm to get it into gear. You really have to make sure that the shifter is fully in 1st and Reverse, or it will pop out of gear when you let the clutch out. This is not the fault of the car, but the fault of the driver.
Manual transmissions -- Replacing the transmission fluid often helps shifting. Early transmissions have paper blocker ring that require Dexron III compatible (usually organic) fluid because some synthetics will destroy the paper blocker rings and subsequently the transmission. Later transmissions, and all rebuilt transmissions, have Kevlar/carbon fiber parts that allow the use of synthetic fluids. I believe the 98-00 transmissions have the paper blocker rings. The safe transmission fluids seem to be: GM Synchromesh PN #12345349, Honda ATF-Z1, Royal Purple Synchromax, Amsoil ATF, O�Reilly Dexron III ATF. The following transmission fluids may be unsafe for early transmissions: Redline D4 ATF, Mobil 1 ATF, Royal Purple Max ATF.
Related threads:
LS1.com - Ending the speculation: Blocker rings, who's had them fail?
LS1Tech.com - Ending the speculation: Blocker rings, who's had them fail?
Mobil 1 Synthetic ATF for a M6?
If it is especially tough to shift into 2nd or 4th gear, it's possible that the synchro's are worn out or the forks are bent. Do NOT force it into gear. Abuse creates and aggravates this problem. You can still drive, even quite well, without synchro's....or a clutch for that matter if you know how to rev match.
Some aftermarket shifters make it easier to make sure you're fully in gear, and prevent gear grinding, but they also vibrate, and require more effort to shift. The stock shifter has a tuned weight damper that changes the vibrations to a non-audible frequency. The shaking doesn�t annoy some people, and there are some fixes.
Leaky butt
The differential can leak from the side covers. The problem has to do with the design. The lip on the casing is not wide enough to create a proper seal with the cover. Resealing the covers can be successful, but many dealers do not use the correct sealant.
Inside/outside tire spinning
If one tire spins while turning, adjust the friction modifier ratio. Aftermarket gear fluid from Royal Purple, Amsoil and Redline do not require additional friction modifier. GM�s friction modifier is PN #12377916. Too much friction modifier and the inside tire will spin/skip/hop. Too little friction modifier and the outside tire will spin/skip/hop. -- Thanks Russ!
Tire hop
Tire hop during hard acceleration in cold weather is common, even if the same tires don�t hop in warmer weather. Tire rubber when viewed thru a microscope looks like a web. Normally parts of this web grabs onto objects on the ground and stretch until either the car moves forward, or the web breaks, resulting in tire spin. I believe in cold weather, the web is too stiff for either of these events to occur, so the tires hop. To find out more, read Racing & High Performance Tire: Using Tires to Tune for Grip and Balance. I haven�t read it, but if you do, please let me know if my guess is correct. I found a couple stories on Google about people curing wheel hop with stiffer bushings and/or (jounce) shocks.
Interior rattles
The visors may rattle when they are put up, but if you flip them down, the rattle goes away. Squeezing the mirror lid down seems to take care of it. Try glueing a piece of felt or velcro between the mirror and lid to see if that fixes it. Caravaggio also makes replacement leather visors, but they go for $400.
The stereo is Bose, and to go along with the historically crappy build quality of Bose products, Bose has graced the Corvette with Bose emblems on the door speaker covers that rattle when you play music with bass. A Bose system doesn't exist that puts out good bass, but the system still manages to rattle the emblems when playing Country, Hip Hop, or Techno at moderate volumes. Check this problem by having a passenger and yourself putting a finger on the emblems with music playing. Glue the emblems down to fix it.
If the roof isn't tightened down enough, it will rattle. There are some adjustment screws in the roof to make this adjustment.
Belt Chirping
During cold weather, the belt can chirp. Goodyear Gatorback belts from AutoZone don�t chirp.
Sticky Hatch
During cold weather, the hatch may pop up slowly, or not at all. Spray the latches with silicone grease until they come up properly. If the struts do not hold up the hatch, try lubing the strut bars.
1997: Service Bulletin: Hatch Will Not Pop Up When Activated in Cold Weather
Rocker failure
The needle bearings in the OEM rockers have been known to fail. Usually the problem is noticed with extra valvetrain noise and needle bearings stuck to a magnetic oil plug. Nasty Performance will rebuild OEM rockers with Harland Sharp bearings. This seems to be one of the better solutions since the stock rocker is very good at high rpms. Most aftermarket rockers are nose heavy and require grinding the heads and valve covers to fit. Currently Harland Sharp rockers are having problems with c-clip retainers falling off and causing problems on the way. I�ll be following this issue since I have a set of HS rockers on my shelf waiting for this issue to be resolved. Here are some links:
LS1Tech - EMERGENCY!! ROCKERS! Help ASAP!
LS1Tech - Harland Sharp Rocker Failure
LS1Tech - Install or not install HS rockers?
1998-2002: Service Bulletin: Needle Bearings Found In Oil Pan (Replace Rocker Arms)
Other Information
Active Stability Control
This allows you to keep some control of the car even when you do really stupid stunts. It doesn't bend the laws of physics, but will keep the car pointed where you are steering; you may still slide off the road, but at least the car will be pointed in the direction you were steering! One of the sensors is located around the passenger seat, and needs to be considered when installing a racing bucket. If you move that sensor, Active Stability will not know how to balance the car, and can be very dangerous. Active Stability came out around '99.
Jacking
The C5 was the first car to use hydroformed frame rails. Hydroformed rails are quickly becoming a common platform for new cars, but not many shops are prepared to lift these vehicles. The C5 requires an adapter for regular jacks and lifts to fit the jacking points. Make your own adapters with a hockey puck (or two) with a 1 1/2" eye bolt screwed thru the center. Stick the eye bolt thru the slit in the jacking point, turn 90 degrees, place jack under adapter and jack away....if you can get the jack under the car. You may have to use ramps. The C5 is so low that most people make their own wooden ramps....rhino ramps are too steep.
Key Fobs
There are basically two different kinds of key fobs, and they are not compatible with each other.
97-00, but 00 does not have the Passive Lock feature
01-04
Both remotes use a CR2450 coin type battery. I found replacement batteries at Office Depot. To replace, use a coin to wedge between the seam, and twist.
Ref: Service manual, page 8-747.
Spark plugs
The OEM platinum plugs, along with other plugs have had problems with the pucks falling off. I have a picture of missing pucks in this thread. This thread outlines some of the problems with using platinum, and a recommendation for using silver tipped plugs. Basically, of all spark plug tips, platinum is the worst conductor, copper is good, iridium is even better and silver is the best. Don�t take my word for it, do a little research, starting with this review. As for longevity, platinum, iridium and silver do have an advantage over copper, but plugs foul up after ~10K negating any difference corrosion would cause, and no plug will run well after 100K miles.
To make the spark plugs easier to change, get the Snap-On double-swivel sparkplug tool and remove the coil packs. Here�s all you need to know about sparkplug changes: Go!
Alternator Replacement
�98 AC Delco part #10246634
________________________________________ _______________________
These problems, and many others, are addressed at the www.corvetteactioncenter.com in the Tech Center -> Knowledge Base.
While these problems do sound numerous and severe, just remember that JD Power considers this a very reliable car. If you buy a Corvette, consider yourself fortunate that there are many reSrcs available to help you locate and correct problems.
Secrets of the C5
Copied from www.corvettemechanic.com
Power
First you need to know how your car is doing. A trip to the dyno can give you quick answers.
Tuning software can diagnose and tune your car. LS1Tech and HPTuners are two popular tuning packages. At some point in the future, both packages will be able to do scanning with incorporated wideband sensor support. At this time, December 2004, only HPTuners can do both.
Popular upgrades:
Cold air intakes: Vararam, Halltech, Blackwing, zip-tie
Intake manifolds: LS6, LS2, LSX, Wiend, sheetmetal
Cat-back exhausts: B&B, Borla, Z06 Ti, Corsa
Long tube headers: LG, Kooks, TPIS, Stainless Works, Breathless, Jet-Hot, GHL, QTP
Superchargers: ATI (go to A&A), Vortech, Magnacharger
Turbochargers
Stroke & bore
Head & cam packages: TEA, AFR, TSP, Patriot, Cartek
Tires: Kumho Ecsta MX, Nitto Extreme RII
Aerodynamics, gearing and top speed
The hardtops and Z06 have shorter rear windows, are less aerodynamic, noisier, and weigh less than the standard C5 couple like mine. Even though the Z06 has more hp than standard C5�s, they have a lower top speed than manual Z51 C5 coupes. This is due to both aerodynamics and gearing. All C5�s top out at redline in 5th gear, so a taller 5th gear, or much shorter 6th gear, or taller redline is required to go faster. All else being equal, a Z51 coupe will still go faster than a Z06. Above 190 mph, air builds up under the front of the car. This can be solved with a vented hood like the ACP C5-R or MCM hoods.
Weight reduction
You can achieve substantial weight reduction with the following modifications, while still having a car that's very comfortable to drive. Most of these modifications will directly increase (and decrease in a few cases) the safety of the car, while safety is indirectly improved due to the better handling and limits of a lighter car. Fighter pilots say "speed is life". Acceleration, deceleration, and lateral acceleration are all forms of acceleration, and lighter cars accelerate better in each of these ways because the tires have less mass to control....thus a lighter car is a safer car. Lighter cars have better moments of inertia which allows them to turn in more easily and roll less. Lighter cars are also easier on the tires and gas.
All the stage weight estimates are typically wild butt guesses, but it makes it easy to see what is possible. The weight listings in the separate weight posting is MUCH more reliable.
Stage I: Streetable weight reduction mods
Non-popup headlights (~40 lbs)
Braking rotors with an aluminum hat, or titanium rotors (unproven on street cars) (~20-30 lbs)
Carbon fiber hood (~12 lbs)
Z06 (thinner) windshield and side windows (~5.7 lbs)
Non runflat tires (~20 lbs)
Slicks (~30 lbs)
Z06 wheels (~4 lbs est.)
Corsa titanium exhaust (~35 lbs)
Long tube headers (~20 lbs)
Halltech aluminum alternator & bracket (10 lbs)
Carbon fiber driveshaft (~2 lbs)
Newer torque tube
Less options [HUD, elec AC, Active Stability, seat/mirror/steering wheel memory, cd changer] (~50 lbs)
Less gasoline & wiper fluid (No wiper fluid=9lbs, 6 lbs for every gallon of gas in that 18 gallon tank....~81 lbs for autocrossing)
Remove
cargo net
targa top (~20 lbs)
BCM�s
C5 "appearance mods" - exhaust plates, doorsill covers, etc.
fuel rail covers
all loose change, CD's, golf clubs, misc. items, from center console, hatch area, and glove box
Replace
stock crank pulley with aluminum aftermarket pulley
steel dampener with aluminum dampener
stock targa top with lexan piece (coupes)
water pump with electric water pump
battery with smaller battery
non-stressed fasteners with aluminum or titanium fasteners
leaf springs with coil over shocks with titanium springs
steel shifter with aluminum shifter and delrin or titanium shift ****
Empty your pockets of extra change, PDA's, cell phones, keys, lead plates, or whatever other junk you lug around
Go on a diet =p
Stage II: Hardcore semi-streetable weight reduction mods
Aluminum flywheel (~10 lbs)
Lighter clutch like Exedy or Quartermaster (~10 lbs)
Racing buckets (40-50 lbs)
Off-road x-pipe (10 lbs)
Replace stock hood, fenders, doors, roof, hatch and bumpers with aftermarket carbon fiber pieces
Remove
Tire repair kit (Z06)
Floor mats
Fog lights
Stage III: Track only weight reduction mods
Racing steering wheel & delete both airbags (~30 lbs, but get a 4-6 point harness)
Use unpadded aluminum or carbon fiber steering wheel
Run open headers
Replace stock front and rear glass with polycarbonate �glass�
Rebuild motor with Al or Ti connecting rods, Ti valve spring retainers and pushrods
Port the heads
Replace valve covers with magnesium or carbon fiber parts
Strip entire car, acid wash chassis, put car back together.
Remore
Column locking hardware
Interior � passenger seat, carpets, speaker panels, head liner, dash, center console, glove box, door panels, sun visors, rear view mirror, insulation, etc.
A/C Compressor
A/C controls and ducting
AIR pump system
Factory radio, speakers, and/or CD changer, and unnecessary wiring
HUD projector
Windshield wiper fluid reservoir and pump
Windshield wipers and motors
Stock cat back
Power steering pump
Front sway bar (drag only)
ABS, TC, AH hardware and sensors (drag only)
Fender wells
Headlight assembly, turn signals, taillights and reflectors
Shave side mirrors
Torque tunnel cover
OEM seat belts
Parking brake
Side windows and motors
Power locks and power windows
Side impact beams
Casting flash from engine, then polish
Reducing unsprung weight�not all is streetable
Forged 1-piece wheels
Use 3-piece wheels by Jongbloed, Kodiak, CCW, BBS
Skinny front wheels (drag only)
Ti fasteners on 3-piece wheels (~1 lbs per wheel)
Lighter non-runflat tires, or even track only synthetic corded slicks
Lighter calipers
2-piece, unvented or titanium rotors
Titanium wheel studs
Aluminum or titanium lug nuts
Remove tire pressure sensors
Remove rubber valve stem cap
Balance the wheels without tires or balancing weights, and then mount tires
Great literature for hardcore techies
Helm�s Service Manual --- this should come with every Corvette IMHO
Key Design Developments of the 1997 Chevrolet Corvette (SAE SP-1282)
GM eSI Techline Service Manual
Nuts, Bolts and Fasteners and Plumbing Handbook, Carroll Smith
Drive to Win, Carroll Smith: The Essential Guide to Race Driving
Engineer to Win: The Essential Guide to Racing Car Materials Technology or How to Build Winners Which Don�t Break, Carroll Smith
Tune to Win, Carroll Smith
Fiberglass & Composite Materials: An Enthusiast�s Guide to High Performance Non-Metallic Materials for Automotive Racing and Marine Use
How to Make Your Car Handle, Fred Puhn
Race Car Vehicle Dynamics (SAE R146)
Racing & High Performance Tire: Using Tires to Tune for Grip and Balance (SAE R351)
Physics of Racing
Leaking Battery
Many C5's came with AC Delco Freedom batteries that tend to have the case crack near the battery posts. The leaking battery acid would drip down the side of the battery, down the funnel-like battery support, straight down onto the PCM and the wiring loom. It can also get onto the A/C lines. I believe they are the vacuum lines that control the movement of the interior vents, and usually the system will default to blowing out the defroster vent. Sometimes car crippling damage would occur, sometimes not. It worst it would mean replacing the battery, the PCM, the wiring harness, grinding the rust off the frame to repaint it, changing the A/C lines and possibly swapping out another computer as well. This mostly happened on early C5�s because later C5�s used a gel-type battery that cannot leak, but I believe the problem resurfaced on �04 or �05 models again.
Check this out before buying a C5. Use a 8 mm monkey wrench, preferably a ratcheting closed-end version, to removed the battery cables. You also remove a holding block on the front side of the battery. You will need a long extension to reach it. The battery lifts out, then remove the black plastic battery tray. Look under the tray for rust or white powder--signs of evidence of battery acid damage. It would probably be best to move to the next Vette unless you don't mind possibly tackling this repair in the future. It's possible that the car will throw codes for no apparent reason.
No matter what Vette you buy, replace the battery with a gel-type battery, like the Optima Redtop, sold at CostCo for $100.
Grounding Problems aka CRAZY electrical gremlins!
Bill Curlee has a great thread on the problems that corroded ground connections can create, and how to clean out the grounds. The most problematic ground connections are behind the headlights on both sides. Check out Bill�s thread for detailed info: Go!
Here�s where all the grounds are: Go!
Water Intrusion
Water leaks have several ways of getting in the car, and none of them AFAIK are very difficult to fix. Proper adjustments and maintenance will prevent most leaks.
Bill Curlee�s thread abouting locating & cleaning the udders, and sealing the door hinges.
Here�s a few TSB�s from the CorvetteActionCenter.com:
1997-1998: Service Bulletin: Waterleak Above Door Glass (Reseal Blowout Clip)
1997-2002: Service Bulletin: General Waterleak Guide
1997: Service Bulletin: Water Drips into Rear Compartment After Hatch/Glass Has Been Opened
Seats
Corvette seats are delicate. Sliding hard across the bolster can break it, causing it to flap side-to-side. The leather is cheap, and there's little protection for it. It will wear out and form cracks, which is normal�for cheap leather.
The wire springs in the seat bottom, and the bars in the bolsters can also wear thru the foam and leather, but that can be fixed by placing layer of burlap between the springs and the foam.
Check the black plastic surround on the bottom of the seat to make sure it fits snugly against the leather, and isn't cracked. Older style plastic surrounds had a tendency to separate from the seat, but could be pushed back in. The newer style plastic surrounds can be used as a direct replacement, but one of the plastic studs may need to be ground off, or a hole will need to get punched into the leather.
The seats tend to rock back and forth by about a 1/4" during acceleration and braking. It can be fixed, but GM will not fix it. Some lucky owners can get the dealer to replace the frame under warranty. The seat backs swinging forward under braking is normal, and not considered a problem.
Here are a couple fixes:
Corvettemechanic.com --- must be a member
Rocking Seat Fix
Seat choice
Get the sport seats. The sport seats have a hole under the headrest. Some people put racing harness belts thru those loops. The seat frames and foam in both seats are interchangeable. Harness belt holes can be installed using Ford harness cutouts. Ask the dealership for them, they should know what it is without a part #. The foam in a standard seat will need to be cut, and sewing will have to be done, but it�s an easy job.
Headlight bezel plugs
There are 1-1/2" plugs that are located on the headlight bezels that would fall off on the older Vette's. The new style plugs, have a twist-lock to prevent them from falling out, but also requires new bezels. Only the new bezels & plugs are available now, and they are compatible with older C5�s.
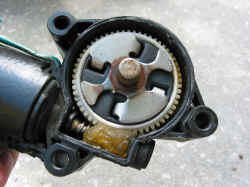
Headlight gears
The gears in the headlight motor are plastic, and wear out over time. Ice, heavy Euro or projector headlights and twilight sentinal will cause the gears to wear out quickly. Fortunately a few years ago, Rodney started selling replacement brass gears, check out his website. Corvette America and probably a few other vendors now sell their own copy of his brass gears. Here�s a thread that shows how to replace the gears.
Replacement nylon gears are also available from Motormite Help!, part #42400 for $10-13. Src
To replace:
Originally Posted by MyBlueC5
Src
Raise the headlamps.
Remove the screws that hold the plastic bezel around the headlamp.
Remove (3) 10mm bolts holding the motor to the headlamp assy. (one is a bolt with a nut on the end, the other two are just bolts)
Unplug the wiring to the motor.
Remove (3) 7mm bolts holding the cover for the gear.
Replace gear, reinstall.
Literally a 10 minute fix.
�it is completely unnecessary to remove the headlamp assy to pull the motor off to get to the gear.
Originally Posted by pattymelt1285
Src
At first my driver�s side headlight would only come halfway up and I would have to get out of the car, turn the headlights on then manually pull up the light. After a few weeks it would not even go up or down at all. I decided to order some new brass gears. After much research I decided to buy them from www.bfranker.badz28.com
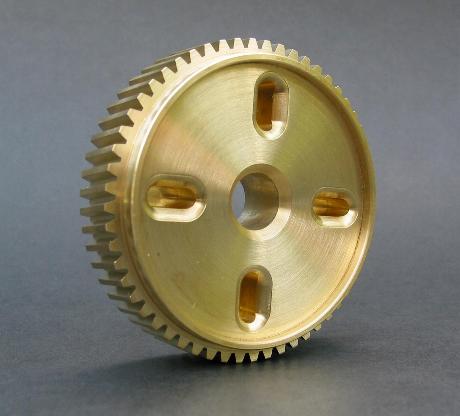
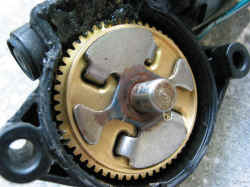
The gears from bfranker do not use the stock rubber inside the gear. Good thing, because when I pulled out the stock gear and it was fine! But the rubber bumper was destroyed! With bfrankers gears you don�t have to retain the stock rubber bumper. In this picture you can see the good stock gear on the left on the bad one on the right, also notice it broke the plastic tabs inside the gear that keep the rubber bumper from spinning:

Pic of the stock gear and stock rubber bumper:
Picture of bfrankers gear:
Installed:
Rodney Dickman's gear:

Installed with rubber bumper:

I would go with bfrankers, because with his gear it eliminates the rubber bumper. On 97-99 Corvettes the motor case unbolts with 3 bolts, but on 00+ they are sealed and with bfrankers kit he even includes the epoxy to close the motor case as does Rodneys. I am not ******* on Rodney�s gears, but I am just letting you guys know what else is out there. Bfrankers kit is $43 shipped for one gear kit, or $81 shipped for two. The install only took about 45 min and they work perfect now. More info and instructions for bfrankers gear can be found here:
http://www.bfranker.badz28.com/headlightfix/index.htm
The install is almost the same as the 93-97 Trans Am in the instructions.
Info for Rodneys gear:
http://www.rodneydickman.com/corvette.html
Patrick
At first my driver�s side headlight would only come halfway up and I would have to get out of the car, turn the headlights on then manually pull up the light. After a few weeks it would not even go up or down at all. I decided to order some new brass gears. After much research I decided to buy them from www.bfranker.badz28.com
The gears from bfranker do not use the stock rubber inside the gear. Good thing, because when I pulled out the stock gear and it was fine! But the rubber bumper was destroyed! With bfrankers gears you don�t have to retain the stock rubber bumper. In this picture you can see the good stock gear on the left on the bad one on the right, also notice it broke the plastic tabs inside the gear that keep the rubber bumper from spinning:
Pic of the stock gear and stock rubber bumper:
Picture of bfrankers gear:
Installed:
Rodney Dickman's gear:
Installed with rubber bumper:
I would go with bfrankers, because with his gear it eliminates the rubber bumper. On 97-99 Corvettes the motor case unbolts with 3 bolts, but on 00+ they are sealed and with bfrankers kit he even includes the epoxy to close the motor case as does Rodneys. I am not ******* on Rodney�s gears, but I am just letting you guys know what else is out there. Bfrankers kit is $43 shipped for one gear kit, or $81 shipped for two. The install only took about 45 min and they work perfect now. More info and instructions for bfrankers gear can be found here:
http://www.bfranker.badz28.com/headlightfix/index.htm
The install is almost the same as the 93-97 Trans Am in the instructions.
Info for Rodneys gear:
http://www.rodneydickman.com/corvette.html
Patrick
All Data Diy
Headlamp Mounting Bolts 20 N.m (15 lb ft)
Headlamp Mounting Nuts 10 N.m (89 lb in)
Headlamp Bezel Retaining Screws 1.9 N.m (17 lb in)
Headlamp Capsule Retaining Screws 3.5 N.m (31 lb in)
Headlamp Intermediate Bracket Screws 1.9 N.m (17 lb in)
Headlamp Opening Door Screws 1.9 N.m (17 lb in)
Roof noises
If you buy a coupe with a removable roof, you can expect wind noise and some creaking. The wind noise will never totally go away, but if there's creaking, you can eliminate that by thinly applying dielectric silicone grease to the weather-stripping. It also prevents cracking, so do this to all weather-stripping, on any car.
Hood rattles
During cold weather the rubber hood stops can also rub and rattle against the hood. Adjust and lubricate the rubber stops so when you pull the corner of the hood up, it doesn�t pull up, but the hood still closes.
Drivetrain rattling
The valvetrain makes a significant amount of noise at idle. It may sound like sewing machine. Converting the valve rockers to true shaft-mounted adjustable roller rockers with may help eliminate the valvetrain noise if adjusted properly. Installing a big cam and stiffer valve springs will make the noise louder.
On manual transmission cars (M6 or M12), the transmission sounds like it is rattling when leaving the line. It is normal. It is the clutch throwout bearing rattling around. Sometimes you'll hear a horrible rattle if you shut off the engine. If you press the clutch pedal in while shutting off the car, you won't hear it.
Shaky breaking
The front brake rotors warp easily under heavy braking�or at least that�s what uneducated drivers think. I tend to believe StopTech: http://www.stoptech.com/whitepapers/...otors_myth.htm
I verified this by lightly grinding my rotors with steel wool. Garnet paper is recommended, but I haven�t tried it.
If you insist the problem is warping, don�t turn the rotors since thinner rotors warp more easily. Resurfacing the rotors is only a temporary fix, one that is less effective each time your resurface the rotors due to the reduced thermal capacity of the rotors. Rotors are available for $25 at Napa and RockAuto.
Scraped front ends and rocker panels
Checking for scrapes is an easy way to tell if the car was treated well. It's almost impossible not to scrape the front end, but there are two metal crash bar loops that should prevent the bumper from scraping. The bumper itself should not have scrape marks on it. Check the underside of the tip of the bumper, and the bottom corners of the bumper. If the crash bar gets scraped enough, eventually it will wear down to the point where it needs to get replaced. It costs about $220 for the crash bar, nut-serts, bolts and insulators, and can be replaced in a couple of hours, just be sure to hook the hoses and electric connector back to the A.I.R. pump.
Here�s a list of ALL the parts you�ll need to replace the impact bar and the side air deflectors:
Part #------Qty---Description
10188023---001---Insulator (goes to bottom of radiator)
10278679---001---Insulator (goes to bottom of radiator)
10278679---005---Nut
10400765---001---Plate (the actual impact bar, unpainted)
10419312---001---Panel (air deflector)
10419313---001---Panel (air deflector)
11515638---010---Nut-speci
11515757---010---Bolt-Metr
10281487---010---Nut
Not all of these parts need to get replaced, and there will be a few leftovers, but it will get the job done.
The rocker panels tend to get scraped on lifts and big speed bumps.
A & A Corvettes invented two products to prevent damage from both kinds of scraping. They have wheels that attach to the crash bar, allowing the car to roll on driveways instead of wearing down the crash bar. It will still scrape the spoiler, but the spoiler is a cheap wear item that takes only 2 minutes to replace without a lift or jack. They also make two aluminum strips that attached the frame next to the rocker panels, and they take the scrapes themselves instead of the rockers panels. Neither of the devices are visible unless looking under the car, and they are discreet enough to possibly be missed anyway. If you see these devices installed, you can be pretty sure the owner took good care of the car. Without this extra protection, you can expect to replace the crash bar and repair the rockers several times over the life of the car. WARNING: It won�t stop all scraping damage, just reduce the possibility of it happening, and reduce the damage when it does happen. Low hanging headers will probably still scrape.
Hood seal weather-strip
The sides and back of the hood compartment have weather-strip installed from the factory. The front is left open. Many owners install weather-strip along this front edge. You may not even notice it since it looks identical to rest of the weather-stripping. This extra weather-strip helps keep the engine compartment clean, and may also help the air intake system work better. This is another sign that the owner took good care of the car. The engine compartment stays pretty clean, but this the "extra step".
A/C System
There are two kinds of climate controls. One is manual with *****, and the other is a dual-zone electronic system. The dual-zone system did cost more, but is not as reliable as the manual system. A leaking battery can affect both systems; a symptom is when the vents cannot be switched.
Over time, and especially in humid climates, condensation can leak onto the passenger side carpet. There are 3 udders under the driver�s side cowl, and behind the battery. There are slits on the bottom--vigorously squeeze and massage the udders until free of debris.
If the vent settings cannot be changed, the vacuum line is probably loose, clogged or broken. Read more!
Squeaky steering wheel
When you turn the steering wheel, you may hear a squeak. It's just the plastic surfaces rubbing against each other. A shot of lubricant fixes this.
Squeaky/chirping/grinding wheel bearings
Drive slowly, better yet, coast along at low speeds with the windows open in a quiet location. Listen for a squeak from the wheels. Try turning in different directions. If you hear the rear wheels squeaking, you may have a worn wheel bearing. A replacement bearing costs $600 list, but you can usually find it for $400-450. I've heard that AutoZone has a better replacement for $126 by a company named Timken. The part is easy to replace if you can separate the ball joints; I bought the Kent-Moore tool to do mine. The problem may persist safely for a few months, but eventually will become annoying. It seems to be a common problem, and more so for the rear wheel bearing. I've never heard of it happening twice to the same car, so if you fix it once, you're probably good for life. Several racers replace their wheel bearing every year.
A broken emergency drum clip may cause a false diagnosis. Be careful when removing & replacing the rear rotors.
Oil woes
Many late 2000 thru 2001 Vette's burn a lot of oil when the engine is kept constantly over 4,000 rpm's. This is caused by ring flutter, which allows extra oil to seep past the oil control rings, but doesn't seem to cause any extra wear to the engine. Chevrolet has rebuilt and replaced engines for owners that complained about excessive oil consumption. Their policy is that while the engine isn't normally operated like that outside of racing, it is the owner's prerogative to drive around in second gear all the time if they want to. It is covered under the warranty.
The PCV system also has a tendency to suck oil back into the intake at high rpm's. It doesn't seem to cause any problems, other than a slight mess inside the intake manifold. The newer style PCV system can be installed, but this requires removing all the components in the top of the engine valley. Usually only racer's bother with the hassle. Several generations of PCV systems have had the problem, and at this time, December 2004, the PCV system still sucks oil into the intake.
The oil-sucking problem will cause carbon buildup in the cylinders. The dealership sells GM Top End Cleaner, and Napa sells SeaFoam. The Top End Cleaner is not available in some smog states like California. Run a tube from the bottle into the hole for the PCV system behind the throttle body on the passenger side. Start the car, then start slowly sucking the solution into the engine. Don�t go too fast or the engine could lockup. As soon as the solution is gone, stop the motor for >4 hours, but preferably 12 hours. Be aware that when the engine is restarted, there will be a LOT of smoke!
The oil-sucking can be prevented by installing a catch can. AMW and Greddy make catch cans, but a homebuilt catch can may be built using a Campbell-Hausfield air tool oil separator from most tool stores, including AutoZone. The AMW and Greddy cans are ~$100, but look great. The CH can is $15-25 for all the parts, and you can see how much oil is in it.
Overheating & burning smells
Even though the engine can heat up to 220, even 240 degrees Fahrenheit, this is normal. The radiator will keep the engine cool enough unless the radiator is blocked. Reprogramming the PCM can allow the fans to turn on earlier. If the fans also cool an aftermarket oil cooler, make sure the oil occasionally gets to 220 degrees to allow condensation and fuel to evaporate away. Fan settings and oil thermostats are two different ways to do this.
It's not uncommon for plastic bags to get sucked up under the front bumper, and cover the radiator, thus causing the car to truly overheat. If this happens, take a quick peek under the bumper, and remove anything under there. Sometimes bags get stuck to the exhaust pipes too, causing quite a stench as they burn away.
Locked steering column
All C5�s, particularly manual transmission C5�s, and early C6 steering columns have a tendency to lock and stay locked. Usually it can be unlocked once, but just once. Some owners claim that vigorously shaking the steering wheel can unlock the steering wheel. Dealer's are able to disable the locking mechanism with a modified locking plate. Currently this is the only real method to disable the locking mechanism. Basically the wheel will still try to lock, but there will be nothing for it to lock to. It�s like a door dead bolt with a slot cut into the door jamb. There is a $100 kit that disables the steering column lock, and can be installed easily, but enough car vibrations can cause the lock to fall into the locking plate, even while driving!
GM has a part (#88952428 or 88952428) that has a harness wiring jumper and different lock plate. Not sure what the difference in the kits are.
After reading a few posts, manual transmission C5�s & C6�s are still in danger, even if the lock is disabled. The lock can vibrate out over time and get trapped in the locking plate. Auto transmission cars that have undergone the recall and new auto�s will not have the locking plate at all, so they are safe. More information about COMPLETELY disabling the steering column lock will be forthcoming from other�s on the forum, and by my own personal project. Until then, here are a few links about the topic:
Column Lock Harness K Installation
A4 non locking column plate --- must be a member
Column-lock again even with CLB!
Has anyone ELSE beat column lock?
Faulty gas gauge
If you have bad gas (phew!), the fuel sender can be affected by the high sulfur content in the fuel, and cause the gauge to read empty. They car will still operate normally, and the gas gauge will work again if you use better gas, and will usually start again when you restart the car. It's just better to use good gas. Some people have had luck with running fuel filter cleaners thru the gas tank. New fuel senders sometimes fixes this problem. This thread has a LOT of ideas about what could be causing the problems, how to avoid problems, and how to fix it. It also points out how the late C5 fuel tanks and crossover tube is different.
Noisy fuel pump
There are two fuel tanks, and two fuel pumps. One fuel pump continually pumps gas from the passenger side tank into the driver side tank, and is quiet. The main fuel pump is directly behind the drivers seat, and can be annoying loud, especially on early C5�s. It's normal, and not a sign of a failing fuel pump. Chevrolet does have a bulletin out instructing how to better insulate against the sound of the fuel pump. This is merely an annoyance. A newer, quieter pump can also be installed.
Extremely high oil pressure reading
The oil pressure sensor can fail, but it is still okay to drive. Turn the car off, but with the key in the �on� position and check the oil pressure gauge. It should read �0�. If the oil pressure sensor is bad, it will show a positive reading. The oil pressure sender is located behind the intake manifold, and will require moving the intake manifold. The sender costs about $40 and part # 12573107 or 12562230.
How-to
Suspension squeaking
In cold weather you may hear the suspension creak when you go over speed bumps. To fix this, clean (optional) and lubricate the sway bar bushings. The adjustable metal sway bar end links on Hotchkis and T1 bars can also create loud clicking sounds. Most adjustable end links are quiet initially, but wear out and get noisy over time. Greasing and protecting the end links from dirt may prevent wear.
Tough shifting
The shifter in manually shifted Corvette's takes a strong arm to get it into gear. You really have to make sure that the shifter is fully in 1st and Reverse, or it will pop out of gear when you let the clutch out. This is not the fault of the car, but the fault of the driver.
Manual transmissions -- Replacing the transmission fluid often helps shifting. Early transmissions have paper blocker ring that require Dexron III compatible (usually organic) fluid because some synthetics will destroy the paper blocker rings and subsequently the transmission. Later transmissions, and all rebuilt transmissions, have Kevlar/carbon fiber parts that allow the use of synthetic fluids. I believe the 98-00 transmissions have the paper blocker rings. The safe transmission fluids seem to be: GM Synchromesh PN #12345349, Honda ATF-Z1, Royal Purple Synchromax, Amsoil ATF, O�Reilly Dexron III ATF. The following transmission fluids may be unsafe for early transmissions: Redline D4 ATF, Mobil 1 ATF, Royal Purple Max ATF.
Related threads:
LS1.com - Ending the speculation: Blocker rings, who's had them fail?
LS1Tech.com - Ending the speculation: Blocker rings, who's had them fail?
Mobil 1 Synthetic ATF for a M6?
If it is especially tough to shift into 2nd or 4th gear, it's possible that the synchro's are worn out or the forks are bent. Do NOT force it into gear. Abuse creates and aggravates this problem. You can still drive, even quite well, without synchro's....or a clutch for that matter if you know how to rev match.
Some aftermarket shifters make it easier to make sure you're fully in gear, and prevent gear grinding, but they also vibrate, and require more effort to shift. The stock shifter has a tuned weight damper that changes the vibrations to a non-audible frequency. The shaking doesn�t annoy some people, and there are some fixes.
Leaky butt
The differential can leak from the side covers. The problem has to do with the design. The lip on the casing is not wide enough to create a proper seal with the cover. Resealing the covers can be successful, but many dealers do not use the correct sealant.
Inside/outside tire spinning
If one tire spins while turning, adjust the friction modifier ratio. Aftermarket gear fluid from Royal Purple, Amsoil and Redline do not require additional friction modifier. GM�s friction modifier is PN #12377916. Too much friction modifier and the inside tire will spin/skip/hop. Too little friction modifier and the outside tire will spin/skip/hop. -- Thanks Russ!
Tire hop
Tire hop during hard acceleration in cold weather is common, even if the same tires don�t hop in warmer weather. Tire rubber when viewed thru a microscope looks like a web. Normally parts of this web grabs onto objects on the ground and stretch until either the car moves forward, or the web breaks, resulting in tire spin. I believe in cold weather, the web is too stiff for either of these events to occur, so the tires hop. To find out more, read Racing & High Performance Tire: Using Tires to Tune for Grip and Balance. I haven�t read it, but if you do, please let me know if my guess is correct. I found a couple stories on Google about people curing wheel hop with stiffer bushings and/or (jounce) shocks.
Interior rattles
The visors may rattle when they are put up, but if you flip them down, the rattle goes away. Squeezing the mirror lid down seems to take care of it. Try glueing a piece of felt or velcro between the mirror and lid to see if that fixes it. Caravaggio also makes replacement leather visors, but they go for $400.
The stereo is Bose, and to go along with the historically crappy build quality of Bose products, Bose has graced the Corvette with Bose emblems on the door speaker covers that rattle when you play music with bass. A Bose system doesn't exist that puts out good bass, but the system still manages to rattle the emblems when playing Country, Hip Hop, or Techno at moderate volumes. Check this problem by having a passenger and yourself putting a finger on the emblems with music playing. Glue the emblems down to fix it.
If the roof isn't tightened down enough, it will rattle. There are some adjustment screws in the roof to make this adjustment.
Belt Chirping
During cold weather, the belt can chirp. Goodyear Gatorback belts from AutoZone don�t chirp.
Sticky Hatch
During cold weather, the hatch may pop up slowly, or not at all. Spray the latches with silicone grease until they come up properly. If the struts do not hold up the hatch, try lubing the strut bars.
1997: Service Bulletin: Hatch Will Not Pop Up When Activated in Cold Weather
Rocker failure
The needle bearings in the OEM rockers have been known to fail. Usually the problem is noticed with extra valvetrain noise and needle bearings stuck to a magnetic oil plug. Nasty Performance will rebuild OEM rockers with Harland Sharp bearings. This seems to be one of the better solutions since the stock rocker is very good at high rpms. Most aftermarket rockers are nose heavy and require grinding the heads and valve covers to fit. Currently Harland Sharp rockers are having problems with c-clip retainers falling off and causing problems on the way. I�ll be following this issue since I have a set of HS rockers on my shelf waiting for this issue to be resolved. Here are some links:
LS1Tech - EMERGENCY!! ROCKERS! Help ASAP!
LS1Tech - Harland Sharp Rocker Failure
LS1Tech - Install or not install HS rockers?
1998-2002: Service Bulletin: Needle Bearings Found In Oil Pan (Replace Rocker Arms)
Other Information
Active Stability Control
This allows you to keep some control of the car even when you do really stupid stunts. It doesn't bend the laws of physics, but will keep the car pointed where you are steering; you may still slide off the road, but at least the car will be pointed in the direction you were steering! One of the sensors is located around the passenger seat, and needs to be considered when installing a racing bucket. If you move that sensor, Active Stability will not know how to balance the car, and can be very dangerous. Active Stability came out around '99.
Jacking
The C5 was the first car to use hydroformed frame rails. Hydroformed rails are quickly becoming a common platform for new cars, but not many shops are prepared to lift these vehicles. The C5 requires an adapter for regular jacks and lifts to fit the jacking points. Make your own adapters with a hockey puck (or two) with a 1 1/2" eye bolt screwed thru the center. Stick the eye bolt thru the slit in the jacking point, turn 90 degrees, place jack under adapter and jack away....if you can get the jack under the car. You may have to use ramps. The C5 is so low that most people make their own wooden ramps....rhino ramps are too steep.
Key Fobs
There are basically two different kinds of key fobs, and they are not compatible with each other.
97-00, but 00 does not have the Passive Lock feature
01-04
Both remotes use a CR2450 coin type battery. I found replacement batteries at Office Depot. To replace, use a coin to wedge between the seam, and twist.
Ref: Service manual, page 8-747.
Originally Posted by vette747
Fob programming
1-Turn the ignition to RUN
2-Turn the radio off
3-Press the RESET button in order to clear any IPC warning messages
4-Press the Option button on the DIC until the IPC display is blank in order to enter the program mode
5-Press and hold the Reset button for 3 seconds
6-Press the option button until FOB Training message is displayed
7-Press the Reset button in order to begin the programming sequence.
8-Simultaneously press and hold the lock an unlock buttons on the first transmitter for 12 seconds. The IPC will indicate when that transmitter is programmed and when to proceed to the next. Repeat this step for each transmitter.
The OEM platinum plugs, along with other plugs have had problems with the pucks falling off. I have a picture of missing pucks in this thread. This thread outlines some of the problems with using platinum, and a recommendation for using silver tipped plugs. Basically, of all spark plug tips, platinum is the worst conductor, copper is good, iridium is even better and silver is the best. Don�t take my word for it, do a little research, starting with this review. As for longevity, platinum, iridium and silver do have an advantage over copper, but plugs foul up after ~10K negating any difference corrosion would cause, and no plug will run well after 100K miles.
To make the spark plugs easier to change, get the Snap-On double-swivel sparkplug tool and remove the coil packs. Here�s all you need to know about sparkplug changes: Go!
Alternator Replacement
�98 AC Delco part #10246634
Originally Posted by Evil-Twin
If you have the original alternator, it is clutch-less. Newer C5's with automatic ( A4) came with a clutch at the pulley to address belt squeal when putting in and out of gear. You have a Valeo 110 amp alternator made in France... it is a good unit. Your specs seem to be OK. The alternator is not your everyday alternator, it communicates with your PCM, the PCM that came with your car.,. GM came up with a clutch type A4 alternator with 140 amps, made in Mexico... the alternator works OK, but does not communicate well with your pre 2000 PCM. Many people experience charging system fault messages with this unit..The PCM thinks it is a 110 unit.
AS our Resident Electrical guru has mentioned, and I concur, if you have a problem with your alternator, the PCM will flash you a message stating you have a "charging system fault".,.,.If you do not have this, then I suspect you are ok...
The latest word I heard from the people who sign my pension check is that they have a fix for this: and its is the new Mexican made clutch driven 140 amp alternator, and a PCM reflash.... But to be honest... this is from the same group that said they have a fix for the column lock disaster... If I were you, I would never give up my original alternator.
You have a smart alternator, here is how it works:
The L-terminal circuit from the generator is a discrete circuit (a discrete circuit has no splices and only one Src and destination) into the PCM. The PCM applies ignition voltage to the generator L-terminal circuit. A small amount of current flows from this circuit through the generator windings to ground to create a magnetic field which starts the generator process. When the generator is at operating speed and producing voltage, a solid state switch for the L-terminal circuit in the generator opens and the PCM detects that the initial startup current flow has stopped.
The PCM expects to detect low voltage on the L-terminal circuit prior to the generator rotating at operating speed and conversely expects the circuit to be at ignition voltage potential when the generator is operational. When the PCM detects a fault (circuit shorted to ground, or circuit shorted to voltage), the Driver Information Center will display Charging System Fault.
The generator has an input to the PCM called the F Terminal to indicate the percentage of total capacity that the generator is producing. This signal is detected by the PCM as a duty cycle from the generator and displayed on the scan tool as a percentage. The PCM can monitor the generators output under all conditions to determine if it is functioning normally.
When there is low demand from the electrical system on the generator, a low duty cycle percentage will be displayed. As more accessory load is placed on the generator, the duty cycle output detected by the PCM will approach 100 percent. A normally functioning generating system will never reach 100 percent as indicated on the scan tool.
The L and F terminals are the red and grey
I tried to make this as simple as possible so those thinking 1960's/70's alternators/gen will throw all that old stuff away, clear their head and rethink smart alternator/gen. systems.
Thanks Bill Curlee for the vote of confidence...
Good Luck
Bill aka ( ET )
These problems, and many others, are addressed at the www.corvetteactioncenter.com in the Tech Center -> Knowledge Base.
While these problems do sound numerous and severe, just remember that JD Power considers this a very reliable car. If you buy a Corvette, consider yourself fortunate that there are many reSrcs available to help you locate and correct problems.
Secrets of the C5
Copied from www.corvettemechanic.com
● The little yellow �helper light� on the bottom of the rear-view mirror that illuminates the shifter area.
● That you can put your key in the driver�s door and turn it twice towards the front to unlock the passenger door and a third time to pop the trunk.
● That you can pop the trunk and also pop the gas cap cover by pulling on metal lines hidden in the back.
● The little slotted cover on the dash behind the steering wheel is where the inside air temperature sensor is located.
● All of the option codes are in the glove box.
● Tire inflation recommended pressures are on the driver�s door.
● The thing that looks like a little LED near the DIC buttons is a light sensor.
● The thing that looks like a little LED near the defroster vent is a UV sensor for determining A/C usage to compensate for the heating effect of the sun.
● The build sheet is in the front re-bar.
● If you leave your turn signal on, in about 1 minute it will start to ding (loud enough to hear over the stereo) to let you know you have old timers disease.
● You can reset the oil life by pumping the gas pedal 3 times (but not with the engine running).
● Hold down the reset button while on one of the trip odometers and it changes that reading to the miles you�ve traveled since last starting the engine.
● Hold down the Active Handling button for 5 sec. to engage �Competitive Driving� on cars equipped with active handling (2000 and previous years must be stopped.)
● If you pull the seatbelts all the way out while you�re buckled in, they ratchet back in to hold you tighter into the seat. (then move the seat forward to make it extra snug -- Leafty)
● Simply remove fuse #2 under the hood and your DRLs will be out permanently. Only thing affected is that when you unlock at night using the key fob your front turn signal lights and back up lights will not flash. Your front turn signals will operate normally, however.
● The side-view mirrors can twist both forward and backward, decreasing the chance of damage if struck.
● There is a release opening with a flap to let air out of the car when the hatch is closed. It is located just above the driver side rear compartment behind the carpet and on the side of the car. Not that it really works well.
● Also you can ground your amp to a screw/bolt that holds the rear middle compartment to the frame.
● If you have a 6-speed car you can pop the trunk when the car is running by lifting the e-brake.
● There is a spot on the driver side just out of the middle compartment under the carpet for the lug nut key. You should have a compartment on the drivers & passenger�s side (in the trunk) and a center compartment. On the left (drivers) side of the center compartment, on the left side where the center cover fits, there is an �indent� that holds the wheel lock key.
● If you turn on the headlights, then go to parking light position, the lamps remain up but the headlights are not left on.
● If you have the passive entry feature: If you lock the keys in the car, wait a few minutes and then shake the car. That will unlock the car.
● HUD has a shift light for the manuals.
● You can easily shift the M6 trans up or down without the clutch if you match revs. (Not great for longevity, however.)
● You can eject the cd from the in-dash player without turning on any power. Don�t even need key in the ignition.
● The cruise will disengage if you purposely make sharp side to side turns while cruising at say 60-80 mph.
● When the engine is shut off, you can get the odometer reading by turning on the parking lights.
● You can program setting #3 (both memory buttons at once) in the seat memory to run the seat back and steering wheel forward for getting in/out of the car with the engine running.
● If you hate DRLs you can pull the e-brake ONE click and they go off.
First you need to know how your car is doing. A trip to the dyno can give you quick answers.
Tuning software can diagnose and tune your car. LS1Tech and HPTuners are two popular tuning packages. At some point in the future, both packages will be able to do scanning with incorporated wideband sensor support. At this time, December 2004, only HPTuners can do both.
Popular upgrades:
Cold air intakes: Vararam, Halltech, Blackwing, zip-tie
Intake manifolds: LS6, LS2, LSX, Wiend, sheetmetal
Cat-back exhausts: B&B, Borla, Z06 Ti, Corsa
Long tube headers: LG, Kooks, TPIS, Stainless Works, Breathless, Jet-Hot, GHL, QTP
Superchargers: ATI (go to A&A), Vortech, Magnacharger
Turbochargers
Stroke & bore
Head & cam packages: TEA, AFR, TSP, Patriot, Cartek
Tires: Kumho Ecsta MX, Nitto Extreme RII
The convertible and coupe (it's really a targa) come with run-flat tires, with 17" wheels in the front, and 18" in the rear, with tire pressure sensors. The Z06 comes with non run-flat tire, but has a tire repair kit. Switching from run-flat tires to regular tires typically allows the C5 to ride softer, accelerate faster, and corner harder, but if you use the tire repair kit (goo) on wheels with the unobtainium tire pressure sensors, you'll destroy the sensors. No C5 has a spare tire. The best way to improve the handling of any car is usually thru the tires.
The hardtops and Z06 have shorter rear windows, are less aerodynamic, noisier, and weigh less than the standard C5 couple like mine. Even though the Z06 has more hp than standard C5�s, they have a lower top speed than manual Z51 C5 coupes. This is due to both aerodynamics and gearing. All C5�s top out at redline in 5th gear, so a taller 5th gear, or much shorter 6th gear, or taller redline is required to go faster. All else being equal, a Z51 coupe will still go faster than a Z06. Above 190 mph, air builds up under the front of the car. This can be solved with a vented hood like the ACP C5-R or MCM hoods.
Weight reduction
You can achieve substantial weight reduction with the following modifications, while still having a car that's very comfortable to drive. Most of these modifications will directly increase (and decrease in a few cases) the safety of the car, while safety is indirectly improved due to the better handling and limits of a lighter car. Fighter pilots say "speed is life". Acceleration, deceleration, and lateral acceleration are all forms of acceleration, and lighter cars accelerate better in each of these ways because the tires have less mass to control....thus a lighter car is a safer car. Lighter cars have better moments of inertia which allows them to turn in more easily and roll less. Lighter cars are also easier on the tires and gas.
All the stage weight estimates are typically wild butt guesses, but it makes it easy to see what is possible. The weight listings in the separate weight posting is MUCH more reliable.
Stage I: Streetable weight reduction mods
Non-popup headlights (~40 lbs)
Braking rotors with an aluminum hat, or titanium rotors (unproven on street cars) (~20-30 lbs)
Carbon fiber hood (~12 lbs)
Z06 (thinner) windshield and side windows (~5.7 lbs)
Non runflat tires (~20 lbs)
Slicks (~30 lbs)
Z06 wheels (~4 lbs est.)
Corsa titanium exhaust (~35 lbs)
Long tube headers (~20 lbs)
Halltech aluminum alternator & bracket (10 lbs)
Carbon fiber driveshaft (~2 lbs)
Newer torque tube
Less options [HUD, elec AC, Active Stability, seat/mirror/steering wheel memory, cd changer] (~50 lbs)
Less gasoline & wiper fluid (No wiper fluid=9lbs, 6 lbs for every gallon of gas in that 18 gallon tank....~81 lbs for autocrossing)
Remove
cargo net
targa top (~20 lbs)
BCM�s
C5 "appearance mods" - exhaust plates, doorsill covers, etc.
fuel rail covers
all loose change, CD's, golf clubs, misc. items, from center console, hatch area, and glove box
Replace
stock crank pulley with aluminum aftermarket pulley
steel dampener with aluminum dampener
stock targa top with lexan piece (coupes)
water pump with electric water pump
battery with smaller battery
non-stressed fasteners with aluminum or titanium fasteners
leaf springs with coil over shocks with titanium springs
steel shifter with aluminum shifter and delrin or titanium shift ****
Empty your pockets of extra change, PDA's, cell phones, keys, lead plates, or whatever other junk you lug around
Go on a diet =p
Stage II: Hardcore semi-streetable weight reduction mods
Aluminum flywheel (~10 lbs)
Lighter clutch like Exedy or Quartermaster (~10 lbs)
Racing buckets (40-50 lbs)
Off-road x-pipe (10 lbs)
Replace stock hood, fenders, doors, roof, hatch and bumpers with aftermarket carbon fiber pieces
Remove
Tire repair kit (Z06)
Floor mats
Fog lights
Stage III: Track only weight reduction mods
Racing steering wheel & delete both airbags (~30 lbs, but get a 4-6 point harness)
Use unpadded aluminum or carbon fiber steering wheel
Run open headers
Replace stock front and rear glass with polycarbonate �glass�
Rebuild motor with Al or Ti connecting rods, Ti valve spring retainers and pushrods
Port the heads
Replace valve covers with magnesium or carbon fiber parts
Strip entire car, acid wash chassis, put car back together.
Remore
Column locking hardware
Interior � passenger seat, carpets, speaker panels, head liner, dash, center console, glove box, door panels, sun visors, rear view mirror, insulation, etc.
A/C Compressor
A/C controls and ducting
AIR pump system
Factory radio, speakers, and/or CD changer, and unnecessary wiring
HUD projector
Windshield wiper fluid reservoir and pump
Windshield wipers and motors
Stock cat back
Power steering pump
Front sway bar (drag only)
ABS, TC, AH hardware and sensors (drag only)
Fender wells
Headlight assembly, turn signals, taillights and reflectors
Shave side mirrors
Torque tunnel cover
OEM seat belts
Parking brake
Side windows and motors
Power locks and power windows
Side impact beams
Casting flash from engine, then polish
Reducing unsprung weight�not all is streetable
Forged 1-piece wheels
Use 3-piece wheels by Jongbloed, Kodiak, CCW, BBS
Skinny front wheels (drag only)
Ti fasteners on 3-piece wheels (~1 lbs per wheel)
Lighter non-runflat tires, or even track only synthetic corded slicks
Lighter calipers
2-piece, unvented or titanium rotors
Titanium wheel studs
Aluminum or titanium lug nuts
Remove tire pressure sensors
Remove rubber valve stem cap
Balance the wheels without tires or balancing weights, and then mount tires
Great literature for hardcore techies
Helm�s Service Manual --- this should come with every Corvette IMHO
Key Design Developments of the 1997 Chevrolet Corvette (SAE SP-1282)
GM eSI Techline Service Manual
Nuts, Bolts and Fasteners and Plumbing Handbook, Carroll Smith
Drive to Win, Carroll Smith: The Essential Guide to Race Driving
Engineer to Win: The Essential Guide to Racing Car Materials Technology or How to Build Winners Which Don�t Break, Carroll Smith
Tune to Win, Carroll Smith
Fiberglass & Composite Materials: An Enthusiast�s Guide to High Performance Non-Metallic Materials for Automotive Racing and Marine Use
How to Make Your Car Handle, Fred Puhn
Race Car Vehicle Dynamics (SAE R146)
Racing & High Performance Tire: Using Tires to Tune for Grip and Balance (SAE R351)
Physics of Racing
Last edited by leaftye; 12-22-2005 at 11:35 PM. Reason: Only took a year between updates!

The following users liked this post:
99FRC Newb (01-23-2024)
12-24-2004, 06:47 PM
#2
Safety Car
Thread Starter
Member Since: Nov 2003
Location: San Diego, CA "leaf" "tee" "e"
Posts: 4,979
Likes: 0
Received 5 Likes
on
4 Posts
C5 Suspension
Swaybars
18.5 lbs - T1 front anti-swaybar w/OEM adjustable endlinks & bushings - Src
8.5 oz - T1 OEM adjustable endlink - Src
3 oz - T1 OEM (endlink) bolt, nut and spacers - Src
5 oz - T1 OEM rear bushings (2) - Src
4.1 lbs - Z51 rear anti-swaybar w/OEM bushings - Src
3.6 lbs - Z51 rear anti-swaybar - Src
4.5 oz - Z51 rear OEM bushings (2) - Src
18.5 oz - Z51 OEM endlinks (2) - Src
9.5 oz - QA-1 endlinks - Src
6.5 oz - Lowe's 1/2" hole, 1.5 mm (avg) thick, 2" diameter (8) - Src
4 oz - Lowe's 1/2" hole, 2.25 mm (avg) thick, 3.5 cm diameter (8) - Src
Rotors
4.8 lbs - ZMI titanium ---Src
14 lb - rear left brake rotor from Napa, made in Canada, part# 86702 - Src
14 lb, 4 oz - rear right brake rotor from Napa, made in Canada, part# 86703 - Src
18 lb, 14 oz - front right brake rotor from Napa, made in USA, part# 86700 - Src
18 lb, 10 oz - front left brake rotor from Napa, made in Canada, part# 86701 - Src
Calipers
5.8 lbs - ZMI - Src
1/2 oz - single Speedbleeder - Src
Pads
1 lb, 2 oz - PFC Z-rated brake pads, single side, rear, without shim - Src
1/2 oz - PFC brake pad rear shim, single side - Src
2 lb, 5 oz - PFC Z-rated brake pads, single side, front, without shims - Src
3 oz - PFC brake pad front shims (2), single side - Src
Wheels
19.2 lbs, front; 21.4 lbs, rear - 97-99 OEM wagon - Src
22 lbs, front; 29 lbs, rear - 97-99 OEM wagon - Src
17 lbs, front; 19.5 lbs rear - 97-00 OEM magnesium - Src
17.5 lbs, front; 19.5 lbs, rear - 97-00 OEM magnesium - Src
18.08 lbs, front; 20.06 rear - 00 OEM standard, thin spoke, high polish - Src
17 lbs, front; 20 lbs, rear - 00 OEM standard, thin spoke, painted, no sensors or centercaps - Src
16 lbs, front; 20 lbs, rear - 01 OEM standard high polish - Src
19.6 lbs, front; 21.4 lbs, rear - 01 Z06 forged - Src
19.2 lbs, front; 21 lbs, rear - 02-04 Z06 cast/spun - Src, Src
24 lbs, 18x10.5 - 00+ repro high polish - Src
28 lbs, front; 32 lbs, rear - Z06 chrome repro - Src
23 lbs, front; 26 lbs, rear - Z06 chrome repro - Src
23.5 lbs, front; 24.5 lbs, rear - Z06 Motorsports, polished - Src
20 lbs, 17x8.5, 58mm offset, front; 23 lbs, 18x9.5, 65mm offset, rear - PWO - Src
22 lbs, 18x10.5, 58mm offset, front - HRE 545 w/clear center - Src
27 lbs, 18x12, 74mm offset, rear - HRE 545 w/clear center - Src
24/25 lbs - Z07 wheel weight, front - Src
28 lbs - Z07 wheel weight, rear - Src
Lugnuts
1.5 oz - OEM open lugnut - Src
Tires
NOTE: Kumho tires are not currently differentiated between runflat and nonrunflat tires.
29.5 lbs, front; 32.5 lbs, rear - Goodyear EMT, stock size - Src
27 lbs, front; 33 lbs, rear - Bridgestone S03's, stock size - Src
26.4 lbs - Goodyear GS-C 275/40R17 - Src
12 lbs, 275/40x17; 15 lbs, 315/35x17; 16 lbs, 305/30x18 - Hoosier A3S03 - Src
28 lbs, 275/40x17=28lbs; 30.5 lbs, 315/35x17 - Goodyear ZR "S" Rains - Src
25 lbs, 275/40x17; 28 lbs, 315/35x17 (shaved to 6/32") - Goodyear GS CS - Src
23lbs, 265/40x17; 24.5 lbs, 275/40x18; 25.5 lbs, 295/35x18 - Goodyear F1 GS CS - Src
27 lbs, 265/40R18; 28 lbs, 315/40R18 - Goodyear GS F1 SC - Src
25 lbs, 255/40R17 - Bridgestone Potenza S02 - Src
27 lbs, 275/40R18 - Bridgestone Potenza S02 - Src
29 lbs, 285/30R18 - Bridgestone Potenza S02 - Src
30 lbs, 285/30R18 - Bridgestone Potenza S02 - Src
30 lbs, 295/30R18 - Bridgestone Potenza S02 - Src
29 lbs, 295/35R18 - Bridgestone Potenza S02 - Src
28 lbs, 245/45R17 - Kumho Ecsta 711 - Src
29 lbs, 245/45R17 - Kumho Ecsta Supra - Src
32 lbs, 245/45R17 - Kumho Ecsta MX - Src
26 lbs, 245/45R17 - Kumho Ecsta Victoracer V700 - Src
30 lbs, 265/40R17 - Kumho Ecsta Supra - Src
20 lbs, 275/40R17 - Kumho Ecsta MX - Src
36 lbs, 275/40R17 - Kumho Ecsta MX - Src
25 lbs, 285/30R18 - Kumho Ecsta V700 - Src
TBD lbs, 295/35R18 - Kumho Ecsta ASX - Src
30 lbs, 295/35R18 - Kumho Ecsta Supra - Src
20 lbs, 275/35R18 - Kumho Ecsta MX - Src
31 lbs, 295/35R18 - Kumho Ecsta MX - Src
26 lbs, 305/30R18 - Kumho Ecsta V700 - Src
28 lbs, 315/35R18 - Kumho Ecsta V710 - Src
30 lbs, 335/30R18 - Kumho Ecsta V700 - Src
Tire Rack
Kumho ECSTA ASX Specs
245/45WR17 27 lbs
275/40WR18 30 lbs
UTQG: 420 AA A
Avon Tech M550 A/S Specs
245/45WR17 29 lbs
275/40WR18 34 lbs
UTQG: 360 AA A
Avon Tech M500 Specs
245/45WR17 28 lbs
275/40WR18 32 lbs
UTQG: 280 AA A
Continental ContiExtremeContact Specs
245/45WR17 24 lbs
275/40WR18 25 lbs
UTQG: 400 AA A
Kumho ECSTA MX Specs
245/45YR17 25 lbs
275/40YR18 29 lbs
UTQG: 220 AA A
Pirelli PZero Nero M&S Specs
245/45WR17 24 lbs
275/40WR18 29 lbs
UTQG: 400 AA A (front), 400 A A (rear)
BFGoodrich g-Force T/A KDW Specs
245/45YR17 28 lbs
275/40YR18 32 lbs
UTQG: 300 AA A
Goodyear Eagle F1 GS Specs
245/45YR17 25 lbs
275/40YR18 28 lbs
UTQG: 300 AA A
Kumho ECSTA MX (runflat) Specs
245/45YR17 32 lbs
275/40YR18 35 lbs
UTQG: 220 AA A
Continental ContiSportContact 2 Specs
245/45YR17 25 lbs
275/40YR18 26 lbs
UTQG: 280 AA A
Dunlop SP Sport 9000 Specs
245/45WR17 26 lbs
275/40WR18 29 lbs
UTQG: 280 A A
BFGoodrich g-Force T/A KD Specs
245/45YR17 27 lbs
275/40YR18 31 lbs
UTQG: 200 AA A
Goodyear Eagle F1 GS-D3 Specs
245/45YR17 25 lbs
275/40YR18 28 lbs
UTQG: 280 AA A
Michelin Pilot XGT Z4 Specs
245/45WR17 26 lbs
275/40WR18 30 lbs
UTQG: 300 A A
Bridgestone Potenza RE050 Specs
245/45WR17 26 lbs
275/40YR18 28 lbs
UTQG: 140 A A
Bridgestone Potenza S-03 Pole Position Specs
245/45YR17 28 lbs
275/40YR18 34 lbs
UTQG: 220 AA A
Goodyear Eagle F1 Supercar Specs
245/45YR17 24 lbs
275/40YR18 27 lbs
UTQG: 220 AA A
Wheel & Tire combined weight
45 lbs, front - 97-00 OEM magnesium w/Nitto 275/40-17 (1/2 tread) - Src
50 lbs, rear - 97-00 OEM magnesium w/Yoko 295/35-18 AVS Sport non-runflats - Src
47 lbs, front - 97-00 OEM magnesium w/OEM 245/45-17 runflats - Src
53 lbs, rear - 97-00 OEM magnesium w/OEM 275/40-18 runflats - Src
50 lbs, 17x8.5, 58mm offset, front - PWO w/OEM 245/45-17 runflats (1/2 tread) - Src
51 lbs - '06 C6Z GM Stock Wheel/Tire Combo, front - Src
56 lbs - '06 C6Z GM Stock Wheel/Tire Combo, rear - Src
C6 Suspension
Z51 rotors
Estimates based on information above and http://forums.corvetteforum.com/showthread.php?t=880807
17 lb, 14 oz - front rotor
24 lb, 16 oz - rear rotor
Drivetrain
Clutch/Flywheel
23.3 lbs - O.E. iron flywheel - Src
44.8 lbs - O.E. flywheel/clutch assembly - Src
49 lbs - Z06 clutch/flywheel assembly - Src
42.8 lbs - Z06 stock - Src
36.7 lbs - Exedy Single Disk - Src
36.7 lbs - Exedy Dual Disk - Src
12.4 lbs - Fidanza flywheel - Src
33.9 lbs - Fidanza flywheel & SPEC clutch assembly - Src
14 lbs - Quartermaster 5.5" 3-disc clutch/flywheel/hardware - Src
115-129 lbs - T56 transmission, TUET1806 - Src
21 lbs - DTE A4 Differential Strut Kit, Stage I - Src
Motor & accessories
457.6 lbs, LS1 auto; 497.2 lbs, LS1/LS6 manual - LS1/LS6 dressed - Src
443 lbs - LS2 dressed - Src
~600 oz - LS1/LS6 connecting rods - Src
434 gm - LS1/LS6 piston - Src
76 gm, intake; 63 gm, exhaust - '02 LS6 valves - Src
99 gm, intake; 86 gm, exhaust - LS1 valves - Src
11.2 gm - LS1/LS6 retainer - Src
7.2 gm - Comp Ti retainer - Src
15 lbs - A.I.R. system & plumbing - Src
30 lbs - AC/condenser/lines/oil holder/brackets/pulleys - Src
10-3/4 oz - airbridge - Src
1 lb, 14 oz - radiator top cover with screws (x4) - Src
1 lb, 12 oz - fuel rail covers - Src
16 lbs - P1SC head unit - Src
14 lbs - A&A single intercooler - Src
8 oz -- Headlight relay
2.5 oz -- OEM air filter clip/band x2
6 oz -- Serpentine belt OEM
4.25 lbs -- OEM LS1 air filter assembly without any clamps of any sort
10.5 oz -- OEM LS1 air bridge
2.1 oz -- Timing belt cover
92.5 lbs - GEN III V8 (LS1) Aluminum block - GM Manual, JRP's SuperFAQ
210.4 lbs - GEN III V8 (LS1) Cast Gray Iron Block - GM Manual, JRP's SuperFAQ
18.9 lbs - GEN III V8 (LS1) Aluminum head - GM Manual, JRP's SuperFAQ
43.2 lbs - GEN III V8 (LS1) Iron head - GM Manual, JRP's SuperFAQ
13.45 lbs - LS1 water pump - Src
10.25 lbs - LS2 water pump - Src
15.5 oz - LS1 piston - Src
480 gm - LS7 titanium connecting rod - Src
~685 gm - LS2 connecting rod - Src
76 gm - LS7 intake valve (2.200) - Src
71 gm - LS7 exhaust valve (1.600) - Src
- Src
Batteries
13 lbs - Odyssey/Dynabatt/Hawker racing battery - Src
13.5 lbs - Genesis G16EP, LWH=7.15x3.01x6.65, CC=280 - Src
15 lbs - PC 680, LWH=7.27x3.12x6.67, CC=280 - Src
23 lbs - SVR SVR28-12, LWH=6.88x6.50x4.88 - Src
23 lbs - Genesis G26EP, LWH=6.57x6.92x4.96, CC=470 - Src
26 lbs - Odyssey PC 925, LWH=6.69x7.05x5.04, CC=470 - Src
26 lbs - SVR SVR33-12, LWH=7.75x5.00x7.25, CC=500 - Src
26 lbs - Optima Yellow Top 51, LWH=9.25x5.00x9.00, CC=500 - Src
32.8 lbs - AC Delco 75P-7YR, LWH=9.50x7.10x7.30, CC=550 - Src
32.9 lbs - Genesis G42EP, LWH=7.78x6.53x6.72, CC=630 - Src
35.4 lbs - Odyssey PC 1200, LWH=7.87x6.66x7.55, CC=630 - Src
33.1 lbs - Optima Red Top 75/35, LWH=9.31x6.81x7.63, CC=650 - Src
37.7 lbs - AC Delco 34P-7YR, LWH=10.3x6.80x7.80, CC=650 - Src
36 lbs - Exide Select Orbital 75, LWH=9.00x7.00x7.44, CC=690 - Src
38.8 lbs - Optima Red Top 34/78, LWH=10.0x6.88x7.81, CC=750 - Src
38 lbs - Exide Select Orbital 78, LWH=10.1x7.00x8.1, CC=770 - Src
45.6 lbs - AC Delco 65P-7YR, LWH=11.9x7.50x7.60, CC=800 - Src
57 lbs - SVR SVR80-12, LWH=10.6x6.50x6.25, CC=800 - Src
58.7 lbs - Odyssey PC 1700, LWH=13.02x6.62x7.68, CC=930 - Src
Exhaust
Headers with H-pipe unless noted otherwise
68 lbs - 97 stock double wall manifolds & h-pipe - Src
72.5 lbs - 02 cast iron manifolds with pup cats & h-pipe - Src
46 lbs - GHL 1-3/4" headers w/3" collectors & 3" Random Tech cats and x-pipe - Src
52 or 61 lbs - FLP LT's w/cats - Src
49 lbs - Kooks LT's w/high-flow cats - Src
48.5 lbs - LGM Pro LT's w/high-flow cats - Src
45.4 lbs - QTP LT's w/high-flow cats - Src
50 lbs - Stainless Works w/cats - Src
63 lbs - SuperMAXX LT's w/high-flow cats - Src
Cat-back Exhaust
14 lbs per side - Z06 Ti - Src
13.5 lbs per side - Z06 Ti - Src
15-16 lbs per side - Z06 Ti - Src
17 lbs per side - Z06 Ti - Src
22 lbs per side - OEM steel - Src
24 lbs per side - OEM steel - Src
19 lbs - B&B PRT's - Src
19 lbs - Borla Stingers (2-tip) - Src
22 lbs - Borla Stingers (4-tip) - Src
Universal Components
12.0 lbs - Random Tech X-pipe - Src
5.8 lbs - Random Tech left cat - Src
5.7 lbs - Random Tech right cat - Src
2.5 lbs - Dynatech clamps (4) - Src
Body
9.0 lbs - Window glass (left) - Src
9.0 lbs - Window glass (right) - Src
36.09 lbs - C5 Windshield - Src
30.39 lbs - Z06 Windshield - Src, Src
3.0 lbs - Exterior rear view mirror (left) - Src
3.0 lbs - Exterior rear view mirror (right) - Src
6.2 lbs - Stock tunnel plate - Src
15.4 lbs - Elite Engineering 304 SS, 0.134" tunnel plate, uncoated - Src
9.4 lbs - Elite Engineering aluminum 1/4" tunnel plate, uncoated - Src
9.6 lbs - Elite Engineering aluminum 1/4" tunnel plate, coated - Src
14.6 lbs - Elite Engineering aluminum 3/8" tunnel plate, coated - Src
9.2 lbs - LAPD 1/4" 6061-T6 aluminum Tunnel Heat/Insulator/Chassis Re-Enforcement Plate, coated - Src, Src
12.2 lbs - LAPD 3.8" 6061-T6 aluminum Tunnel Heat/Insulator/Chassis Re-Enforcement Plate, coated - Src, Src
12.7 lbs - VNM 304 SS BackBone, coated - Src, Src
1/2 oz - part# 11515757, crashbar bolt - Src
1/4 oz - part# 10281493, crashbar nutsert (big) - Src
1/2 oz - part# 10281487, crashbar nutsert (small) (x4) - Src
1/2 oz - part# 10#11515638, radiator/bumper nut-speci (x4) - Src
1/2 oz - part# 11513568, radiator/bumper screws (x3) - Src
1 lb, 14 oz - US headlight with bulbs - Src
3 lbs - Euro headlight with bulb
1 oz - front spring to subframe bolt - Src
502 lbs - C5 frame - Src
30.4 lbs - C5 Hood & substrate (no light) - Src
20.5 lbs - CE Hood (with substrate & light??) - Src
31.1 lbs - C5/Z06 Hood (with substrate & light??) - Src
14 lbs - Motor City 100% carbon fiber hood - Src
24 lbs - Motor City 50% carbon fiber, 50% fiberglass hood - Src
5.26 lbs - Stock 63mm driveshaft, part #12564457 - Src, Src
4.56 lbs - LG carbon fiber driveshaft - Src, Src
4.5 oz - Headlight surround
5 oz - Air dam - right side
20.22 lbs - C6 transparent roof - Src
20.90 lbs - C6 painted roof - Src
21.86 lbs - C5 painted roof - Src
Interior
3.5 lbs - Driver side air bag - Src
8.5 lbs - Passenger air bag - Src
3.5 lbs - Driver side seatbelt - Src
4 lbs - Interior fan motor - Src
8 lbs - Front speakers - Src
18.0 lbs - HVAC (base under dash unit - Src
4.0 lbs - Blower motor (Heat/AC) - Src
2.0 lbs - HVAC plastic ducts - Src
4.0 lbs - Airbag/glove box aluminum support - Src
2.0 lbs - Aluminum center console support - Src
1.0 lbs - A/C control head - Src
2.0 lbs - Dash vent duct - Src
1.0 lbs - Knee bolster support (white foam) - Src
1.0 lbs - Bose radio amplifier box - Src
3.0 lbs - Radio, AM/FM/CD - Src
7.0 lbs - Door module, harness, regulator (left) - Src
7.0 lbs - Door module, harness, regulator (right) - Src
3.0 lbs - Glove box assembly - Src
3.0 lbs - Door speaker (left) - Src
3.0 lbs - Door speaker (right) - Src
3 lb, 8 oz - driver side seat belt and fasteners - Src
11 oz - cd changer pack, no cds - Src
6-1/2 oz - 12 cds - Src
2 lb, 2 oz - trunk side storage covers, both - Src
1 lb, 10 oz - passenger floormat - Src
2.5 oz - Right seat button surround part # 1027308
2.5 oz - Ashtray
3 oz - Driver's seat frame plastic bracket covers and front bolts
5 oz - Seat belt top bolt and covers
1.5 oz - Dashboard cigarette lighter male & female
Seats
Sparco - Src
I'm using the Sparco Evo 2 as the largest possible seat that can fit, so all the seats below should fit. 20.91"/531mm base, 23.66"/601mm shoulder
18.00 lbs - Sprint (steel tube)
15.00 lbs - Ultra (fiberglass)
16.50 lbs - Off Road (fiberglass)
18.50 lbs - All Road (fiberglass)
21.50 lbs - Pro 2000 (fiberglass)
13.00 lbs - Pro 2000 (carbon fiber)
18.50 lbs - Evo (fiberglass)
12.50 lbs - Evo (carbon fiber)
20.00 lbs - Evo 2 (fiberglass)
17.50 lbs - Pro WRC (fiberglass)
14.50 lbs - Pro WRC (carbon fiber)
18.00 lbs - Rev (fiberglass)
22.00 lbs - Corsa (fiberglass)
12.50 lbs - Corsa (carbon fiber)
25.00 lbs - Circuit (fiberglass)
15.00 lbs - Circuit S-light (carbon fiber)
14.00 lbs - S-light (carbon fiber)
17.00 lbs - Speed (steel tube)
44.00 lbs - Milano (steel tube)
40.00 lbs - Monza (steel tube)
40.00 lbs - Torino (steel tube)
48.00 lbs - Milano Presige (steel tube)
16.00 lbs - Roadster (fiberglass)
20.00 lbs - Fighter (fiberglass)
Cobra seats
I'm using the Sparco Evo 2 as the largest possible seat that can fit, so all the seats below should fit. 20.91"/531mm base, 23.66"/601mm shoulder
14.3 lbs - Aqua 4x4 (fiberglass)
17.6 lbs - Evolution (fiberglass)
14.1 lbs - Evolution Technology (carbon fiber)
14.3 lbs - Imola (fiberglass)
11.2 lbs - Imola Technology (carbon fiber)
15.4 lbs - Suzuka (fiberglass)
12.3 lbs - Suzuka Technology (carbon fiber)
19.8 lbs - Monaco (steel)
Other seats from Flying Miata site that aren't listed above
I'm using the Sparco Evo 2 as the largest possible seat that can fit, so all the seats below should fit. 20.91"/531mm base, 23.66"/601mm shoulder
12.00 lbs - Aerosport AS100
7.50 lbs - Aerosport AS100/CK
12.00 lbs - Aerosport AS100N
7.50 lbs - Aerosport AS100N/CK
16.00 lbs - Aerosport AS200
30.00 lbs - Corbeau A4
12.00 lbs - Corbeau Classic Bucket
21.00 lbs - Corbeau Classic II
16.00 lbs - Corbeau Forza
25.00 lbs - Corbeau GT7
12.00 lbs - Corbeau GTA Lo Back
10.50 lbs - Corbeau Monza
42.00 lbs - Koenig Bio-Med
32.00 lbs - Koenig CL200
32.00 lbs - Koenig CP200
30.00 lbs - Koenig CP700
28.00 lbs - Koenig CPK700
38.00 lbs - Koenig K370
38.00 lbs - Koenig K530
38.00 lbs - Koenig K4000
31.00 lbs - Koenig K5000
31.00 lbs - Koenig K5000G
36.00 lbs - Koenig Miata
32.00 lbs - Koenig RL200
12.00 lbs - Koenig RS1000
10.00 lbs - Koenig RS2000
10.00 lbs - Koenig RS3000
26.00 lbs - Koenig S50
30.00 lbs - Koenig S100
28.00 lbs - Koenig SP700
28.00 lbs - Koenig Speedster
12.60 lbs - Momo Start
16.90 lbs - Momo T-Frame
14.70 lbs - NEX Racing Seat
16.50 lbs - NEX Reclinable Racing Seat
13.20 lbs - OMP Champion
18.50 lbs - OMP Eco
15.00 lbs - OMP Evoluzione
24.30 lbs - OMP Rec
24.30 lbs - OMP Red
19.00 lbs - OMP San Remo
14.30 lbs - OMP Sport
19.80 lbs - OMP Strada
19.50 lbs - Procar by Scat, Race 1600 Series
16.50 lbs - Procar by Scat, Xtreme 1700 Series
14.30 lbs - RaceTech JetSprint
16.50 lbs - RaceTech ProSprint
18.70 lbs - RaceTech RAC 4009
13.20 lbs - RaceTech RAC 9000
14.30 lbs - RaceTech RAC 9009
9.90 lbs - Recaro SPA
12.10 lbs - SPA Racer
Fasteners -- no weights, just intentions to replace with Al or Ti
?? oz - Bolt, Rocker Arm Cover 202-12556430 M6x1.0x33.5 - Src
?? oz - Bolt, HDR Pt (Bolt, Eng Lift Brkt) 231-11516328 M10x1.5x30 - Src
?? oz - Stud, Ign Coil M6x1.0x40 239/240-12557539 - Src
?? oz - Bolt, Front/Rear Timing Cover M8x1.25x30 277/309-11515758 - Src
?? oz - Bolt, Flywhl M11x1.5x23.5 124-12553332 - Src
?? oz - Bolt, CLU Press Plt M10x1.5x25 174-12561465 - Src
?? oz - Bolt, HFH Dome Hd, Tq tube front to bellhousing M10x1.5x40 5-11516862 - Src
?? oz - Bolt, Front bumper impact bar skid plate to subframe, Hex M8x1.25x30, 9-11516594 - Src
?? oz - Screw, Radiator support, Hex M6x1x25, 2-11503982 - Src
?? oz - Screw, RD WA HD, 4.2x1.41x16, 13-11515498 - Src
?? oz - Bolt, Scr Rd, M4.2x1.4x30 8.38 OD, 15-20374961 - Src
?? oz - Bolt, Intake Manifold w/flat washer, M6x1.0x21.8, 13.6 OD, 11-12552344 - Src
?? oz - Bolt, Metric Hx Flg HD, Throttle Body, M6x1x30, 2-11514008 - Src
?? oz - Bolt/Screw Spring-to-subframe, M10x1.5x30x20THD, 22.3 OD, 39-11515798 - Src
?? oz - Bolt, W/WA Floor panel tunnel reinforcement, M6x1x25, 25-11514139 - Src
2000 Corvette Vehicle Dismantling Manual
0.42 kg - Engine oil filter
0.31 kg - Refrigerant 134A
10.86 kg - Fuel tank (both)
0.34 kg - Fuel tank isolator
0.24 kg - Fuel filler neck insert
0.20 kg - Fuel tank tube
16.52 kg - Battery
0.14 kg - Wheel weights (8)
1.53 kg - Driver side air bag
3.95 kg - Passenger air bag
30.57 kg - Rear tire (2)
27.12 kg - Front tire (2)
16.37 kg - Windshield
8.48 kg - Front door window, lh, rh (2)
0.56 kg - Front door weatherstrip (2)
0.79 kg - Sun roof panel weatherstrip (3)
3.50 kg - Sun roof panel
1.15 kg - Sun roof panel rear weatherstrip
11.40 kg - Back window
8.63 kg - Hood
5.16 kg - Hood substrate
6.74 kg - Front bumper fascia
1.27 kg - Front bumper energy absorber
0.39 kg - Fender liner duct (2)
3.16 kg - Front fender, right
0.56 kg - Front liner insert (2)
3.34 kg - Front fender liner, right
3.16 kg - Front fender liner, left
3.11 kg - Front fender, left
4.09 kg - Right rocker panel
3.73 kg - Left rocker panel
0.43 kg - Charcoal canister housing
2.82 kg - Quarter panel, right rear
4.32 kg - Axle assembly boot, lh, rh (4)
1.14 kg - Wheel liner, right rear
1.07 kg - Wheel liner, left rear
2.72 kg - Quarter panel, left rear
2.90 kg - Rear bumper energy absorber
8.24 kg - Rear bumper fascia
1.26 kg - Front seat foam, lower, lh, rh (2)
0.30 kg - Front seat belt webbing (2)
1.18 kg - Front seat foam, center, lh, rh (2)
1.64 kg - Front seat foam, upper, lh, rh (2)
2.40 kg - Front seat frame (2)
0.34 kg - Hood weatherstrip
0.15 kg - Master cylinder reservoir
0.64 kg - Valve cover shield (2)
3.64 kg - Intake manifold
0.43 kg - Battery tray
1.31 kg - Coolant reservoir
0.36 kg - Air cleaner tube
0.24 kg - Power steering pump reservoir
0.63 kg - Washer fluid reservoir
0.82 kg - Radiator bracket
0.86 kg - Radiator cooling fan (2)
0.62 kg - Radiator tank (2)
1.54 kg - Radiator cooling fan frame
0.86 kg - Air cleaner cover
0.29 kg - Air cleaner frame
0.50 kg - Air cleaner housing, lower
2005 Corvette Vehicle Dismantling Manual
24.80 kg - Front tire (2)
0.42 kg - Engine Oil Filter
16.3 kg - Battery
3.48 kg - Passenger Air Bag
0.26 kg - Fuel Tank Isolator
11.21 kg - Fuel Tank (2)
26.80 kg - Rear Tire (2)
1.53 kg - Driver Side Air Bag (1)
0.20 kg - Wheel Weights (4)
0.78 kg - Side Air Bag (2)
0.62 kg - Seat Belt Pretensioner (2)
14.49 kg - Windshield
7.04 kg - Front door window, lh, rh (2)
12.86 kg - Front door, lh, rh (2)
0.72 kg - Front door weatherstrip (2)
1.12 kg - Windshield opening weatherstrip
3.50 kg - Lift off roof panel
1.15 kg - Lift off panel rear weatherstrip
10.47 kg - Back window
0.40 kg - Lift off panel side weatherstrip (2)
10.5 kg - Hood
0.46 kg - Front wheelhouse extension (2)
6.97 kg - Front bumper fascia
1.66 kg - Front bumper energy absorber
0.33 kg - Front fender brake cooler duct (2)
3.85 kg - Front fender, right
0.79 kg - Front wheelhouse lower rear closeout (2)
0.79 kg - Front wheelhouse lower front closeout (2)
3.82 kg - Front fender, left
3.50 kg - Quarter panel, right rear
4.32 kg - Axle assembly boot, lh, rh (2)
4.12 kg - Rear Wheelhouse liner, lh, rh (2)
3.57 kg - Quarter panel, left rear
1.76 kg - Rear bumper energy absorber
7.00 kg - Rear bumper fascia
2.16 kg - Lower rear fascia
0.45 kg - Grille
1.34 kg - Front seat foam, lower, lh, rh (2)
0.30 kg - Front seat belt webbing (2)
1.09 kg - Front seat foam, center, lh, rh (2)
1.48 kg - Front seat foam, upper, lh, rh (2)
5.97 kg - Front seat frame back (2)
0.34 kg - Hood weatherstrip
0.15 kg - Master cylinder reservoir
1.24 kg - Valve cover shield (2)
3.64 kg - Intake manifold
0.49 kg - Battery tray
0.38 kg - Engine air inlet duct
0.69 kg - Engine air inlet tube
0.24 kg - Power steering pump reservoir
0.78 kg - Radiator bracket
0.58 kg - Radiator cooling fan
0.78 kg - Radiator tank (2)
1.50 kg - Radiator cooling fan frame
0.52 kg - Air cleaner housing, upper (2)
0.64 kg - Air cleaner housing, lower (2)
F-Body
49 lbs - '99 WS6 driver leather power seat with lumber - Src
40 lbs - '99 WS6 passenger leather power seat - Src
23.5 lbs - '99 WS6 rear leather seatback & buckets - Src
27 lbs - '94 Formula leather rear seatback & buckets without seatbelts - Src
29 lbs - '00 SS Formula leather rear seatback & buckets with seatbelts - Src
34-36 lbs - Carpet - Src, Src
14 lbs - Year One lightweight carpet - Src
19.5 lbs - Bogart Aluma Light 15x3.5 w/Moroso DS-2 - Src
25.5 lbs - Pro Star 15x3.5 w/Steel Belted Radial - Src
34.5 lbs - Bogart Aluma Light 15x10.5 w/28x10.5 ET Drag - Src
31.0 lbs - Pro Star 15x8 w/27.1x9 ET Drag - Src
10.2 lbs - Bogart 15x4 - Src
11.7 lbs - Bogart Aluma Light 15x9.75 - Src
Good F-body weight loss thread - copied thru pg 2
13 lbs - '93 Z28 rear bumper - Src
19 lbs - '00 SS rear bumper - Src
14 lbs - Burger electric water pump w/pulley & thermo - Src
19.1 lbs - '01 Formula front bumper support and brackets - Src
20 lbs - '01 Formula rear bumper support and brackets - Src
41 lbs - '01 Formula carpet - Src
29 lbs - '01 Formula drivers or passenger cloth seat- Src
14 lbs - '01 Formula rear seat back w/seatbelts - Src
5 lbs - '01 Formula rear buckets - Src
47 lbs - '01 Formula A/C (compressor, condensor, lines all but evap), PS (pump, lines, bolts) - Src
10 lbs - '01 Formula center console - Src
3 lbs - '01 Formula rear speaker/hatch panels - Src
13.2 lbs - '01 Formula aluminum driveshaft - Src
9 lbs - '98 WS6 Trans Am ABS module & bracket - Src
Srcs for lightweight body panels & highgrade or lightweight hardware
Corvette Race Bodies (ACP)
Yoyodyne Ti
BarnHill Bolt Co.
RaceBolts.com
Titanium Joe/
Still looking for:
Repro wheel weights
Racing wheel weight
Additional tire weights
Regular, locking and aftermarket lugnut weights
OEM and aftermarket hood weights
Additional swaybar weights
Weight of control arms, knuckle, wheel bearings
Engine and individual components
Swaybars
18.5 lbs - T1 front anti-swaybar w/OEM adjustable endlinks & bushings - Src
8.5 oz - T1 OEM adjustable endlink - Src
3 oz - T1 OEM (endlink) bolt, nut and spacers - Src
5 oz - T1 OEM rear bushings (2) - Src
4.1 lbs - Z51 rear anti-swaybar w/OEM bushings - Src
3.6 lbs - Z51 rear anti-swaybar - Src
4.5 oz - Z51 rear OEM bushings (2) - Src
18.5 oz - Z51 OEM endlinks (2) - Src
9.5 oz - QA-1 endlinks - Src
6.5 oz - Lowe's 1/2" hole, 1.5 mm (avg) thick, 2" diameter (8) - Src
4 oz - Lowe's 1/2" hole, 2.25 mm (avg) thick, 3.5 cm diameter (8) - Src
Rotors
4.8 lbs - ZMI titanium ---Src
14 lb - rear left brake rotor from Napa, made in Canada, part# 86702 - Src
14 lb, 4 oz - rear right brake rotor from Napa, made in Canada, part# 86703 - Src
18 lb, 14 oz - front right brake rotor from Napa, made in USA, part# 86700 - Src
18 lb, 10 oz - front left brake rotor from Napa, made in Canada, part# 86701 - Src
Calipers
5.8 lbs - ZMI - Src
1/2 oz - single Speedbleeder - Src
Pads
1 lb, 2 oz - PFC Z-rated brake pads, single side, rear, without shim - Src
1/2 oz - PFC brake pad rear shim, single side - Src
2 lb, 5 oz - PFC Z-rated brake pads, single side, front, without shims - Src
3 oz - PFC brake pad front shims (2), single side - Src
Wheels
19.2 lbs, front; 21.4 lbs, rear - 97-99 OEM wagon - Src
22 lbs, front; 29 lbs, rear - 97-99 OEM wagon - Src
17 lbs, front; 19.5 lbs rear - 97-00 OEM magnesium - Src
17.5 lbs, front; 19.5 lbs, rear - 97-00 OEM magnesium - Src
18.08 lbs, front; 20.06 rear - 00 OEM standard, thin spoke, high polish - Src
17 lbs, front; 20 lbs, rear - 00 OEM standard, thin spoke, painted, no sensors or centercaps - Src
16 lbs, front; 20 lbs, rear - 01 OEM standard high polish - Src
19.6 lbs, front; 21.4 lbs, rear - 01 Z06 forged - Src
19.2 lbs, front; 21 lbs, rear - 02-04 Z06 cast/spun - Src, Src
24 lbs, 18x10.5 - 00+ repro high polish - Src
28 lbs, front; 32 lbs, rear - Z06 chrome repro - Src
23 lbs, front; 26 lbs, rear - Z06 chrome repro - Src
23.5 lbs, front; 24.5 lbs, rear - Z06 Motorsports, polished - Src
20 lbs, 17x8.5, 58mm offset, front; 23 lbs, 18x9.5, 65mm offset, rear - PWO - Src
22 lbs, 18x10.5, 58mm offset, front - HRE 545 w/clear center - Src
27 lbs, 18x12, 74mm offset, rear - HRE 545 w/clear center - Src
24/25 lbs - Z07 wheel weight, front - Src
28 lbs - Z07 wheel weight, rear - Src
Lugnuts
1.5 oz - OEM open lugnut - Src
Tires
NOTE: Kumho tires are not currently differentiated between runflat and nonrunflat tires.
29.5 lbs, front; 32.5 lbs, rear - Goodyear EMT, stock size - Src
27 lbs, front; 33 lbs, rear - Bridgestone S03's, stock size - Src
26.4 lbs - Goodyear GS-C 275/40R17 - Src
12 lbs, 275/40x17; 15 lbs, 315/35x17; 16 lbs, 305/30x18 - Hoosier A3S03 - Src
28 lbs, 275/40x17=28lbs; 30.5 lbs, 315/35x17 - Goodyear ZR "S" Rains - Src
25 lbs, 275/40x17; 28 lbs, 315/35x17 (shaved to 6/32") - Goodyear GS CS - Src
23lbs, 265/40x17; 24.5 lbs, 275/40x18; 25.5 lbs, 295/35x18 - Goodyear F1 GS CS - Src
27 lbs, 265/40R18; 28 lbs, 315/40R18 - Goodyear GS F1 SC - Src
25 lbs, 255/40R17 - Bridgestone Potenza S02 - Src
27 lbs, 275/40R18 - Bridgestone Potenza S02 - Src
29 lbs, 285/30R18 - Bridgestone Potenza S02 - Src
30 lbs, 285/30R18 - Bridgestone Potenza S02 - Src
30 lbs, 295/30R18 - Bridgestone Potenza S02 - Src
29 lbs, 295/35R18 - Bridgestone Potenza S02 - Src
28 lbs, 245/45R17 - Kumho Ecsta 711 - Src
29 lbs, 245/45R17 - Kumho Ecsta Supra - Src
32 lbs, 245/45R17 - Kumho Ecsta MX - Src
26 lbs, 245/45R17 - Kumho Ecsta Victoracer V700 - Src
30 lbs, 265/40R17 - Kumho Ecsta Supra - Src
20 lbs, 275/40R17 - Kumho Ecsta MX - Src
36 lbs, 275/40R17 - Kumho Ecsta MX - Src
25 lbs, 285/30R18 - Kumho Ecsta V700 - Src
TBD lbs, 295/35R18 - Kumho Ecsta ASX - Src
30 lbs, 295/35R18 - Kumho Ecsta Supra - Src
20 lbs, 275/35R18 - Kumho Ecsta MX - Src
31 lbs, 295/35R18 - Kumho Ecsta MX - Src
26 lbs, 305/30R18 - Kumho Ecsta V700 - Src
28 lbs, 315/35R18 - Kumho Ecsta V710 - Src
30 lbs, 335/30R18 - Kumho Ecsta V700 - Src
Tire Rack
Kumho ECSTA ASX Specs
245/45WR17 27 lbs
275/40WR18 30 lbs
UTQG: 420 AA A
Avon Tech M550 A/S Specs
245/45WR17 29 lbs
275/40WR18 34 lbs
UTQG: 360 AA A
Avon Tech M500 Specs
245/45WR17 28 lbs
275/40WR18 32 lbs
UTQG: 280 AA A
Continental ContiExtremeContact Specs
245/45WR17 24 lbs
275/40WR18 25 lbs
UTQG: 400 AA A
Kumho ECSTA MX Specs
245/45YR17 25 lbs
275/40YR18 29 lbs
UTQG: 220 AA A
Pirelli PZero Nero M&S Specs
245/45WR17 24 lbs
275/40WR18 29 lbs
UTQG: 400 AA A (front), 400 A A (rear)
BFGoodrich g-Force T/A KDW Specs
245/45YR17 28 lbs
275/40YR18 32 lbs
UTQG: 300 AA A
Goodyear Eagle F1 GS Specs
245/45YR17 25 lbs
275/40YR18 28 lbs
UTQG: 300 AA A
Kumho ECSTA MX (runflat) Specs
245/45YR17 32 lbs
275/40YR18 35 lbs
UTQG: 220 AA A
Continental ContiSportContact 2 Specs
245/45YR17 25 lbs
275/40YR18 26 lbs
UTQG: 280 AA A
Dunlop SP Sport 9000 Specs
245/45WR17 26 lbs
275/40WR18 29 lbs
UTQG: 280 A A
BFGoodrich g-Force T/A KD Specs
245/45YR17 27 lbs
275/40YR18 31 lbs
UTQG: 200 AA A
Goodyear Eagle F1 GS-D3 Specs
245/45YR17 25 lbs
275/40YR18 28 lbs
UTQG: 280 AA A
Michelin Pilot XGT Z4 Specs
245/45WR17 26 lbs
275/40WR18 30 lbs
UTQG: 300 A A
Bridgestone Potenza RE050 Specs
245/45WR17 26 lbs
275/40YR18 28 lbs
UTQG: 140 A A
Bridgestone Potenza S-03 Pole Position Specs
245/45YR17 28 lbs
275/40YR18 34 lbs
UTQG: 220 AA A
Goodyear Eagle F1 Supercar Specs
245/45YR17 24 lbs
275/40YR18 27 lbs
UTQG: 220 AA A
Wheel & Tire combined weight
45 lbs, front - 97-00 OEM magnesium w/Nitto 275/40-17 (1/2 tread) - Src
50 lbs, rear - 97-00 OEM magnesium w/Yoko 295/35-18 AVS Sport non-runflats - Src
47 lbs, front - 97-00 OEM magnesium w/OEM 245/45-17 runflats - Src
53 lbs, rear - 97-00 OEM magnesium w/OEM 275/40-18 runflats - Src
50 lbs, 17x8.5, 58mm offset, front - PWO w/OEM 245/45-17 runflats (1/2 tread) - Src
51 lbs - '06 C6Z GM Stock Wheel/Tire Combo, front - Src
56 lbs - '06 C6Z GM Stock Wheel/Tire Combo, rear - Src
C6 Suspension
Z51 rotors
Estimates based on information above and http://forums.corvetteforum.com/showthread.php?t=880807
17 lb, 14 oz - front rotor
24 lb, 16 oz - rear rotor
Drivetrain
Clutch/Flywheel
23.3 lbs - O.E. iron flywheel - Src
44.8 lbs - O.E. flywheel/clutch assembly - Src
49 lbs - Z06 clutch/flywheel assembly - Src
42.8 lbs - Z06 stock - Src
36.7 lbs - Exedy Single Disk - Src
36.7 lbs - Exedy Dual Disk - Src
12.4 lbs - Fidanza flywheel - Src
33.9 lbs - Fidanza flywheel & SPEC clutch assembly - Src
14 lbs - Quartermaster 5.5" 3-disc clutch/flywheel/hardware - Src
115-129 lbs - T56 transmission, TUET1806 - Src
21 lbs - DTE A4 Differential Strut Kit, Stage I - Src
Motor & accessories
457.6 lbs, LS1 auto; 497.2 lbs, LS1/LS6 manual - LS1/LS6 dressed - Src
443 lbs - LS2 dressed - Src
~600 oz - LS1/LS6 connecting rods - Src
434 gm - LS1/LS6 piston - Src
76 gm, intake; 63 gm, exhaust - '02 LS6 valves - Src
99 gm, intake; 86 gm, exhaust - LS1 valves - Src
11.2 gm - LS1/LS6 retainer - Src
7.2 gm - Comp Ti retainer - Src
15 lbs - A.I.R. system & plumbing - Src
30 lbs - AC/condenser/lines/oil holder/brackets/pulleys - Src
10-3/4 oz - airbridge - Src
1 lb, 14 oz - radiator top cover with screws (x4) - Src
1 lb, 12 oz - fuel rail covers - Src
16 lbs - P1SC head unit - Src
14 lbs - A&A single intercooler - Src
8 oz -- Headlight relay
2.5 oz -- OEM air filter clip/band x2
6 oz -- Serpentine belt OEM
4.25 lbs -- OEM LS1 air filter assembly without any clamps of any sort
10.5 oz -- OEM LS1 air bridge
2.1 oz -- Timing belt cover
92.5 lbs - GEN III V8 (LS1) Aluminum block - GM Manual, JRP's SuperFAQ
210.4 lbs - GEN III V8 (LS1) Cast Gray Iron Block - GM Manual, JRP's SuperFAQ
18.9 lbs - GEN III V8 (LS1) Aluminum head - GM Manual, JRP's SuperFAQ
43.2 lbs - GEN III V8 (LS1) Iron head - GM Manual, JRP's SuperFAQ
13.45 lbs - LS1 water pump - Src
10.25 lbs - LS2 water pump - Src
15.5 oz - LS1 piston - Src
480 gm - LS7 titanium connecting rod - Src
~685 gm - LS2 connecting rod - Src
76 gm - LS7 intake valve (2.200) - Src
71 gm - LS7 exhaust valve (1.600) - Src
The lightweight titanium valves weigh 21grams less than the stainless steel valves used in the LS2, despite the valve head having 22 percent more area.
Batteries
13 lbs - Odyssey/Dynabatt/Hawker racing battery - Src
13.5 lbs - Genesis G16EP, LWH=7.15x3.01x6.65, CC=280 - Src
15 lbs - PC 680, LWH=7.27x3.12x6.67, CC=280 - Src
23 lbs - SVR SVR28-12, LWH=6.88x6.50x4.88 - Src
23 lbs - Genesis G26EP, LWH=6.57x6.92x4.96, CC=470 - Src
26 lbs - Odyssey PC 925, LWH=6.69x7.05x5.04, CC=470 - Src
26 lbs - SVR SVR33-12, LWH=7.75x5.00x7.25, CC=500 - Src
26 lbs - Optima Yellow Top 51, LWH=9.25x5.00x9.00, CC=500 - Src
32.8 lbs - AC Delco 75P-7YR, LWH=9.50x7.10x7.30, CC=550 - Src
32.9 lbs - Genesis G42EP, LWH=7.78x6.53x6.72, CC=630 - Src
35.4 lbs - Odyssey PC 1200, LWH=7.87x6.66x7.55, CC=630 - Src
33.1 lbs - Optima Red Top 75/35, LWH=9.31x6.81x7.63, CC=650 - Src
37.7 lbs - AC Delco 34P-7YR, LWH=10.3x6.80x7.80, CC=650 - Src
36 lbs - Exide Select Orbital 75, LWH=9.00x7.00x7.44, CC=690 - Src
38.8 lbs - Optima Red Top 34/78, LWH=10.0x6.88x7.81, CC=750 - Src
38 lbs - Exide Select Orbital 78, LWH=10.1x7.00x8.1, CC=770 - Src
45.6 lbs - AC Delco 65P-7YR, LWH=11.9x7.50x7.60, CC=800 - Src
57 lbs - SVR SVR80-12, LWH=10.6x6.50x6.25, CC=800 - Src
58.7 lbs - Odyssey PC 1700, LWH=13.02x6.62x7.68, CC=930 - Src
Exhaust
Headers with H-pipe unless noted otherwise
68 lbs - 97 stock double wall manifolds & h-pipe - Src
72.5 lbs - 02 cast iron manifolds with pup cats & h-pipe - Src
46 lbs - GHL 1-3/4" headers w/3" collectors & 3" Random Tech cats and x-pipe - Src
52 or 61 lbs - FLP LT's w/cats - Src
49 lbs - Kooks LT's w/high-flow cats - Src
48.5 lbs - LGM Pro LT's w/high-flow cats - Src
45.4 lbs - QTP LT's w/high-flow cats - Src
50 lbs - Stainless Works w/cats - Src
63 lbs - SuperMAXX LT's w/high-flow cats - Src
Cat-back Exhaust
14 lbs per side - Z06 Ti - Src
13.5 lbs per side - Z06 Ti - Src
15-16 lbs per side - Z06 Ti - Src
17 lbs per side - Z06 Ti - Src
22 lbs per side - OEM steel - Src
24 lbs per side - OEM steel - Src
19 lbs - B&B PRT's - Src
19 lbs - Borla Stingers (2-tip) - Src
22 lbs - Borla Stingers (4-tip) - Src
Universal Components
12.0 lbs - Random Tech X-pipe - Src
5.8 lbs - Random Tech left cat - Src
5.7 lbs - Random Tech right cat - Src
2.5 lbs - Dynatech clamps (4) - Src
Body
9.0 lbs - Window glass (left) - Src
9.0 lbs - Window glass (right) - Src
36.09 lbs - C5 Windshield - Src
30.39 lbs - Z06 Windshield - Src, Src
3.0 lbs - Exterior rear view mirror (left) - Src
3.0 lbs - Exterior rear view mirror (right) - Src
6.2 lbs - Stock tunnel plate - Src
15.4 lbs - Elite Engineering 304 SS, 0.134" tunnel plate, uncoated - Src
9.4 lbs - Elite Engineering aluminum 1/4" tunnel plate, uncoated - Src
9.6 lbs - Elite Engineering aluminum 1/4" tunnel plate, coated - Src
14.6 lbs - Elite Engineering aluminum 3/8" tunnel plate, coated - Src
9.2 lbs - LAPD 1/4" 6061-T6 aluminum Tunnel Heat/Insulator/Chassis Re-Enforcement Plate, coated - Src, Src
12.2 lbs - LAPD 3.8" 6061-T6 aluminum Tunnel Heat/Insulator/Chassis Re-Enforcement Plate, coated - Src, Src
12.7 lbs - VNM 304 SS BackBone, coated - Src, Src
1/2 oz - part# 11515757, crashbar bolt - Src
1/4 oz - part# 10281493, crashbar nutsert (big) - Src
1/2 oz - part# 10281487, crashbar nutsert (small) (x4) - Src
1/2 oz - part# 10#11515638, radiator/bumper nut-speci (x4) - Src
1/2 oz - part# 11513568, radiator/bumper screws (x3) - Src
1 lb, 14 oz - US headlight with bulbs - Src
3 lbs - Euro headlight with bulb
1 oz - front spring to subframe bolt - Src
502 lbs - C5 frame - Src
30.4 lbs - C5 Hood & substrate (no light) - Src
20.5 lbs - CE Hood (with substrate & light??) - Src
31.1 lbs - C5/Z06 Hood (with substrate & light??) - Src
14 lbs - Motor City 100% carbon fiber hood - Src
24 lbs - Motor City 50% carbon fiber, 50% fiberglass hood - Src
5.26 lbs - Stock 63mm driveshaft, part #12564457 - Src, Src
4.56 lbs - LG carbon fiber driveshaft - Src, Src
4.5 oz - Headlight surround
5 oz - Air dam - right side
20.22 lbs - C6 transparent roof - Src
20.90 lbs - C6 painted roof - Src
21.86 lbs - C5 painted roof - Src
Interior
3.5 lbs - Driver side air bag - Src
8.5 lbs - Passenger air bag - Src
3.5 lbs - Driver side seatbelt - Src
4 lbs - Interior fan motor - Src
8 lbs - Front speakers - Src
18.0 lbs - HVAC (base under dash unit - Src
4.0 lbs - Blower motor (Heat/AC) - Src
2.0 lbs - HVAC plastic ducts - Src
4.0 lbs - Airbag/glove box aluminum support - Src
2.0 lbs - Aluminum center console support - Src
1.0 lbs - A/C control head - Src
2.0 lbs - Dash vent duct - Src
1.0 lbs - Knee bolster support (white foam) - Src
1.0 lbs - Bose radio amplifier box - Src
3.0 lbs - Radio, AM/FM/CD - Src
7.0 lbs - Door module, harness, regulator (left) - Src
7.0 lbs - Door module, harness, regulator (right) - Src
3.0 lbs - Glove box assembly - Src
3.0 lbs - Door speaker (left) - Src
3.0 lbs - Door speaker (right) - Src
3 lb, 8 oz - driver side seat belt and fasteners - Src
11 oz - cd changer pack, no cds - Src
6-1/2 oz - 12 cds - Src
2 lb, 2 oz - trunk side storage covers, both - Src
1 lb, 10 oz - passenger floormat - Src
2.5 oz - Right seat button surround part # 1027308
2.5 oz - Ashtray
3 oz - Driver's seat frame plastic bracket covers and front bolts
5 oz - Seat belt top bolt and covers
1.5 oz - Dashboard cigarette lighter male & female
Seats
Sparco - Src
I'm using the Sparco Evo 2 as the largest possible seat that can fit, so all the seats below should fit. 20.91"/531mm base, 23.66"/601mm shoulder
18.00 lbs - Sprint (steel tube)
15.00 lbs - Ultra (fiberglass)
16.50 lbs - Off Road (fiberglass)
18.50 lbs - All Road (fiberglass)
21.50 lbs - Pro 2000 (fiberglass)
13.00 lbs - Pro 2000 (carbon fiber)
18.50 lbs - Evo (fiberglass)
12.50 lbs - Evo (carbon fiber)
20.00 lbs - Evo 2 (fiberglass)
17.50 lbs - Pro WRC (fiberglass)
14.50 lbs - Pro WRC (carbon fiber)
18.00 lbs - Rev (fiberglass)
22.00 lbs - Corsa (fiberglass)
12.50 lbs - Corsa (carbon fiber)
25.00 lbs - Circuit (fiberglass)
15.00 lbs - Circuit S-light (carbon fiber)
14.00 lbs - S-light (carbon fiber)
17.00 lbs - Speed (steel tube)
44.00 lbs - Milano (steel tube)
40.00 lbs - Monza (steel tube)
40.00 lbs - Torino (steel tube)
48.00 lbs - Milano Presige (steel tube)
16.00 lbs - Roadster (fiberglass)
20.00 lbs - Fighter (fiberglass)
Cobra seats
I'm using the Sparco Evo 2 as the largest possible seat that can fit, so all the seats below should fit. 20.91"/531mm base, 23.66"/601mm shoulder
14.3 lbs - Aqua 4x4 (fiberglass)
17.6 lbs - Evolution (fiberglass)
14.1 lbs - Evolution Technology (carbon fiber)
14.3 lbs - Imola (fiberglass)
11.2 lbs - Imola Technology (carbon fiber)
15.4 lbs - Suzuka (fiberglass)
12.3 lbs - Suzuka Technology (carbon fiber)
19.8 lbs - Monaco (steel)
Other seats from Flying Miata site that aren't listed above
I'm using the Sparco Evo 2 as the largest possible seat that can fit, so all the seats below should fit. 20.91"/531mm base, 23.66"/601mm shoulder
12.00 lbs - Aerosport AS100
7.50 lbs - Aerosport AS100/CK
12.00 lbs - Aerosport AS100N
7.50 lbs - Aerosport AS100N/CK
16.00 lbs - Aerosport AS200
30.00 lbs - Corbeau A4
12.00 lbs - Corbeau Classic Bucket
21.00 lbs - Corbeau Classic II
16.00 lbs - Corbeau Forza
25.00 lbs - Corbeau GT7
12.00 lbs - Corbeau GTA Lo Back
10.50 lbs - Corbeau Monza
42.00 lbs - Koenig Bio-Med
32.00 lbs - Koenig CL200
32.00 lbs - Koenig CP200
30.00 lbs - Koenig CP700
28.00 lbs - Koenig CPK700
38.00 lbs - Koenig K370
38.00 lbs - Koenig K530
38.00 lbs - Koenig K4000
31.00 lbs - Koenig K5000
31.00 lbs - Koenig K5000G
36.00 lbs - Koenig Miata
32.00 lbs - Koenig RL200
12.00 lbs - Koenig RS1000
10.00 lbs - Koenig RS2000
10.00 lbs - Koenig RS3000
26.00 lbs - Koenig S50
30.00 lbs - Koenig S100
28.00 lbs - Koenig SP700
28.00 lbs - Koenig Speedster
12.60 lbs - Momo Start
16.90 lbs - Momo T-Frame
14.70 lbs - NEX Racing Seat
16.50 lbs - NEX Reclinable Racing Seat
13.20 lbs - OMP Champion
18.50 lbs - OMP Eco
15.00 lbs - OMP Evoluzione
24.30 lbs - OMP Rec
24.30 lbs - OMP Red
19.00 lbs - OMP San Remo
14.30 lbs - OMP Sport
19.80 lbs - OMP Strada
19.50 lbs - Procar by Scat, Race 1600 Series
16.50 lbs - Procar by Scat, Xtreme 1700 Series
14.30 lbs - RaceTech JetSprint
16.50 lbs - RaceTech ProSprint
18.70 lbs - RaceTech RAC 4009
13.20 lbs - RaceTech RAC 9000
14.30 lbs - RaceTech RAC 9009
9.90 lbs - Recaro SPA
12.10 lbs - SPA Racer
Fasteners -- no weights, just intentions to replace with Al or Ti
?? oz - Bolt, Rocker Arm Cover 202-12556430 M6x1.0x33.5 - Src
?? oz - Bolt, HDR Pt (Bolt, Eng Lift Brkt) 231-11516328 M10x1.5x30 - Src
?? oz - Stud, Ign Coil M6x1.0x40 239/240-12557539 - Src
?? oz - Bolt, Front/Rear Timing Cover M8x1.25x30 277/309-11515758 - Src
?? oz - Bolt, Flywhl M11x1.5x23.5 124-12553332 - Src
?? oz - Bolt, CLU Press Plt M10x1.5x25 174-12561465 - Src
?? oz - Bolt, HFH Dome Hd, Tq tube front to bellhousing M10x1.5x40 5-11516862 - Src
?? oz - Bolt, Front bumper impact bar skid plate to subframe, Hex M8x1.25x30, 9-11516594 - Src
?? oz - Screw, Radiator support, Hex M6x1x25, 2-11503982 - Src
?? oz - Screw, RD WA HD, 4.2x1.41x16, 13-11515498 - Src
?? oz - Bolt, Scr Rd, M4.2x1.4x30 8.38 OD, 15-20374961 - Src
?? oz - Bolt, Intake Manifold w/flat washer, M6x1.0x21.8, 13.6 OD, 11-12552344 - Src
?? oz - Bolt, Metric Hx Flg HD, Throttle Body, M6x1x30, 2-11514008 - Src
?? oz - Bolt/Screw Spring-to-subframe, M10x1.5x30x20THD, 22.3 OD, 39-11515798 - Src
?? oz - Bolt, W/WA Floor panel tunnel reinforcement, M6x1x25, 25-11514139 - Src
2000 Corvette Vehicle Dismantling Manual
0.42 kg - Engine oil filter
0.31 kg - Refrigerant 134A
10.86 kg - Fuel tank (both)
0.34 kg - Fuel tank isolator
0.24 kg - Fuel filler neck insert
0.20 kg - Fuel tank tube
16.52 kg - Battery
0.14 kg - Wheel weights (8)
1.53 kg - Driver side air bag
3.95 kg - Passenger air bag
30.57 kg - Rear tire (2)
27.12 kg - Front tire (2)
16.37 kg - Windshield
8.48 kg - Front door window, lh, rh (2)
0.56 kg - Front door weatherstrip (2)
0.79 kg - Sun roof panel weatherstrip (3)
3.50 kg - Sun roof panel
1.15 kg - Sun roof panel rear weatherstrip
11.40 kg - Back window
8.63 kg - Hood
5.16 kg - Hood substrate
6.74 kg - Front bumper fascia
1.27 kg - Front bumper energy absorber
0.39 kg - Fender liner duct (2)
3.16 kg - Front fender, right
0.56 kg - Front liner insert (2)
3.34 kg - Front fender liner, right
3.16 kg - Front fender liner, left
3.11 kg - Front fender, left
4.09 kg - Right rocker panel
3.73 kg - Left rocker panel
0.43 kg - Charcoal canister housing
2.82 kg - Quarter panel, right rear
4.32 kg - Axle assembly boot, lh, rh (4)
1.14 kg - Wheel liner, right rear
1.07 kg - Wheel liner, left rear
2.72 kg - Quarter panel, left rear
2.90 kg - Rear bumper energy absorber
8.24 kg - Rear bumper fascia
1.26 kg - Front seat foam, lower, lh, rh (2)
0.30 kg - Front seat belt webbing (2)
1.18 kg - Front seat foam, center, lh, rh (2)
1.64 kg - Front seat foam, upper, lh, rh (2)
2.40 kg - Front seat frame (2)
0.34 kg - Hood weatherstrip
0.15 kg - Master cylinder reservoir
0.64 kg - Valve cover shield (2)
3.64 kg - Intake manifold
0.43 kg - Battery tray
1.31 kg - Coolant reservoir
0.36 kg - Air cleaner tube
0.24 kg - Power steering pump reservoir
0.63 kg - Washer fluid reservoir
0.82 kg - Radiator bracket
0.86 kg - Radiator cooling fan (2)
0.62 kg - Radiator tank (2)
1.54 kg - Radiator cooling fan frame
0.86 kg - Air cleaner cover
0.29 kg - Air cleaner frame
0.50 kg - Air cleaner housing, lower
2005 Corvette Vehicle Dismantling Manual
24.80 kg - Front tire (2)
0.42 kg - Engine Oil Filter
16.3 kg - Battery
3.48 kg - Passenger Air Bag
0.26 kg - Fuel Tank Isolator
11.21 kg - Fuel Tank (2)
26.80 kg - Rear Tire (2)
1.53 kg - Driver Side Air Bag (1)
0.20 kg - Wheel Weights (4)
0.78 kg - Side Air Bag (2)
0.62 kg - Seat Belt Pretensioner (2)
14.49 kg - Windshield
7.04 kg - Front door window, lh, rh (2)
12.86 kg - Front door, lh, rh (2)
0.72 kg - Front door weatherstrip (2)
1.12 kg - Windshield opening weatherstrip
3.50 kg - Lift off roof panel
1.15 kg - Lift off panel rear weatherstrip
10.47 kg - Back window
0.40 kg - Lift off panel side weatherstrip (2)
10.5 kg - Hood
0.46 kg - Front wheelhouse extension (2)
6.97 kg - Front bumper fascia
1.66 kg - Front bumper energy absorber
0.33 kg - Front fender brake cooler duct (2)
3.85 kg - Front fender, right
0.79 kg - Front wheelhouse lower rear closeout (2)
0.79 kg - Front wheelhouse lower front closeout (2)
3.82 kg - Front fender, left
3.50 kg - Quarter panel, right rear
4.32 kg - Axle assembly boot, lh, rh (2)
4.12 kg - Rear Wheelhouse liner, lh, rh (2)
3.57 kg - Quarter panel, left rear
1.76 kg - Rear bumper energy absorber
7.00 kg - Rear bumper fascia
2.16 kg - Lower rear fascia
0.45 kg - Grille
1.34 kg - Front seat foam, lower, lh, rh (2)
0.30 kg - Front seat belt webbing (2)
1.09 kg - Front seat foam, center, lh, rh (2)
1.48 kg - Front seat foam, upper, lh, rh (2)
5.97 kg - Front seat frame back (2)
0.34 kg - Hood weatherstrip
0.15 kg - Master cylinder reservoir
1.24 kg - Valve cover shield (2)
3.64 kg - Intake manifold
0.49 kg - Battery tray
0.38 kg - Engine air inlet duct
0.69 kg - Engine air inlet tube
0.24 kg - Power steering pump reservoir
0.78 kg - Radiator bracket
0.58 kg - Radiator cooling fan
0.78 kg - Radiator tank (2)
1.50 kg - Radiator cooling fan frame
0.52 kg - Air cleaner housing, upper (2)
0.64 kg - Air cleaner housing, lower (2)
F-Body
49 lbs - '99 WS6 driver leather power seat with lumber - Src
40 lbs - '99 WS6 passenger leather power seat - Src
23.5 lbs - '99 WS6 rear leather seatback & buckets - Src
27 lbs - '94 Formula leather rear seatback & buckets without seatbelts - Src
29 lbs - '00 SS Formula leather rear seatback & buckets with seatbelts - Src
34-36 lbs - Carpet - Src, Src
14 lbs - Year One lightweight carpet - Src
19.5 lbs - Bogart Aluma Light 15x3.5 w/Moroso DS-2 - Src
25.5 lbs - Pro Star 15x3.5 w/Steel Belted Radial - Src
34.5 lbs - Bogart Aluma Light 15x10.5 w/28x10.5 ET Drag - Src
31.0 lbs - Pro Star 15x8 w/27.1x9 ET Drag - Src
10.2 lbs - Bogart 15x4 - Src
11.7 lbs - Bogart Aluma Light 15x9.75 - Src
Good F-body weight loss thread - copied thru pg 2
13 lbs - '93 Z28 rear bumper - Src
19 lbs - '00 SS rear bumper - Src
14 lbs - Burger electric water pump w/pulley & thermo - Src
19.1 lbs - '01 Formula front bumper support and brackets - Src
20 lbs - '01 Formula rear bumper support and brackets - Src
41 lbs - '01 Formula carpet - Src
29 lbs - '01 Formula drivers or passenger cloth seat- Src
14 lbs - '01 Formula rear seat back w/seatbelts - Src
5 lbs - '01 Formula rear buckets - Src
47 lbs - '01 Formula A/C (compressor, condensor, lines all but evap), PS (pump, lines, bolts) - Src
10 lbs - '01 Formula center console - Src
3 lbs - '01 Formula rear speaker/hatch panels - Src
13.2 lbs - '01 Formula aluminum driveshaft - Src
9 lbs - '98 WS6 Trans Am ABS module & bracket - Src
Srcs for lightweight body panels & highgrade or lightweight hardware
Corvette Race Bodies (ACP)
Yoyodyne Ti
BarnHill Bolt Co.
RaceBolts.com
Titanium Joe/
Still looking for:
Repro wheel weights
Racing wheel weight
Additional tire weights
Regular, locking and aftermarket lugnut weights
OEM and aftermarket hood weights
Additional swaybar weights
Weight of control arms, knuckle, wheel bearings
Engine and individual components
Last edited by leaftye; 12-22-2005 at 11:40 PM. Reason: Adding more...
12-24-2004, 06:48 PM
#3
Safety Car
Thread Starter
Member Since: Nov 2003
Location: San Diego, CA "leaf" "tee" "e"
Posts: 4,979
Likes: 0
Received 5 Likes
on
4 Posts
C5 Suspension
Brake Rotor Dimensions-front
3 cm, 2 mm --- rotor thickness --- Source
7 cm --- center hole diameter --- Source
7 cm --- lug to lug spacing --- Source
11 cm --- lug diameter...don't know how to say from two lugs across rotor to single lug. Imagine an acute triangle if dots were connected --- Source
3 cm, 8 mm --- inside face of hub to rotor surface --- Source
19 cm --- inner hub diameter --- Source
21 cm, 7 mm --- out hub diameter --- Source
32 cm, 5 mm --- rotor diameter --- Source
Brake Rotor Dimensions-rear -- dimensions that are same as front are not repeated
2 cm, 6 mm --- rotor thickness --- Source
4 cm, 2 mm --- inside face of hub to rotor surface --- Source
20 cm, 2 mm --- out hub diameter --- Source
30 cm, 5 mm --- rotor diameter --- Source
Caliper Pistons
1-9/16" dia x 2 pistons per caliper = 3.835 sq inches --- Front Pistons --- Source
1-3/4" dia x 1 piston per caliper = 2.405 sq inches --- Rear Piston --- Source
Swaybars
23mm, front; 19.1mm, rear --- FE1/Base --- Source
25.4mm, front; 21.7mm, rear --- FE3/Z51 97-99 --- Source
28.6mm, front; 23.6mm, rear --- FE3/Z51 00-04 --- Source
30.0mm, front; 23.6mm, rear --- FE4/Z06 --- Source
31.75mm, front; 25.4mm, rear --- Hotchkis --- Source
38.4mm, front; 27.5mm, rear --- GM T1 --- Source
Spring Rates
439.66 lb/in, front; 576.70 lb/in, rear (manual trans); 588.12 lb/in, rear (auto trans) --- FE-1/Base --- Source
440 lb/in, front; 577 lb/in, rear --- FE-1/Base --- Source
457 lb/in, front; 577 lb/in, rear --- MSRC --- Source
525 lb/in, front --- FE-3/Z51 --- Source
660 lb/in, front --- FE-3/Z51 --- Source
327 lb/in, rear --- FE-3/Z51 --- Source
633 lb/in, rear --- FE-3/Z51 --- Source
634 lb/in, rear --- FE-3/Z51 --- Source
525.31 lb/in, front; 633.80 lb/in, rear (manual trans); 645.22 lb/in, rear (auto trans) --- FE-3/Z51 --- Source
525 lb/in, front; 634 lb/in, rear --- FE-3/Z51 --- Source
620 lb/in, rear --- FE-4/Z06 --- Source
650 lb/in, front; 680 lb/in, rear --- FE-4/Z06 --- Source
525 lb/in, front; 714 lb/in, rear --- FE-4/Z06 --- Source
650 lb/in, front; 800 lb/in, rear --- T1 --- Source
1,000 lb/in, front; 680 lb/in, rear --- Danny Popp's setup --- Source
77 N/mm --- FE1 & F45 front suspension spring rate --- SAE SP-1282
1.15 Hz --- FE1 & F45 front suspension ride frequency --- SAE SP-1282
103 N/mm --- FE1 & F45 rear suspension spring rate --- SAE SP-1282
1.36 Hz --- FE1 & F45 rear suspension ride frequency --- SAE SP-1282
1.18 --- FE1 & F45 Ride frequency ratio --- SAE SP-1282
93 N/mm --- FE3 front suspension spring rate --- SAE SP-1282
1.20 Hz --- FE3 front suspension ride frequency --- SAE SP-1282
113 N/mm --- FE3 rear suspension spring rate --- SAE SP-1282
1.45 Hz --- FE3 rear suspension ride frequency --- SAE SP-1282
1.21 --- FE3 Ride frequency ratio --- SAE SP-1282
Misc Suspension
36mm --- FE-1/Base shock absorber piston --- SAE SP-1282
45mm --- FE-3/Z51 shock absorber piston --- SAE SP-1282
aluminum --- front upper control arm bushing bar pin material --- SAE SP-1282
aluminum --- rear uppper control arm bushing inner metals --- SAE SP-1282
glass reinforced resin --- early stabilizer end links --- SAE SP-1282
AA6061-T6 (forged) --- front upper control arm material --- SAE SP-1282
A356-T6 (hybrid cast preform-forging) --- front lower control arm material --- SAE SP-1282
A356-T6 (hybrid cast preform-forging) --- rear upper control arm material --- SAE SP-1282
A356-T6 (hybrid cast preform-forging) --- rear lower control arm material --- SAE SP-1282
A356-T6 (hybrid cast preform-forging) --- knuckles (all are from the same casting) --- SAE SP-1282
Control Arm Notes
Front lower, and upper/lower control arms are an L-shape variation. The forward leg of the control arm is set near to wheel center. The forward leg of the lower control arms is fitted with a "handling" bushing; the rear leg is fitted with a "ride" bushing. The "ride" bushing absorbs the brunt of road deflections while the "handling" bushing absorbs the brunt of the cornering forces. The "handling" bushing is 3-6 times stiffer than the "ride" bushing.
C5 Alignment
6.5� --- front caster angle --- SAE SP-1282
0.2� --- rear caster angle --- SAE SP-1282
36mm --- front caster trail --- SAE SP-1282
63mm --- front spindle length --- SAE SP-1282
50.7mm --- rear spindle length --- SAE SP-1282
8.8� --- front kingpin angle --- SAE SP-1282
9.2� --- rear kingpin angle (inclination) --- SAE SP-1282
10mm --- front scrub radius --- SAE SP-1282
1.0mm --- rear scrub radius --- SAE SP-1282
1.34:1 --- front shock lever arm ratio --- SAE SP-1282
1.43:1 --- rear shock lever arm ratio --- SAE SP-1282
5.2 --- rear side-view swing arm angle --- SAE SP-1282
C4 Alignment
5.9� --- front caster angle --- SAE SP-1282
1.2� --- rear caster angle --- SAE SP-1282
45mm --- front caster trail --- SAE SP-1282
93mm --- front spindle length --- SAE SP-1282
123.0mm --- rear spindle length --- SAE SP-1282
16� --- front kingpin angle --- SAE SP-1282
-7.1� --- rear kingpin angle (inclination) --- SAE SP-1282
162.3mm --- rear scrub radius --- SAE SP-1282
7.8 --- rear side-view swing arm angle --- SAE SP-1282
Chassis
720 N-mm/deg (>10X roll couple distribution) --- Static stiffness --- SAE SP-1282
23 Hz (separation from suspension tramp mode) --- Structural 1st torsional mode --- SAE SP-1282
16 Hz --- Suspension tramp frequency --- SAE SP-1282
21 Hz (separation from suspension hop mode) --- Structural 1st bending mode --- SAE SP-1282
15 Hz --- Suspension hop frequency --- SAE SP-1282
20 dB separation from mount --- Input mobility --- SAE SP-1282
Chassis Notes
The cored composite floorboards increased 1st structural torsion mode by 0.1-0.2 Hz. The tunnel closeout (aka tunnel plate) increased 1st structure torsion mode by ~2 Hz. It makes sense that stronger tunnel plates stiffen the chassis. The C6 Z06 has carbon fiber floorboards to reduce weight, but possibly stiffen the chassis as well. The boards behind the seats often flex and pop on convertibles, and I believe stiffer boards would further increase chassis stiffness.
OEM Wheel specs
8.5"x17", front; 9.5"x18", rear --- 97-99 Wagon wheels --- Source
8.5"x17", offset=58mm, front; 9.5"x18", offset=65mm, rear --- 00-04 Thin/Thick 5-spoke wheels --- Source, Source
9.5"x17", front; 10.5"x18", rear --- 01-04 Z06 forged or cast wheels --- Source
17"x11", offset=50mm, rear --- AFS GS --- Source, Source=http://forums.corvetteforum.com/showthread.php?t=448185]Source[/URL]
OEM Tire specs
P245/45ZR17, front; P275/40ZR18, rear --- Goodyear Eagle F1 GS --- SAE SP-1282
Alignment
Autocross
CAMBER: -2.5� front, -1.5� rear; CASTER: max; TOE: -1/8" toe-out, front; 1/8" toe-in, rear --- Source
C5 Service Manual Alignment --- Source
Front Individual Toe +0.04 degree
Front Sum Toe +0.08 degree
Front Individual Caster +6.9 degree
Front Cross Caster within 0.50 degree
Front Individual Camber -0.20 degree
Front Cross Camber within 0.50 degree
Rear Individual Toe -0.01 degree
Rear Sum Toe -0.02 degree
Rear Individual Camber -0.18 degree
Rear Cross Camber within 0.50 degree
Z06 Service Manual Alignment --- Source
LEFT & RIGHT FRONT:
Camber: Specified Range: -1.2 to -0.2 Optimal: -0.7
Caster: Specified Range: 6.4 to 7.4 Optimal 6.9
Toe: Specified Range: 0.15 to 0.25 Optimal 0.20
FRONT
Cross Camber: Specified Range: -0.5 to 0.5 Optimal: 0.0
Cross Caster: Specified Range: -0.5 to 0.5 Optimal: 0.0
Total Toe: Specified Range: 0.30 to 0.50 Optimal: 0.40
LEFT & RIGHT REAR
Camber: Specified Range: -1.2 to -0.2 Optimal: -0.7
Toe: Specified Range: -0.06 to 0.05 Optimal: -0.005
REAR
Total Toe: Specified Range: -0.11 to 0.09 Optimal: -0.01
Thrust Angle: Specified Range: -0.10 to 0.10 Optimal: 0.00
Z06 (missing in '01) Service Manual Alignment - as written by Hib Halverson, but same as above --- Source
Front Individual Toe: +0.04 degree +/- 0.10 degree
Front Sum Toe : +0.08 degree +/- 0.20 degree
Front Individual Caster: +6.9 degree +/- 0.50 degree
Front Cross Caster: within +/- 0.25 degree
Front Individual Camber: -0.70 degree +/-0.50 degree
Front Cross Camber: within +/-0.25 degree
Rear Individual Toe: -0.01 degree +/- 0.10 degree
Rear Sum Toe: -0.02 degree +/- 0.20 degree
Rear Individual Camber: -0.68 degree +/- 0.50 degree
Rear Cross Camber: within +/- 0.50 degree
Chassis
0.080" before hydroforming, 0.071" after hydroforming --- C5 frame rail wall thickness --- Source
55mm --- Stock driveshaft diameter, part #12561082 --- Source
63mm --- Stock driveshaft diameter, part #12564457 --- Source
2 1/2" --- LG carbon fiber driveshaft --- Source
Transmission
Still looking for:
Street, aggressive street, Kumho and Hoosier alignment specs
Nut & bolt length, guage, thread pitch, and head size--strength if available
Wheel offsets for stock and 1-piece aftermarket or repro wheels
Head part #'s, compression ratio's and flow rates
Cam specs
Brake Rotor Dimensions-front
3 cm, 2 mm --- rotor thickness --- Source
7 cm --- center hole diameter --- Source
7 cm --- lug to lug spacing --- Source
11 cm --- lug diameter...don't know how to say from two lugs across rotor to single lug. Imagine an acute triangle if dots were connected --- Source
3 cm, 8 mm --- inside face of hub to rotor surface --- Source
19 cm --- inner hub diameter --- Source
21 cm, 7 mm --- out hub diameter --- Source
32 cm, 5 mm --- rotor diameter --- Source
Brake Rotor Dimensions-rear -- dimensions that are same as front are not repeated
2 cm, 6 mm --- rotor thickness --- Source
4 cm, 2 mm --- inside face of hub to rotor surface --- Source
20 cm, 2 mm --- out hub diameter --- Source
30 cm, 5 mm --- rotor diameter --- Source
Caliper Pistons
1-9/16" dia x 2 pistons per caliper = 3.835 sq inches --- Front Pistons --- Source
1-3/4" dia x 1 piston per caliper = 2.405 sq inches --- Rear Piston --- Source
Swaybars
23mm, front; 19.1mm, rear --- FE1/Base --- Source
25.4mm, front; 21.7mm, rear --- FE3/Z51 97-99 --- Source
28.6mm, front; 23.6mm, rear --- FE3/Z51 00-04 --- Source
30.0mm, front; 23.6mm, rear --- FE4/Z06 --- Source
31.75mm, front; 25.4mm, rear --- Hotchkis --- Source
38.4mm, front; 27.5mm, rear --- GM T1 --- Source
Spring Rates
439.66 lb/in, front; 576.70 lb/in, rear (manual trans); 588.12 lb/in, rear (auto trans) --- FE-1/Base --- Source
440 lb/in, front; 577 lb/in, rear --- FE-1/Base --- Source
457 lb/in, front; 577 lb/in, rear --- MSRC --- Source
525 lb/in, front --- FE-3/Z51 --- Source
660 lb/in, front --- FE-3/Z51 --- Source
327 lb/in, rear --- FE-3/Z51 --- Source
633 lb/in, rear --- FE-3/Z51 --- Source
634 lb/in, rear --- FE-3/Z51 --- Source
525.31 lb/in, front; 633.80 lb/in, rear (manual trans); 645.22 lb/in, rear (auto trans) --- FE-3/Z51 --- Source
525 lb/in, front; 634 lb/in, rear --- FE-3/Z51 --- Source
620 lb/in, rear --- FE-4/Z06 --- Source
650 lb/in, front; 680 lb/in, rear --- FE-4/Z06 --- Source
525 lb/in, front; 714 lb/in, rear --- FE-4/Z06 --- Source
650 lb/in, front; 800 lb/in, rear --- T1 --- Source
1,000 lb/in, front; 680 lb/in, rear --- Danny Popp's setup --- Source
77 N/mm --- FE1 & F45 front suspension spring rate --- SAE SP-1282
1.15 Hz --- FE1 & F45 front suspension ride frequency --- SAE SP-1282
103 N/mm --- FE1 & F45 rear suspension spring rate --- SAE SP-1282
1.36 Hz --- FE1 & F45 rear suspension ride frequency --- SAE SP-1282
1.18 --- FE1 & F45 Ride frequency ratio --- SAE SP-1282
93 N/mm --- FE3 front suspension spring rate --- SAE SP-1282
1.20 Hz --- FE3 front suspension ride frequency --- SAE SP-1282
113 N/mm --- FE3 rear suspension spring rate --- SAE SP-1282
1.45 Hz --- FE3 rear suspension ride frequency --- SAE SP-1282
1.21 --- FE3 Ride frequency ratio --- SAE SP-1282
Misc Suspension
36mm --- FE-1/Base shock absorber piston --- SAE SP-1282
45mm --- FE-3/Z51 shock absorber piston --- SAE SP-1282
aluminum --- front upper control arm bushing bar pin material --- SAE SP-1282
aluminum --- rear uppper control arm bushing inner metals --- SAE SP-1282
glass reinforced resin --- early stabilizer end links --- SAE SP-1282
AA6061-T6 (forged) --- front upper control arm material --- SAE SP-1282
A356-T6 (hybrid cast preform-forging) --- front lower control arm material --- SAE SP-1282
A356-T6 (hybrid cast preform-forging) --- rear upper control arm material --- SAE SP-1282
A356-T6 (hybrid cast preform-forging) --- rear lower control arm material --- SAE SP-1282
A356-T6 (hybrid cast preform-forging) --- knuckles (all are from the same casting) --- SAE SP-1282
Control Arm Notes
Front lower, and upper/lower control arms are an L-shape variation. The forward leg of the control arm is set near to wheel center. The forward leg of the lower control arms is fitted with a "handling" bushing; the rear leg is fitted with a "ride" bushing. The "ride" bushing absorbs the brunt of road deflections while the "handling" bushing absorbs the brunt of the cornering forces. The "handling" bushing is 3-6 times stiffer than the "ride" bushing.
C5 Alignment
6.5� --- front caster angle --- SAE SP-1282
0.2� --- rear caster angle --- SAE SP-1282
36mm --- front caster trail --- SAE SP-1282
63mm --- front spindle length --- SAE SP-1282
50.7mm --- rear spindle length --- SAE SP-1282
8.8� --- front kingpin angle --- SAE SP-1282
9.2� --- rear kingpin angle (inclination) --- SAE SP-1282
10mm --- front scrub radius --- SAE SP-1282
1.0mm --- rear scrub radius --- SAE SP-1282
1.34:1 --- front shock lever arm ratio --- SAE SP-1282
1.43:1 --- rear shock lever arm ratio --- SAE SP-1282
5.2 --- rear side-view swing arm angle --- SAE SP-1282
C4 Alignment
5.9� --- front caster angle --- SAE SP-1282
1.2� --- rear caster angle --- SAE SP-1282
45mm --- front caster trail --- SAE SP-1282
93mm --- front spindle length --- SAE SP-1282
123.0mm --- rear spindle length --- SAE SP-1282
16� --- front kingpin angle --- SAE SP-1282
-7.1� --- rear kingpin angle (inclination) --- SAE SP-1282
162.3mm --- rear scrub radius --- SAE SP-1282
7.8 --- rear side-view swing arm angle --- SAE SP-1282
Chassis
720 N-mm/deg (>10X roll couple distribution) --- Static stiffness --- SAE SP-1282
23 Hz (separation from suspension tramp mode) --- Structural 1st torsional mode --- SAE SP-1282
16 Hz --- Suspension tramp frequency --- SAE SP-1282
21 Hz (separation from suspension hop mode) --- Structural 1st bending mode --- SAE SP-1282
15 Hz --- Suspension hop frequency --- SAE SP-1282
20 dB separation from mount --- Input mobility --- SAE SP-1282
Chassis Notes
The cored composite floorboards increased 1st structural torsion mode by 0.1-0.2 Hz. The tunnel closeout (aka tunnel plate) increased 1st structure torsion mode by ~2 Hz. It makes sense that stronger tunnel plates stiffen the chassis. The C6 Z06 has carbon fiber floorboards to reduce weight, but possibly stiffen the chassis as well. The boards behind the seats often flex and pop on convertibles, and I believe stiffer boards would further increase chassis stiffness.
OEM Wheel specs
8.5"x17", front; 9.5"x18", rear --- 97-99 Wagon wheels --- Source
8.5"x17", offset=58mm, front; 9.5"x18", offset=65mm, rear --- 00-04 Thin/Thick 5-spoke wheels --- Source, Source
9.5"x17", front; 10.5"x18", rear --- 01-04 Z06 forged or cast wheels --- Source
17"x11", offset=50mm, rear --- AFS GS --- Source, Source=http://forums.corvetteforum.com/showthread.php?t=448185]Source[/URL]
OEM Tire specs
P245/45ZR17, front; P275/40ZR18, rear --- Goodyear Eagle F1 GS --- SAE SP-1282
Alignment
Autocross
CAMBER: -2.5� front, -1.5� rear; CASTER: max; TOE: -1/8" toe-out, front; 1/8" toe-in, rear --- Source
C5 Service Manual Alignment --- Source
Front Individual Toe +0.04 degree
Front Sum Toe +0.08 degree
Front Individual Caster +6.9 degree
Front Cross Caster within 0.50 degree
Front Individual Camber -0.20 degree
Front Cross Camber within 0.50 degree
Rear Individual Toe -0.01 degree
Rear Sum Toe -0.02 degree
Rear Individual Camber -0.18 degree
Rear Cross Camber within 0.50 degree
Z06 Service Manual Alignment --- Source
LEFT & RIGHT FRONT:
Camber: Specified Range: -1.2 to -0.2 Optimal: -0.7
Caster: Specified Range: 6.4 to 7.4 Optimal 6.9
Toe: Specified Range: 0.15 to 0.25 Optimal 0.20
FRONT
Cross Camber: Specified Range: -0.5 to 0.5 Optimal: 0.0
Cross Caster: Specified Range: -0.5 to 0.5 Optimal: 0.0
Total Toe: Specified Range: 0.30 to 0.50 Optimal: 0.40
LEFT & RIGHT REAR
Camber: Specified Range: -1.2 to -0.2 Optimal: -0.7
Toe: Specified Range: -0.06 to 0.05 Optimal: -0.005
REAR
Total Toe: Specified Range: -0.11 to 0.09 Optimal: -0.01
Thrust Angle: Specified Range: -0.10 to 0.10 Optimal: 0.00
Z06 (missing in '01) Service Manual Alignment - as written by Hib Halverson, but same as above --- Source
Front Individual Toe: +0.04 degree +/- 0.10 degree
Front Sum Toe : +0.08 degree +/- 0.20 degree
Front Individual Caster: +6.9 degree +/- 0.50 degree
Front Cross Caster: within +/- 0.25 degree
Front Individual Camber: -0.70 degree +/-0.50 degree
Front Cross Camber: within +/-0.25 degree
Rear Individual Toe: -0.01 degree +/- 0.10 degree
Rear Sum Toe: -0.02 degree +/- 0.20 degree
Rear Individual Camber: -0.68 degree +/- 0.50 degree
Rear Cross Camber: within +/- 0.50 degree
Chassis
0.080" before hydroforming, 0.071" after hydroforming --- C5 frame rail wall thickness --- Source
55mm --- Stock driveshaft diameter, part #12561082 --- Source
63mm --- Stock driveshaft diameter, part #12564457 --- Source
2 1/2" --- LG carbon fiber driveshaft --- Source
Transmission
http://www.zo6vette.com/forums/showthread.php?t=60015
M12 6-Speed Manual
This transmission is unique to the Z06, and is the only transmission available for that model. It is not available on Corvette coupes or convertibles. It has more aggressive gearing to increase torque multiplication in most forward gears, allowing for more rapid acceleration and more usable torque at higher speeds.
A transmission temperature sensor was added to protect the M12 from higher thermal stresses. The sensor warns the driver via the Driver Information Center with a TRANS OVER TEMP light if thermal loads become excessive, meaning that the transmission could be damaged if not allowed to cool down.
Gear Ratios
LS1/MM6 LS6/M12
1st Gear 2.66:1 2.97:1
2nd Gear 1.78:1 2.07:1
3rd Gear 1.30:1 1.43:1
4th Gear 1.00:1 1.00:1
5th Gear 0.74:1 0.84:1
6th Gear 0.50:1 0.56:1
Reverse 2.90:1 3.28:1
http://forums.corvetteforum.com/showthread.php?t=345793
53mm driveshaft till 2000. Metal-matrix composite
63mm driveshaft alluminum alloy 6061, improved driveshaft couplings
Lighter Automatic Transmission Case
By optimizing the design of the automatic transmission case Corvette engineers were able to trim some material and reduce thickness in some areas to reduce mass by 3.3 pounds.
New Synchronizers
Carbon blocker rings have been installed on all manual transmission forward gears to provide for smoother shifts and additional robustness.
Gear Ratios
LS1/MN6 LS6/M12
1st Gear 2.66:1 2.97:1
2nd Gear 1.78:1 2.07:1
3rd Gear 1.30:1 1.43:1
4th Gear 1.00:1 1.00:1
5th Gear 0.74:1 0.84:1
6th Gear 0.50:1 0.56:1
Reverse 2.90:1 3.28:1
Vehicle Speed @ Redline
LS1/MN6 LS6/M12
1st Gear 51 48
2nd Gear 76 69
3rd Gear 104 100
4th Gear 136 143
5th Gear 175 171
6th Gear N/A N/A
Reverse - -
Other M12 Modifications
A transmission temperature sensor was added to protect the M12 from higher thermal stresses. The sensor warns the driver via the Driver Information Center with a "trans over temp" light if thermal loads become excessive - meaning that the transmission could be damaged if not allowed to cool down.
New Pressure Modulator
The original Bosch 5.0 hydraulic pressure modulator is replaced by an improved Bosch 5.3 modulator. It is reduced in size, transmits less noise, and works better at low temperatures. It weighs 3.5 pounds less than the previous modulator and provides better apply response at lower temperatures (-20 degrees Celsius), meaning that the system will become fully functional more quickly after a cold start-up.
Street, aggressive street, Kumho and Hoosier alignment specs
Nut & bolt length, guage, thread pitch, and head size--strength if available
Wheel offsets for stock and 1-piece aftermarket or repro wheels
Head part #'s, compression ratio's and flow rates
Cam specs
Last edited by leaftye; 12-22-2005 at 11:41 PM. Reason: Adding more...
12-24-2004, 06:50 PM
#4
Safety Car
Thread Starter
Member Since: Nov 2003
Location: San Diego, CA "leaf" "tee" "e"
Posts: 4,979
Likes: 0
Received 5 Likes
on
4 Posts
This makes it easier for me to provide some good information without typing much. These are some of my favorite threads.
General specs & FAQ's
Jerami's SuperFAQ For Commonly Asked Questions --- Lot's of specs!
Mod Guide: Induction and Exhaust (PLEASE READ BEFORE POSTING)
GM head Guide
Cam Guide
David Farmer C5 Torque Spec Sheet --- World Challenge racer
David Farmer F-body Torque Spec Sheet
David Farmer C5 Fuse Panel sheet
David Farmer DIY Alignment
Solutions to VERY common problems
IMPORTANT ELECTRICAL INFORMATION (Long!)
Oil Pressure Sensor Replacement
Little lift for changing tires
Column Lock
Build Your Own CLB
Steering Column Lock FAQs - please read before you post (sticky please)
Brakes
Brake fluid bleed flush
Problem with speed bleeders
Motive Power Bleeder
Cant get rear brake rotor out - Need help!
C5 rotors $23 each
How do you put your front Calipers on the rear of a C5?
Suspension
Need VBP control arm bushing install help
Best Poly Bushing for C5/Z06
Steering Popping at low speed
T-1 End Links --- I made my own end-links!
coilovers VS stock design
How come no one puts 18 inch Z06 rear wheels on front of Z06
Looking for Dropped Spindles for C5 --- 3R CNC uprights
Motor
Cylinder Head Discussion
Camshaft Discussion Part III
Another way to prime oil pump/system?
Eliminate EGR and AIR?
Modified LS1 Rocker Arms(new Bearings)
Harland Sharp rebuilt rockers
Lifter Recomendation
Morel lifters
Drilling Lifter Cups
Any data on the Darton MID block setups?
How hard is it to change rod bolts?
Katech Rod Bolts Causing Problems???
Optimal quench?
top engine cleaning and KR
Home Made Catch-Can
MAF Screened or Unscreened
Removing Gasket from block....there must be a better way
Water-Alky injection for under $200
Wiring schematic-Ls1/6 to Ls2 TB connector
241 & 853 casting flow #'s...
Head Porting:
Articles
Angling For Power
Bench Racing
Combustion Science and Theory
Compressions Ratio -vs- Compression Pressure
Standard Abrasives - DIY Cylinder Head Porting Guide
Do-It-Yourself Small-Block Cylinder Head Porting
Fire in the Hole-How combustion chamber design relates to engine performance
Go With the Flow Part I: Making Sense of Cylinder Head Flow Testing
Go With the Flow Part II: Making Sense of Cylinder Head Flow Testing
Head Porting at Home
Magnificent Quench
Quench Quest
Go With the Flow Part I: Making Sense of Cylinder Head Flow Testing
Go With the Flow Part II: Making Sense of Cylinder Head Flow Testing
Threads
Good books or articles on head porting???
Head Porting
Head Porting At Home
Head Porting Book?
Here are the head cross section pics
Home heads Porters Come In
Home porting on heads?
Pics of ported and polished heads
Porting At Home
Porting stock ls1 heads?
porting tips for LS1 heads
PP LS6 Style Head Review (flow, specs, comparison inside)
Who's ported their own heads?
Tuning
Finally, How to Tune 101!
HP Tuners .bin file Repository -- Search for bins, upload your own bins!
*READ ME FIRST--Tuning Documentation, VE/MAF Tuning, SES Lights + more!
Ignition timing 101
The Perfect Wideband for HP Tuners
Cooling [coolant & oil...to include the pump]
Getting there (tranny/diff coolers
Tranny and Diff Coolers
Seperate oil cooler or combined oil/radiator...
Oil Cooler and/or Accusump DIYers...Please check in...
Change a thermostat... w/out draining coolant????
Question on shimming and porting ls6 oil pump
Your thoughts on Ported vs regular LS6 oil pump
Question regarding shimming of oil pumps for increased oil pressure
Do-It-Yourself Thermostat Modification
How do ya burp the Radiator
Know Thy Oil Pan!!
Drivetrain
Dumb question about MN12 transmission / clutch --- includes drivetrain removal and clutch swap
Any links to a DIY clutch install?
How do a I dissassemble a torque tube?
Modded my new BPP shifter for vib. isolation
I Cut Down Stock My Shifter !
Pilot bearing removal tip
C5 Corvette noisy throwout bearing?
Snap ring part #'s ??
What causes the clutch to stick?
T-56, fluids,mods,answers
Finally changed my transmission fluid (warning lots of pics)
New 5th and 6th gear ratios
Torque Tube Mod Kit --- Peachstate Posse rubber coupling
Aluminum shift forks C5 .. help
Drivetrain Maintenance & Upgrade Discussion
Lighting
Just installed brass headlight gears (pics)
Replacement gear in headlight motor? --- $13 plastic gear available at local parts stores
Flush tailllights done a different way... (rather long, sorry)
High beam driving lights --- High beam bulbs in low beam socket
HID retrofits in order of originality:
Headlights...Part# 1 --- Sleepy eyes
C5 HID projector headlight retrofit done! PICS* (56K death)
HID & export headlamp assemblies
New headlight question-projector halogen & HID's with Angel Eyes
Everyone that's serious about lights knows about Daniel Stern:
http://www.danielsternlighting.com/p.../products.html
http://faq.auto.light.tripod.com/car-oem-hid.htm
More info:
Shortest length projector?
High beams: necessary?
AUTOMOTIVE HID KITs THAT WORK UNDER WATER?!
Here's another REALLY GOOD faq:
http://faqlight.carpassion.info/
LED Lighting:
LED tails ... Dial Up Warning
LED Accent Lighting
LED Radio Install Guide... {Dial Up Warning}
LED radio done!! (pics)
Did my tag lights with LEDs!!!
LED taglight ~ Part Deux (pics again)
LED mods just keep on coming ... DU warning -- underhood light
LED installs for: DIC, HVAC, rear view mirror, door buttons -- also neon side coves
Opinions of Side Vent Lighting?
Finally! Tech Tips on how to change your DIC, Mirror, and HVAC Light to LEDs! -- trunk light too
LED Accent lighting - side coves
Mirror Leds
Body kits --- if I hate it, I probably won't post a link here
ACP Widebody Kit
Other
Fuel Filter on a C5
How to replace TPM Sensor Batteries
Glass Reinforced Thermoset Polyester repair ? Rocker Panel
Opinions on floor mats
Momo steering wheel, I LOVE IT!!
Hood Seal Please -- covers trunk seal too!
Exterior mirror repair HOW TO! (in case your's is flopping)
OEM Z06 Wheel Paint Finish?
Best Fan Belts ?
Electric windows, how to repair
Firewall penetration
Source for T hooks
Any tips for rear hatch removal?
Finally, a Simple C5 Cupholder (lengthy for dialups) --- $2 leather cupholder
Added by MAJ Z06, but from David Farmer one of our World Challenge racers:
http://www.davidfarmerracing.com/c5-fuse.pdf C5 fuse layout-not year specific
http://www.davidfarmerracing.com/C5torque.PDF All engine/suspension/brake/drivetrain torque specs
http://www.metricchemical.com/align.PDF my diy alignment guide
http://www.metricchemical.com/fbody.pdf F-body torque sheet
and lastly, DTC (trouble codes) for C5's
http://www.davidfarmerracing.com/dtc-c5.PDF
I print these front/back, laminate, and keep in my tool box.
Last edited by LTC Z06; 11-14-2005 at 02:28 PM.
The following users liked this post:
DKZC5 (01-19-2018)
12-24-2004, 06:51 PM
#5
Safety Car
Thread Starter
Member Since: Nov 2003
Location: San Diego, CA "leaf" "tee" "e"
Posts: 4,979
Likes: 0
Received 5 Likes
on
4 Posts
I started this over in the Autocross/Racing Forum, but am bringing over the highlight to share and elicit your ideas. Many of the ideas here will be just as effective on both the C5 and the C6.
http://forums.corvetteforum.com/showthread.php?t=979585
http://forums.corvetteforum.com/showthread.php?t=979585
Originally Posted by leaftye
Anyone try to stiffen the chassis? I'm thinking primarily about C5's, but any thoughts or proven ideas would be great to hear about.
Most of my ideas are from the 1997 SAE pubs (SAE SP-1282).
My first idea is about the tunnel reinforcement plate. The pubs said this area was worth 2 Hz or 2nd order torsional stiffness. Lots of folks already sell aluminum plates, and those may be as good as it's going to get. I'm curious if enhancing the plate to resist 1st order bending stiffness would work. I'm thinking of using a composite plate with 800F resistent resings with a structural reinforcement rib from front to rear. Might it help? I don't know, but flat (bottom) composite plates are pretty easy to create.
My second idea has to do with the boards behind the seats. The diagrams in the SAE pubs shows those as shear boards that are designed to resist 2nd order torsional loads. I don't know what these are made of, but if they're as flat as they look, it'd be another easy part to create out of composites.
The third idea is with the floorboards. The SAE pub didn't seem to think they were worth much. The new Z06 with composite floorboards is what is making me think this area could be improved. A composite panel with a thick aluminum honeycomb core should be VERY stiff. These boards run a good length along the frame where there is little else to resist bending loads.
If I ever try to create new panels for any of these ideas, it'll be a long way off in the future. Right now it's just a mental exercise. Cost issues aside, do these ideas have any merit? What other ideas are you guys floating around in your heads?
Originally Posted by Solofast
One of my racing buddies was doing CAD on the C5 some time ago at GM when the C5 was in the design stage. He was amazed that the height of the rear bulkhead (behind the seats) had a huge impact on the overall stiffness of C5 chassis. If you are looking to add stiffness you should go there first.
Not likely that a custom underside plate would be much if at all better than one of the ones available. What you need to look at is bridging openings with diagonals (like in a cage) to get whopping big increases in stiffness. Still, as others have said, this is pretty stiff chassis and you are beyond the point where you are going to feel much difference. GM did a bunch of C4 tests with the roof out and in. Although taking the roof out made the chassis much less stiff, the max lateral acceleration for the car remained the same. This was with autocross alignment. I could always feel the C4 twist so I always raced with the roof in, but other race with it out an it doesn't seem to make a measurable difference.
Not likely that a custom underside plate would be much if at all better than one of the ones available. What you need to look at is bridging openings with diagonals (like in a cage) to get whopping big increases in stiffness. Still, as others have said, this is pretty stiff chassis and you are beyond the point where you are going to feel much difference. GM did a bunch of C4 tests with the roof out and in. Although taking the roof out made the chassis much less stiff, the max lateral acceleration for the car remained the same. This was with autocross alignment. I could always feel the C4 twist so I always raced with the roof in, but other race with it out an it doesn't seem to make a measurable difference.
Originally Posted by leaftye
A multi-point cage is one way of stiffness the chassis, but at the expense of added weight. While a cage would add torsional stiffness, I believe most of the chassis twisting occurs from the back of the doors up to the front swaybar mounts. Unfortunately there's little we can do up front unless someone figures out a way to redesign the front shear wall....and I can't imagine it being anything but a serious PITA job.
The C5 chassis is stiff....for an open car In the SAE report they say it was the stiffest open body car (convertible), and as stiff as good sedans. As good as a stiff sedan doesn't sound all that spectacular to me. Also the report said they were able to lower the spring and swaybar rates with a stiffer chassis.
1st order bending stiffness is 21 Hz, 2nd order torsional stiffness is 23 Hz. At one time during development they had the chassis at 28 Hz for both, but had to make a bunch of compromises to meet weight, cost and comfort requirements. One compromise was moving part of the front tunnel forward. "Part" is the key word. Because they didn't move the rest of the tunnel, the shear wall was compromised, and I think they lost 2 Hz of torsional stiffness. The tunnel was also going to be thicker, but they made it thinner to take weight out of the car.
They also gave up a lot of torsional stiffness by going with a roof that latches on instead of bolting on. The latches make it easy to remove, but do little to increase chassis stiffness. Makes me curious as to how difficult it would be to cast replacement bolt-on latches with aluminum.... I never remove the roof anyway.
Another area is the bumper bars. They said the connection of them was very critical, but they are not welded at all edge. They don't have any gussets or braces either. At the very least, I would seam weld it. I plan on trying this one myself. I'm looking at laying down my radiator, which requires welding. Removing the bumper would make it easier to weld, and if the bumper is already off....
Originally Posted by leaftye
There are two types of control arm bushings. The front bushing is the handling bushing, and the rear bushing is the ride bushing.
Front=handling
Rear=ride/comfort
The report said changing the handling bushing hurt the ride and vice-versa. The handling bushings are 3-6 times as stiff as the ride bushings. It will increase noise. They used the control arm bushings to realize a 20 dB reduction before reaching the frame.
Front=handling
Rear=ride/comfort
The report said changing the handling bushing hurt the ride and vice-versa. The handling bushings are 3-6 times as stiff as the ride bushings. It will increase noise. They used the control arm bushings to realize a 20 dB reduction before reaching the frame.
Originally Posted by leaftye
I'm using the term composite because I don't yet know which replacement composite would be better. Carbon fiber is great torsional stiffness, but is fatigues very quickly when damaged. There are other composites that don't such catastrophic failures as CF. Hexcel Composites has a document on the website about sandwich panels (like the floorboards) as shown below:
Note: Only the core thickness changes
t=thickness
Solid Material
t=1
Stiffness=1.0
Flexural Strength=1.0
Weight=1.0
Solid panels with core thickness=1t
t=2
Stiffness=7.0
Flexural Strength=3.5
Weight=1.03
Solid panels with core thickness=3t
t=4
Stiffness=37.0
Flexural Strength=9.2
Weight=1.06
Note: Only the core thickness changes
t=thickness
Solid Material
t=1
Stiffness=1.0
Flexural Strength=1.0
Weight=1.0
Solid panels with core thickness=1t
t=2
Stiffness=7.0
Flexural Strength=3.5
Weight=1.03
Solid panels with core thickness=3t
t=4
Stiffness=37.0
Flexural Strength=9.2
Weight=1.06
Originally Posted by ghoffman
Keep in mind as well that the natural frequencies that you quote are very high and to get higher requires that you increase stiffness and/or decrease mass. The basic equation for natural frequencies goes as the square root of the stiffness over mass. Obviously, the trick is to increase the stiffness faster than the mass. Many times, the challenge is to increase the mode you want without lowering the other modes of interest due to increased mass. Also, the error most people who are not trained in structural mechanics make is to not realize that the end attachments (�boundary conditions�) are at least as important as the structure between the attachments. You are probably correct that complete seam welding would help in some areas. I suspect that increasing the out of plane (the �Z� direction normal to the flat surface) stiffness of any individual panel would have little effect. Shear panels are very common in aircraft structures, look at a B-52 and you will see ripples along the side of the fuselage. That is a type of shear panel called a �tensile field� panel because it is like a picture frame with a piece of paper on the back. As the picture frame tries to �parallelogram�, the paper ripples and becomes like a cable diagonal stiffener. With this example, the out of plane stiffness of the panel itself is almost irrelevant since it is the in-plane stiffness that matters. If you have access to the FEM model of the car you will be able to get the strain energy density output and that will indicate what area is doing the work for any specific mode shape.
I recommend a couple of books if you really want to get into this. The first is the bible of just about every structures engineer, the second is very similar in format but is the dynamicists' version.
1) Roark's Formulas for Stress and Strain, by Warren C. Young ISBN: 0070725411
As you look at the effect of the end conditions with this book, you will really see how huge the end conditions are to the overall structure. For example, consider the violin string, it has very little stiffness until it is under tension.
2) Formulas for Natural Frequencies and Mode shapes by Robert D. Blevins, ISBN: 1575241846
Originally Posted by leaftye
I know the tunnel brace issue has been beat to death, but I can't help sharing this:
After reading thru it again, I noticed that the tunnel is only spot welded, when surely seam welding would be benefit stiffness while adding negligible weight, but be a lot of work. Also it looks like it would be better to increase the number of bolts. It would cause more tunnel plate machining and make it take longer to R&R, but I can handle that, as I'm sure all of us can.
Excerpt from SAE SP-1282: The 1997 Chevrolet Corvette Structure Architecture Synthesis
Tunnel and Tunnel Closeout Configuration
The structural stiffness advantages of a closed center tunnel were derived early in the vehicle development process and were based on basic engineering principals, competitive assessment and analytical model feasibility studies. The close section tunnel provided high torsional stiffness for relatively low mass. However, because a closed section tunnel was so difficult to execute in the 'C5', additional studies, in the structural concept development phase, were necessary to quantify its advantages.
The 'C5' powertrain layout of front engine and rear drive required the drive shaft to traverse the length of the tunnel. Additionally, because of the desired low profile of a Corvette, the exhaust could not be packaged under the floor and had to be packaged in the tunnel. The above two packaging requirements, coupled with the manufacturing requirement that the entire driveline load as an assembled unit, dictated the size and structural configuration of the tunnel.
The 'C5' tunnel is comprised of two "L" shaped stampings spot welded together to form an upside down "U" section. The number of bolts was a balance between manufacturing processing and the desire to have the tunnel structure behave as a continuous closed section. The analytical trimmed body model was also used to quantify that removal of the tunnel closeout from the structure would result in a first structure torsion mode degradation of approximately 2 Hz.
Originally Posted by ghoffman
Rather than increasing the number of "bolts", you should have a few (4) interference fit shear pins. I attended a structural dynamics conference and there was a guy that had done testing of large skyscraper buildings. To make a long story short, any bolted structure that has clearance holes is very non-linear in its' response because (like a building with riveted steel beams) as the deflection occurs, the clearance in the holes is taken up progressively and it gets stiffer. No matter how many bolts you have, this will occur. I would try going to the next larger size in 4-6 holes and match drill them with zero clearance or even a slight interference fit.
Last edited by leaftye; 01-09-2005 at 04:20 AM. Reason: Finally adding information here
12-24-2004, 07:14 PM
#6
Safety Car
Thread Starter
Member Since: Nov 2003
Location: San Diego, CA "leaf" "tee" "e"
Posts: 4,979
Likes: 0
Received 5 Likes
on
4 Posts
Coming in next update:
Cam specs
Cylinder head differences
Build sheet location
Transmission differences
Differential differences
Drivetrain fluid tips update
More headlight upgrade information
Leaf spring weights
Swaybar weights
OEM & aftermarket brake caliper weights
Fastener specs update & relocation
Harness bar weights
LS1/LS6/LS7 engine part weights
Little lift info
Headlight gear update
Headlight plug update
Rocking seat update
Drivers sport seat weight
Hardbar seat bracket weight
Balljoint replacement info
Suspension creak tips
Aerodynamics ideas
Lightweight carpet options
Lightweight fastener vendors update
Low speed steering pop info
Chassis stiffening update
Ford seat cutout update
Composites info
Rattling Bose emblem update
Tire weight update
Fix link to Bill Curlee's water intrusion thread
Lugnut weights
Long term updates to watch for:
Column lock fixes
Suspension dimensions
More weights
More fastener specs
Repro wheel weights
Aluminum & titanium fasteners replacement part #'s and sources
Aftermarket hood weights
3-piece wheel weights
Additional swaybar weights (approximations??)
Has this fallen off your C5?
http://forums.corvetteforum.com/show...post1553516432
Last edited by LTC Z06; 01-12-2006 at 10:42 AM.
12-26-2004, 12:58 AM
#7
Safety Car
Thread Starter
Member Since: Nov 2003
Location: San Diego, CA "leaf" "tee" "e"
Posts: 4,979
Likes: 0
Received 5 Likes
on
4 Posts
Whew, just added tons of info. Hopefully the weather allows me to reward myself with a nice drive! All this information is worthless if not enjoyed.
01-02-2005, 08:28 PM
#8
Le Mans Master

Thanks. this is very helpful.
01-02-2005, 09:20 PM
#9
Safety Car
Thread Starter
Member Since: Nov 2003
Location: San Diego, CA "leaf" "tee" "e"
Posts: 4,979
Likes: 0
Received 5 Likes
on
4 Posts
You're welcome! I mostly put information that I'm curious about, but also information that I keep relaying in various posts. Now I can look up information quickly, and if anyone has a question, I can probably send them a link to this thread and be done.
01-03-2005, 12:10 AM
#10
Tech Contributor


Member Since: Dec 1999
Location: Anthony TX
Posts: 32,736
Received 2,180 Likes
on
1,583 Posts
CI 6,7,8,9,11 Vet
St. Jude Donor '08

Man,,,,,That is one HELL of a post!!!!!!!!! Well done!! Brovo Zulu!!!!
What do you think about this??
There are lots of people who are having water intrusion problems! Been there done that! I will come up with a all inclusive water knowledge post, kind of like the electrical ground post and you can add it in to your post.
Very cool Post!!!!!!!!!!!!! You da MAN!!!

Bill Curlee
What do you think about this??
There are lots of people who are having water intrusion problems! Been there done that! I will come up with a all inclusive water knowledge post, kind of like the electrical ground post and you can add it in to your post.
Very cool Post!!!!!!!!!!!!!
You da MAN!!! Bill Curlee
01-03-2005, 12:59 AM
#11
Safety Car
Thread Starter
Member Since: Nov 2003
Location: San Diego, CA "leaf" "tee" "e"
Posts: 4,979
Likes: 0
Received 5 Likes
on
4 Posts
Thanks Bill, that means a lot coming from you! Most of the information from this thread comes from other folks, but I try to give them their due credit by linking to their threads. Good catch about my lack of water intrusion information. It seems like water wants to come in from all over the place, so it'd be great to see your post. I'll be happy to read it since my roof/window leaks have been frustration enough that I'm pretty firmly set that whenever I get my skills high enough, I'll be fabricating a braced hardtop for my coupe. If I had the skills to create upper window channels with automatic window movement for the channels, I'd do that too....might as well kill almost all chance off a leaky roof and windows!
Your electrical grounding thread is great, as is all the advice you post. Whenever you create your water knowledge thread, I'll DEFINITELY link to it. I won't copy that much information because it would be like stealing from you, but I'll provide enough information to give readers a reason to visit your thread. I can't wait to see your thread!
Eugene
 01-04-2005, 12:31 AM
#13
Safety Car


How about:
Twighlight Sentinel: This options turns the lights on for you whether you want them to or not if the sensor thinks its dark enough for headlights. Problem is when you have this option on when just starting your car in your garage. Eventually you'll wear out one or both of the headlight motor gears. Typical dealer fix it cost is approximately $400 for a new headlight motor (parts and install). You can buy just the gears for approx $50 per headlight and do it yourself, swapping the plastic gears for bronze.
Twighlight Sentinel: This options turns the lights on for you whether you want them to or not if the sensor thinks its dark enough for headlights. Problem is when you have this option on when just starting your car in your garage. Eventually you'll wear out one or both of the headlight motor gears. Typical dealer fix it cost is approximately $400 for a new headlight motor (parts and install). You can buy just the gears for approx $50 per headlight and do it yourself, swapping the plastic gears for bronze.
01-04-2005, 12:53 AM
#14
Tech Contributor
Member Since: Oct 1999
Location: Charlotte, NC (formerly Endicott, NY)
Posts: 40,076
Received 8,915 Likes
on
5,326 Posts
One question and one exception.
What are the Ford Harness cutouts and where do you get them?
I take exception on one thing. The front fascia is usually the first thing to come in contact with objects versus the skid bars. The bumper sticks out much further than the two skid bars and they really don't keep the bumper from running up over something. I have scraped the bottom of my front fascia several times and never even touched the skid bars. In cases where I got both fascia and the skid bars the little wheels that some people attach would have been torn right off.
Bill
 01-04-2005, 01:13 AM
#15
Team Owner

Thanks for all the work and information you have put together.
One thing I noticed was tire weights. I think there may be an error or two.
20 lbs, 275/35R18 --- Kumho Ecsta MX --- Source
31 lbs, 295/35R18 --- Kumho Ecsta MX --- Source
Does this seem right to you?? These tires are almost the same size but there is a 30% weight difference.
Note the stock EMT runflat weights:
29.5 lbs, front; 32.5 lbs, rear --- Goodyear EMT, stock size --- Source
Something doesn't jive here....
01-04-2005, 07:23 AM
#16
Safety Car
Thread Starter
Member Since: Nov 2003
Location: San Diego, CA "leaf" "tee" "e"
Posts: 4,979
Likes: 0
Received 5 Likes
on
4 Posts
Napacruzerc5, I can put something in there for the bronze gears. We'll definitely need it if the HID projector retrofit kits become popular. I've been lucky with my plastic gears, but I know it's just a matter of time, and I'd like to keep my popups until someone comes out with a reasonably priced and high quality nonpopup kit....current kits could've been made by some high school kid, but are priced like they're made by Nasa!
Bill, I'll look further into the Ford cutouts. I've posted about them several times, so I'll post more info to make it easier for people to do. As for scraping, maybe I've been lucky with my A&A kit! I'll change the wording so it doesn't sound like it'll definitely stop scraping...nothing can do that!
Macinamouth, I got those numbers from the Kumho site. I thought the numbers were strange too. I think the problem is it doesn't differentiate between their runflat and nonrunflat Ecsta MX. If I can figure it out, I'll post more info....it isn't really wrong right now, but it definitely lacks something.
Thanks guys for the great feedback, it'll do a lot to help me improve this writeup!
01-04-2005, 11:23 AM
#17
Drifting


Member Since: Dec 1999
Location: Central Florida
Posts: 1,315
Likes: 0
Received 27 Likes
on
22 Posts
If the inside tire is spinning in turns, you have too much
friction modifier, not too little. When I change the rear lube
in my autocross car (A C4) I use Redline shock oil which
contains 2% modifier. (GM uses 4%) If you dont have enough
modifier, your outside wheel will chatter around corners.
Great list and INFO!
Russ
friction modifier, not too little. When I change the rear lube
in my autocross car (A C4) I use Redline shock oil which
contains 2% modifier. (GM uses 4%) If you dont have enough
modifier, your outside wheel will chatter around corners.
Great list and INFO!
Russ


