
Aiming Headlights
 05-18-2012, 12:33 AM
#1
Intermediate

Thread Starter

Member Since: Jul 2011
Location: League City Tx
Posts: 31
Likes: 0
Received 0 Likes
on
0 Posts

I have a 98 c5 and am attempting to aim the headlights. can anybody offer some suggestions on the best and easiest procedures? any help would be appreciated. it seems like there are about 6 to 8 adjustments on each side to adjust. my low beams are too low and aimed too far to the right, but my high beams are great where they are.
thank you in advance,
SS
thank you in advance,
SS
 05-18-2012, 12:55 AM
#2
Melting Slicks

I have a 98 c5 and am attempting to aim the headlights. can anybody offer some suggestions on the best and easiest procedures? any help would be appreciated. it seems like there are about 6 to 8 adjustments on each side to adjust. my low beams are too low and aimed too far to the right, but my high beams are great where they are.
thank you in advance,
SS
thank you in advance,
SS


Last edited by CactusCat; 05-18-2012 at 01:02 AM.
05-18-2012, 01:37 AM
#3
Tech Contributor
Member Since: Dec 2003
Location: Horncastle Lincolnshire, England
Posts: 19,384
Likes: 0
Received 79 Likes
on
61 Posts
2023 C5 of the Year Finalist - Unmodified

 Read the notes on lubricating the golden rod before you start.
Aiming Stock Headlights
Preparation
Chose a white wall to project the lights onto
Mark a vertical centreline on the screen in line with the center of the car (black tape?)
(look over the roof of the car to get the line)
Measure the height from the floor to the center of the headlight capsule
Mark a horizontal aiming line on the screen
Measure the distance between the centreline of the right headlight module and the center of the left headlight module.
Position the vertical tapes this distance to the right and left of the screen centreline
Lubricate the adjustment screws before adjusting See Note
Adjustments
Raise the hood
Raise the headlights
Remove the headlamp adjustment screw plug
Turn on the low beam headlights and block the light from projecting onto the screen from the passenger headlight
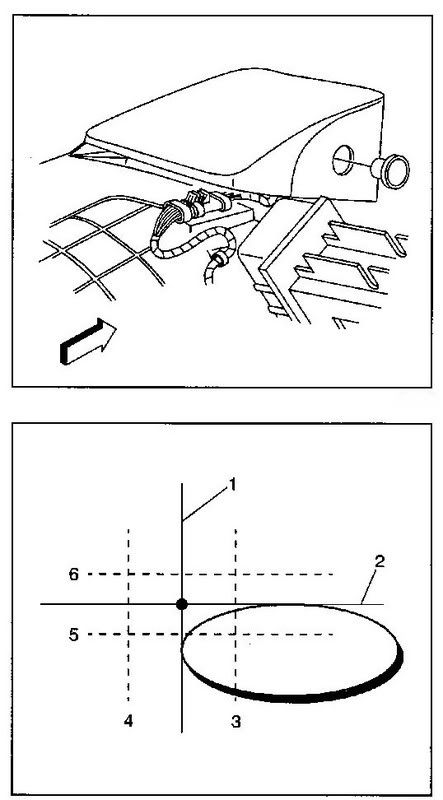
Check the horizontal aim
Adjust the horizontal aim adjusting screw to align the left edge of the high intensity zone with the headlight vertical centreline
The left edge of the beam should lie within 4” to the left and 4” to the right
of the vertical centreline.
Check the vertical aim
Adjust the vertical aim adjusting screw to align the top edge of the high intensity zone with the headlight horizontal centreline
The left edge of the beam should lie within 2” above and 2.5” below the lamp horizontal centreline.
Reinstall the headlamp adjustment screw plug
Repeat for the other headlight
Turn off the lights and close the hood
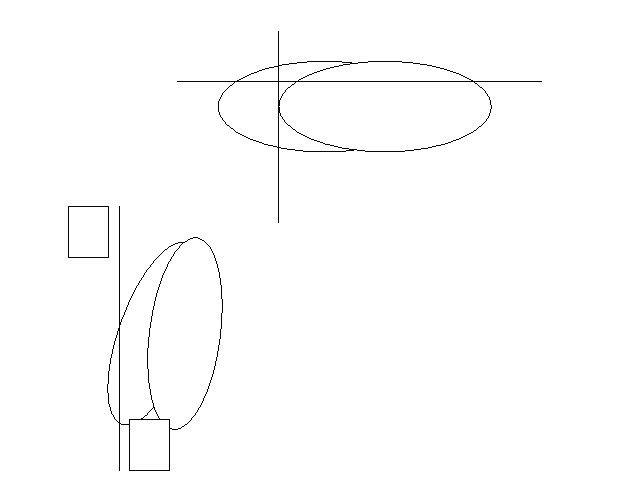
This is the pattern you're looking for
Advice Frome LonestarFRC:
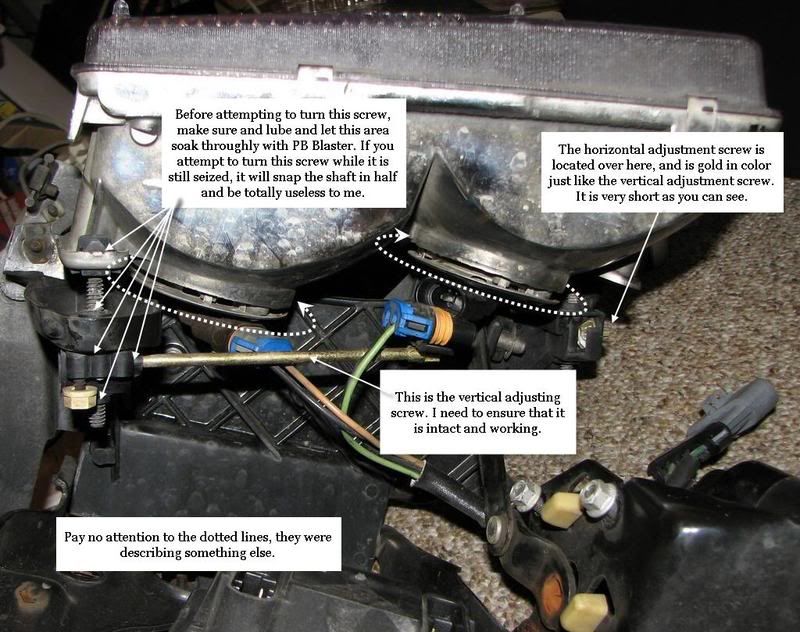
Lubrication may not be enough. The problem is that the spray can't actually penetrate to where it's needed. There's a little internal gear-drive mechanism involved.
Important! If you attempt to make any adjustments, especially one involving the up/down adjuster and it doesn't move, or you meet a lot of resistance, stop right there. Do NOT attempt to force things. You will ABSOLUTELY break the long "goldenrod' (gold colored rod about 3" long). This is not an "if" or "maybe". Do NOT force it by twisting your wrench/nut-driver harder and harder. Once broken, these pieces are NOT available as a separate repair piece from GM. They will only sell you the entire headlight assembly.
If yours are frozen up, do a search on this issue. Many many posts about it. "Goldenrods" is one if the terms that may be helpful when doing a search. There IS a way to unfreeze the gear-drive mechanism but it involves removal of the headlight assembly to get access.
(Thanks to Junkman2008 for the picture)
Last edited by DeeGee; 05-18-2012 at 01:42 AM.
The following users liked this post:
mevman (01-07-2016)
05-30-2013, 09:16 AM
#6
Cruising
Great Information. I just installed new pop up project lenses and HID's. Tonight I'm tackling the aiming of the passenger side height, and also adjusting the torx screws so the headlamp cover fits flush. (Slight lift above fender from one tensioner screw)
05-31-2013, 07:28 AM
#7
Intermediate
Thread Starter
Member Since: Jul 2011
Location: League City Tx
Posts: 31
Likes: 0
Received 0 Likes
on
0 Posts
A quick thank you for all the advice and pictures, it really helped me to succeed in adjusting my headlights. I have since upgraded my headlights to HIDs, using the manufacturers housing, and what a difference that has made! I can actually see ahead now!!!!!!
SS
SS
03-20-2016, 12:00 PM
#8
Burning Brakes

 ...Has anyone shared the problem of adjusting the low beams to the correct height and find that upon using the high beams, that they are aiming at the tree tops and virtually useless !! I thought there was a thread posted a long time ago stating that there was a flaw in the lens mold that created this issue. I have 9011 HIR bulbs in the low beams and they are a noticeable improvement, but still not great. Any solid feedback from someone in the know would be appreciated !!....
 . Looking forward to the day of installing installing projectors !!
03-20-2016, 04:29 PM
. Looking forward to the day of installing installing projectors !!
03-20-2016, 04:29 PM
#9
Drifting


 ...Has anyone shared the problem of adjusting the low beams to the correct height and find that upon using the high beams, that they are aiming at the tree tops and virtually useless !! I thought there was a thread posted a long time ago stating that there was a flaw in the lens mold that created this issue. I have 9011 HIR bulbs in the low beams and they are a noticeable improvement, but still not great. Any solid feedback from someone in the know would be appreciated !!..... Looking forward to the day of installing installing projectors !!
03-20-2016, 08:01 PM
...Has anyone shared the problem of adjusting the low beams to the correct height and find that upon using the high beams, that they are aiming at the tree tops and virtually useless !! I thought there was a thread posted a long time ago stating that there was a flaw in the lens mold that created this issue. I have 9011 HIR bulbs in the low beams and they are a noticeable improvement, but still not great. Any solid feedback from someone in the know would be appreciated !!..... Looking forward to the day of installing installing projectors !!
03-20-2016, 08:01 PM
#10
Melting Slicks
In the description above if the headlight lens is the original OEM lens then the cause is usually due to either the low or high beam bulb is not set in the socket properly. ACA projector lenses also had a design/manufacturer flaw that had the high beam socket misaligned (higher than the low beam). At least one vendor (Radioflyer) has sold corrected ACA lens housings with properly aligned high/low beams.
That problem is ACA specific. OEM should be fine. Check bulbs to make sure they are properly seated.
03-20-2016, 09:09 PM
#11
Melting Slicks
Member Since: Sep 2012
Location: LaGrange Park, IL IL
Posts: 2,308
Received 158 Likes
on
131 Posts
St. Jude Donor '13, '15
Maybe I missed this, but when 25 ft away, at what height are we supposed to get the top of the light beam at? I felt like I had adjusted my ACA projectors at the right height, but find that they light up the stop signs and trees at further distances when driving.
03-21-2016, 09:22 AM
#12
Team Owner


So I bought an HID system from the Radioflyer and the ACA housings he provided had the high and low beams in perfect alignment

I found that the lamp housings are not very difficult to completely remove from the car. Once you remove the black surround and the top cover, all of the mounting bolts are exposed. Removing the housing allows easy access to the adjusting screws so you can clean any old grease or junk from the threads. Use some silicone or white lithium grease to grease the threads on the rods and the adjusting screws. This will make it easy to adjust the lights and keep from breaking the rods or the screw assemblies.
The following users liked this post:
2FAS4UU (03-21-2016)
03-21-2016, 11:38 AM
#13
Burning Brakes
 ...c4cruiser.... Thanks for your reply, Having put 'many' different types of halogen bulbs in over the years and trying to find a acceptable solution I finally have concluded that there is no 'REAL' solution to the OEM flawed headlights other than complete replacement. In regards to the other suggestions of checking bulb seating, believe me when I say that it's not the installation problem. I'm still searching in parts for sale regularly for a good used set of ACA Sun Guns or a Radio Flyer set, lol, impossible to find !!! I'm glad to hear that it's not just my problem as well with factory housings. Love my car, but hate the headlights that GM designers came up with, must have been another 'cost' issue when they got to lighting, lol again !!...
 03-26-2016, 02:42 PM
#14
Drifting
I just changed out my stock 9005 and 9006 bulbs to 9011 and 9012 HIR bulbs and noticed the first night I used them, the passenger side beams (high and low) were pointing way low down to the ground. At first I thought I knocked something loose or the lights needed adjustment, and then I realized that maybe the bulbs were improperly inserted in their sockets and angled wrong instead of being straight ahead. Removing both of them and reinserting them properly cured the aiming problem. When you replace any of these bulbs, they must be put back in properly, so check that first if they are not aimed correctly after you replace them. And BTW, the lights are MUCH brighter now and I am very happy with the results.