
Plasti-dip mod = cheapest/easiest thing ever
 05-11-2011, 10:28 PM
#41
Melting Slicks

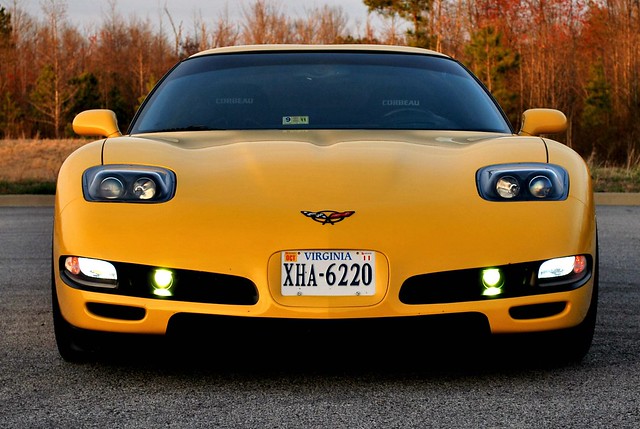
I did my front bumper with it and the rear. And to answer the question about how the front holds up I would say rather well. I have washed it many times and scrubbed off bugs. Only thing is you have to be a little careful on the outside edge of the paint as it is possible to start to make it peel back or break off a little. But that was only in the area near the fog lights.


 05-11-2011, 11:34 PM
#42


Wow that front bumper looks so good! I just completed the lower part of my rear bumper. Didnt come out to bad, a very little bit of roughness on the edges. But the real test will be when its day light out, May attempt the front bumper tomorrow!! 
 05-12-2011, 02:05 AM
#44
Pro

Member Since: Mar 2011
Location: Tuscaloosa AL
Posts: 738
Likes: 0
Received 0 Likes
on
0 Posts
I did my front bumper with it and the rear. And to answer the question about how the front holds up I would say rather well. I have washed it many times and scrubbed off bugs. Only thing is you have to be a little careful on the outside edge of the paint as it is possible to start to make it peel back or break off a little. But that was only in the area near the fog lights.

Last edited by Razzputon; 05-12-2011 at 09:08 PM.
05-12-2011, 04:47 AM
#45
Racer

Member Since: Feb 2011
Location: Arkansas - river valley
Posts: 326
Likes: 0
Received 0 Likes
on
0 Posts
if so can you take a pic of just the bottom middle before you do the air ducts/fog light area ?
I'd like to see how that looks.


 05-12-2011, 09:23 AM
#47
Tech Contributor
Member Since: Aug 1999
Location: Should this thoughtful, valuable contribution meet with no acknowledgement or 'thanks' this post----
Posts: 16,382
Received 399 Likes
on
257 Posts

[QUOTE=Qwik01;1577591760]I did my front bumper with it and the rear. And to answer the question about how the front holds up I would say rather well. I have washed it many times and scrubbed off bugs. Only thing is you have to be a little careful on the outside edge of the paint as it is possible to start to make it peel back or break off a little. But that was only in the area near the fog lights.
Damn! That is so original, yet simple in design! I love it! Too bad you live in a front-plate state...would look so much better with a yellow filler plate with black CORVETTE letters....call your Congressman!
Damn! That is so original, yet simple in design! I love it! Too bad you live in a front-plate state...would look so much better with a yellow filler plate with black CORVETTE letters....call your Congressman!
05-12-2011, 10:39 AM
#48
Pro
It's a matter of personal taste - I really like how several of you have done it, it's one more way to set off your car as your own. I'd personally rather find a high-quality rear diffuser for the C5. I've seen them on the C6s in carbon fiber and they look awesome!
I do find it a bit funny that guys with cars that come with exposed black ABS plastic go and get it painted body color and then a bunch of people with vettes that don't have exposed black plastic turn their painted surfaces into it.
I'm going to go pick up a can and do some experimenting to see what I think. I've got another car with too much plasti-chrome-bling from the factory and would love to see if this can solve some of that for me.
05-12-2011, 10:54 AM
#49
Drifting

I blacked out the emblems of my DD a few months ago and they have held up well.
See my DIY thread here: http://www.mbworld.org/forums/c63-am...k-emblems.html
Haven't done the vette as nothing seems appropriate.
See my DIY thread here: http://www.mbworld.org/forums/c63-am...k-emblems.html
Haven't done the vette as nothing seems appropriate.
05-12-2011, 10:56 AM
#50
i have to get some pin striping first to help me make the line but once i get it done ill snap a pic of it for you.
05-12-2011, 08:39 PM
#51
Melting Slicks
[QUOTE=$$$frumnuttin';1577594294]
I did my front bumper with it and the rear. And to answer the question about how the front holds up I would say rather well. I have washed it many times and scrubbed off bugs. Only thing is you have to be a little careful on the outside edge of the paint as it is possible to start to make it peel back or break off a little. But that was only in the area near the fog lights.
Damn! That is so original, yet simple in design! I love it! Too bad you live in a front-plate state...would look so much better with a yellow filler plate with black CORVETTE letters....call your Congressman!
Damn! That is so original, yet simple in design! I love it! Too bad you live in a front-plate state...would look so much better with a yellow filler plate with black CORVETTE letters....call your Congressman!

 05-13-2011, 12:25 AM
#55
Melting Slicks
Holds up great! I will use this as an example...
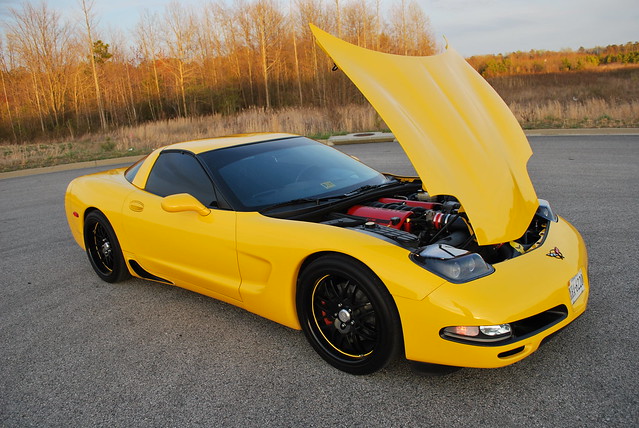
My side air ducts stick out quite a bit and rocks chip the edge pretty bad. When I got the car the black paint was worn off the inside of the air duct. I added a few coats black dupli color paint. A month later it looked like I didnt even paint it. I then used spray on bed liner. I thought this stuff would hold up to anything. The rocks chipped and wore away this paint as well in a month. So I sanded all that off and spray on 3 good coats of plasti dip. It has been a few months and the side air ducts look as good as the day I spray them!!!
You really could spray your whole front end with this stuff to act like a bra. It will not chip away with rocks and you can peel it right off and re-apply if ever neccessary.
05-13-2011, 08:50 AM
#57
Burning Brakes


Don,
I used probably 3/4 of a can doing the lower portion of the fasica and the vents. I tried to stay clear of the tape at this point. The vents are the hardest to do. I didn't want to run out part way through my final spray so I started with a new can. So in answer to your question, 1 can would probably do it but I wouldn't want to run out and not be done.
I used probably 3/4 of a can doing the lower portion of the fasica and the vents. I tried to stay clear of the tape at this point. The vents are the hardest to do. I didn't want to run out part way through my final spray so I started with a new can. So in answer to your question, 1 can would probably do it but I wouldn't want to run out and not be done.
 05-13-2011, 09:30 AM
#59
Burning Brakes
05-13-2011, 10:31 AM
#60
Le Mans Master


Don,
I used probably 3/4 of a can doing the lower portion of the fasica and the vents. I tried to stay clear of the tape at this point. The vents are the hardest to do. I didn't want to run out part way through my final spray so I started with a new can. So in answer to your question, 1 can would probably do it but I wouldn't want to run out and not be done.
I used probably 3/4 of a can doing the lower portion of the fasica and the vents. I tried to stay clear of the tape at this point. The vents are the hardest to do. I didn't want to run out part way through my final spray so I started with a new can. So in answer to your question, 1 can would probably do it but I wouldn't want to run out and not be done.
It was $5.88 a can at lowes, its in the spray paint section, it was hidden all the way to the right at my store.