
How to remove the front turn/running light lens
 03-11-2011, 03:06 AM
#1
Heel & Toe

Thread Starter
Member Since: Oct 2010
Location: Big Bear City Ca
Posts: 15
Likes: 0
Received 0 Likes
on
0 Posts
I ordered new turn/running light lens for the front and want to know what is the best way to remove the stock one's to replace them. Almost looks like to me that you have to remove the head lights to have room to get down there to remove them, is this right or is there an easyer and better way. Thanks for the help.
 03-11-2011, 05:55 AM
#2
Tech Contributor
Member Since: Dec 2003
Location: Horncastle Lincolnshire, England
Posts: 19,384
Likes: 0
Received 79 Likes
on
61 Posts
2023 C5 of the Year Finalist - Unmodified

Here you go. There are differences of opinion on which is the best way to do it. This is what the book says:
Document ID# 655625
2002 Chevrolet Corvette
________________________________________
Park/Turn Signal/Side Marker Lamp Replacement
Removal Procedure
1. Raise and support the vehicle. Refer to Lifting and Jacking the Vehicle in General Information.
2. Remove the front fascia lower closeout panel.

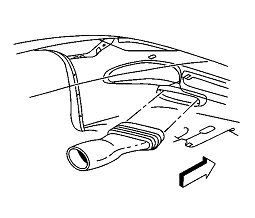
3. Release the brake caliper cooling duct from the front fascia, and position the duct aside.
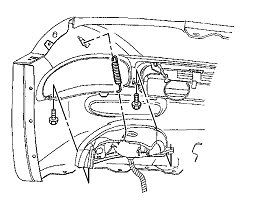
4. Remove the front turn signal lamp bracket retaining spring from the lamp bracket.
5. Remove the lamp bracket retaining spring from the front fascia.
6. Remove the front turn signal lamp bracket retaining screws.
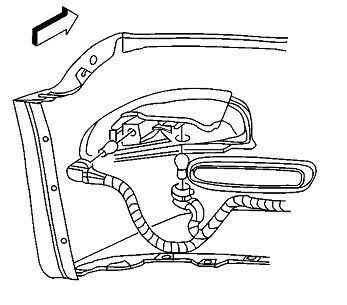
7. Disconnect the sockets from the lamp.
8. Remove the lamp, with the bracket, from the vehicle.
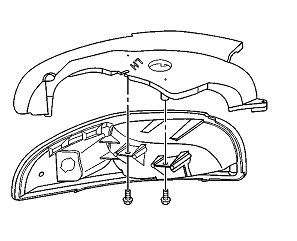
9. Remove the lamp to bracket retaining screws.
10. Remove the lamp from the bracket.
Installation Procedure
1. Install the front park/turn signal and sidemarker lamp into position on the front turn signal lamp bracket.
Notice
Use the correct fastener in the correct location. Replacement fasteners must be the correct part number for that application. Fasteners requiring replacement or fasteners requiring the use of thread locking compound or sealant are identified in the service procedure. Do not use paints, lubricants, or corrosion inhibitors on fasteners or fastener joint surfaces unless specified. These coatings affect fastener torque and joint clamping force and may damage the fastener. Use the correct tightening sequence and specifications when installing fasteners in order to avoid damage to parts and systems.
2. Install the front park/turn signal and sidemarker lamp to bracket retaining screws.
Tighten
Tighten the front park/turn signal and sidemarker lamp to bracket retaining screws to 2 N�m (18 lb in).
3. Install the sockets to the lamp.
4. Install the lamp, with the bracket, to the front fascia.
5. Align the lamp to the opening in the front fascia and hold the lamp firmly in place against the fascia, while installing the front turn signal lamp bracket retaining screws.
Tighten
Tighten the front turn signal lamp bracket retaining screws to 3 N�m (27 lb in).
6. Install the lamp bracket retaining spring to the front fascia.
7. Install the front turn signal lamp bracket retaining spring to the lamp bracket.
8. Position the brake caliper cooling duct to the front fascia and press the duct toward the fascia to secure.
9. Install the front fascia lower closeout panel. Refer to Close Out Panel - Front Bumper Fascia Lower in Bumpers.
Document ID# 655625
2002 Chevrolet Corvette
________________________________________
Park/Turn Signal/Side Marker Lamp Replacement
Removal Procedure
1. Raise and support the vehicle. Refer to Lifting and Jacking the Vehicle in General Information.
2. Remove the front fascia lower closeout panel.
3. Release the brake caliper cooling duct from the front fascia, and position the duct aside.
4. Remove the front turn signal lamp bracket retaining spring from the lamp bracket.
5. Remove the lamp bracket retaining spring from the front fascia.
6. Remove the front turn signal lamp bracket retaining screws.
7. Disconnect the sockets from the lamp.
8. Remove the lamp, with the bracket, from the vehicle.
9. Remove the lamp to bracket retaining screws.
10. Remove the lamp from the bracket.
Installation Procedure
1. Install the front park/turn signal and sidemarker lamp into position on the front turn signal lamp bracket.
Notice
Use the correct fastener in the correct location. Replacement fasteners must be the correct part number for that application. Fasteners requiring replacement or fasteners requiring the use of thread locking compound or sealant are identified in the service procedure. Do not use paints, lubricants, or corrosion inhibitors on fasteners or fastener joint surfaces unless specified. These coatings affect fastener torque and joint clamping force and may damage the fastener. Use the correct tightening sequence and specifications when installing fasteners in order to avoid damage to parts and systems.
2. Install the front park/turn signal and sidemarker lamp to bracket retaining screws.
Tighten
Tighten the front park/turn signal and sidemarker lamp to bracket retaining screws to 2 N�m (18 lb in).
3. Install the sockets to the lamp.
4. Install the lamp, with the bracket, to the front fascia.
5. Align the lamp to the opening in the front fascia and hold the lamp firmly in place against the fascia, while installing the front turn signal lamp bracket retaining screws.
Tighten
Tighten the front turn signal lamp bracket retaining screws to 3 N�m (27 lb in).
6. Install the lamp bracket retaining spring to the front fascia.
7. Install the front turn signal lamp bracket retaining spring to the lamp bracket.
8. Position the brake caliper cooling duct to the front fascia and press the duct toward the fascia to secure.
9. Install the front fascia lower closeout panel. Refer to Close Out Panel - Front Bumper Fascia Lower in Bumpers.
 03-11-2011, 09:48 AM
#4
Race Director


Member Since: Jul 2008
Location: The Sunshine State
Posts: 16,995
Received 2,675 Likes
on
1,479 Posts
2022 C5 of the Year Finalist - Modified
2021 C5 of the Year Finalist - Modified
C7 of the Year - Modified Finalist 2021
Finalist 2020 C7 of the Year -- Modified
2020 C5 of the Year Finalist - Modified
C5 of Year Finalist (appearance mods) 2019
2018 C5 of Year Finalist
If you're planning any other lighting mods (fogs/headlights), I suggest going in through the top after you remove your OEM headlights. It offers the most room, etc.
If you're just swapping out the corners/lights, you can go in through the bottom access panels after you remove the flex spoilers. The angles are a little tougher and you're lying on your back while performing the work but it can be done.
If you're just swapping out the corners/lights, you can go in through the bottom access panels after you remove the flex spoilers. The angles are a little tougher and you're lying on your back while performing the work but it can be done.
03-11-2011, 10:02 AM
#5
Race Director
Member Since: Jul 2007
Location: Reno is so close to Hell you can see Sparks , State Of Confusion
Posts: 18,681
Likes: 0
Received 38 Likes
on
23 Posts
St. Jude Donor '12-'13-'14
If you're planning any other lighting mods (fogs/headlights), I suggest going in through the top after you remove your OEM headlights. It offers the most room, etc.
If you're just swapping out the corners/lights, you can go in through the bottom access panels after you remove the flex spoilers. The angles are a little tougher and you're lying on your back while performing the work but it can be done.
If you're just swapping out the corners/lights, you can go in through the bottom access panels after you remove the flex spoilers. The angles are a little tougher and you're lying on your back while performing the work but it can be done.
Mr.Bill
03-11-2011, 10:32 AM
#6
Administrator


Member Since: Mar 2001
Location: In a parallel universe. Currently own 2014 Stingray Coupe.
Posts: 342,870
Received 19,275 Likes
on
13,957 Posts
C7 of the Year - Modified Finalist 2021
MO Events Coordinator
St. Jude Co-Organizer
St. Jude Donor '03-'04-'05-'06-'07-'08-'09-'10-'11-'12-'13-'14-'15-'16-'17-'18-'19-
'20-'21-'22-'23-'24
NCM Sinkhole Donor
CI 5, 8 & 11 Veteran


 I've found that going through the access panel works best for me - buy you can try the other way and see how it does for you.