
Oil Pressure Sensor R&R
 01-02-2011, 10:24 PM
#1
Race Director


Thread Starter

Member Since: Aug 2003
Location: Lake Mary Florida
Posts: 13,421
Likes: 0
Received 7 Likes
on
7 Posts

Well another notch in my belt for C5 maintenance. Got the opportunity to change out the oil pressure sensor on my '01 this weekend.
Wanted to say thanks to Bill Curlee and Evil Twin for their help and advise, and of course Junkman who provided a great illustrated procedure on the LS1 site.
Good thing I had decided to do this instead of putting it off. I couldn't see the sensor but once I had things opened up and the intake in process of coming out did I note that the defective sensor was starting to leak oil.
I saw a number of posts in all my searches where people say you can reuse the gaskets for the intake and throttle body. Well according to the factory service manual, it says no you cannot reuse them. So I had all new one's ready to install. I took lots photos, as soon as I upload them off the camera I'll post a few, especially the different of what an original intake gasket looks like compared to a brand new one. Big difference.
Anyway, after taking it all apart (and that is a lot of work), cleaning and re-assembling, did a fuel leak test, it looked good, with the coolant system ready to be bled I just touched the starter and my LS1 fired up instantly without hesitation and perfect smooth idle and throttle operation. I was very impressed with that. And what's more, I had correct OIL PRESSURE now!
First time through a major procedure it takes a little longer for me because I don't want to break or damage anything else, and the steps are new. Once you've done it I'm sure the time will be cut significantly.
I'll add a few pics later. I was also able to address the service bulletin on the knock sensor valley plugs.

 01-03-2011, 11:40 AM
#3
Drifting


I need to replace mine. I've got the relocate kit and the sendor. Just have not wanted to take it apart when I could be driving it. It is on my to do list along with installing new shifter, changing the transmission and transaxle fluids and the oil and filter.
You have inspired me, thanks.
You have inspired me, thanks.
01-03-2011, 12:08 PM
#4
Pro

It must of been Change your Oil Sender weekend in the corvette world. I changed my 99 Vert yesterday. I'm happy to have it done. From a person that scared to take anything a part on my car it wasn't a bad job. Just have to follow directions.
01-03-2011, 12:52 PM
#5
Race Director
Thread Starter
Member Since: Aug 2003
Location: Lake Mary Florida
Posts: 13,421
Likes: 0
Received 7 Likes
on
7 Posts
Yep it wasn't that bad of a job, took a while obviously the first time.
I'll pull pictures down tonight when I get home and post.
Those of you procrastinating, be it known that sensor may be leaking oil. Mine had just started, so I was glad I did not put it off any longer.
I just used the stock sensor, I believe they have been through 8 revisions. The latest is an aluminum sensor housing.
Yeah I have a few things to add to the steps I found available on the forums.
01-03-2011, 01:18 PM
#6
Race Director
Thread Starter
Member Since: Aug 2003
Location: Lake Mary Florida
Posts: 13,421
Likes: 0
Received 7 Likes
on
7 Posts
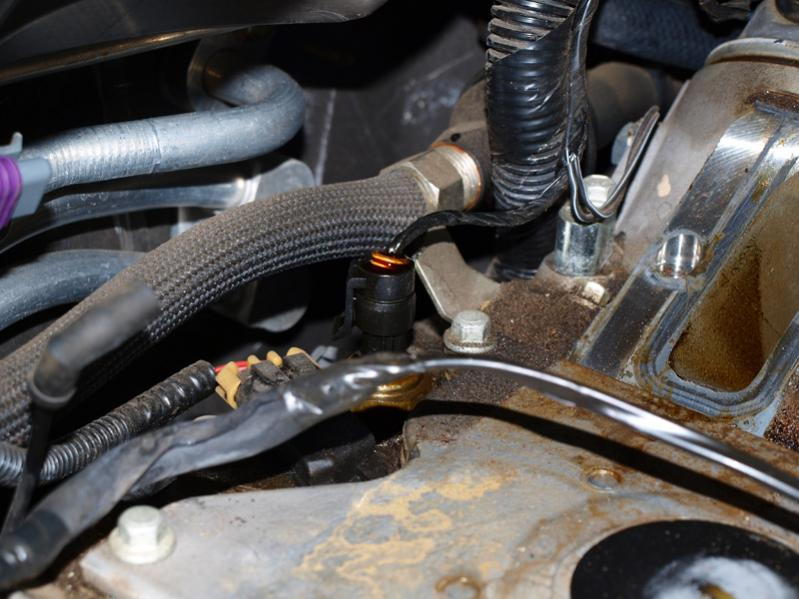
Briefly, here's one image of my first glance at the sensor once I pulled the intake manifold. Notice the top of the connector is pushed up and oil is leaking out. Seems like nearly every picture I've seen of a defective sensor, that orange top is pushed out and they leak. The original was a brass case sensor, but you can see the oil spewing out of the top and down over the sensor body.
More pictures to come.
Some of these pictures I was really surprised at home much dirt had collected in the openings of the manifold. And if you look at my engine compartment you'd think it was spotless. It took a lot of vacuuming to get the majority of this material out of there before I sealed the ports with tape in prep to clean it all up.
01-03-2011, 01:30 PM
#7
Pro
Well another notch in my belt for C5 maintenance. Got the opportunity to change out the oil pressure sensor on my '01 this weekend.
Wanted to say thanks to Bill Curlee and Evil Twin for their help and advise, and of course Junkman who provided a great illustrated procedure on the LS1 site.
Good thing I had decided to do this instead of putting it off. I couldn't see the sensor but once I had things opened up and the intake in process of coming out did I note that the defective sensor was starting to leak oil.
I saw a number of posts in all my searches where people say you can reuse the gaskets for the intake and throttle body. Well according to the factory service manual, it says no you cannot reuse them. So I had all new one's ready to install. I took lots photos, as soon as I upload them off the camera I'll post a few, especially the different of what an original intake gasket looks like compared to a brand new one. Big difference.
Anyway, after taking it all apart (and that is a lot of work), cleaning and re-assembling, did a fuel leak test, it looked good, with the coolant system ready to be bled I just touched the starter and my LS1 fired up instantly without hesitation and perfect smooth idle and throttle operation. I was very impressed with that. And what's more, I had correct OIL PRESSURE now!
First time through a major procedure it takes a little longer for me because I don't want to break or damage anything else, and the steps are new. Once you've done it I'm sure the time will be cut significantly.
I'll add a few pics later. I was also able to address the service bulletin on the knock sensor valley plugs.
Wanted to say thanks to Bill Curlee and Evil Twin for their help and advise, and of course Junkman who provided a great illustrated procedure on the LS1 site.
Good thing I had decided to do this instead of putting it off. I couldn't see the sensor but once I had things opened up and the intake in process of coming out did I note that the defective sensor was starting to leak oil.
I saw a number of posts in all my searches where people say you can reuse the gaskets for the intake and throttle body. Well according to the factory service manual, it says no you cannot reuse them. So I had all new one's ready to install. I took lots photos, as soon as I upload them off the camera I'll post a few, especially the different of what an original intake gasket looks like compared to a brand new one. Big difference.
Anyway, after taking it all apart (and that is a lot of work), cleaning and re-assembling, did a fuel leak test, it looked good, with the coolant system ready to be bled I just touched the starter and my LS1 fired up instantly without hesitation and perfect smooth idle and throttle operation. I was very impressed with that. And what's more, I had correct OIL PRESSURE now!
First time through a major procedure it takes a little longer for me because I don't want to break or damage anything else, and the steps are new. Once you've done it I'm sure the time will be cut significantly.
I'll add a few pics later. I was also able to address the service bulletin on the knock sensor valley plugs.
01-03-2011, 02:12 PM
#8
Administrator

Member Since: Mar 2001
Location: In a parallel universe. Currently own 2014 Stingray Coupe.
Posts: 343,014
Received 19,305 Likes
on
13,977 Posts
C7 of the Year - Modified Finalist 2021
MO Events Coordinator
St. Jude Co-Organizer
St. Jude Donor '03-'04-'05-'06-'07-'08-'09-'10-'11-'12-'13-'14-'15-'16-'17-'18-'19-
'20-'21-'22-'23-'24
NCM Sinkhole Donor
CI 5, 8 & 11 Veteran


Congrats on a successful repair. This place sure is valuable as a resource for working on these cars.
 I think that is how the dealership does it.
01-03-2011, 07:03 PM
I think that is how the dealership does it.
01-03-2011, 07:03 PM
#11
Race Director
Thread Starter
Member Since: Aug 2003
Location: Lake Mary Florida
Posts: 13,421
Likes: 0
Received 7 Likes
on
7 Posts
I watched that video. That guy was extremely lucky for a number of reasons.
The position of the clip to latch the electrical connection is determined by the position the sensor ends up once torqued.
That electrical connection, in nearly every picture I've seen (now this is a generalized statement) has had the top seal popping out and oil seeping from them. The wire is not that long, so there would be practically no way to gain access to press it back down inside the plastic shell of the electrical connector and you need to clean all the oil out, which in my case I used throttle body cleaner and compressed air to dry it. So I'd like to see how he cleaned it up.
At great risk, would you use a coat hanger to pop free an electrical connection at the most conservative a 6-7 year old car if not 15 year old vehicle in which that plastic connector has been exposed to all kinds of heat over the years. (I wouldn't) Many of you know about the hazards of working on equipment with a few years under it's belt. Things like electrical connections like to break.
Next there were several CF posts about losing the sensor once removed and it falling down around the aft section of the engine. I thought to myself that would not happen to me. Ha. I used a oil pressure sensor socket which fits both 1" and 1 1/16" sensors with a 1/2" drive and it has rounded corners to mate to the sensor which has rounded corners. With every thing exposed as shown in my picture above, as I was loosening the sensor using just the socket by hand (I had already broken it free) just as I lifted the socket free the sensor was completely loose and you got it, it fell back along the rear of the engine. I never even had the chance to see it. So, being a brass sensor body, my magnetic pickup was useless, so out with my 11" 45� needle nose and I got lucky and snagged the edge of the electrical connector of the sensor and was able to pull it free and out of there. And to think he did all that without dropping the sensor, this dude was extremely lucky.
Again risking putting that sensor down there, hitting the hole perfectly and getting it started without stripping the threads, this dude needs to go to Las Vegas. Plus he did not torque the sensor, that puppy requires 20Nm (15 lb-ft) of torque, too much you crush the electronics package, too little you'll probably have a leak. And it is not recommended to torque using a swivel interface.
Plus as some of my pictures will show, and in nearly every picture I've seen, there will be a huge amount of dirt and debris in these channels of the heads. With such a small opening from the mate of the intake, for the life of me I cannot figure how so much dirt gets in there. My engine and compartment is practically spotless, I thought mine won't be that dirty. HA! I could not believe how much dirt is there.
If you are aware, order both PVC valves as well, this is a great time to replace them.
You don't have to pull the throttle body although it made it easier because the motor assembly on the side hits the power steering reservoir making it really difficult to pull the intake. So removing three bolts and lifting the throttle body free, you can later give it a good cleaning before re-assembly.
And there is a TSB on the knock sensor plugs that require them being sealed to prevent false DTCs. After discussing this with retired Bowling Green folks, I understand why the TSB says don't complete the circle of sealant. You are instructed to stop the bead towards the rear leaving about a 20� arc of the plug unsealed.
The difference from my job to this quick method, I know my sensor is properly torqued, the electrical connection is clean. I know my intake manifold is clean, that it has 8 new gaskets and two new foam pads. I know that all the dirt that has built up since 03-2001 has been removed. I know that my throttle body is clean and no build up along the plate edge, or plate interface to the body, and it has a fresh new gasket.
In some instances people with larger hands or larger arms might wish to extend the length of the small vacuum hose. I didn't do that step only because for me I didn't have too much problem removing any of the connections on the back side of the manifold after I moved it forward a few inches before lifting it out. And installing it was just as easy reversing the process, that is connect them up as it is going into position. (I have smaller hands and wrist.)
The question about that hose, I believe it is a component of the conditioned air system in the cabin.
I wouldn't have believed it unless I saw it.
Last edited by Jet-Jock; 01-04-2011 at 12:37 AM.
01-03-2011, 07:18 PM
#12
Team Owner


I like the video - wonder if it is always as smooth a process ?
 Worth a try!
I'll wait till mine goes out

Thanks,Matt
01-03-2011, 07:29 PM
#13
Race Director
Member Since: Apr 2005
Location: Wesley Chapel, FL Las Vegas, NV
Posts: 10,042
Received 2,112 Likes
on
986 Posts


Got to admit he did it.
So after watching the Vid I decided to have a look at mine with the Maggie installed.
I reached right down with my hand a pulled the plug of the sensor!!! Plenty of room. So if and when I have to change mine it will be a cinch to get to it.
Another good reason to have a Maggie.

Last edited by Vega$Vette; 01-03-2011 at 07:49 PM.
01-03-2011, 07:54 PM
#14
Race Director
Thread Starter
Member Since: Aug 2003
Location: Lake Mary Florida
Posts: 13,421
Likes: 0
Received 7 Likes
on
7 Posts
True true, I just went out and looked again at mine. Now that everything is clean in there, I can see my sensor. But everything would need to be working perfect that day for it to go well. There are parts of his procedure that wasn't in the video.
I'm happy with my job.

I'm happy with my job.
01-03-2011, 09:51 PM
#15
Race Director
Thread Starter
Member Since: Aug 2003
Location: Lake Mary Florida
Posts: 13,421
Likes: 0
Received 7 Likes
on
7 Posts
Couple of pictures:
Here's an image of the amount of dirt once the intake manifold was lifted.

It's not like I operate a dirty Vette!

Some folks say re-use the gaskets, FSM says do not re-use the gaskets: The one on the left was installed early in 2001
and has 57K miles of operation on it, the one of the right is new. In case it is not obvious, the old gasket is compressed flat
slightly below the flange level, the new one is raised up with a channel in it.

Doing the TSB for knock sensor plugs.

Here's an image of the amount of dirt once the intake manifold was lifted.
It's not like I operate a dirty Vette!
Some folks say re-use the gaskets, FSM says do not re-use the gaskets: The one on the left was installed early in 2001
and has 57K miles of operation on it, the one of the right is new. In case it is not obvious, the old gasket is compressed flat
slightly below the flange level, the new one is raised up with a channel in it.
Doing the TSB for knock sensor plugs.
01-03-2011, 10:20 PM
#16

 Also needed a 'grabber' tool to reach the old unit when I dropped it but this method works! Just read the comments to the video, I put a hint about the coat hanger part - rotate, dont pull
01-03-2011, 10:29 PM
Also needed a 'grabber' tool to reach the old unit when I dropped it but this method works! Just read the comments to the video, I put a hint about the coat hanger part - rotate, dont pull
01-03-2011, 10:29 PM
#17
Race Director
Thread Starter
Member Since: Aug 2003
Location: Lake Mary Florida
Posts: 13,421
Likes: 0
Received 7 Likes
on
7 Posts
For those who must replace their OPS, and choose to follow the procedure to remove the manifold, here's a link to Junkman's post on the subject that I used Click Here and a few notes below that I thought were missing but I pulled from the FSMs.
Reminder: when loosening the **** to drain the coolant, use a 1/4" socket drive plus short extension which will fit perfectly. ONLY turn it counter-clockwise a quarter of a turn. Any further and you will shear a pin in the cylinder of the ****. If it doesn't pop out, try a pair of needle nose and slightly pull on it. Don't keep turning it, you will damage the ****.
Reminder: Upon re-assembly, it took two and a third Prestone 50-50 Dexcool jugs. Fill through the surge tank and once the level reaches the bottom of the filler neck stop. Start the engine and let it idle for 1 minute then put the cap on and tighten. I like to change the display to metric, bring the coolant temp to 99�C. Do this with the AC Off, and cycle the engine from 2500-3000 RPMs for 30 seconds then let it idle for 30 seconds. Repeat until the temp reaches 99�C. Make sure the AC is off else it will enable the fans and you may not ever reach that temp. Once you reach the temp, let it idle for one minute and shut off the engine. Open the surge tank cap buy turning the cap counter-clockwise 1/4-1/2 turn until you hear hissing. Do not press down on the cap. Allow the pressure to bleed off. Then remove the cap, start the engine and let it idle for 1 minute, if the level drops top it off 1/2" above the full mark as seen from the front of the tank. Shut off the engine and re-install the cap.
Reminder: before you start the engine, perform a fuel leak test. Turn the key to On for 2 seconds, then OFF for 10 seconds, then turn the key ON for 1 minute. During which time on the second step verify no fuel leaks from the engine (use a flash light it helps.) If OK turn the key Off and install the fuel rail covers.
Start the engine, it should fire right over at the touch of the starter. Engine should operate very smoothly. Do the coolant bleed procedure listed above. You may get a little residual smoke from cleaning fluids and new materials but it will disappear quickly.
Some of you may wish to lengthen the small vacuum line that connects to the rear of the manifold. It has the elbow in it. Go to Autozone and pickup nylon vacuum line 1/4 and 5/32 and some inline fittings for one diameter to another package. These pieces are not expensive. I found them on the wall at Autozone between the filters and oil. Add a few inches to the line will make it easier to install or remove. (My hands were small enough to reach in behind the manifold and remove all three fittings.)
Apply blue locktite to the manifold bolts.
Tighten the rear two (8 & 9) with an 8mm open end wrench. You may wish to feel the 5Nm torque on the first round of torque and try to replicate it on one of the bolts with the open end wrench and compare against the torque wrench value, this is so you can nearly hit that torque value for those rear two bolts that you can't gain access to in order to torque them. Same on the repeat torque when you bring them up to 10Nm.
Be sure to do the TSB for the knock sensor plugs while your in there. Also consider doing the PVCs too while you have everything opened up.
For bolts 8 & 9, before you attempt to lift the manifold, pull them up a couple inches and put some tape (like painters blue tape) around them to hold them up, or use clothes pins. Otherwise they will interfere with removing the manifold. Remember to pre-install them with tape holding them up during the re-installation. On the driver's side be sure to put the fuel rail stop into place as it is held on with the last two manifold bolts. It is there to stop the fuel rail from breaking and spraying fuel into the cabin during a front end collision.
That's all I can remember at the moment...
As always you assume your own risk when DIY maintenance is done on your cars.
01-03-2011, 10:34 PM
#18
Le Mans Master

Member Since: Dec 2004
Location: Myrtle Beach SC
Posts: 5,789
Likes: 0
Received 7 Likes
on
6 Posts
St. Jude Donor '05-'06
All you need to do to keep it from falling out is put a little tape inside the socket before you push it on.Not a big deal I have done a lot in tight spots. It doesn't look that hard. No need to worry about the little seal plug bet it just pushes back in probably blown out by the oil pressure. Even not going in I bet it would not be an issue. Call me lazy but it looks a lot easier than pulling the intake for no reason and possibly getting some crap in the cylinder.
01-03-2011, 10:40 PM
#19
Race Director
Thread Starter
Member Since: Aug 2003
Location: Lake Mary Florida
Posts: 13,421
Likes: 0
Received 7 Likes
on
7 Posts
Yeah I know this one is rather controversial, also is the other method of cutting a hole in the fiberglass structure under the wiper blade fascia.
I debated cutting hole for days, but couldn't bring myself to do it.
You can also use a small piece of clay bar if you have some laying around to help keep the module in a socket. Done that before with other situations.
I'm just posting on how I did it.
Oh you're right on the weather seal of the connector, the oil pressure pushes it out when the membrane breaks. It just pushes back into place. I cleaned mine first. All I can say one will need small hands! LOL
Last edited by Jet-Jock; 01-03-2011 at 10:43 PM.
01-03-2011, 11:32 PM
#20
Race Director
My OPS had gone bad about a month before the cam swap we just did. NO WAY we were not gonna change it out. Restart on a cam swap demands knowing if you have oil pressure. Oil pump O ring thing. We did it the remove the manifold and slide it forward out of the way method. I didn't need to change the mani gaskets. The video on this thread looks to good to be true but I saw it with my own eyes!
This forum is a GREAT source of info and opinions!
This forum is a GREAT source of info and opinions!