
Door Panel Delamination Fix Tutorial/Write Up/How To
 07-24-2010, 03:32 AM
#1
Racer

Thread Starter
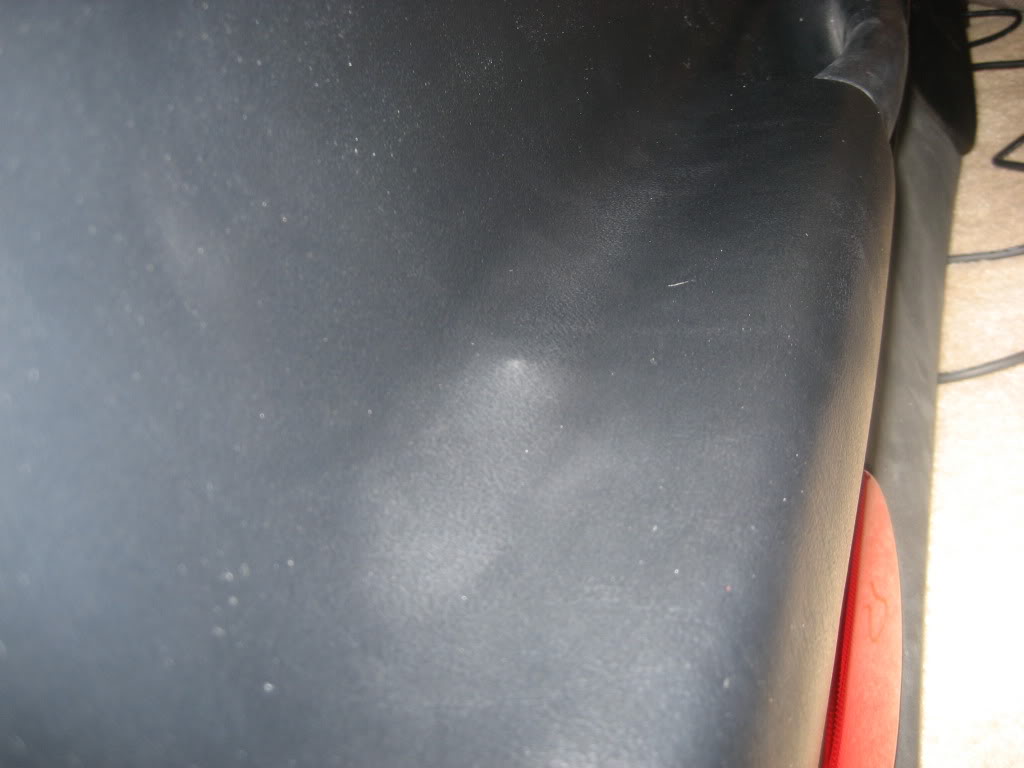
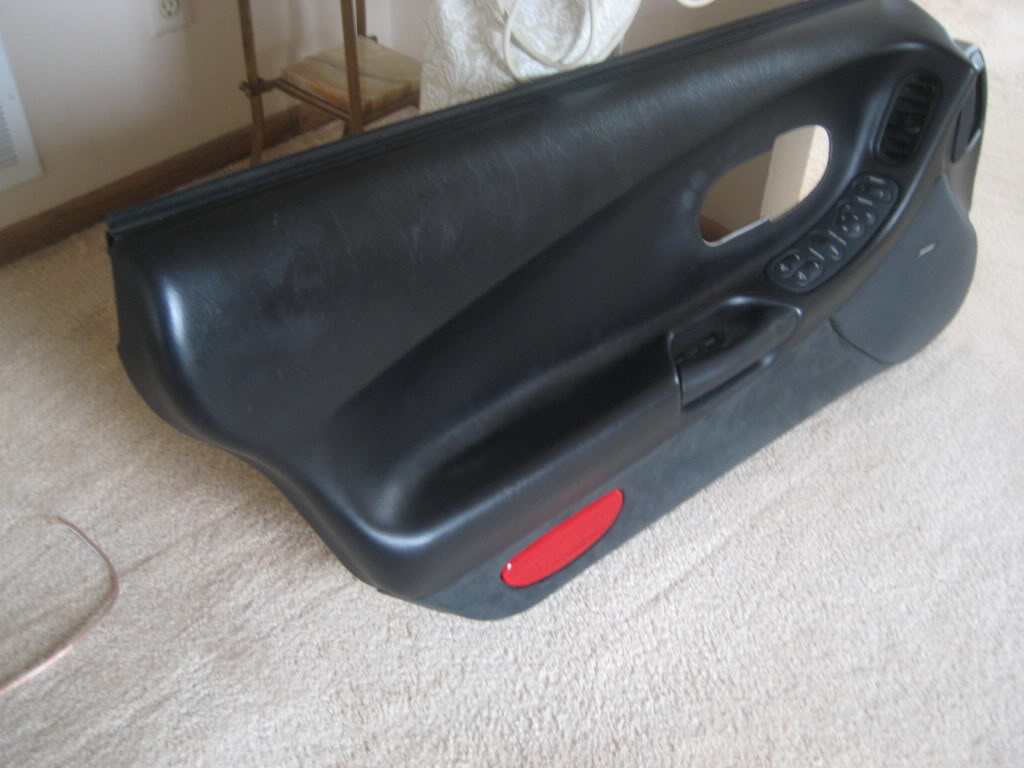
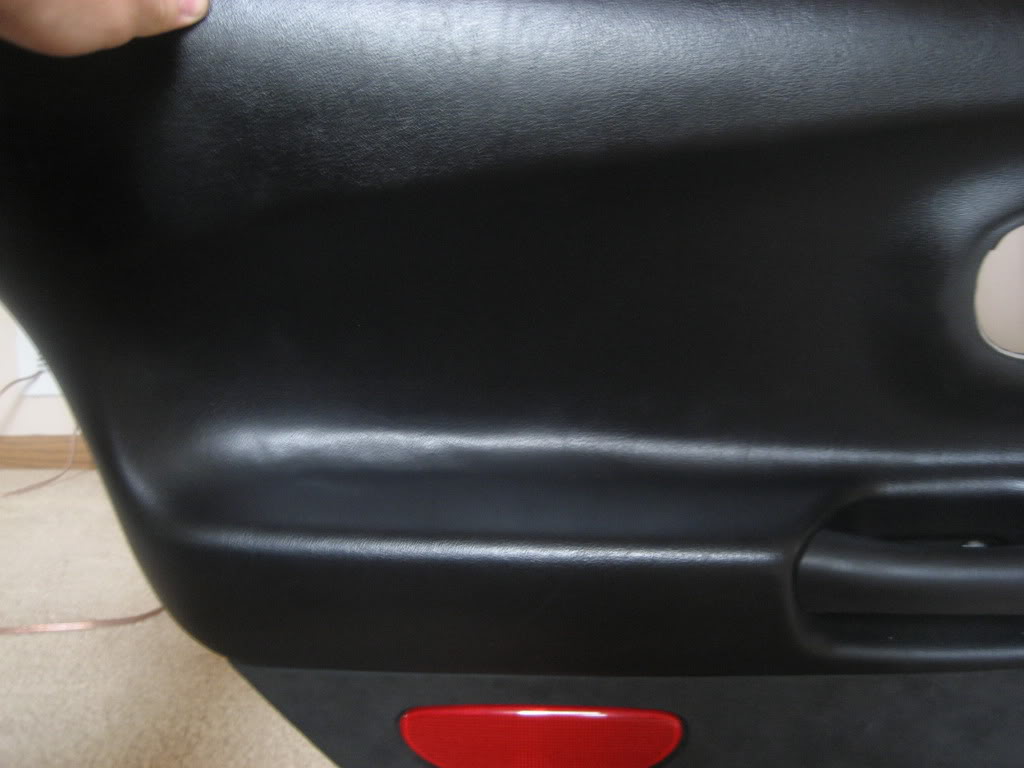
Hey Corvette Forum how is everyone? Good? Ok. In my fairly short Corvette ownership/obsession of just over a year it has come to my attention that there are some factory "short falls" associated with these cars. One of these being the delamination of the vinyl on the door panels. For those that aren't in the know(be thankful), it is when the vinyl along the arm rest begins to release from the substrate and you get what looks like an air pocket along the curve.
It has affected a lot of people and there has been lots of talk about different options for fixes. There is the popular arm rest fix that I think we have all seen. Personally I don't like the look too much and was after something a little better. I suppose you could buy new trim panels but we all know how much that costs. I guess you could recover them through a vendor like apsis, again cost being the major down side to this. None of these are actual fixes though, just ways around it or replacements.
In my research for a cure I came across some people discussing getting adhessive behind the trim panel and re gluing the vinyl back down. That seemed at least plausible to me so that is the option I went with. Even though people were talking, I could not find any article about an actual process or pics to go along with any of it.
Ah, a use for a tutorial. I figured i'd take pics along the way and document the whole thing... the good, bad, and the ugly, in hopes of helping other forum members with the same problem. I tend to get a little bit detailed so if the text is bringing you down just scroll through as there will be plenty of pictures. So here's my take on it and maybe you can learn from my trials and tribulations...
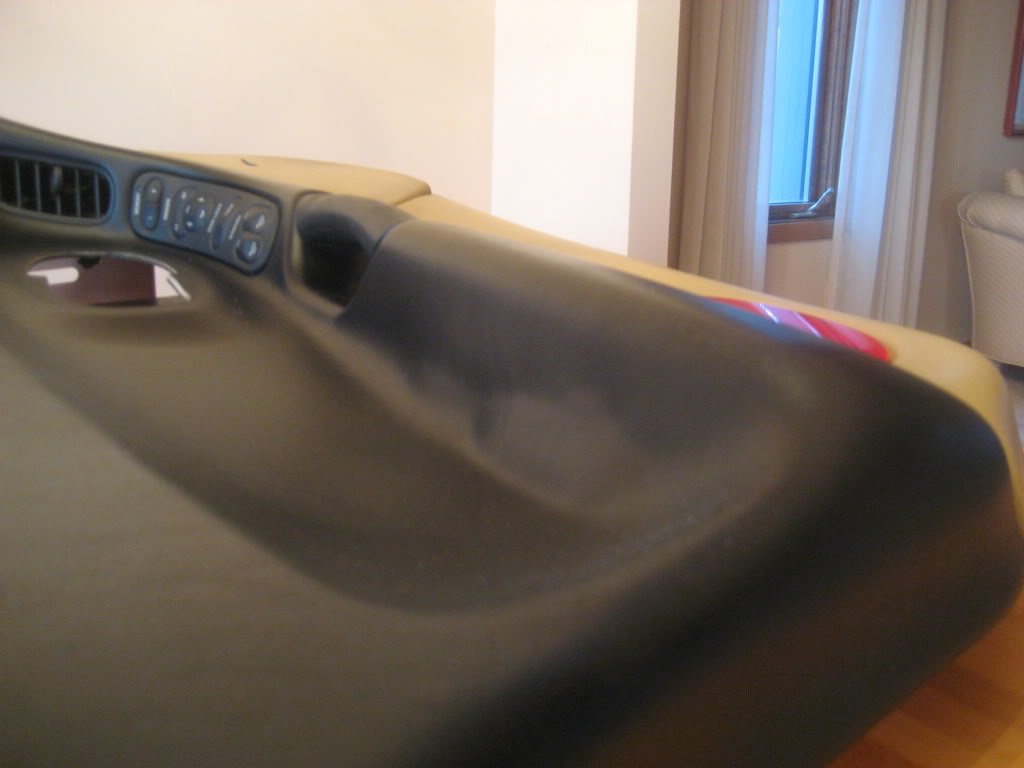
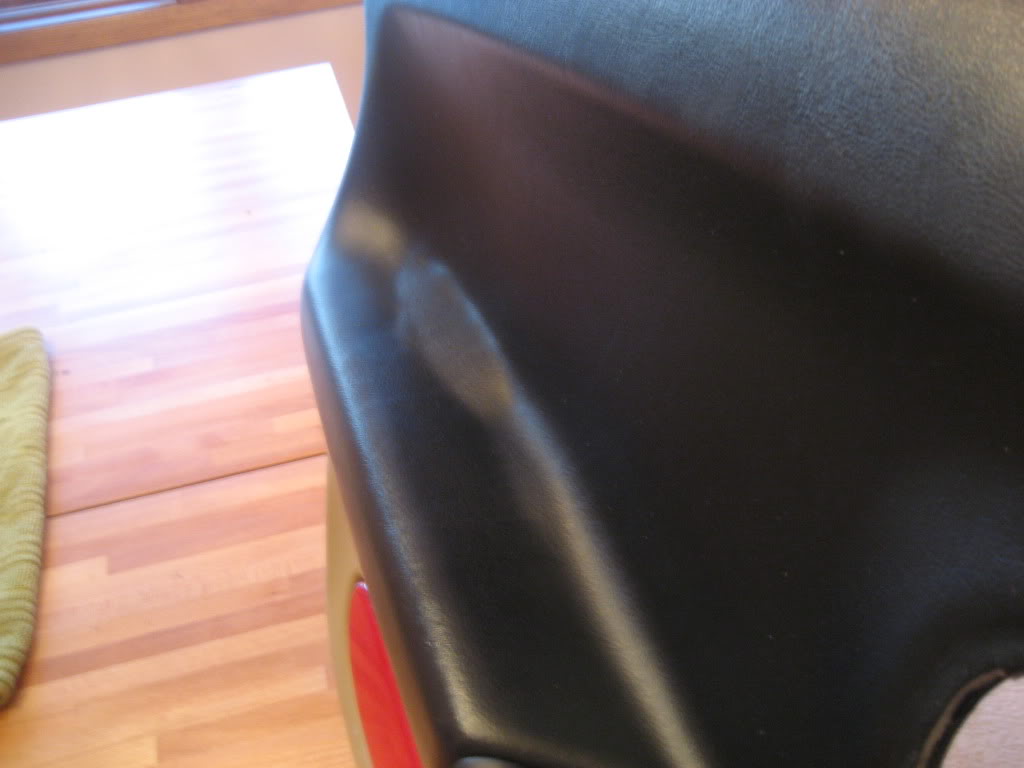
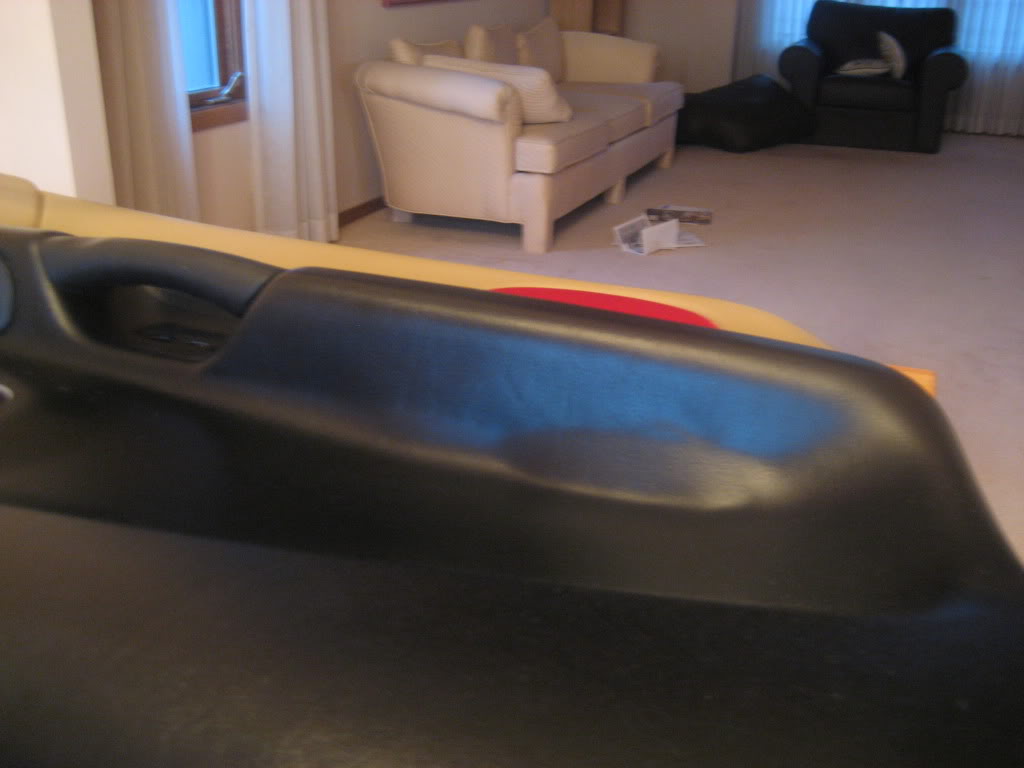
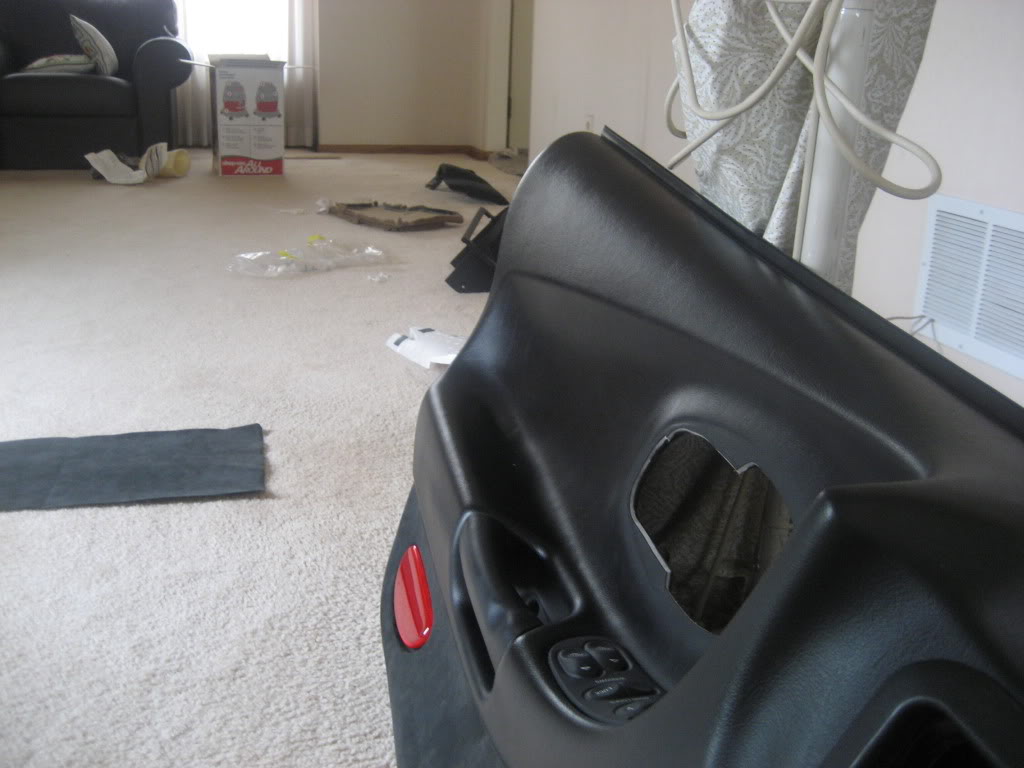
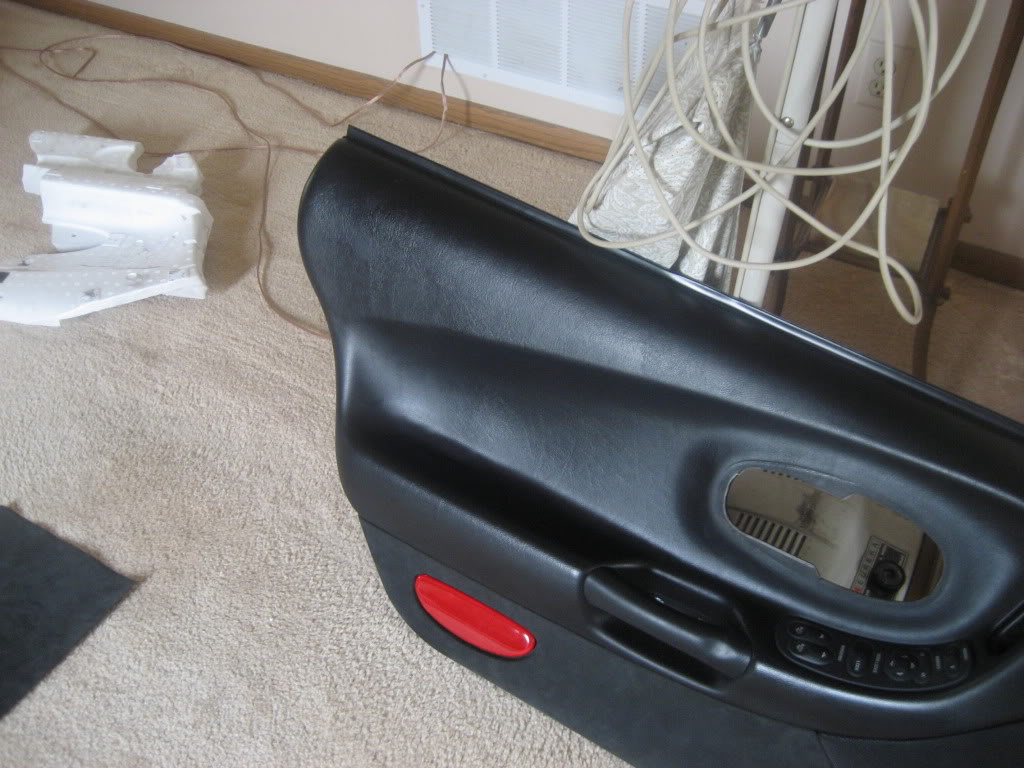
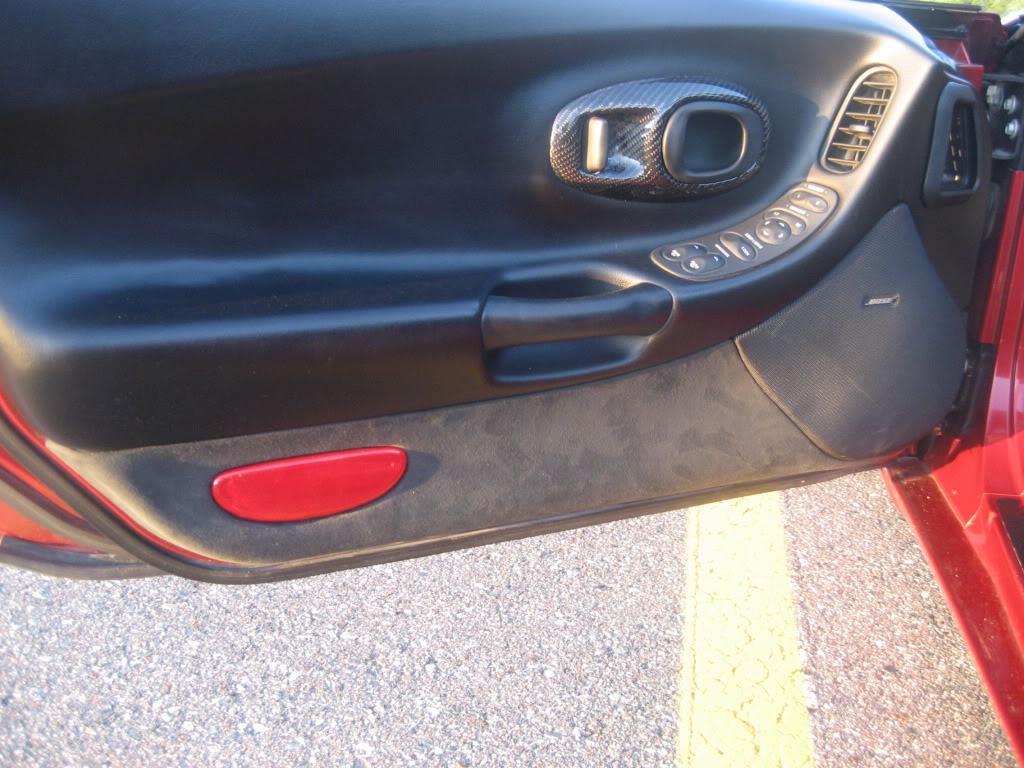
I suppose I should start off with some "before" pics. My car was experiencing the problem on both trim panels (a two'fer bonus) and it was worse on the driver's door. I was pretty excited that I not only got to fix one door, but I got to do both... yay
O.k. so I just realized that I don't have pics of the passenger side door panel. I know I took some but can't find them. Oh well, the process is the same for both doors so it doesn't matter. I can upload them later if I find them.
I bet some of those "before" pics are looking strangely familiar to some of you. I know there are worse ones out there so I guess I got kinda lucky. I should say now that if yours is just starting to delaminate I would fix it sooner than later as your results will be better when the problem is more minor.
So after taking off the trim panels the first thing I did was drill holes on the backside of the panel in the affected area. Once you take off the white styrofoam that is back there you will see tiny holes that the factory used to vacuum stretch the vinyl when the panel was being made.
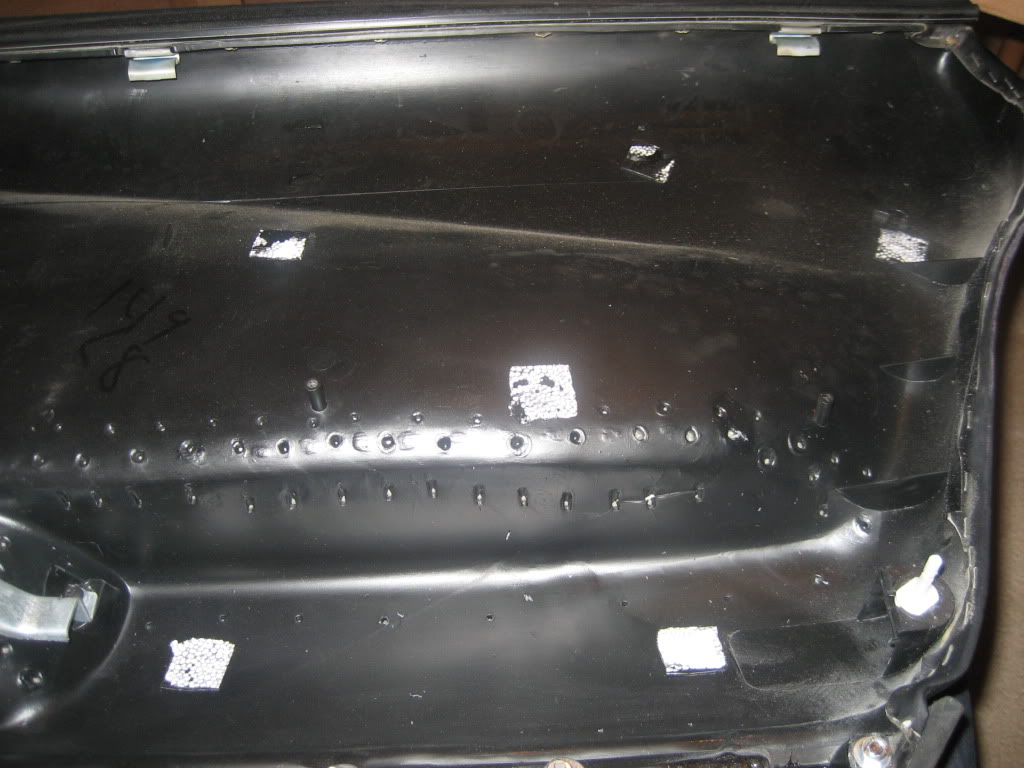
You can drill on these holes as well as add your own. I went with a "more is better" approach for mine. To aid in deciding where to drill I used a small, dull, nail and stuck it through the factory holes and watched from the front to see where the nail was pushing out on.
In the photo you can see that the nail is pushing out in the center of the bubble or air pocket. By using this method to check where my holes were I was able to accurately drill enough holes to fully cover the affected area. The adhesive will be injected through these holes so the goal is to have holes all over the delaminated area to insure that glue gets to the affected area. Action shot time...
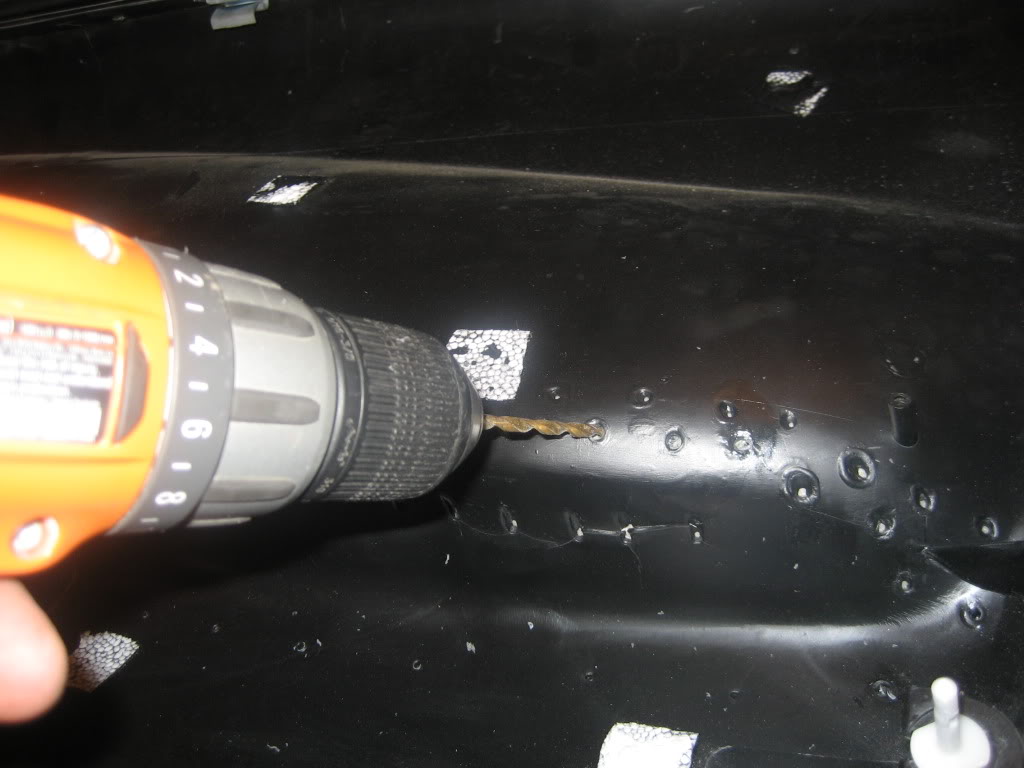
In the above photo notice the crack in the trim panel along the bottom row of holes. See it? Ya mine was delaminating and broken. Take note as I will be talking about this more in the results section at the end.
I think it goes without saying that caution is to be used when drilling. If you go too far you will be calling up Apsis or another vendor for new trim panels. GO SLOWLY and pay attention to what you are doing. Once you do a few you will get the feel for what pressure is needed and how long it takes to go through. Also pay attention to drill sounds as it will bog slightly when you are getting close to puncturing through. Drilling through the plastic without damaging the vinyl on the other side is hard to do and takes time and patience. Start in the middle of the air pocket because there is more distance between the vinyl and the substrate. Once you get to the edges there is less margin for error. Here is a crappy rendering of a side view of the process...

Jealous of those photoshop skills? ya me neither But the point is don't f up your trim panel by drilling too far. If I were to do this project again I would cut the drill bit down so it was an inch long and then just put it in the chuck so it was barely sticking out and "couldn't" be pushed through too far. I didn't have access to a cut off wheel to cut my bit down that night so I had to do it the terrifying way. Here we are all swiss cheesed up...
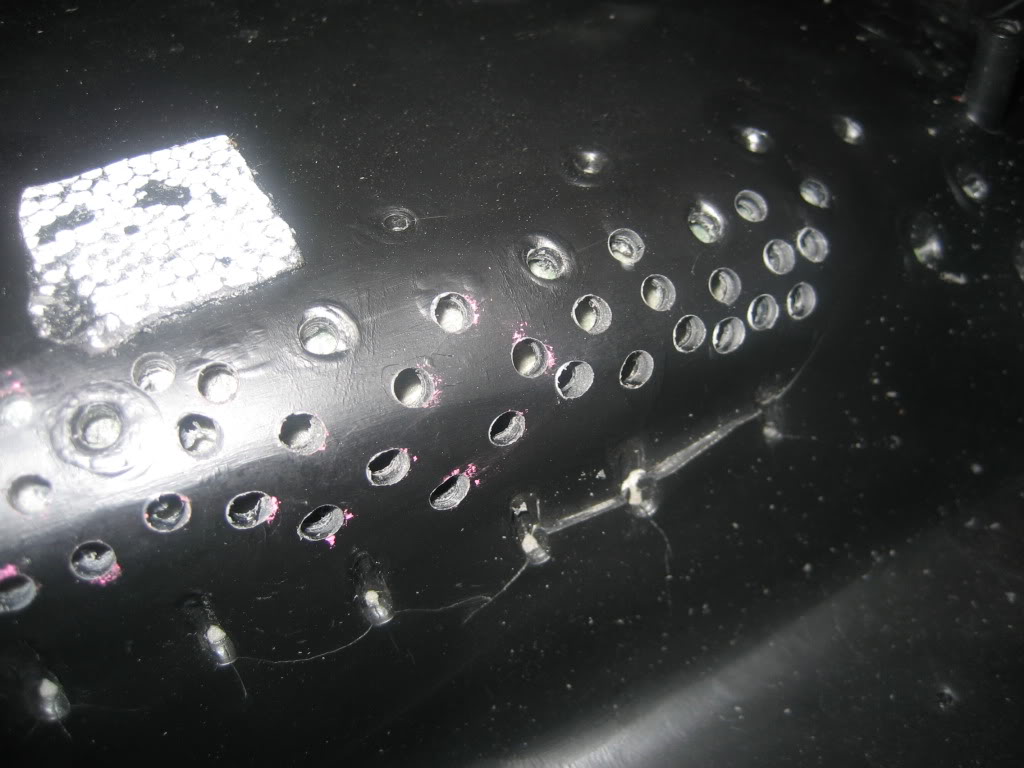
You can see that crack I mentioned earlier a little bit better in that pic. On a few of my holes I got plastic chips that got stuck in the air pocket and had to be fished out with a right angle pick. It sucked very badly but make sure you don't get debris in the air pocket as it will affect how the vinyl lays back down. To check this simply press the vinyl against the substrate from the outside and if you feel a big lump in there you have to clear it out. nuff said
Moving right along.... now i have the trim panel prepped for the gluing. About glue selection: I wanted something that set up fast, like a few minutes fast. Something that would give me a decent amount of work time, but at least set up fast enough to hold the vinyl down into place while the glue completely cured. I settled on an epoxy made by Locktite.
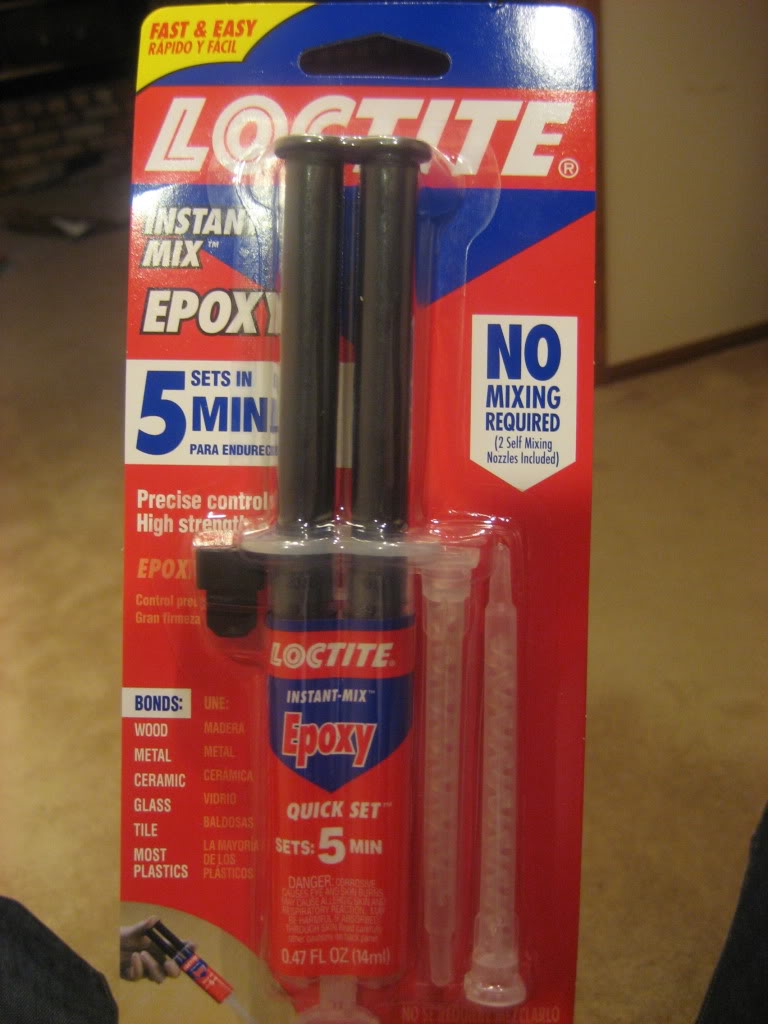
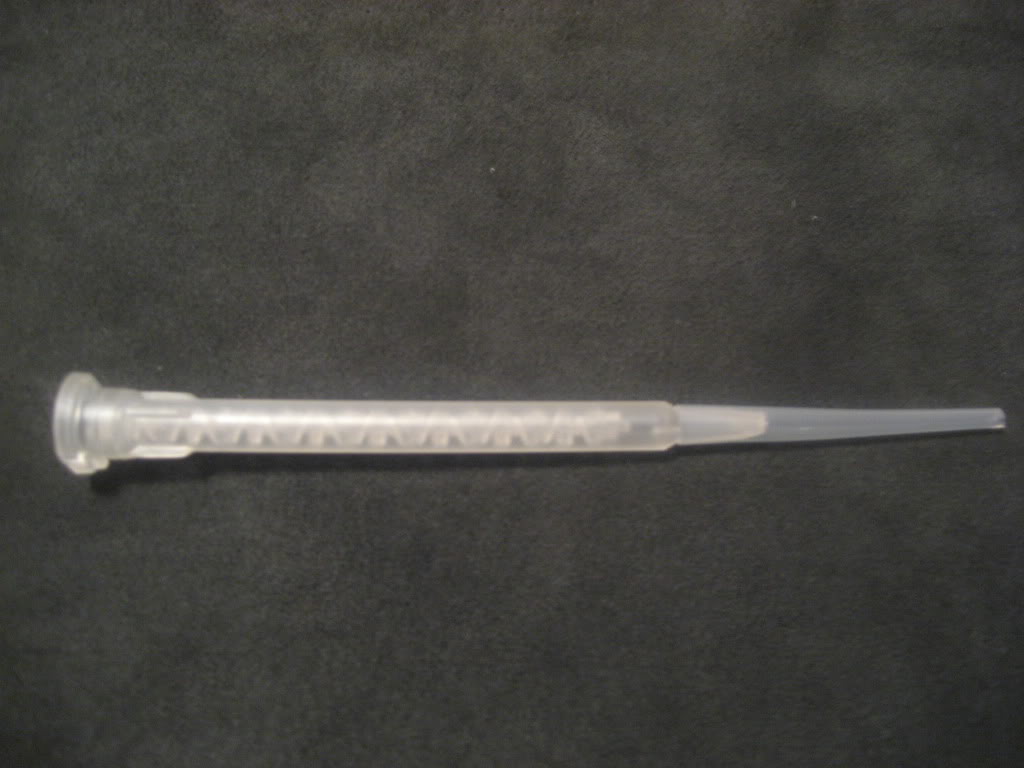
I bought this at the Home Depot for less than $10. It is perfect because it sets in 5 minutes so plenty of work time. It is "ready to handle" in 20 minutes and completely cured in a few hours if I remember correctly. Plus it mixes in the tips as you dispense it so no lost time in that category. Oh and epoxy will be PLENTY strong for this application.
I modified the tip a little bit with some IV type materials I got from a nurse friend of mine. I wanted to make the tip longer and narrower so that I could actually get inside the air pocket and dispense the glue where I needed it.
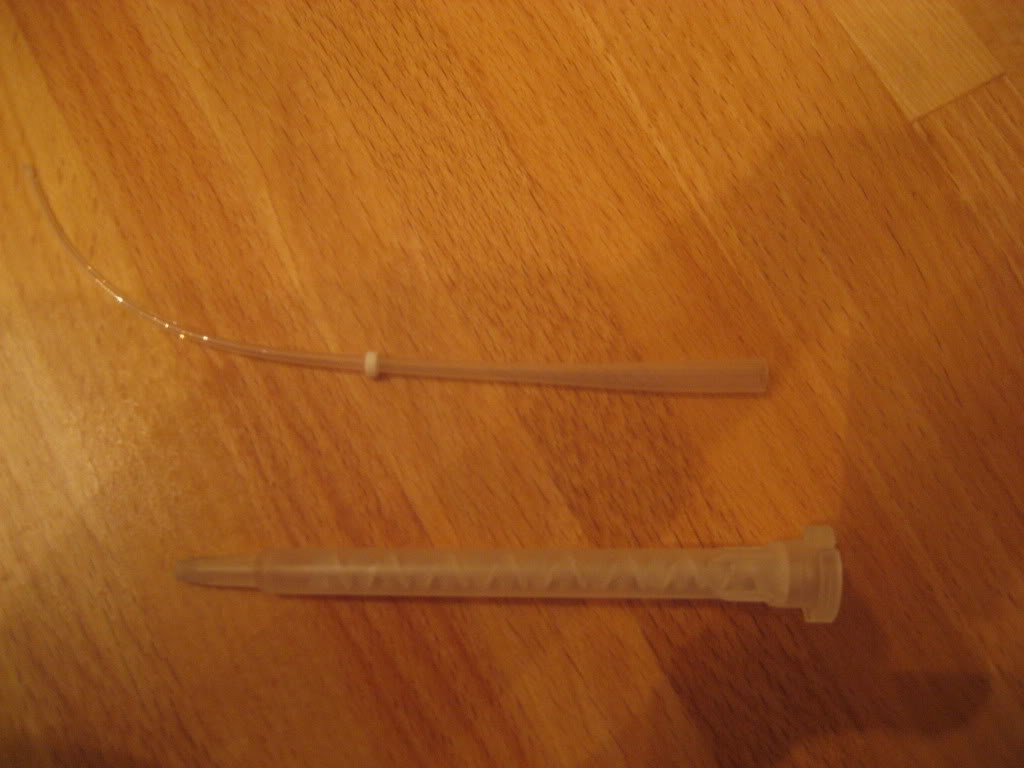
The top thing was then cut down and shoved onto the Locktite supplied tip to make this "hybrid" tip... oh yeah
My original plan called for the use of a hypodermic needle and I was going to load the epoxy into the chamber and then inject it into the holes. I got the largest bore size hypodermic needle I could get and it was way too small for the thick glue to be squirted out. The viscosity of the adhesive just wasn't going to allow for this option to work. The "hybrid" tip I made worked way better, just an FYI.
When I first started this project and was looking at the back side of the trim panel I noticed the factory holes that were used in the original construction of the panel, pictured in one of the first pics of this thread. I concluded that they used some type of vacuum inducing machinery to suck down the vinyl into all the tightly contoured spots. I thought if that's the way they did it, then that's the way i'm doing it.
Next step in this process is to acquire a crappy vacuum. I say crappy because what I did with it is so abusive that it will in effect render the machine useless. DON'T USE YOUR GOOD VACUUM. You can find one on craigslist for $5-$20 fairly easily. I went through two, one for each panel but that was kinda my fault (more on that later) and you will just need one.
I wanted a new vacuum that had a lot of suction and didn't think a used one would be as strong. Plus with all the creepy petafile type people on craigslist you never know what you're getting into. So I took a trip to the local wal mart and picked up a brand spankin new top of the line Shop Vac. If you go this route make sure to keep your receipt as you will be taking advantage of their extremely liberal return policy
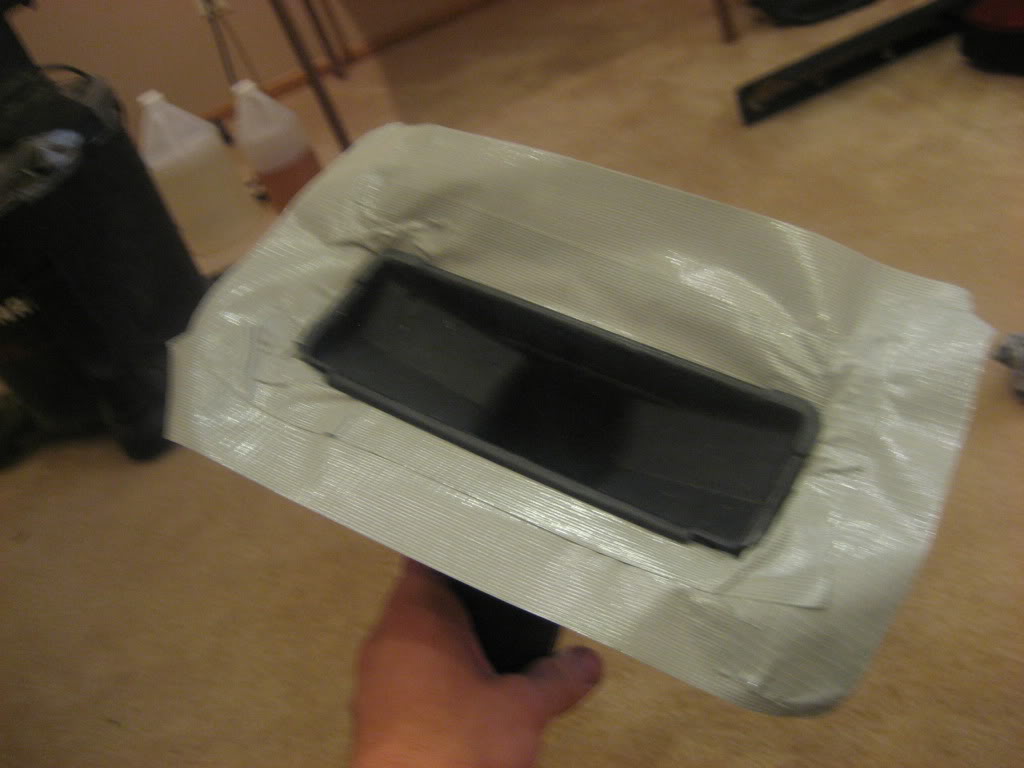
O.k. so now that the vacuum is gotten it is time to select a nozzle that best fits the trim panel delamination area. I got the closest one and then got some duct tape to go around the edges to insure tight fitment.
Alright so I have my glue ready to go, I have my vacuum set up with the proper attachment and tape, and I have my trim panel all prepped with the holes. It is go time.
Even though I will be explaining this slowly, the next few steps are to be done as fast as possible and should take only a few minutes. It is extremely important to have everything lined up and easily accessible.
First I began injecting the epoxy into the holes I had drilled. I didn't really go to every hole per say, but moved around the area and got plenty of glue back behind the pocket of air. My advice here is to use a ton of glue as you should have plenty. I used a cartridge per trim panel if I remember right. Excess glue will just be sucked into the vacuum hose so there is no reason not to be liberal with this application.
After the glue is applied I tossed the cartridge and quickly reached for the vacuum. Stuck it on the area making sure to get good coverage and then used extra duct tape to make sure there were no air leaks.
Turn that bad boy on and watch from the front as your vinyl gets sucked back down to the substrate and goes back to that nice, tight, oem curve. from the back, the set up should look like this...
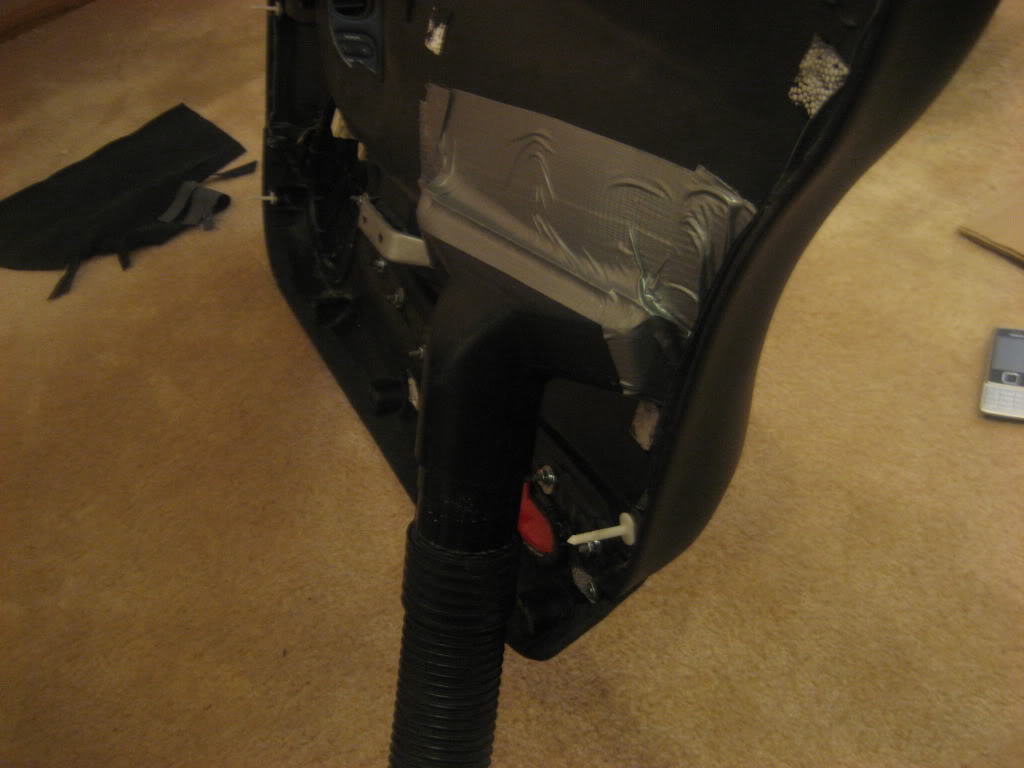
I also worked the area from the front with my hand just pressing and massaging the vinyl to make sure it was laying right and to get all the excess glue squeezed out.
The cure time is 5 min but I just let the vacuum run for a good 10 min just to be safe. You want a nice strong vacuum being pulled on the piece while that epoxy has time to do its thing.
Now if you don't know already, a shop vac relies on air flow to keep the motor cool and happy. In this application it is just holding a vacuum so there is no air flow to the motor and it is only a matter of time before it overheats and things start to get damaged. This is why you buy a crappy vac, or return it to the store when you are done.
You should do this part in a garage because the smell of the overworked electrical motor is stinky. You should also stand around close by for the 10 min you will be running the vac incase there is a problem. You shouldn't lay down on the couch for "just a minute" because you will be rudely awakened a few hours later by smoke alarms and a vacuum that is on fire. That is why I needed two vacuums for this project.
Once I completed my project I packaged up the Shop Vac and returned it to the store where I stated (without lying) that I used the vacuum once and the motor smelled like it was burning up. The kind Somali gentleman agreed with me that it "smelled funny" and had no problem with the return. You don't even need a receipt at this place, c'mon.
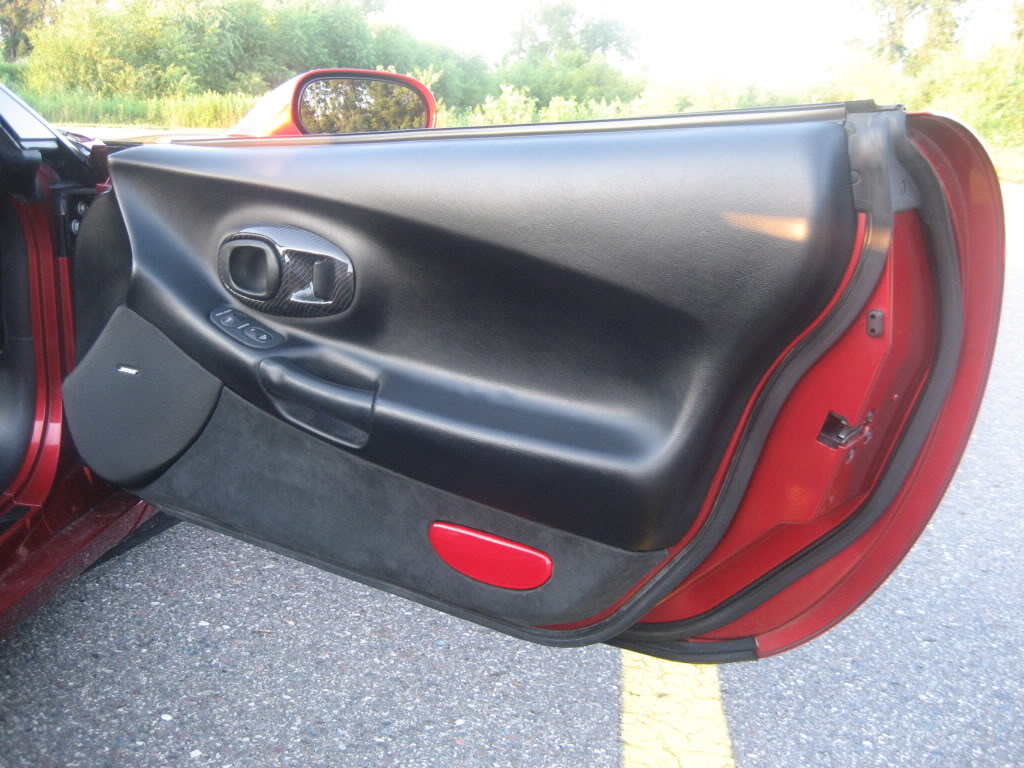
What's that? time for some after shots you say? Alright here they are (oh and for the passenger side you'll just have to believe me that there was an air pocket just like on the driver's door.) (Another side note: I recovered the bottom half of my door panels with Alcantara during this process so that is why they aren't black and oak like in the before pics. I can assure you they are the same door panels.)
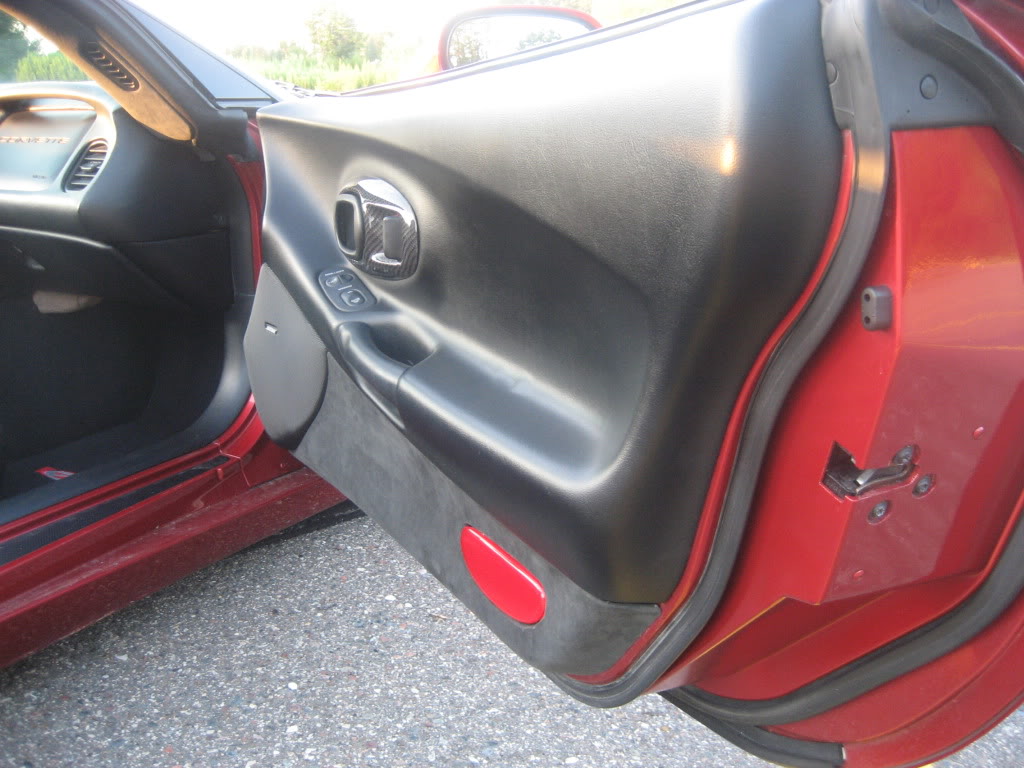
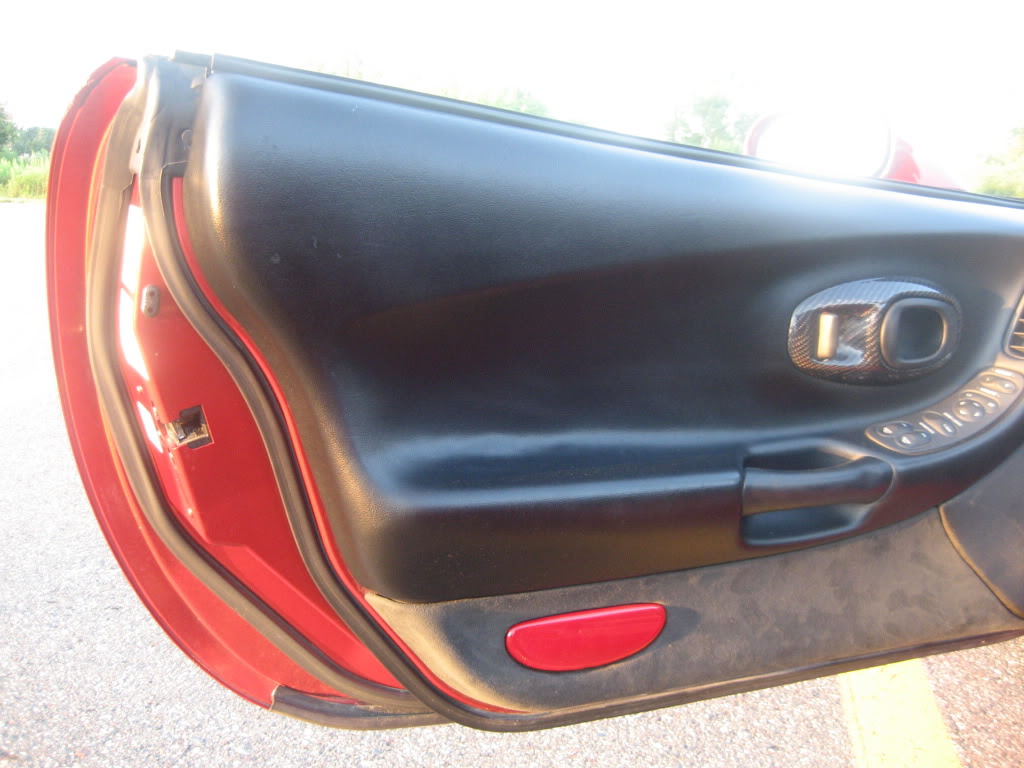
And here's a few with the trim panels back on the car...
Results (What can you expect)
So as you can see from the pics the outcome is down right decent. Especially since I have about $15 in epoxy and that is about it for expenses. Remember the crack I pointed out earlier? This had a big part in the outcome of the driver's door and it didn't turn out as good because of this issue. In a few of the shots it maybe looks a little bit lumpy right where the crack is, that is why. You will not have this issue, well unless yours is cracked too I guess.
Even though it looks great in pictures the repair is not 100% perfect and it probably will never be there without replacing/recovering the panel. BUT, for less than 20 bucks it gives you a VERY GOOD fix that will prevent further damage and also looks a hell of a lot better than what it did before. I used to have passenger's comment on the delamination or ask about it and I also felt like a jack *** trying to explain it, I have not had any comments since the fix.
So what do you think? As always, this tutorial is meant to help other forum members work through similar problems that they might be having with their cars. That being said, feel free to post up with questions comments or concerns (positive or negative, I can take it) If you have done a similar fix or know of other methods/ tips/ tricks please post them so it helps other people. This process is simply what "I" did but if you can build on it or add to it please do. My goal is for a new Corvette owner(who has this problem) to be able to do a search and pull up a wealth of knowledge on the subject.
I think that is about it. Good luck and let me know how it works out for you. Mark
It has affected a lot of people and there has been lots of talk about different options for fixes. There is the popular arm rest fix that I think we have all seen. Personally I don't like the look too much and was after something a little better. I suppose you could buy new trim panels but we all know how much that costs. I guess you could recover them through a vendor like apsis, again cost being the major down side to this. None of these are actual fixes though, just ways around it or replacements.
In my research for a cure I came across some people discussing getting adhessive behind the trim panel and re gluing the vinyl back down. That seemed at least plausible to me so that is the option I went with. Even though people were talking, I could not find any article about an actual process or pics to go along with any of it.
Ah, a use for a tutorial. I figured i'd take pics along the way and document the whole thing... the good, bad, and the ugly, in hopes of helping other forum members with the same problem. I tend to get a little bit detailed so if the text is bringing you down just scroll through as there will be plenty of pictures. So here's my take on it and maybe you can learn from my trials and tribulations...
I suppose I should start off with some "before" pics. My car was experiencing the problem on both trim panels (a two'fer bonus) and it was worse on the driver's door. I was pretty excited that I not only got to fix one door, but I got to do both... yay
O.k. so I just realized that I don't have pics of the passenger side door panel. I know I took some but can't find them. Oh well, the process is the same for both doors so it doesn't matter. I can upload them later if I find them.
I bet some of those "before" pics are looking strangely familiar to some of you. I know there are worse ones out there so I guess I got kinda lucky. I should say now that if yours is just starting to delaminate I would fix it sooner than later as your results will be better when the problem is more minor.
So after taking off the trim panels the first thing I did was drill holes on the backside of the panel in the affected area. Once you take off the white styrofoam that is back there you will see tiny holes that the factory used to vacuum stretch the vinyl when the panel was being made.
You can drill on these holes as well as add your own. I went with a "more is better" approach for mine. To aid in deciding where to drill I used a small, dull, nail and stuck it through the factory holes and watched from the front to see where the nail was pushing out on.
In the photo you can see that the nail is pushing out in the center of the bubble or air pocket. By using this method to check where my holes were I was able to accurately drill enough holes to fully cover the affected area. The adhesive will be injected through these holes so the goal is to have holes all over the delaminated area to insure that glue gets to the affected area. Action shot time...
In the above photo notice the crack in the trim panel along the bottom row of holes. See it? Ya mine was delaminating and broken. Take note as I will be talking about this more in the results section at the end.
I think it goes without saying that caution is to be used when drilling. If you go too far you will be calling up Apsis or another vendor for new trim panels. GO SLOWLY and pay attention to what you are doing. Once you do a few you will get the feel for what pressure is needed and how long it takes to go through. Also pay attention to drill sounds as it will bog slightly when you are getting close to puncturing through. Drilling through the plastic without damaging the vinyl on the other side is hard to do and takes time and patience. Start in the middle of the air pocket because there is more distance between the vinyl and the substrate. Once you get to the edges there is less margin for error. Here is a crappy rendering of a side view of the process...
Jealous of those photoshop skills? ya me neither
But the point is don't f up your trim panel by drilling too far. If I were to do this project again I would cut the drill bit down so it was an inch long and then just put it in the chuck so it was barely sticking out and "couldn't" be pushed through too far. I didn't have access to a cut off wheel to cut my bit down that night so I had to do it the terrifying way. Here we are all swiss cheesed up...You can see that crack I mentioned earlier a little bit better in that pic. On a few of my holes I got plastic chips that got stuck in the air pocket and had to be fished out with a right angle pick. It sucked very badly but make sure you don't get debris in the air pocket as it will affect how the vinyl lays back down. To check this simply press the vinyl against the substrate from the outside and if you feel a big lump in there you have to clear it out. nuff said
Moving right along.... now i have the trim panel prepped for the gluing. About glue selection: I wanted something that set up fast, like a few minutes fast. Something that would give me a decent amount of work time, but at least set up fast enough to hold the vinyl down into place while the glue completely cured. I settled on an epoxy made by Locktite.
I bought this at the Home Depot for less than $10. It is perfect because it sets in 5 minutes so plenty of work time. It is "ready to handle" in 20 minutes and completely cured in a few hours if I remember correctly. Plus it mixes in the tips as you dispense it so no lost time in that category. Oh and epoxy will be PLENTY strong for this application.
I modified the tip a little bit with some IV type materials I got from a nurse friend of mine. I wanted to make the tip longer and narrower so that I could actually get inside the air pocket and dispense the glue where I needed it.
The top thing was then cut down and shoved onto the Locktite supplied tip to make this "hybrid" tip... oh yeah
My original plan called for the use of a hypodermic needle and I was going to load the epoxy into the chamber and then inject it into the holes. I got the largest bore size hypodermic needle I could get and it was way too small for the thick glue to be squirted out. The viscosity of the adhesive just wasn't going to allow for this option to work. The "hybrid" tip I made worked way better, just an FYI.
When I first started this project and was looking at the back side of the trim panel I noticed the factory holes that were used in the original construction of the panel, pictured in one of the first pics of this thread. I concluded that they used some type of vacuum inducing machinery to suck down the vinyl into all the tightly contoured spots. I thought if that's the way they did it, then that's the way i'm doing it.
Next step in this process is to acquire a crappy vacuum. I say crappy because what I did with it is so abusive that it will in effect render the machine useless. DON'T USE YOUR GOOD VACUUM. You can find one on craigslist for $5-$20 fairly easily. I went through two, one for each panel but that was kinda my fault (more on that later) and you will just need one.
I wanted a new vacuum that had a lot of suction and didn't think a used one would be as strong. Plus with all the creepy petafile type people on craigslist you never know what you're getting into. So I took a trip to the local wal mart and picked up a brand spankin new top of the line Shop Vac. If you go this route make sure to keep your receipt as you will be taking advantage of their extremely liberal return policy
O.k. so now that the vacuum is gotten it is time to select a nozzle that best fits the trim panel delamination area. I got the closest one and then got some duct tape to go around the edges to insure tight fitment.
Alright so I have my glue ready to go, I have my vacuum set up with the proper attachment and tape, and I have my trim panel all prepped with the holes. It is go time.
Even though I will be explaining this slowly, the next few steps are to be done as fast as possible and should take only a few minutes. It is extremely important to have everything lined up and easily accessible.
First I began injecting the epoxy into the holes I had drilled. I didn't really go to every hole per say, but moved around the area and got plenty of glue back behind the pocket of air. My advice here is to use a ton of glue as you should have plenty. I used a cartridge per trim panel if I remember right. Excess glue will just be sucked into the vacuum hose so there is no reason not to be liberal with this application.
After the glue is applied I tossed the cartridge and quickly reached for the vacuum. Stuck it on the area making sure to get good coverage and then used extra duct tape to make sure there were no air leaks.
Turn that bad boy on and watch from the front as your vinyl gets sucked back down to the substrate and goes back to that nice, tight, oem curve. from the back, the set up should look like this...
I also worked the area from the front with my hand just pressing and massaging the vinyl to make sure it was laying right and to get all the excess glue squeezed out.
The cure time is 5 min but I just let the vacuum run for a good 10 min just to be safe. You want a nice strong vacuum being pulled on the piece while that epoxy has time to do its thing.
Now if you don't know already, a shop vac relies on air flow to keep the motor cool and happy. In this application it is just holding a vacuum so there is no air flow to the motor and it is only a matter of time before it overheats and things start to get damaged. This is why you buy a crappy vac, or return it to the store when you are done.
You should do this part in a garage because the smell of the overworked electrical motor is stinky. You should also stand around close by for the 10 min you will be running the vac incase there is a problem. You shouldn't lay down on the couch for "just a minute" because you will be rudely awakened a few hours later by smoke alarms and a vacuum that is on fire.
That is why I needed two vacuums for this project.Once I completed my project I packaged up the Shop Vac and returned it to the store where I stated (without lying) that I used the vacuum once and the motor smelled like it was burning up. The kind Somali gentleman agreed with me that it "smelled funny" and had no problem with the return. You don't even need a receipt at this place, c'mon.
What's that? time for some after shots you say? Alright here they are (oh and for the passenger side you'll just have to believe me that there was an air pocket just like on the driver's door.) (Another side note: I recovered the bottom half of my door panels with Alcantara during this process so that is why they aren't black and oak like in the before pics. I can assure you they are the same door panels.)
And here's a few with the trim panels back on the car...
Results (What can you expect)
So as you can see from the pics the outcome is down right decent. Especially since I have about $15 in epoxy and that is about it for expenses. Remember the crack I pointed out earlier? This had a big part in the outcome of the driver's door and it didn't turn out as good because of this issue. In a few of the shots it maybe looks a little bit lumpy right where the crack is, that is why. You will not have this issue, well unless yours is cracked too I guess.
Even though it looks great in pictures the repair is not 100% perfect and it probably will never be there without replacing/recovering the panel. BUT, for less than 20 bucks it gives you a VERY GOOD fix that will prevent further damage and also looks a hell of a lot better than what it did before. I used to have passenger's comment on the delamination or ask about it and I also felt like a jack *** trying to explain it, I have not had any comments since the fix.
So what do you think? As always, this tutorial is meant to help other forum members work through similar problems that they might be having with their cars. That being said, feel free to post up with questions comments or concerns (positive or negative, I can take it) If you have done a similar fix or know of other methods/ tips/ tricks please post them so it helps other people. This process is simply what "I" did but if you can build on it or add to it please do. My goal is for a new Corvette owner(who has this problem) to be able to do a search and pull up a wealth of knowledge on the subject.
I think that is about it. Good luck and let me know how it works out for you.
Mark

The following users liked this post:
Centerline1999 (07-11-2018)
07-24-2010, 03:47 AM
#2
Le Mans Master


Damn excellent tutorial!! I'm sure this help many, many Vette owners who have (or will) encounter this problem! Well done!! 
PS -- What shop do you work for in the Twin Cities?
PS -- What shop do you work for in the Twin Cities?
07-24-2010, 04:46 AM
#3
Le Mans Master
 07-24-2010, 10:08 AM
#4
Le Mans Master

Well,,I have to give you a big "ATTA BOY"!! I like your thought process!! I don't have this problem right now,,,but it seems that every once in a while,,not long after I read about a problem,,,wham!!! I think I'll bookmark this just in case !!
!!
!!
07-24-2010, 10:41 AM
#5
Administrator

Member Since: Mar 2001
Location: In a parallel universe. Currently own 2014 Stingray Coupe.
Posts: 342,747
Received 19,237 Likes
on
13,936 Posts
C7 of the Year - Modified Finalist 2021
MO Events Coordinator
St. Jude Co-Organizer
St. Jude Donor '03-'04-'05-'06-'07-'08-'09-'10-'11-'12-'13-'14-'15-'16-'17-'18-'19-
'20-'21-'22-'23-'24
NCM Sinkhole Donor
CI 5, 8 & 11 Veteran


Excellent write-up. Thanks for taking the time to do this and I'm sure this will help others with this problem.
 07-24-2010, 01:42 PM
#7
Le Mans Master

Member Since: May 2007
Location: hagerstown md
Posts: 5,383
Likes: 0
Received 4 Likes
on
4 Posts
St. Jude Donor '08-'09
The good: Great write up.
The bad: You burnt that shop vac up, and returned it knowing YOU are the one that F'd it up and it wasn't a defective vac. Where's your morals man?
Next time, go pick up an old refrigerator and use the compressor motor from it to pull the vacuum. Won't hurt it, you can use it many times, and you'll sleep better.

 07-24-2010, 11:21 PM
#9
Racer
Thread Starter


 07-25-2010, 08:09 AM
#14
Instructor

The good: Great write up.
The bad: You burnt that shop vac up, and returned it knowing YOU are the one that F'd it up and it wasn't a defective vac. Where's your morals man?
Next time, go pick up an old refrigerator and use the compressor motor from it to pull the vacuum. Won't hurt it, you can use it many times, and you'll sleep better.
The bad: You burnt that shop vac up, and returned it knowing YOU are the one that F'd it up and it wasn't a defective vac. Where's your morals man?
Next time, go pick up an old refrigerator and use the compressor motor from it to pull the vacuum. Won't hurt it, you can use it many times, and you'll sleep better.
07-25-2010, 08:41 AM
#15
Team Owner

Mark!
Excellent job - This will be a nice project for the beginning of fall Good job on the write-up and the pics
Thanks,Matt
Excellent job - This will be a nice project for the beginning of fall
Good job on the write-up and the pics Thanks,Matt
07-25-2010, 01:02 PM
#16
Racer
Member Since: Aug 2009
Location: Houston TX
Posts: 255
Likes: 0
Received 1 Like
on
1 Post
St. Jude Donor '12

Mark, OUTSTANDING! I have this same problem, but no so localized. My lining is lifting in a straight line along the armrest and vertical transition. Your fix should absolutely still work for me. Thank you...this little eyesore has been eating on me for a long time now and it's the first thing I see when I get in and out of my car. I'm bookmarking this thread and it will be my next weekend project.
Btw, thank you too for proofreading/spell checking your excellent write-up. So refreshing to read something that has been thought out, wordsmithed, grammatically correct and published error-free. I've even seen publishings from AP (Associated Press) with middle-school errors in it. Again, GREAT JOB! - Mike a.k.a. Cool Arrow
Btw, thank you too for proofreading/spell checking your excellent write-up. So refreshing to read something that has been thought out, wordsmithed, grammatically correct and published error-free. I've even seen publishings from AP (Associated Press) with middle-school errors in it. Again, GREAT JOB! - Mike a.k.a. Cool Arrow
07-26-2010, 12:02 AM
#17
Racer
Thread Starter
http://forums.corvetteforum.com/c5-g...up-how-to.html
The good: Great write up.
The bad: You burnt that shop vac up, and returned it knowing YOU are the one that F'd it up and it wasn't a defective vac. Where's your morals man?
Next time, go pick up an old refrigerator and use the compressor motor from it to pull the vacuum. Won't hurt it, you can use it many times, and you'll sleep better.
The bad: You burnt that shop vac up, and returned it knowing YOU are the one that F'd it up and it wasn't a defective vac. Where's your morals man?
Next time, go pick up an old refrigerator and use the compressor motor from it to pull the vacuum. Won't hurt it, you can use it many times, and you'll sleep better.
Another illustration of why I morally don't have issue with this would be my daily use of professional grade tools at work. Brands like Snap-on and Mac (most pro grade tool companies for that matter) have lifetime warranties on a lot of their tools. I have broken screw drivers using them as punches or prying with them. I have cracked sockets with the use of a breaker bar plus an 8ft pipe. I use and abuse tools everyday and put them up to tasks that are brutally hard and will probably break them, it is part of the job. If something does break however, I get a new one due to the warranty. And that is what keeps me buying from these tool companies. I know warranties and return policies aren't the same, but like I said it is an illustration to my reasoning.
I appreciate you bringing this up and apologize for any offense. This thread is simply what "I" did and if you have a problem with it, by all means, use a different method.
07-26-2010, 09:08 AM
#18
Safety Car

Member Since: Aug 2004
Location: Southwest Kansas
Posts: 4,766
Received 535 Likes
on
285 Posts
2022 Corvette of the Year Finalist -- Unmodified
2021 C6 of the Year Winner - Unmodified

A small suggestion that I might add.....
Take a hair dryer and 'warm up' the vinyl a bit might help with making the suction a bit smoother. Just a thought.
Take a hair dryer and 'warm up' the vinyl a bit might help with making the suction a bit smoother. Just a thought.
07-26-2010, 11:25 AM
#19
Instructor
Member Since: Aug 2009
Location: Orlando FL
Posts: 133
Likes: 0
Received 0 Likes
on
0 Posts
This is a good write-up that I am sure will help many people but I have to agree with sneakelman that what you are suggesting with regards to returning the vacuum is wrong. If you truly feel justified in doing what you are promoting then I ask you this: When you returned the vacuum to Wal-Mart and they asked you if anything was wrong with it did you tell them how you damaged it through your own misuse, or did you tell them something else? The same goes for those high-end tools you mentioned, when you break one due to misuse or abuse as you stated do you tell them what you were doing with it when it broke, or do you tell them something else? Look based on your post you seem like a fairly decent person who means well and I appreciate you taking the time to share your knowledge. I encourage you to reevaluate your position on sneakelmans point because what you are suggesting really is not honest behavior no matter how you try to spin or justify it.
Peace
Peace