
Shaved Front Plate (PICS) Tutorial/Write up/How to
 11-19-2009, 11:02 PM
#1
Racer

Thread Starter
I recently decided to shave the front plate on my car after I had a minor accident and the cover needed replacing. I figured if I have to replace the cover why not try something custom.
Through searching I found a few threads that showed pics of what I wanted to do but actual "how to" info was hard to find. Well being an auto body technician by trade I jumped right in and knew I would be able to accomplish this mod no problem but I wanted to take pics along the way and write a DETAILED tutorial that will hopefully be useful to others in the future.
It outlines my whole thought process around the project, what worked, what didn't, materials used, costs of materials, labor times, and impressions on finished product. It will get a little long but I want to be as thorough as possible in the hopes that someone who is contemplating this mod will go into it knowing everything needed to complete it. If the reading is bumming you out, scroll through and look at the pictures

Let's start with some basic theory about shaving various parts on cars. You want to have as uniform of a substrate as possible and what I mean by that is if you shave a handle on a typical car you will want to weld in a patch of metal and grind it flat so that where there used to be a hole, there is now metal/steel, just like the door is made out of (one solid metal substrate). Everyone has seen a hacked out job where somebody fills holes on a metal door with fiberglass or even straight body filler and as time goes on the job doesn't hold up. That is largely because the underlying materials are different, metal vs. filler, and they expand and contract at different rates due to temperature fluctuations. Over time they will crack, sink, peel, fall off, etc. I figured plastic wouldn't matter as much, but I still wanted to try and have the plastic of the bumper match the plastic of the patch piece.
This becomes a problem because the cover is PUR (polyurethane) and the standard bumper cover filler piece (the one that says Corvette on it) is TPE (thermoplastic elastomer) Everyone I have seen do this mod uses the filler piece and just molds it in, some leave the lettering too. Due to the paragraph above I really had my heart set on using the SAME plastic for the whole thing so I decided to try and make a patch panel out of the old bumper cover. This is how I cut it out:

Problems with this idea quickly presented themselves, as I thought they might. PUR is what is called a "thermoset plastic" meaning that once the shape is formed the first time in the manufacturing process it will not change shape again. Ever see a car that has one of the corners of their bumper covers caved in because they hit something? Sure all the time. Ever see a Vette with something similar? Nope. That is because a PUR (Vette) bumper will only flex so much and then it just cracks, some of you know this the hard way. If you put a civic bumper(thermo plastic) and a vette bumper(thermoset plastic) in a big oven and heated to 1,000 degrees the civic cover would be a pool of plastic and the vette cover would still be in it's shape (well maybe blistered, cracked, and possibly on fire) but not melted in a puddle.
So my patch panel that I cut out of the old bumper is flat and I needed to contour it to the shape of the bumper. I knew all this stuff going into this but said physics be damned, I was going to change the shape, or so I thought. I tried everything from torches to relief cuts to heat lamps and after a good hour and some time under the lamp the piece kinda blistered and cracked. And I gave up on that idea.
So I decided to use the filler panel as the patch piece and not worry about expanding and contracting. I really don't think it will be a huge problem with plastics anyway. Now that the basic plan is in progress let's take a quick look at materials used. For the adhesives, here is what they look like and for the rest of the thread they will be referred to by part numbers.

4247: This is a structural bonding adhesive that kicks really fast, were talking 30 seconds fast. It gives the repair area the strength and durability. I actually used its slower counter part 4240(not pictured) because I was working with big areas and needed at least a minute of spreading time. They are both structural adhesives and you can use whatever you prefer.
5887: This is a COSMETIC adhesive and is used for shaping the area after the strength of the repair has been done. It is similar to body filler on metal, just for looks after damage has been straightened.
5907: This is adhesion promoter and you will be lost without it. Before applying any adhesives to the raw bumper it must first be sprayed with this and let set for at least 10min. This product ensures good adhesion between the plastic and adhesives and if you don't use it you will risk peeling. Peeling is bad.
Mesh (pink roll): This stuff is like the material used on screens for windows and it is pressed into wet adhesive to give the repair added strength. Kinda like fiberglass mat pressed into resin and wetted out.
The rest of the items are mixing tips for adhesives, aluminum tape, and spreaders. You will see them used later.
The part about using the "corvette" filler piece that I didn't like was just molding it in to the bumper because doing that allows no access to the back side of the repair and you will also have a big air pocket in back of the filler piece because of the way it sits in there. I took the filler piece and cut off the right angle edge all the way around to it was flat, then cut out the recessed area of the cover so that when fit up it is flat on both sides. This will allow me to have access to both sides of the repair and should make for a stronger finished product than simply molding in the filler piece to the cover from the front.

Here is the backside of the cover shaved down nice and flat with the recess cut out.

The entire filler piece and mating surface of the cover was sanded with 80 grit sandpaper on a DA (dual action sander) I sanded a slight bevel on all the edges front and back in order to give the adhesive more surface area to grab onto. Here is the back prepped:

and the front with the filler piece sanded in 80:

The holes are called "pinning holes" and they will allow adhesive from the back to flow through to the front. It will give the repair added strength by giving the adhesive a physical bond in addition to a chemical bond. Think of it like stitches holding a cut together.
The back is going to be the power house of the repair so I will do that side first. I used the aluminum tape to hold the filler piece where I wanted it. To get the positioning just right I first put masking taped on the backside of the cover (sticky side facing out) and set the filler piece onto that.

Now that I could see that the gaps were even all the way around I put the aluminum tape over the front side, then peeled the masking tape off the back and we are ready for adhesive.

I sprayed adhesion promoter and let sit for at least 10 minutes. Next I applied the 4240 (or 4247) to the backside and spread evenly trying to do a skim coat first to get adhesive into the pinning holes. I laid the mesh down into the wet adhesive and then pressed it into the repair and applied more adhesive over the top of it. It doesn't look pretty but like I said, this is the strength of the repair and it is on the backside.

Onto the front side we go. The process I used is the same as the back. I am still using the structural 4240 for this to get the front strong like the back but I just need to fill in the seam area on the front and won't be covering the entire area like the backside. Here it is after spreading:

Some people in the past have left the lettering in there but personally I don't care for that look so I ground mine off. If you do keep it it will be difficult to block out and be straight because you don't have as much room to work (you can't sand by the letters or it will mess them up) This will make getting the transition from filler piece to bumper cover difficult. I will bring this up a little later as well. Here is the lettering removed and the initial fill with 5887. (the 4240 was sanded down with 80 grit prior to this pic being taken)

I should mention that at this stage before spreading adhesive I am sanding everything with 80 grit still and using adhesion promoter on both the raw cover and existing adhesive before applying additional coats of adhesive. I like to have 80 grit scratches to adhere to, so all my sanding and pre filling is done with 80.
Looking back another step that I would have done differently was grinding down the lettering as far as I did. I had this vision of the bumper being done and looking great but over time the "Corvette" lettering would sink or come through a bit and look like crap. I ground all my lettering down flat so that I knew this could not happen but at the same time I was left with a deeper than desired "valley" that sucked to fill and took a lot of time and money in materials to build back to the right height. If I were to do it again I would only slightly grind the lettering and hand sand the inside of the letters with 80 to insure adhesion. Here is a pic of my final spread with the 5887:

Notice how far out the repair has to go in order for the finished bumper cover to be straight. There is a lot of blocking (sanding with a block) that needs to be done to get it straight and if you have to work around the lettering I just don't see the finished product looking as smooth. I haven't seen anyone's car who has left the lettering in person so I guess I am no expert but I think it would be very difficult to leave the letters and get a straight bumper at the same time.
Like I said before I start blocking with 80 and then when it is getting closer I gradually go to 180, then 320. After I finish blocking with a certain grit of paper, I then DA with that same grit to make sure and get all the sand scratches out before going to the next finest grit. After 320 it is ready for primer and starting to look like a bumper cover again.

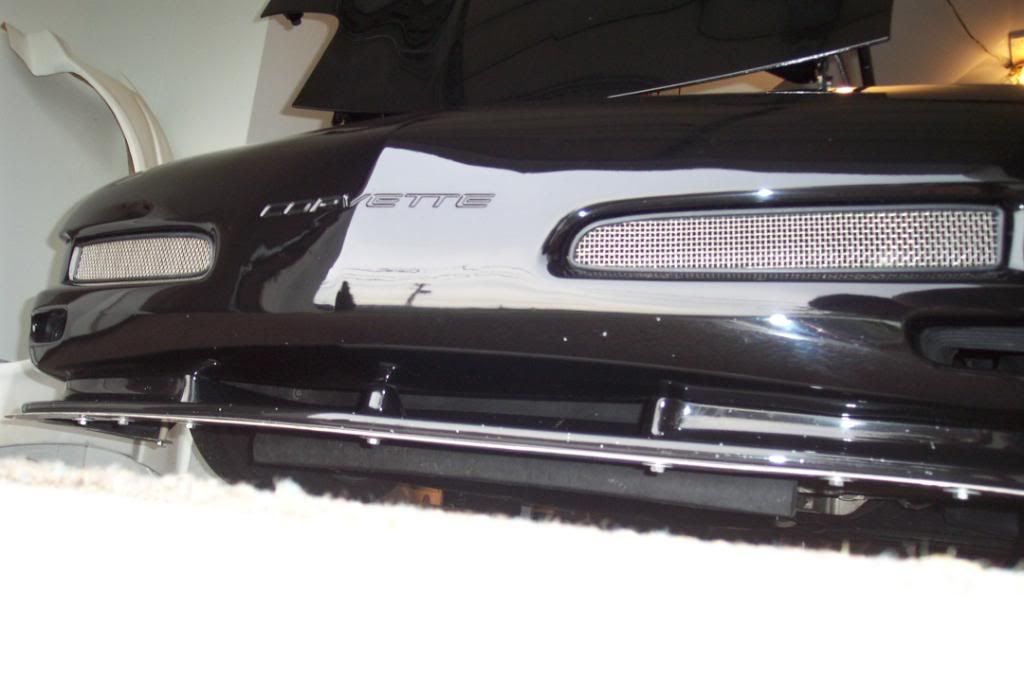
I blocked the primer with 320 then DA'd up to 600 before painting. I guess it is time for some finished pics...


I think the car turned out GREAT and I am really excited about the finished product. I was really going for a look that would pass as OEM to someone that didn't know these cars, but I also wanted something that Corvette owners would appreciate and recognize. I like that subtle vibe where you look at a car and think, "somethings different, but what". I wanted a mod that didn't jump out at you and scream AFTERMARKET but at the same time looked really clean and cool. I think I nailed it, what are you're thoughts? It takes a little getting used to because I have come accustomed to my car with the old bumper, but I think I like the new one way better.
Costs of materials is huge. Each tube of that adhesive runs about $50 and if I were to do it again (without grinding the letters so deep) I would be at about 1 1/2 tubes of the 5887 and probably one tube of 4240. The adhesion promoter is about $40 for a can and even though you only will use maybe a quarter of it, you still have to buy the whole thing. I figure right around $200 for all the 3M adhesive related things. You will also have to figure in sand paper, primer, paint, etc. Keep in mind that this is industry standard material and also that it is made by 3M. I am not saying you can't go to home depot and buy a tube of liquid nails or something and do it cheaper than I did. I used professional grade materials and did the job the best way I knew of. Like most things in life: doing it the right way will cost more and take more time.
That brings us to labor. I worked on my car after hours at work instead of one long weekend session so I don't really have an exact time spent estimate. I would say maybe 10-15 hours from start to primer. I could probably do it faster the second time (like most things in life, right?)
Even though I used what I consider the best materials available for a job like this I am still unsure about the long term durability. I think I will be fine but even I know that those materials are not engineered to fill huge voids in bumper covers like I did. Everything looks good so far and I will use this thread to give periodical updates on the condition of the cover.
I also want to let you know that this is not an easy mod to do. I am not saying that a DIY guy at home can't do this, but at the same time I don't want to make it look easy and have someone jump into it and ruin their bumper cover just to realize they are in way over their head. There is a lot of sanding and quite a few body lines that can be difficult. It is hard to make look right but not impossible.
I also want to pay homage to forum members before me whose pictures inspired me to want to do this to my car. RockyF150, I found the most pics of yours through searches and that gave me perspective on the lettering idea. Even though personally I didn't care for it I am glad I was able to see a finished project, thank you.
And Norcalzosix who has one of the coolest looking Vettes I have ever seen and whose picture made me instantly realized that I needed to keep the emblem.

Overall I am really happy with it and no regrets at this point. Hopefully this has helped somebody who is looking for more information on this rare and unique mod. Feel free to post up with any questions or comments and I will be sure to get back to you.
Through searching I found a few threads that showed pics of what I wanted to do but actual "how to" info was hard to find. Well being an auto body technician by trade I jumped right in and knew I would be able to accomplish this mod no problem but I wanted to take pics along the way and write a DETAILED tutorial that will hopefully be useful to others in the future.
It outlines my whole thought process around the project, what worked, what didn't, materials used, costs of materials, labor times, and impressions on finished product. It will get a little long but I want to be as thorough as possible in the hopes that someone who is contemplating this mod will go into it knowing everything needed to complete it. If the reading is bumming you out, scroll through and look at the pictures
Let's start with some basic theory about shaving various parts on cars. You want to have as uniform of a substrate as possible and what I mean by that is if you shave a handle on a typical car you will want to weld in a patch of metal and grind it flat so that where there used to be a hole, there is now metal/steel, just like the door is made out of (one solid metal substrate). Everyone has seen a hacked out job where somebody fills holes on a metal door with fiberglass or even straight body filler
and as time goes on the job doesn't hold up. That is largely because the underlying materials are different, metal vs. filler, and they expand and contract at different rates due to temperature fluctuations. Over time they will crack, sink, peel, fall off, etc. I figured plastic wouldn't matter as much, but I still wanted to try and have the plastic of the bumper match the plastic of the patch piece.This becomes a problem because the cover is PUR (polyurethane) and the standard bumper cover filler piece (the one that says Corvette on it) is TPE (thermoplastic elastomer) Everyone I have seen do this mod uses the filler piece and just molds it in, some leave the lettering too. Due to the paragraph above I really had my heart set on using the SAME plastic for the whole thing so I decided to try and make a patch panel out of the old bumper cover. This is how I cut it out:
Problems with this idea quickly presented themselves, as I thought they might. PUR is what is called a "thermoset plastic" meaning that once the shape is formed the first time in the manufacturing process it will not change shape again. Ever see a car that has one of the corners of their bumper covers caved in because they hit something? Sure all the time. Ever see a Vette with something similar? Nope. That is because a PUR (Vette) bumper will only flex so much and then it just cracks, some of you know this the hard way. If you put a civic bumper(thermo plastic) and a vette bumper(thermoset plastic) in a big oven and heated to 1,000 degrees the civic cover would be a pool of plastic and the vette cover would still be in it's shape (well maybe blistered, cracked, and possibly on fire) but not melted in a puddle.
So my patch panel that I cut out of the old bumper is flat and I needed to contour it to the shape of the bumper. I knew all this stuff going into this but said physics be damned, I was going to change the shape, or so I thought. I tried everything from torches to relief cuts to heat lamps and after a good hour and some time under the lamp the piece kinda blistered and cracked. And I gave up on that idea.
So I decided to use the filler panel as the patch piece and not worry about expanding and contracting. I really don't think it will be a huge problem with plastics anyway. Now that the basic plan is in progress let's take a quick look at materials used. For the adhesives, here is what they look like and for the rest of the thread they will be referred to by part numbers.
4247: This is a structural bonding adhesive that kicks really fast, were talking 30 seconds fast. It gives the repair area the strength and durability. I actually used its slower counter part 4240(not pictured) because I was working with big areas and needed at least a minute of spreading time. They are both structural adhesives and you can use whatever you prefer.
5887: This is a COSMETIC adhesive and is used for shaping the area after the strength of the repair has been done. It is similar to body filler on metal, just for looks after damage has been straightened.
5907: This is adhesion promoter and you will be lost without it. Before applying any adhesives to the raw bumper it must first be sprayed with this and let set for at least 10min. This product ensures good adhesion between the plastic and adhesives and if you don't use it you will risk peeling. Peeling is bad.
Mesh (pink roll): This stuff is like the material used on screens for windows and it is pressed into wet adhesive to give the repair added strength. Kinda like fiberglass mat pressed into resin and wetted out.
The rest of the items are mixing tips for adhesives, aluminum tape, and spreaders. You will see them used later.
The part about using the "corvette" filler piece that I didn't like was just molding it in to the bumper because doing that allows no access to the back side of the repair and you will also have a big air pocket in back of the filler piece because of the way it sits in there. I took the filler piece and cut off the right angle edge all the way around to it was flat, then cut out the recessed area of the cover so that when fit up it is flat on both sides. This will allow me to have access to both sides of the repair and should make for a stronger finished product than simply molding in the filler piece to the cover from the front.
Here is the backside of the cover shaved down nice and flat with the recess cut out.
The entire filler piece and mating surface of the cover was sanded with 80 grit sandpaper on a DA (dual action sander) I sanded a slight bevel on all the edges front and back in order to give the adhesive more surface area to grab onto. Here is the back prepped:
and the front with the filler piece sanded in 80:
The holes are called "pinning holes" and they will allow adhesive from the back to flow through to the front. It will give the repair added strength by giving the adhesive a physical bond in addition to a chemical bond. Think of it like stitches holding a cut together.
The back is going to be the power house of the repair so I will do that side first. I used the aluminum tape to hold the filler piece where I wanted it. To get the positioning just right I first put masking taped on the backside of the cover (sticky side facing out) and set the filler piece onto that.
Now that I could see that the gaps were even all the way around I put the aluminum tape over the front side, then peeled the masking tape off the back and we are ready for adhesive.
I sprayed adhesion promoter and let sit for at least 10 minutes. Next I applied the 4240 (or 4247) to the backside and spread evenly trying to do a skim coat first to get adhesive into the pinning holes. I laid the mesh down into the wet adhesive and then pressed it into the repair and applied more adhesive over the top of it. It doesn't look pretty but like I said, this is the strength of the repair and it is on the backside.
Onto the front side we go. The process I used is the same as the back. I am still using the structural 4240 for this to get the front strong like the back but I just need to fill in the seam area on the front and won't be covering the entire area like the backside. Here it is after spreading:
Some people in the past have left the lettering in there but personally I don't care for that look so I ground mine off. If you do keep it it will be difficult to block out and be straight because you don't have as much room to work (you can't sand by the letters or it will mess them up) This will make getting the transition from filler piece to bumper cover difficult. I will bring this up a little later as well. Here is the lettering removed and the initial fill with 5887. (the 4240 was sanded down with 80 grit prior to this pic being taken)
I should mention that at this stage before spreading adhesive I am sanding everything with 80 grit still and using adhesion promoter on both the raw cover and existing adhesive before applying additional coats of adhesive. I like to have 80 grit scratches to adhere to, so all my sanding and pre filling is done with 80.
Looking back another step that I would have done differently was grinding down the lettering as far as I did. I had this vision of the bumper being done and looking great but over time the "Corvette" lettering would sink or come through a bit and look like crap. I ground all my lettering down flat so that I knew this could not happen but at the same time I was left with a deeper than desired "valley" that sucked to fill and took a lot of time and money in materials to build back to the right height. If I were to do it again I would only slightly grind the lettering and hand sand the inside of the letters with 80 to insure adhesion. Here is a pic of my final spread with the 5887:
Notice how far out the repair has to go in order for the finished bumper cover to be straight. There is a lot of blocking (sanding with a block) that needs to be done to get it straight and if you have to work around the lettering I just don't see the finished product looking as smooth. I haven't seen anyone's car who has left the lettering in person so I guess I am no expert but I think it would be very difficult to leave the letters and get a straight bumper at the same time.
Like I said before I start blocking with 80 and then when it is getting closer I gradually go to 180, then 320. After I finish blocking with a certain grit of paper, I then DA with that same grit to make sure and get all the sand scratches out before going to the next finest grit. After 320 it is ready for primer and starting to look like a bumper cover again.
I blocked the primer with 320 then DA'd up to 600 before painting. I guess it is time for some finished pics...
I think the car turned out GREAT and I am really excited about the finished product. I was really going for a look that would pass as OEM to someone that didn't know these cars, but I also wanted something that Corvette owners would appreciate and recognize. I like that subtle vibe where you look at a car and think, "somethings different, but what". I wanted a mod that didn't jump out at you and scream AFTERMARKET but at the same time looked really clean and cool. I think I nailed it, what are you're thoughts? It takes a little getting used to because I have come accustomed to my car with the old bumper, but I think I like the new one way better.
Costs of materials is huge. Each tube of that adhesive runs about $50 and if I were to do it again (without grinding the letters so deep) I would be at about 1 1/2 tubes of the 5887 and probably one tube of 4240. The adhesion promoter is about $40 for a can and even though you only will use maybe a quarter of it, you still have to buy the whole thing. I figure right around $200 for all the 3M adhesive related things. You will also have to figure in sand paper, primer, paint, etc. Keep in mind that this is industry standard material and also that it is made by 3M. I am not saying you can't go to home depot and buy a tube of liquid nails or something and do it cheaper than I did. I used professional grade materials and did the job the best way I knew of. Like most things in life: doing it the right way will cost more and take more time.
That brings us to labor. I worked on my car after hours at work instead of one long weekend session so I don't really have an exact time spent estimate. I would say maybe 10-15 hours from start to primer. I could probably do it faster the second time (like most things in life, right?)
Even though I used what I consider the best materials available for a job like this I am still unsure about the long term durability. I think I will be fine but even I know that those materials are not engineered to fill huge voids in bumper covers like I did. Everything looks good so far and I will use this thread to give periodical updates on the condition of the cover.
I also want to let you know that this is not an easy mod to do. I am not saying that a DIY guy at home can't do this, but at the same time I don't want to make it look easy and have someone jump into it and ruin their bumper cover just to realize they are in way over their head. There is a lot of sanding and quite a few body lines that can be difficult. It is hard to make look right but not impossible.
I also want to pay homage to forum members before me whose pictures inspired me to want to do this to my car. RockyF150, I found the most pics of yours through searches and that gave me perspective on the lettering idea. Even though personally I didn't care for it I am glad I was able to see a finished project, thank you.
And Norcalzosix who has one of the coolest looking Vettes I have ever seen and whose picture made me instantly realized that I needed to keep the emblem.
Overall I am really happy with it and no regrets at this point. Hopefully this has helped somebody who is looking for more information on this rare and unique mod. Feel free to post up with any questions or comments and I will be sure to get back to you.


 11-19-2009, 11:46 PM
#4
Administrator


Member Since: Mar 2001
Location: In a parallel universe. Currently own 2014 Stingray Coupe.
Posts: 343,032
Received 19,309 Likes
on
13,980 Posts
C7 of the Year - Modified Finalist 2021
MO Events Coordinator
St. Jude Co-Organizer
St. Jude Donor '03-'04-'05-'06-'07-'08-'09-'10-'11-'12-'13-'14-'15-'16-'17-'18-'19-
'20-'21-'22-'23-'24
NCM Sinkhole Donor
CI 5, 8 & 11 Veteran


Excellent write-up. Thanks for taking the time to document the process.


 11-20-2009, 02:13 AM
#10
Pro

Member Since: Aug 2008
Location: Syracuse NY
Posts: 573
Likes: 0
Received 0 Likes
on
0 Posts

that thing is dead sexy. that color is awesome too. i love how all the mods are subtle, but stand out enough to make it very unique. none of the mods look out of place or over the top. now you got me thinking i need a paint job and a new bumper lol
11-20-2009, 02:43 AM
#12
Le Mans Master


Fabulous work -- excellent pics and how-to!! Ya done yourself proud!! 

11-20-2009, 02:45 AM
#13
Night Owl for life
Member Since: Nov 2003
Location: Bugs Bunny should'a made a left turn here
Posts: 23,201
Received 3,247 Likes
on
1,668 Posts
that looks very good!


