
front bumper signal assembly - replacement
 10-28-2009, 12:05 AM
#1
Melting Slicks


Thread Starter
My front right signal light lens is cracked and I want to change the entire signal light (running light) assembly.....I looked for some pointers but could not find any. Any tips??.....
I found a nice replacement on flea-bay for $60/pair....are there better options out there??
I found a nice replacement on flea-bay for $60/pair....are there better options out there??
Last edited by Tact; 10-28-2009 at 09:53 AM. Reason: eBay links not allowed
 10-28-2009, 01:56 AM
#2
I bought mine off of ebay. Slightly different than the one you are interested in, but same idea. I did see the one you are looking at, last weekend on a C5 at a car show. They look fantastic. So much better than stock.

10-28-2009, 03:06 AM
#3
Tech Contributor
Member Since: Dec 2003
Location: Horncastle Lincolnshire, England
Posts: 19,384
Likes: 0
Received 79 Likes
on
61 Posts
2023 C5 of the Year Finalist - Unmodified

Here's the replacement procedure
Park/Turn Signal/Side Marker Lamp Replacement
Removal Procedure
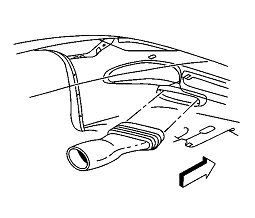
1. Raise and support the vehicle. Refer to Lifting and Jacking the Vehicle in General Information.
2. Remove the front fascia lower closeout panel.

3. Release the brake caliper cooling duct from the front fascia, and position the duct aside.
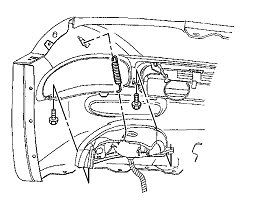
4. Remove the front turn signal lamp bracket retaining spring from the lamp bracket.
5. Remove the lamp bracket retaining spring from the front fascia.
6. Remove the front turn signal lamp bracket retaining screws.
7. Disconnect the sockets from the lamp.
8. Remove the lamp, with the bracket, from the vehicle.
9. Remove the lamp to bracket retaining screws.
10. Remove the lamp from the bracket.
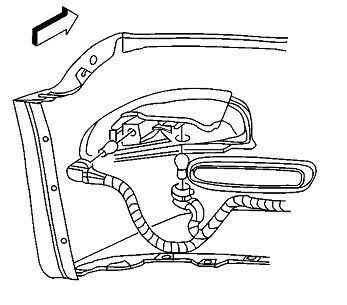
Installation Procedure
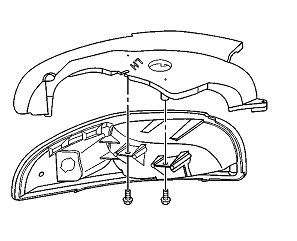
1. Install the front park/turn signal and sidemarker lamp into position on the front turn signal lamp bracket.
Notice
Use the correct fastener in the correct location. Replacement fasteners must be the correct part number for that application. Fasteners requiring replacement or fasteners requiring the use of thread locking compound or sealant are identified in the service procedure. Do not use paints, lubricants, or corrosion inhibitors on fasteners or fastener joint surfaces unless specified. These coatings affect fastener torque and joint clamping force and may damage the fastener. Use the correct tightening sequence and specifications when installing fasteners in order to avoid damage to parts and systems.
2. Install the front park/turn signal and sidemarker lamp to bracket retaining screws.
Tighten
Tighten the front park/turn signal and sidemarker lamp to bracket retaining screws to 2 N�m (18 lb in).
3. Install the sockets to the lamp.
4. Install the lamp, with the bracket, to the front fascia.
5. Align the lamp to the opening in the front fascia and hold the lamp firmly in place against the fascia, while installing the front turn signal lamp bracket retaining screws.
Tighten
Tighten the front turn signal lamp bracket retaining screws to 3 N�m (27 lb in).
6. Install the lamp bracket retaining spring to the front fascia.
7. Install the front turn signal lamp bracket retaining spring to the lamp bracket.
8. Position the brake caliper cooling duct to the front fascia and press the duct toward the fascia to secure.
9. Install the front fascia lower closeout panel. Refer to Close Out Panel - Front Bumper Fascia Lower in Bumpers.
Park/Turn Signal/Side Marker Lamp Replacement
Removal Procedure
1. Raise and support the vehicle. Refer to Lifting and Jacking the Vehicle in General Information.
2. Remove the front fascia lower closeout panel.
3. Release the brake caliper cooling duct from the front fascia, and position the duct aside.
4. Remove the front turn signal lamp bracket retaining spring from the lamp bracket.
5. Remove the lamp bracket retaining spring from the front fascia.
6. Remove the front turn signal lamp bracket retaining screws.
7. Disconnect the sockets from the lamp.
8. Remove the lamp, with the bracket, from the vehicle.
9. Remove the lamp to bracket retaining screws.
10. Remove the lamp from the bracket.
Installation Procedure
1. Install the front park/turn signal and sidemarker lamp into position on the front turn signal lamp bracket.
Notice
Use the correct fastener in the correct location. Replacement fasteners must be the correct part number for that application. Fasteners requiring replacement or fasteners requiring the use of thread locking compound or sealant are identified in the service procedure. Do not use paints, lubricants, or corrosion inhibitors on fasteners or fastener joint surfaces unless specified. These coatings affect fastener torque and joint clamping force and may damage the fastener. Use the correct tightening sequence and specifications when installing fasteners in order to avoid damage to parts and systems.
2. Install the front park/turn signal and sidemarker lamp to bracket retaining screws.
Tighten
Tighten the front park/turn signal and sidemarker lamp to bracket retaining screws to 2 N�m (18 lb in).
3. Install the sockets to the lamp.
4. Install the lamp, with the bracket, to the front fascia.
5. Align the lamp to the opening in the front fascia and hold the lamp firmly in place against the fascia, while installing the front turn signal lamp bracket retaining screws.
Tighten
Tighten the front turn signal lamp bracket retaining screws to 3 N�m (27 lb in).
6. Install the lamp bracket retaining spring to the front fascia.
7. Install the front turn signal lamp bracket retaining spring to the lamp bracket.
8. Position the brake caliper cooling duct to the front fascia and press the duct toward the fascia to secure.
9. Install the front fascia lower closeout panel. Refer to Close Out Panel - Front Bumper Fascia Lower in Bumpers.
10-28-2009, 04:46 AM
#6
Team Owner

10-28-2009, 04:46 AM
#7
Le Mans Master

Member Since: May 2006
Location: DuBois PA
Posts: 5,987
Likes: 0
Received 18 Likes
on
16 Posts
St. Jude Donor '11-'12-'13-'14-'15

 Yep... Worst part of the swap was getting those damn things in and out! Funny... I removed them completely because I couldn't see how you could possibly install new housings w/o scratching them up with the brake cust merely "moved aside"...
 Just to Hyjack a tad but I installed clear corners w/LED strips, thought you might be interested Dee Gee;


Tim
Last edited by tstar; 10-28-2009 at 04:58 AM.
10-28-2009, 05:00 AM
#8
Team Owner
Yeah, I know, been lazy getting to it. Had a couple other projects to take care of first. I'll have it on it's way back in a day or two at most. 
Had a couple other projects to take care of first. I'll have it on it's way back in a day or two at most.
10-28-2009, 08:42 AM
#9
Drifting


My front right signal light lens is cracked and I want to change the entire signal light (running light) assembly.....I looked for some pointers but could not find any. Any tips??.....
I found a nice replacement on flea-bay for $60/pair....are there better options out there??
[
I found a nice replacement on flea-bay for $60/pair....are there better options out there??
[
I just installed the same lights, although I purchased from a different flea-bay seller (PM sent). Took some time to do, and it is a bit tight to get the lights in and out (I have the arm bruises to prove it!) but well worth the effort. They look fantastic!
Last edited by pewter99; 10-28-2009 at 09:53 AM.
10-28-2009, 09:10 AM
#10
Melting Slicks
i replaced my corner lights with clear ones because my drivers side one was cracked. i still have the passenger side one. ill sell it for $15 plus shipping. i can send pics if you would like. although i would suggest getting the clear ones. they look so much better over stock its not even funny.
10-28-2009, 09:35 AM
#11
Race Director


Member Since: Jul 2008
Location: The Sunshine State
Posts: 16,992
Received 2,671 Likes
on
1,479 Posts
2022 C5 of the Year Finalist - Modified
2021 C5 of the Year Finalist - Modified
C7 of the Year - Modified Finalist 2021
Finalist 2020 C7 of the Year -- Modified
2020 C5 of the Year Finalist - Modified
C5 of Year Finalist (appearance mods) 2019
2018 C5 of Year Finalist
I want to perform this mod, however I also plan to upgrade the fogs to HID and the parking corner lights to LED. Since I will need to raise the front end and get under the car, I also plan to install some front brake duct screens. Might as well do it all at once!

10-28-2009, 09:38 AM
#12
Race Director
Member Since: Jul 2008
Location: The Sunshine State
Posts: 16,992
Received 2,671 Likes
on
1,479 Posts
2022 C5 of the Year Finalist - Modified
2021 C5 of the Year Finalist - Modified
C7 of the Year - Modified Finalist 2021
Finalist 2020 C7 of the Year -- Modified
2020 C5 of the Year Finalist - Modified
C5 of Year Finalist (appearance mods) 2019
2018 C5 of Year Finalist
10-28-2009, 09:51 AM
#13
Banned Scam/Spammer

Member Since: Feb 2007
Location: Oklahoma City
Posts: 50,094
Received 265 Likes
on
253 Posts
St. Jude Donor '09-'10-'11-'12-'13-'14-'15-'16-'17,'19,'22
 Yep... Worst part of the swap was getting those damn things in and out! Funny... I removed them completely because I couldn't see how you could possibly install new housings w/o scratching them up with the brake cust merely "moved aside"...
 Just to Hyjack a tad but I installed clear corners w/LED strips, thought you might be interested Dee Gee;
Tim

http://forums.corvetteforum.com/c5-parts-for-sale-wanted/2449912-c5-clear-black-amber-corner-lights-led-packages.html

 10-28-2009, 10:39 AM
#15
Melting Slicks
i dont see what the big deal is with the brake ducts. i didnt even jack my car up. just drove up on a 2x4 and i had plenty of room to do the full install. i did remove the ducts though.. they come out in like 5 seconds...
10-28-2009, 12:14 PM
#17
Racer

Member Since: Sep 2009
Location: Monroe LA
Posts: 275
Likes: 0
Received 0 Likes
on
0 Posts
I found that if you pull the brake ducting off of the bumper opening itself and push it down, you have enough room to put a short 10mm socket on a u-joint with an extension and access the inner bolt that holds the parking light on from the brake duct hole.
I used the diy in the sticky section (post #3): http://forums.corvetteforum.com/c5-t...with-pics.html
From the same thread:

I used the diy in the sticky section (post #3): http://forums.corvetteforum.com/c5-t...with-pics.html
From the same thread:
10-28-2009, 12:16 PM
#18
Melting Slicks
Thread Starter
To all that posted - Thanks!!
This is what I love about owning this car -- Anything I ask about this car has been done, modified, manipulated, rebuilt, or blacked out!
I have all the info I need to do this project, ordering the lights today...I'll post pics when it's done.
Thank again!!
This is what I love about owning this car -- Anything I ask about this car has been done, modified, manipulated, rebuilt, or blacked out!
I have all the info I need to do this project, ordering the lights today...I'll post pics when it's done.
Thank again!!
10-28-2009, 01:53 PM
#19
Le Mans Master
Member Since: May 2006
Location: DuBois PA
Posts: 5,987
Likes: 0
Received 18 Likes
on
16 Posts
St. Jude Donor '11-'12-'13-'14-'15
 Took me about 10 minutes and I was cussing like a sailor...
 And I'm not kidding...
My issue was that I was afraid of scratching the new light's lenses so I removed everything I could for easy access. I was up on ramps.
Tim
10-28-2009, 02:10 PM
#20
Drifting
To all that posted - Thanks!!
This is what I love about owning this car -- Anything I ask about this car has been done, modified, manipulated, rebuilt, or blacked out!
I have all the info I need to do this project, ordering the lights today...I'll post pics when it's done.
Thank again!!
This is what I love about owning this car -- Anything I ask about this car has been done, modified, manipulated, rebuilt, or blacked out!
I have all the info I need to do this project, ordering the lights today...I'll post pics when it's done.
Thank again!!

