
Replacing bulb for the side marker light
 10-11-2009, 05:45 AM
#1
Former Vendor
Thread Starter
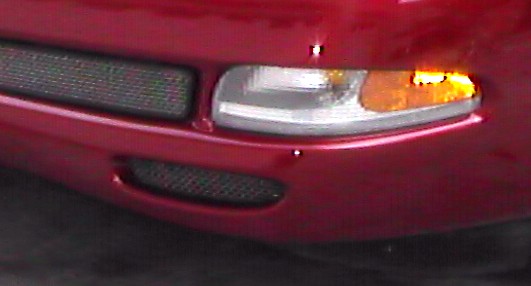
How do you replace the bulb on the red "oval" side marker light? It is probably easy, but it didn't seem obvious to me how you access this bulb. Also, what is the replacement bulb?
I'm trying to get my car to pass inspection.
Thanks
I'm trying to get my car to pass inspection.
Thanks
 10-11-2009, 09:05 AM
#2
Tech Contributor
Member Since: Dec 2003
Location: Horncastle Lincolnshire, England
Posts: 19,384
Likes: 0
Received 79 Likes
on
61 Posts
2023 C5 of the Year Finalist - Unmodified

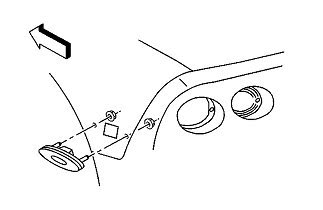
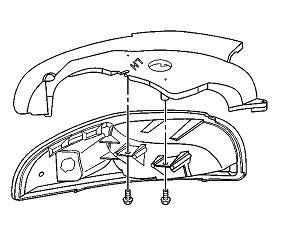
Take out the taillight nearest the marker you need to change. Reach inside and twist the lamp unit counter-clockwise. The bulb is a 194
Here's a pic that should help
Here's a pic that should help
10-11-2009, 09:32 AM
#3
Administrator


Member Since: Mar 2001
Location: In a parallel universe. Currently own 2014 Stingray Coupe.
Posts: 342,704
Received 19,226 Likes
on
13,933 Posts
C7 of the Year - Modified Finalist 2021
MO Events Coordinator
St. Jude Co-Organizer
St. Jude Donor '03-'04-'05-'06-'07-'08-'09-'10-'11-'12-'13-'14-'15-'16-'17-'18-'19-
'20-'21-'22-'23-'24
NCM Sinkhole Donor
CI 5, 8 & 11 Veteran


 with DeeGee. Not hard to do once you take the taillight out.
10-11-2009, 02:16 PM
with DeeGee. Not hard to do once you take the taillight out.
10-11-2009, 02:16 PM
#4
Former Vendor
Thread Starter
Thanks guys!
Do I need more description on the 194 bulb? Do I just walk into Auto Zone and say I need a 194 bulb and they know exactly what I need?
Greg
Do I need more description on the 194 bulb? Do I just walk into Auto Zone and say I need a 194 bulb and they know exactly what I need?
Greg


 04-15-2011, 03:04 PM
#10
Tech Contributor
Member Since: Dec 2003
Location: Horncastle Lincolnshire, England
Posts: 19,384
Likes: 0
Received 79 Likes
on
61 Posts
2023 C5 of the Year Finalist - Unmodified
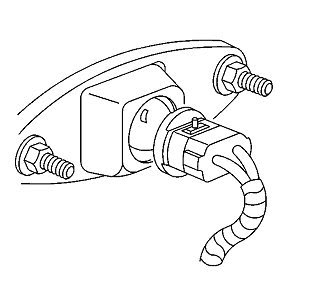
This is the procedure to change the lamp unit. Take a look at the pictures and you'll see where the sidelight bulb fits. You can go in from above or below.
Document ID# 655625
2002 Chevrolet Corvette
________________________________________
Park/Turn Signal/Side Marker Lamp Replacement
Removal Procedure

1. Raise and support the vehicle. Refer to Lifting and Jacking the Vehicle in General Information.
2. Remove the front fascia lower closeout panel.

3. Release the brake caliper cooling duct from the front fascia, and position the duct aside.
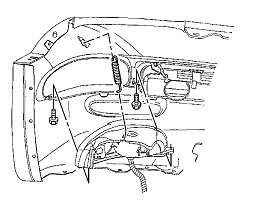
4. Remove the front turn signal lamp bracket retaining spring from the lamp bracket.
5. Remove the lamp bracket retaining spring from the front fascia.
6. Remove the front turn signal lamp bracket retaining screws.
7. Disconnect the sockets from the lamp.
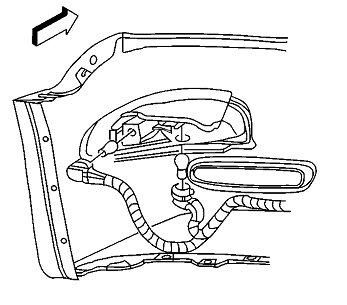
8. Remove the lamp, with the bracket, from the vehicle.
9. Remove the lamp to bracket retaining screws.
10. Remove the lamp from the bracket.
Installation Procedure
1. Install the front park/turn signal and sidemarker lamp into position on the front turn signal lamp bracket.
Notice
Use the correct fastener in the correct location. Replacement fasteners must be the correct part number for that application. Fasteners requiring replacement or fasteners requiring the use of thread locking compound or sealant are identified in the service procedure. Do not use paints, lubricants, or corrosion inhibitors on fasteners or fastener joint surfaces unless specified. These coatings affect fastener torque and joint clamping force and may damage the fastener. Use the correct tightening sequence and specifications when installing fasteners in order to avoid damage to parts and systems.
2. Install the front park/turn signal and sidemarker lamp to bracket retaining screws.
Tighten
Tighten the front park/turn signal and sidemarker lamp to bracket retaining screws to 2 N�m (18 lb in).
3. Install the sockets to the lamp.
4. Install the lamp, with the bracket, to the front fascia.
5. Align the lamp to the opening in the front fascia and hold the lamp firmly in place against the fascia, while installing the front turn signal lamp bracket retaining screws.
Tighten
Tighten the front turn signal lamp bracket retaining screws to 3 N�m (27 lb in).
6. Install the lamp bracket retaining spring to the front fascia.
7. Install the front turn signal lamp bracket retaining spring to the lamp bracket.
8. Position the brake caliper cooling duct to the front fascia and press the duct toward the fascia to secure.
9. Install the front fascia lower closeout panel. Refer to Close Out Panel - Front Bumper Fascia Lower in Bumpers.
Document ID# 655625
2002 Chevrolet Corvette
________________________________________
Park/Turn Signal/Side Marker Lamp Replacement
Removal Procedure
1. Raise and support the vehicle. Refer to Lifting and Jacking the Vehicle in General Information.
2. Remove the front fascia lower closeout panel.
3. Release the brake caliper cooling duct from the front fascia, and position the duct aside.
4. Remove the front turn signal lamp bracket retaining spring from the lamp bracket.
5. Remove the lamp bracket retaining spring from the front fascia.
6. Remove the front turn signal lamp bracket retaining screws.
7. Disconnect the sockets from the lamp.
8. Remove the lamp, with the bracket, from the vehicle.
9. Remove the lamp to bracket retaining screws.
10. Remove the lamp from the bracket.
Installation Procedure
1. Install the front park/turn signal and sidemarker lamp into position on the front turn signal lamp bracket.
Notice
Use the correct fastener in the correct location. Replacement fasteners must be the correct part number for that application. Fasteners requiring replacement or fasteners requiring the use of thread locking compound or sealant are identified in the service procedure. Do not use paints, lubricants, or corrosion inhibitors on fasteners or fastener joint surfaces unless specified. These coatings affect fastener torque and joint clamping force and may damage the fastener. Use the correct tightening sequence and specifications when installing fasteners in order to avoid damage to parts and systems.
2. Install the front park/turn signal and sidemarker lamp to bracket retaining screws.
Tighten
Tighten the front park/turn signal and sidemarker lamp to bracket retaining screws to 2 N�m (18 lb in).
3. Install the sockets to the lamp.
4. Install the lamp, with the bracket, to the front fascia.
5. Align the lamp to the opening in the front fascia and hold the lamp firmly in place against the fascia, while installing the front turn signal lamp bracket retaining screws.
Tighten
Tighten the front turn signal lamp bracket retaining screws to 3 N�m (27 lb in).
6. Install the lamp bracket retaining spring to the front fascia.
7. Install the front turn signal lamp bracket retaining spring to the lamp bracket.
8. Position the brake caliper cooling duct to the front fascia and press the duct toward the fascia to secure.
9. Install the front fascia lower closeout panel. Refer to Close Out Panel - Front Bumper Fascia Lower in Bumpers.
04-15-2011, 03:08 PM
#11
Racer

Or
http://forums.corvetteforum.com/c5-g...gnal-bulb.html
Scroll to #5
The marker light bulb is next to the turn signal bulb
http://forums.corvetteforum.com/c5-g...gnal-bulb.html
Scroll to #5
The marker light bulb is next to the turn signal bulb
04-15-2011, 04:01 PM
#12
Tech Contributor
Member Since: Dec 2003
Location: Horncastle Lincolnshire, England
Posts: 19,384
Likes: 0
Received 79 Likes
on
61 Posts
2023 C5 of the Year Finalist - Unmodified
Or
http://forums.corvetteforum.com/c5-g...gnal-bulb.html
Scroll to #5
The marker light bulb is next to the turn signal bulb
http://forums.corvetteforum.com/c5-g...gnal-bulb.html
Scroll to #5
The marker light bulb is next to the turn signal bulb
 07-13-2014, 11:56 AM
#14
4th Gear

Member Since: Dec 2010
Posts: 4
Likes: 0
Received 0 Likes
on
0 Posts
I'm trying to install a new rear side light on my 2003 Z06. I've got all the parts and have installed, in place, the rear self threading nut. I can't reach to front one to screw it down. Any help here?
07-13-2014, 12:57 PM
#15
Safety Car

Remove outer tail lights and reach in, or remove the license plate and plate holder and reach in. Deep socket also helps. Do not over tighten or you'll break the stud off.
07-13-2014, 07:04 PM
#16
4th Gear
Member Since: Dec 2010
Posts: 4
Likes: 0
Received 0 Likes
on
0 Posts
07-14-2014, 12:16 AM
#18
Instructor
Member Since: Nov 2013
Location: Lindstrom MN
Posts: 197
Likes: 0
Received 6 Likes
on
6 Posts
St. Jude Donor '15, '17
For the rear markers I reached up from under the car and changed them out. Wish I had seen this post first as I had just had the tail lights out to put new halo's in. Would have saved me some time.