
Write-Up Alert:(Madmatt) Stainless Braided Brake Line Install W/Pics
 07-28-2009, 01:13 PM
#1
Team Owner


Thread Starter

I got these from:
Mike Yeager @ Eastcoast Performance,1-864-404-1776 eastcp@bellsouth.net
They were $89.00 + shipping, they were here in no time flat.
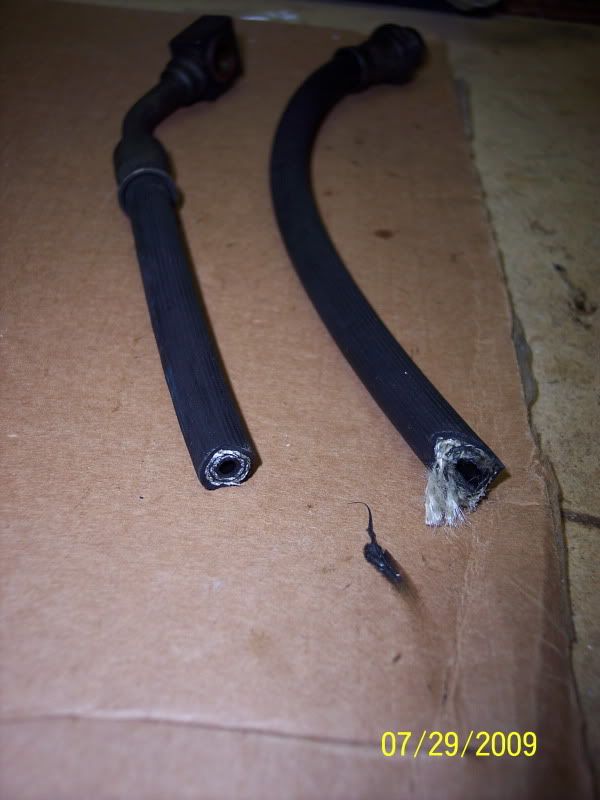
Let me begin by saying that these Brake Lines are totally "HIGH" quality from RUSSELL, the steel braid is even covered with a clear sheething. The "DO NOT" have the round ends but the have the "BLOCK" style ends that mount to the Calipers (Way better for tightening and sealing).
Okay with that said, onto the install/Write-Up-
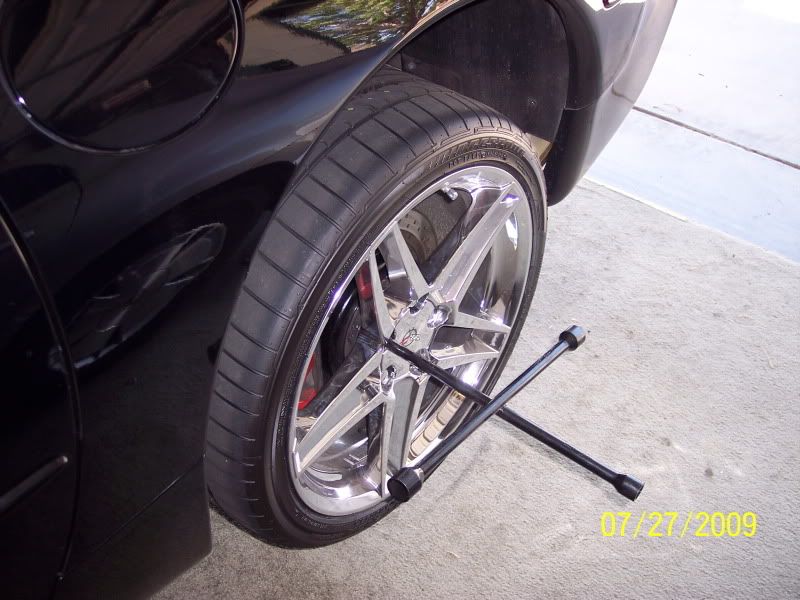
1st - start with jacking up the Vette and removing the rear wheels(You can try to do it w/out removing but I do highly recommed being able to have plenty of room to work)
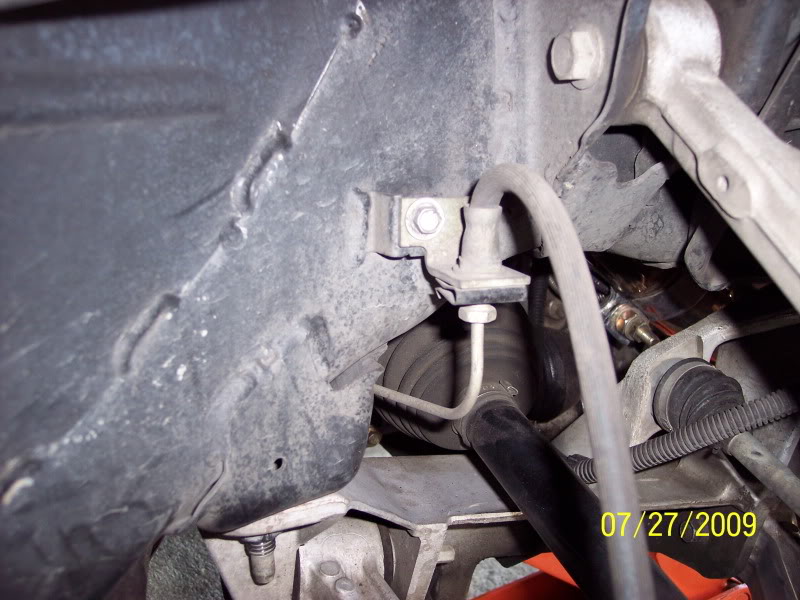
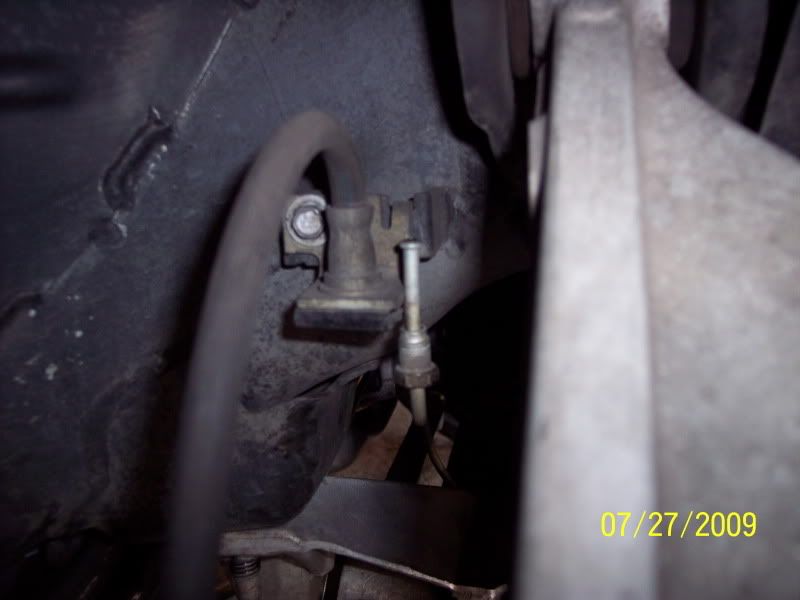
2nd - Here is the ends @ the frame, "LEAVE" the clip on till it's time to remove the RUBBER hose and install the new Brake Line
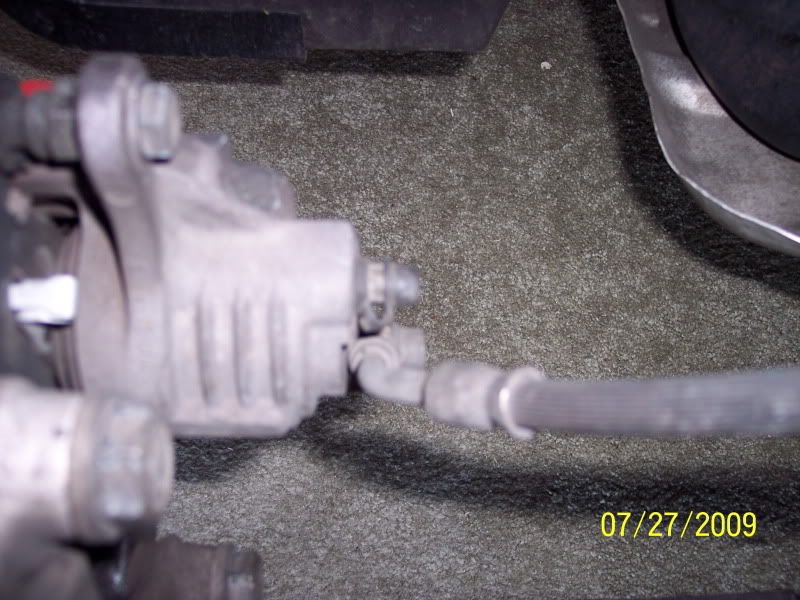
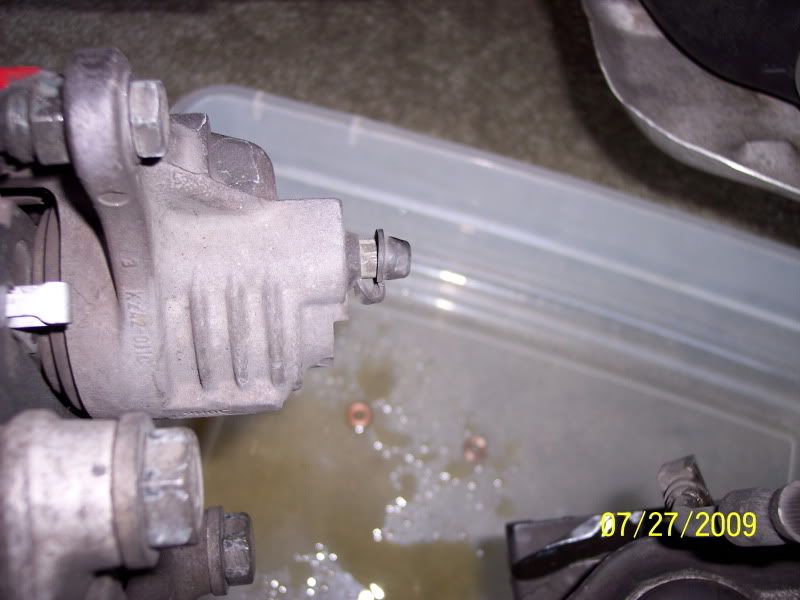
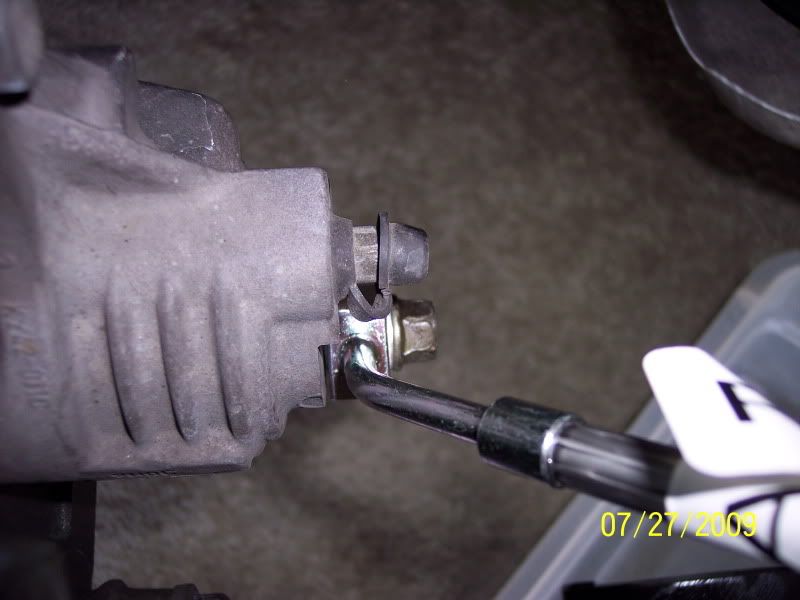
At the Caliper: Use a 13mm wrench to remove the Banjo Bolt
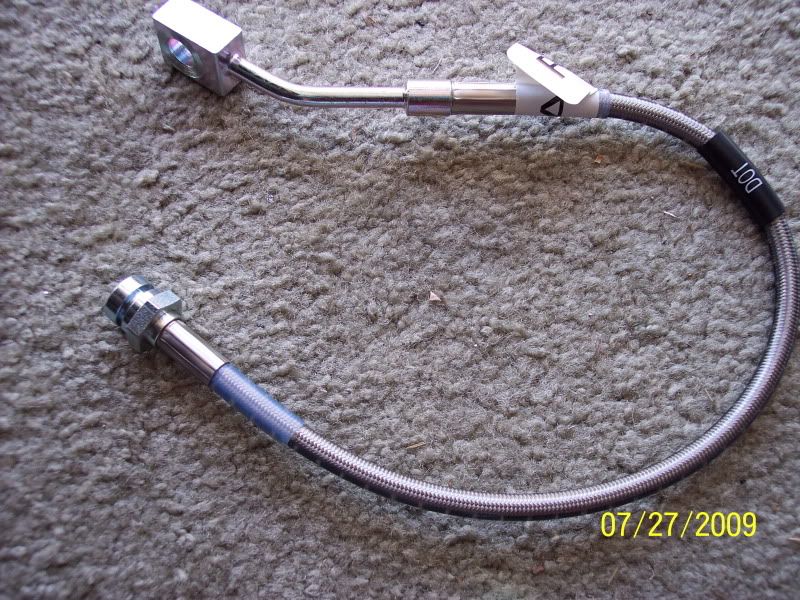
Here are the new lines from RUSSELL: You can see that they are very high qaulity

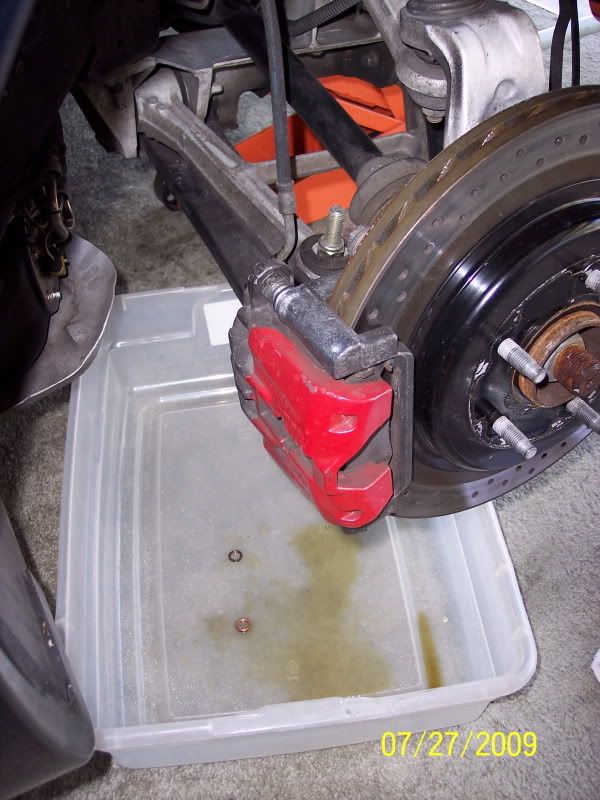
3rd - Remove the hose from the back of the caliper (Make sure you use a drop pan to catch the old fluid, as you can see I like to make sure I have a good area covered)
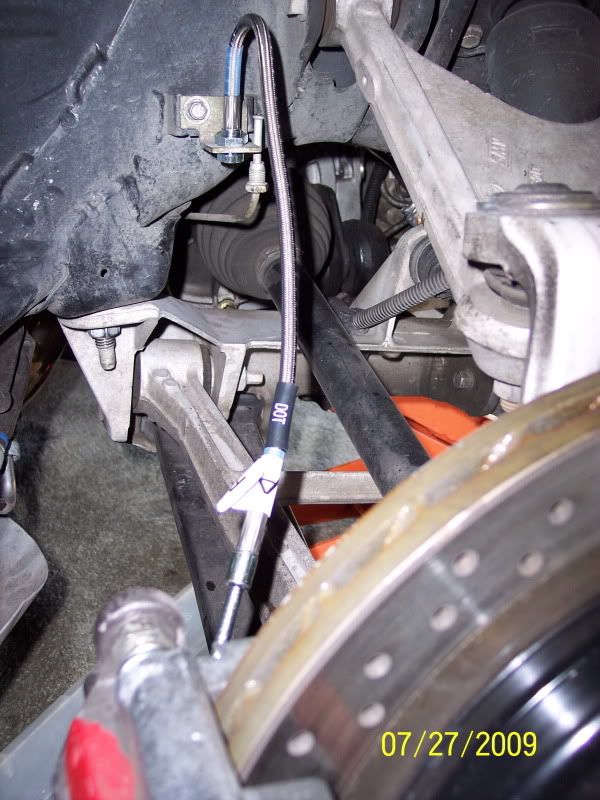
4th - now remove it at the Brake line/Rubber Hose connection @ frame rail: 13mm wrench here too-
As you can see the fluid will drip but that's okay, you will not loose as much fluid as you will flush through when you bleed the brake lines.
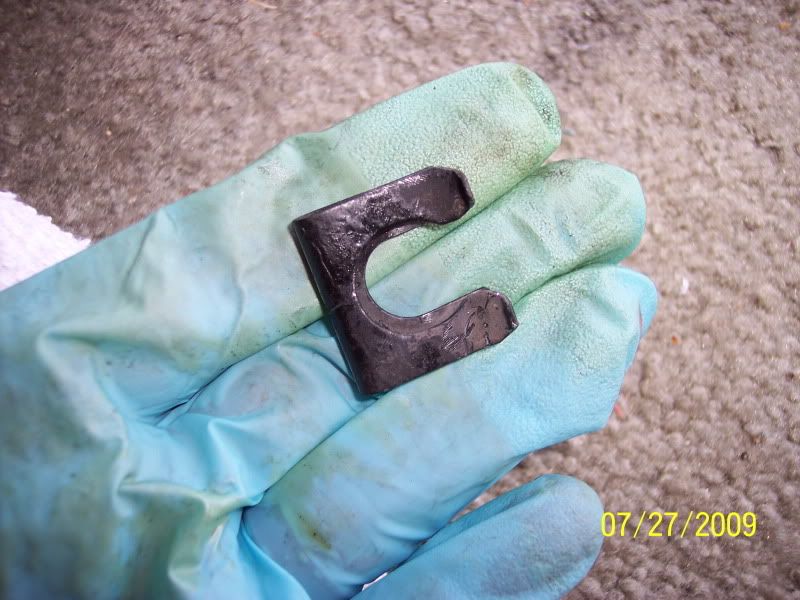
5th - remove the clip, either with a screw driver or needle nose
6th - make sure you wipe off the Banjo Bolt before the re-install and make "SURE" that all the OLD copper washers are removed so you can install the "NEW" ones from RUSSELL - "DO NOT, I repeat, DO NOT" Re-Use the OLD Copper Washers, drop them in the catch tray and make sure they are both there (Some will stick to the block, but just make sure you have two (2) for each line)
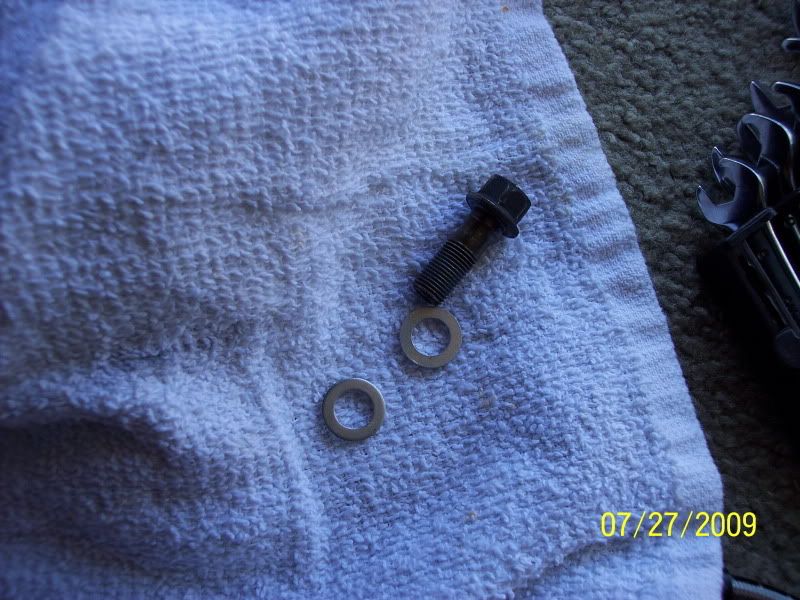
7th - Install new washer on Banjo Bolt, slide into Block and put other washer between the Block and Caliper and tighten to 16-20 lbs Ft (Per factory specs)
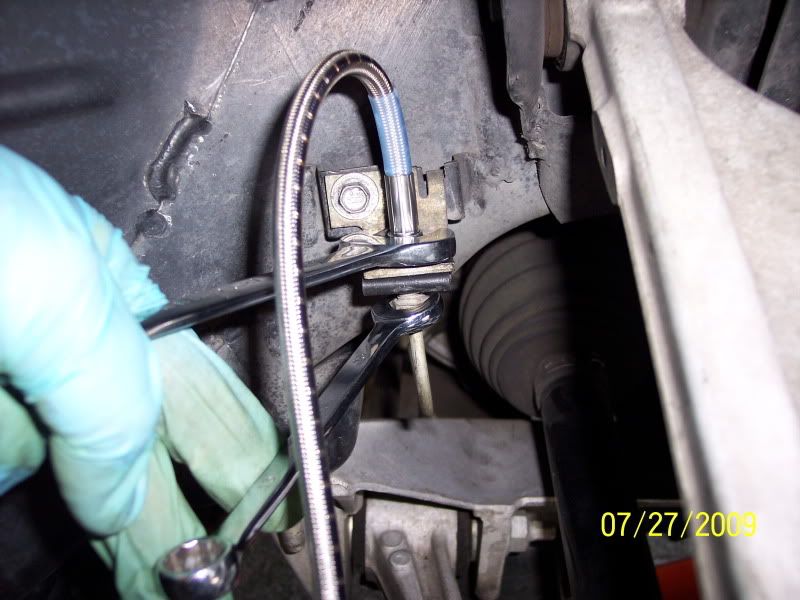
8th - Now back at the connection to the factory line, re-install the same way it came out and slid clip forward, you "WILL" need to take a small blunt tool (I used a small hammer) to tap on the clip so it seats and snaps in place)
9th - Take a 18mm wrench and a 13mm wrench and tighten the two together (As seen in pic) - now it's done and ready to be bleed!
CONTINUED BELOW
Mike Yeager @ Eastcoast Performance,1-864-404-1776 eastcp@bellsouth.net
They were $89.00 + shipping, they were here in no time flat.
Let me begin by saying that these Brake Lines are totally "HIGH" quality from RUSSELL, the steel braid is even covered with a clear sheething. The "DO NOT" have the round ends but the have the "BLOCK" style ends that mount to the Calipers (Way better for tightening and sealing).
Okay with that said, onto the install/Write-Up-
1st - start with jacking up the Vette and removing the rear wheels(You can try to do it w/out removing but I do highly recommed being able to have plenty of room to work)
2nd - Here is the ends @ the frame, "LEAVE" the clip on till it's time to remove the RUBBER hose and install the new Brake Line
At the Caliper: Use a 13mm wrench to remove the Banjo Bolt
Here are the new lines from RUSSELL: You can see that they are very high qaulity
3rd - Remove the hose from the back of the caliper (Make sure you use a drop pan to catch the old fluid, as you can see I like to make sure I have a good area covered)
4th - now remove it at the Brake line/Rubber Hose connection @ frame rail: 13mm wrench here too-
As you can see the fluid will drip but that's okay, you will not loose as much fluid as you will flush through when you bleed the brake lines.
5th - remove the clip, either with a screw driver or needle nose
6th - make sure you wipe off the Banjo Bolt before the re-install and make "SURE" that all the OLD copper washers are removed so you can install the "NEW" ones from RUSSELL - "DO NOT, I repeat, DO NOT" Re-Use the OLD Copper Washers, drop them in the catch tray and make sure they are both there (Some will stick to the block, but just make sure you have two (2) for each line)
7th - Install new washer on Banjo Bolt, slide into Block and put other washer between the Block and Caliper and tighten to 16-20 lbs Ft (Per factory specs)
8th - Now back at the connection to the factory line, re-install the same way it came out and slid clip forward, you "WILL" need to take a small blunt tool (I used a small hammer) to tap on the clip so it seats and snaps in place)
9th - Take a 18mm wrench and a 13mm wrench and tighten the two together (As seen in pic) - now it's done and ready to be bleed!
CONTINUED BELOW
Last edited by madmatt9471; 07-28-2009 at 01:52 PM.
 07-28-2009, 01:14 PM
#2
Team Owner
Thread Starter
10th - Here is where I decided to bleed each caliper once I was done, now you can choose to do them all at once "AFTER" you install all 4 corners, but again I decide to finish one corner then move onto the next.
I borrowed a "ONE" man Brake Bleeding System from my buddy Joe, he got this @ Mid America and man does it work and work GOOD! (It works just like a garden Hudson Sprayer)
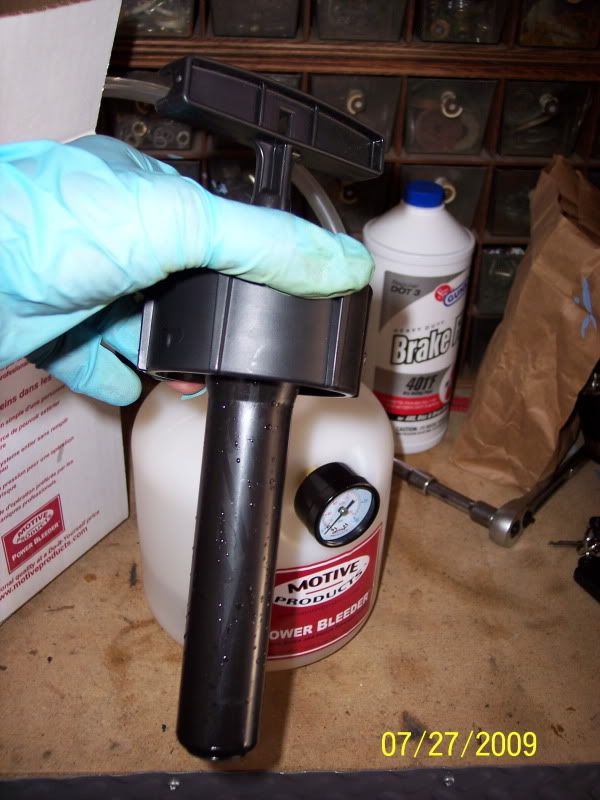
11th - Fill the Bottle with Brake Fluid (Factory recommended) I put in 32 oz's of fluid just to be sure!
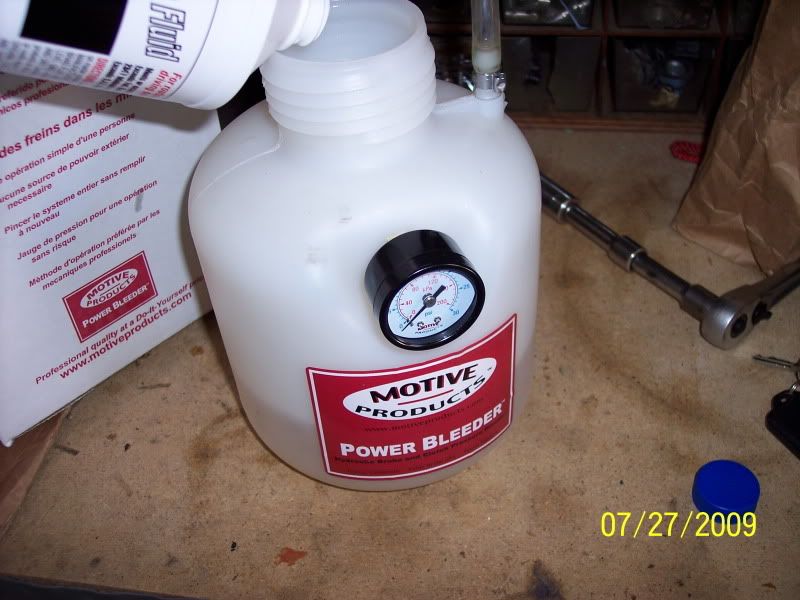
12th - Now as you can see it has a cap with a heavy rubber washer inside to make the seal, You pump air into the bottle and it sends/Pushes/Forces it through the tube into the Master Cylinder and into the Brake System and out the Bleeder Screws @ the Calipers:
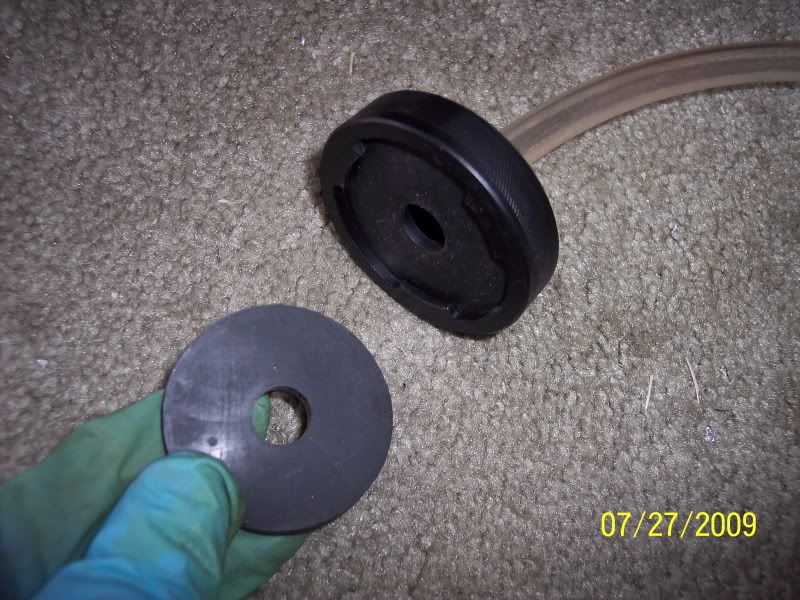
13th - Unscrew the factory MC Cap and screw on the Pump System:
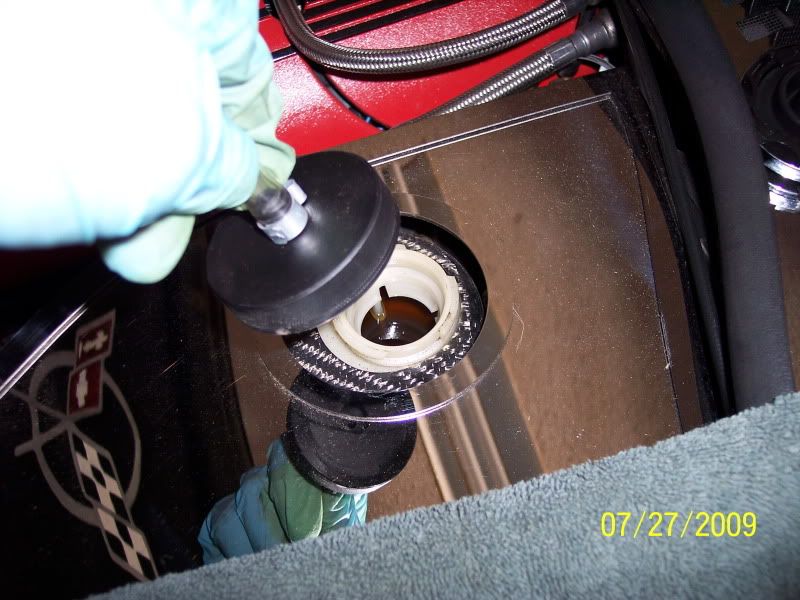
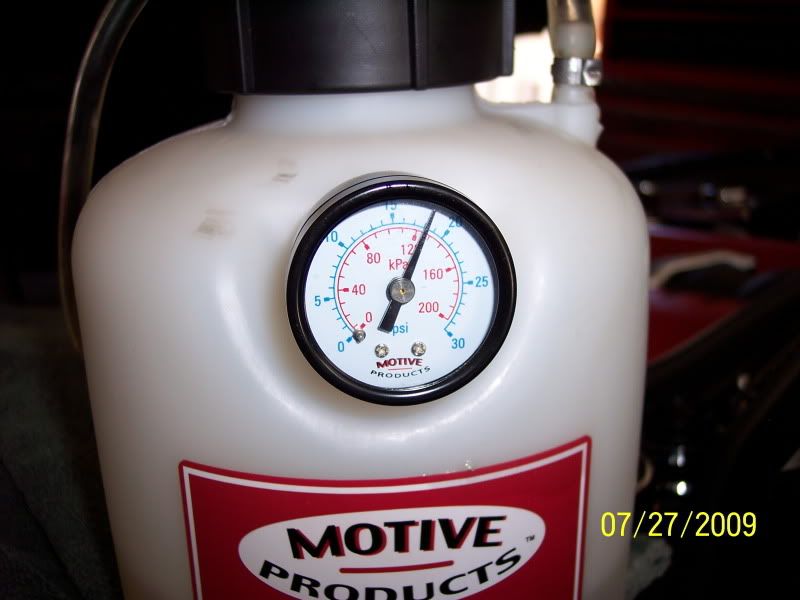
14th - Pump it up (It is recommended that you "DO NOT" pressurize over 20 PSI) so don't do it:
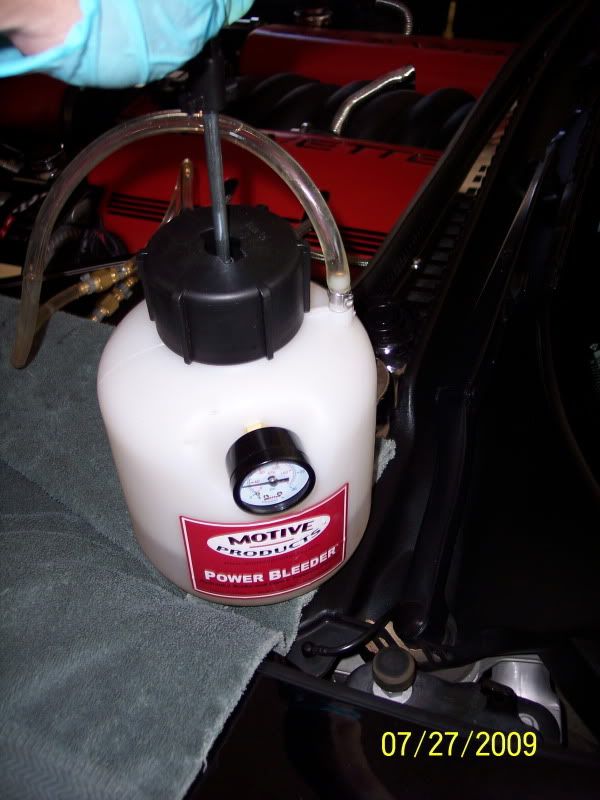
Make sure it's holding pressure:
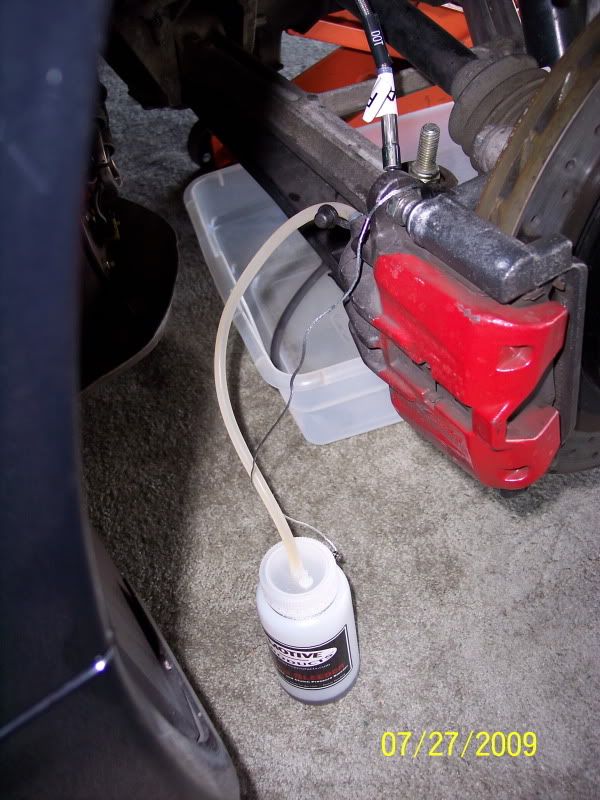
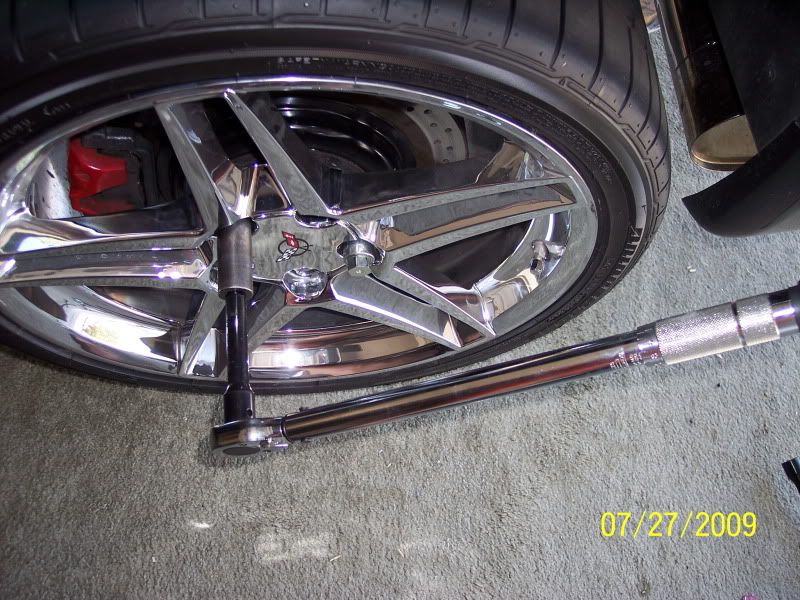
15th - Now go to the rear and attatch the Drain Bottle to the Caliper Bleeding screw (it simply pushes over the NIPPLE TIP, not the Hex Nut part)


16th - Now take a 10mm wrench and loosen the nut of the Bleeder Screw and allow it to drain, you will see the air bubbles and more likely than not discolored fluid. ALLOW the fluid to continue to drain/push through till NO MORE Bubbles and you see nice clear/clean fluid in the drain tube:
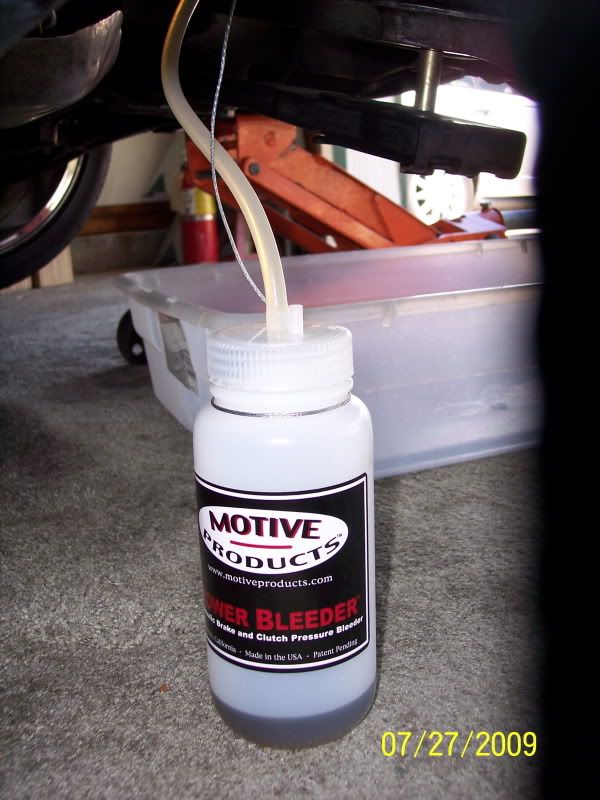
You can see the clear fluid in the tube and the dirty/discolored in the draid bottle:
17th - MOST IMPORTANT STEP - Now "CLOSE" the BLEEDER SCREW and remove the drain bottle line and set aside.
18th - 2nd MOST IMPORTANT STEP - Since I decided to do one at a time, I now "NEED" to DE-PRESSURIZE the brake system.
Do this "BY" loosening the top of the "PUMP" BOTTLE - NOT! NOT! NOT! the one on the Master Cylinder or you will have a huge mess to clean up. You will see it go down and fluid will go back into the bottle.
19th - Now you are all done so make sure you go back and put your wheel back on and tighten the Lug Nuts with a Torque wrench to factory specs - 100 lb Ft per nut!
This is a pic of the Rubber Line Carnage and fluid that comes out of the calipers and lines (Not much fluid in the pan) - I pushed through 3/4 of the new fluid or 24 oz as I flushed the system out the Calipers.

So like I said you will "USE" more fluid than you initially "LOOSE"!
Now you can go to each wheel and repeat the steps or do them all at once, if you do them all at once!
I recommend that you put the Vette on 4 jack stands and remove all 4 wheels and then do the job!
YES! I test drove the Vette after that an like everyone says "A WAY BETTER and FIRMER Brake Pedal and Braking feel!"
A big thanks to Mike Yeager for supplying us with a qaulity piece for our Vettes and my buddy Joe for the use of his One man Brake Bleeding System
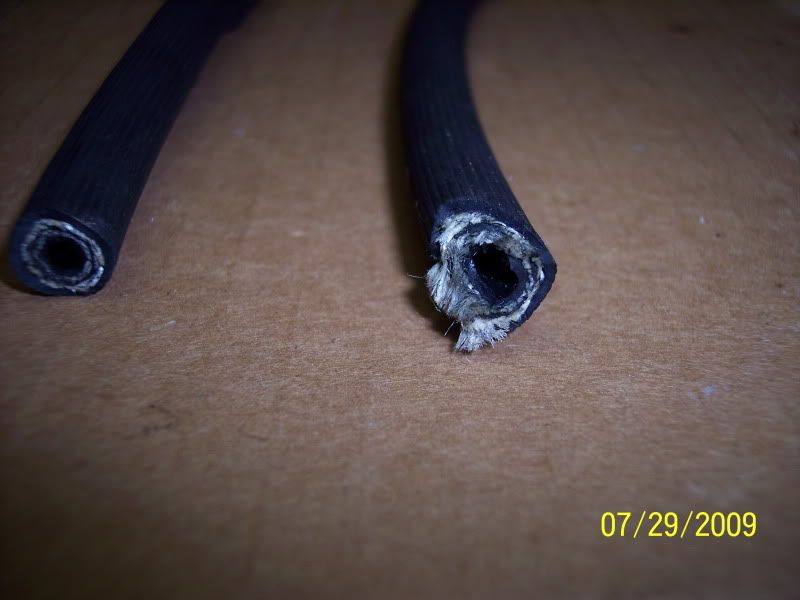
ADDED: Contrary to a Popular/Common mis-information and thought the "STOCK" GM Brake "HOSES" are "NOT" Braided Steel inside - so if anyone says they are then here is the proof: as far as I can tell it is RUBBER at the center, it is soft and squishy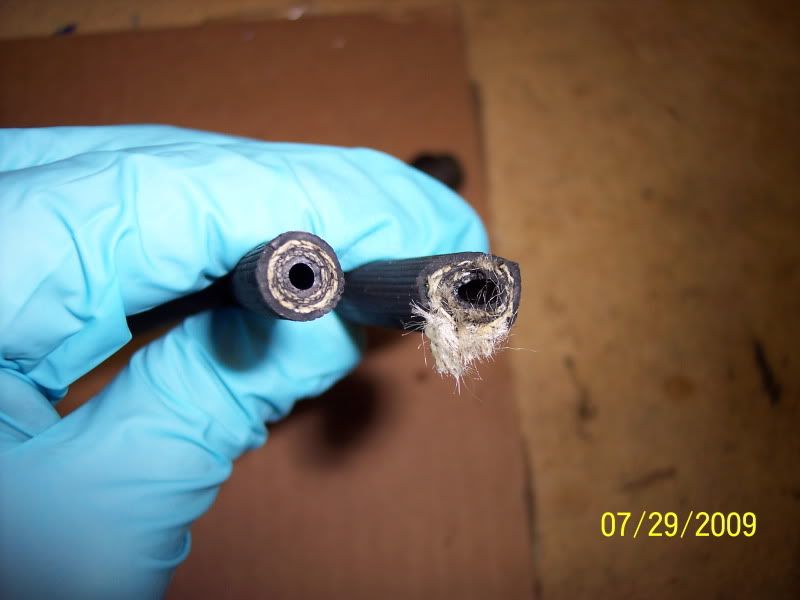
Thanks,Matt
I borrowed a "ONE" man Brake Bleeding System from my buddy Joe, he got this @ Mid America and man does it work and work GOOD! (It works just like a garden Hudson Sprayer)
11th - Fill the Bottle with Brake Fluid (Factory recommended) I put in 32 oz's of fluid just to be sure!
12th - Now as you can see it has a cap with a heavy rubber washer inside to make the seal, You pump air into the bottle and it sends/Pushes/Forces it through the tube into the Master Cylinder and into the Brake System and out the Bleeder Screws @ the Calipers:
13th - Unscrew the factory MC Cap and screw on the Pump System:
14th - Pump it up (It is recommended that you "DO NOT" pressurize over 20 PSI) so don't do it:
Make sure it's holding pressure:
15th - Now go to the rear and attatch the Drain Bottle to the Caliper Bleeding screw (it simply pushes over the NIPPLE TIP, not the Hex Nut part)
16th - Now take a 10mm wrench and loosen the nut of the Bleeder Screw and allow it to drain, you will see the air bubbles and more likely than not discolored fluid. ALLOW the fluid to continue to drain/push through till NO MORE Bubbles and you see nice clear/clean fluid in the drain tube:
You can see the clear fluid in the tube and the dirty/discolored in the draid bottle:
17th - MOST IMPORTANT STEP - Now "CLOSE" the BLEEDER SCREW and remove the drain bottle line and set aside.
18th - 2nd MOST IMPORTANT STEP - Since I decided to do one at a time, I now "NEED" to DE-PRESSURIZE the brake system.
Do this "BY" loosening the top of the "PUMP" BOTTLE - NOT! NOT! NOT! the one on the Master Cylinder or you will have a huge mess to clean up. You will see it go down and fluid will go back into the bottle.
19th - Now you are all done so make sure you go back and put your wheel back on and tighten the Lug Nuts with a Torque wrench to factory specs - 100 lb Ft per nut!
This is a pic of the Rubber Line Carnage and fluid that comes out of the calipers and lines (Not much fluid in the pan) - I pushed through 3/4 of the new fluid or 24 oz as I flushed the system out the Calipers.
So like I said you will "USE" more fluid than you initially "LOOSE"!
Now you can go to each wheel and repeat the steps or do them all at once, if you do them all at once!
I recommend that you put the Vette on 4 jack stands and remove all 4 wheels and then do the job!
YES! I test drove the Vette after that an like everyone says "A WAY BETTER and FIRMER Brake Pedal and Braking feel!"
A big thanks to Mike Yeager for supplying us with a qaulity piece for our Vettes and my buddy Joe for the use of his One man Brake Bleeding System
ADDED: Contrary to a Popular/Common mis-information and thought the "STOCK" GM Brake "HOSES" are "NOT" Braided Steel inside - so if anyone says they are then here is the proof: as far as I can tell it is RUBBER at the center, it is soft and squishy
Thanks,Matt
Last edited by madmatt9471; 07-29-2009 at 09:30 PM.
07-28-2009, 01:28 PM
#3
Burning Brakes

Wow, great write-up! Nice job documenting every step.
Question tho - I've heard on this forum about the ABS pump being a factor when bleeding. Do the brakes feel 100% after this process?

Question tho - I've heard on this forum about the ABS pump being a factor when bleeding. Do the brakes feel 100% after this process?
07-28-2009, 01:32 PM
#4
Team Owner
Thread Starter
Now as far as bleeding the system you do not need to worry, there is no air in it and it will not harm the ABS it simply pushes fluid through while it sits dormat - pretty much like sitting in your Vette and pushing the brake pedal and releasing it - it clamps the calipers and does not harm the ABS
Thanks,matt
 07-28-2009, 01:58 PM
#6
Team Owner
Thread Starter
I have the C6 Z51 Rear Rotors and Brackets and they made a huge difference on the Vette.
I've thought about getting the ones for the front too, but I need to finish a couple other things and then I'll get them too
Thanks,Matt
 07-28-2009, 09:52 PM
#8
Team Owner
Member Since: Mar 2004
Location: Oklahoma City OK
Posts: 58,263
Received 1,677 Likes
on
1,300 Posts
C6 of Year Finalist (appearance mods) 2019

Nice project and write up!
 07-28-2009, 10:46 PM
#10
Administrator


Member Since: Mar 2001
Location: In a parallel universe. Currently own 2014 Stingray Coupe.
Posts: 343,250
Received 19,367 Likes
on
14,016 Posts
C7 of the Year - Modified Finalist 2021
MO Events Coordinator
St. Jude Co-Organizer
St. Jude Donor '03-'04-'05-'06-'07-'08-'09-'10-'11-'12-'13-'14-'15-'16-'17-'18-'19-
'20-'21-'22-'23-'24
NCM Sinkhole Donor
CI 5, 8 & 11 Veteran

Great write-up and thanks for the pics too.
07-29-2009, 06:55 AM
#11
Team Owner
Thread Starter
Thanks fella's!
I'm beggining to think I like doing Write-Ups and working on my Vette


Thanks,Matt
I'm beggining to think I like doing Write-Ups and working on my Vette
Thanks,Matt
07-29-2009, 01:45 PM
#14
Team Owner
Thread Starter
Thanks a lot fella's for the kind words, for me it's just wanting to help others who may have any questions on "ANY" install that I might have done myself
It's also giving accolades to Vendors who go the extra mile for us! Like Mike@ EastCoast did for me for the lines (I still wish I could of got some better clamps from LG for the Big 3 3" Mufflers )
)
I'll make as many Write-Ups as I can and w/pics too
Thanks,Matt
It's also giving accolades to Vendors who go the extra mile for us! Like Mike@ EastCoast did for me for the lines (I still wish I could of got some better clamps from LG for the Big 3 3" Mufflers
)I'll make as many Write-Ups as I can and w/pics too
Thanks,Matt
The following users liked this post:
Forzaman (01-19-2022)
 07-29-2009, 04:19 PM
#17
Safety Car

Curious, have you had any TCS codes pop up? Seems like some people have TCS issues with Russell.
Nice write up
Nice write up
07-29-2009, 04:34 PM
#18
Team Owner
Thread Starter
let us know how it goes
Thanks buddy!
Plus it is kinda baffleing why a code would come up if you BLEED the system correctly, because all they are is an extension of the lines!
Perhaps they were not BLEED right and there is still air in the system for the fella's that get the codes!
The "ONLY" TCS codes I get are the ones that say "Your Back Wheels are Spinning Faster Than the Fronts"
Thanks,Matt

