
deck lid insert
 04-06-2009, 04:55 PM
#1
5th Gear

Thread Starter
Member Since: Apr 2009
Location: Greeneville Tenn
Posts: 5
Likes: 0
Received 0 Likes
on
0 Posts
I'm having trouble keeping my 50th logo deck lid insert stuck.
I have tried velcro,rtv silicon sealer, hot glue.
I don't want to drill holes in the deck lid for screws.
Any ideas?
I have tried velcro,rtv silicon sealer, hot glue.
I don't want to drill holes in the deck lid for screws.
Any ideas?

 04-06-2009, 05:04 PM
#3
Pro

Member Since: Mar 2006
Location: Spring Hill Florida
Posts: 700
Likes: 0
Received 2 Likes
on
2 Posts

My problem seemed not that the velcro parted but it wouldn't stay stuck to the lid or the liner.
I finally got fed up with the same crap and took the lid OFF the car. Four bolts and unsnap the "pistons" and it comes right off. Be sure and "scribe" the position prior to taking it off. Layed it on several towels and took all glue, velcro, etc. off with paint thinner and some sandpaper. Got industrial 3M velcro (really heavy loops) and put it on with Gorilla Glue. Positioned several bricks on the velcro and left it sit overnight. Same for the carpeted liner. Made sure the two velcros lined up and while the lid was on the ground took a hammer and made sure the two velcros mated. Put the lid back on the car and have not had a problem since. That was over a year ago. The Gorilla people warn you about "foaming". It does foam like epoxy but when it is hidden, who cares?
I finally got fed up with the same crap and took the lid OFF the car. Four bolts and unsnap the "pistons" and it comes right off. Be sure and "scribe" the position prior to taking it off. Layed it on several towels and took all glue, velcro, etc. off with paint thinner and some sandpaper. Got industrial 3M velcro (really heavy loops) and put it on with Gorilla Glue. Positioned several bricks on the velcro and left it sit overnight. Same for the carpeted liner. Made sure the two velcros lined up and while the lid was on the ground took a hammer and made sure the two velcros mated. Put the lid back on the car and have not had a problem since. That was over a year ago. The Gorilla people warn you about "foaming". It does foam like epoxy but when it is hidden, who cares?
04-06-2009, 07:48 PM
#4

I bought a roll of 2 inch wide velcro at Lowes that was advertised as "Industrial Strength" for about $10 ( 2inches x 4 ft). I cleaned the inside surface of the deck with GOO GONE and then alcohol. I cut a strip the full 2" wide by the length of the raised reinforcement area on the deck. With both pieces of velcro in contact with one another, I pealed the paper off the toothed side of the velcro and carefully stuck the toothed side to the raised rib. I did this to both raised ribs using almost the entire 4ft of velcro. I carefully cleaned the back side of the insert to be stuck on. I pealed the paper off the smooth side of the velcro and then had a friend help me align where I wanted the insert to be on the deck. We pressed it against the stickey back of the velcro and kept pressing where the deck rib would be until I was satisfied the bonding was complete. That was 3 plus months ago and it is still stuck firmly. I slam the trunk closed regularly and the insert still stays stuck.
 04-07-2009, 01:31 AM
#7
Tech Contributor
Member Since: Dec 2003
Location: Horncastle Lincolnshire, England
Posts: 19,384
Likes: 0
Received 79 Likes
on
61 Posts
2023 C5 of the Year Finalist - Unmodified

Afraid I can't help in that I had the same problem as you and tried everything. The problem was the weight of the board and I needed board to make it rigid enough. I'm afraid the only thing that worked was some push studs but I had to drill 4 holes. You can see what I did at the end of this How To:
DIY Trunk Lid Liner.
I'd been seeing the trunk lid liners on some of the members Vettes but being a good Yorkshireman, the $150 price tag seemed a bit steep. I had a bit of a DIY morning and made one up myself
Parts:
A sheet of pegboard - Home Depot $3
A roll of black car carpet from Walmart - $8
Spray Glue - Lowes $4
Fastners � Autozone $4
Tools:
Steel ruler
Staple gun and staples
Drill, sanding disk and cutting disk
Sanding block and sandpaper
Measuring tape
I made a template from some wrapping paper and transferred it to cardboard. I then used the template to cut the pegboard shaping the edges to make it fit the space using a rotary cutting disc. You should trim enough to give a small gap to allow for the thickness of the carpet. Glue the carpet to the pegboard leaving a 2" strip. Fold that over the edges and staple around the edge after priming with the spray on glue. You may wish to fix velcro to the V Channels on the inside of the trunk lid. This will not hold the weight and the studs are essential. It may hold the liner in place a little better but add to the cost.
Mark positions for the studs carefully. Drill holes through the liner into the V Frame. The stud pushes through and fits tightly into the frame behind. There are 2 studs at the top and 2 at the bottom.
Most Important: Be very careful not to press too hard and drill through the trunk lid
The finished item:
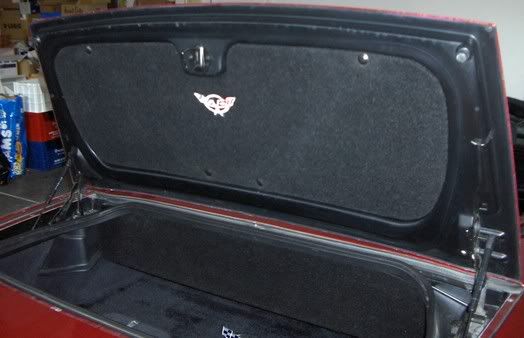
The logo was embroidered by my wife. You could buy the commercial GM logo but that would add to the cost.
An enhancement may be to fit some foam blocks at the lower outer corners. This would prevent some minor flexing.
DIY Trunk Lid Liner.
I'd been seeing the trunk lid liners on some of the members Vettes but being a good Yorkshireman, the $150 price tag seemed a bit steep. I had a bit of a DIY morning and made one up myself
Parts:
A sheet of pegboard - Home Depot $3
A roll of black car carpet from Walmart - $8
Spray Glue - Lowes $4
Fastners � Autozone $4
Tools:
Steel ruler
Staple gun and staples
Drill, sanding disk and cutting disk
Sanding block and sandpaper
Measuring tape
I made a template from some wrapping paper and transferred it to cardboard. I then used the template to cut the pegboard shaping the edges to make it fit the space using a rotary cutting disc. You should trim enough to give a small gap to allow for the thickness of the carpet. Glue the carpet to the pegboard leaving a 2" strip. Fold that over the edges and staple around the edge after priming with the spray on glue. You may wish to fix velcro to the V Channels on the inside of the trunk lid. This will not hold the weight and the studs are essential. It may hold the liner in place a little better but add to the cost.
Mark positions for the studs carefully. Drill holes through the liner into the V Frame. The stud pushes through and fits tightly into the frame behind. There are 2 studs at the top and 2 at the bottom.
Most Important: Be very careful not to press too hard and drill through the trunk lid
The finished item:
The logo was embroidered by my wife. You could buy the commercial GM logo but that would add to the cost.
An enhancement may be to fit some foam blocks at the lower outer corners. This would prevent some minor flexing.
04-07-2009, 03:51 AM
#8
Drifting

Oh , you mean having problems with the trunk liner staying in place.
I've done something similiar to DeeGee's but the retainers are hidden like your door panels.
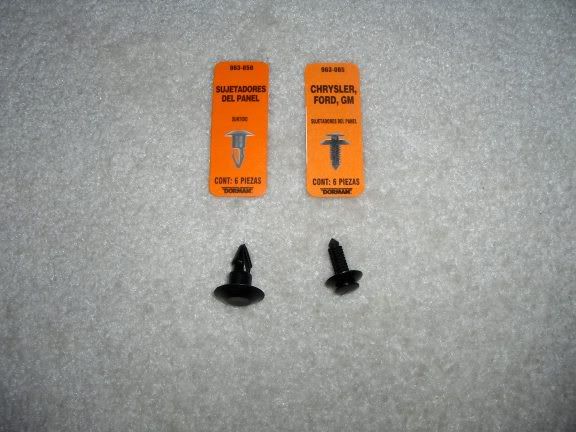
I use 5/32" mason board and GM panel retainers [IMG]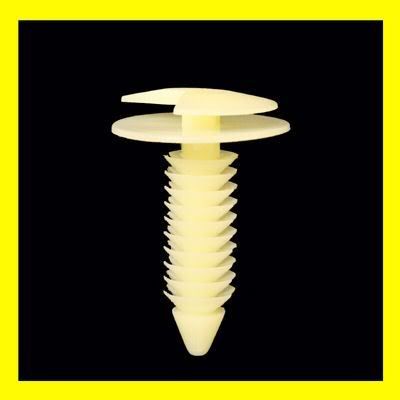 [/IMG]
Installation is simple. Just cut the panel to fit. Drill .125 dia holes thru the board and into the trunk lid braces. Then simply upholster the panel , twist in the retainers from the unexposed side and press into place.
But you have a finished panel, so use any of the 3M body panel acrylic foam double sided tapes and the applicable 3M surface adhesion promoter and it won't come off.
I've done something similiar to DeeGee's but the retainers are hidden like your door panels.
I use 5/32" mason board and GM panel retainers [IMG]
[/IMG]Installation is simple. Just cut the panel to fit. Drill .125 dia holes thru the board and into the trunk lid braces. Then simply upholster the panel , twist in the retainers from the unexposed side and press into place.
But you have a finished panel, so use any of the 3M body panel acrylic foam double sided tapes and the applicable 3M surface adhesion promoter and it won't come off.

 04-07-2009, 12:03 PM
#10
Administrator


Member Since: Mar 2001
Location: In a parallel universe. Currently own 2014 Stingray Coupe.
Posts: 343,294
Received 19,390 Likes
on
14,024 Posts
C7 of the Year - Modified Finalist 2021
MO Events Coordinator
St. Jude Co-Organizer
St. Jude Donor '03-'04-'05-'06-'07-'08-'09-'10-'11-'12-'13-'14-'15-'16-'17-'18-'19-
'20-'21-'22-'23-'24
NCM Sinkhole Donor
CI 5, 8 & 11 Veteran


Good solution mentioned by DeeGee. Would look like a factory-installed piece.

