
ACA HID Install - Lotsa Pics
 03-27-2008, 01:35 PM
#61
Le Mans Master


From my research on HIDs:
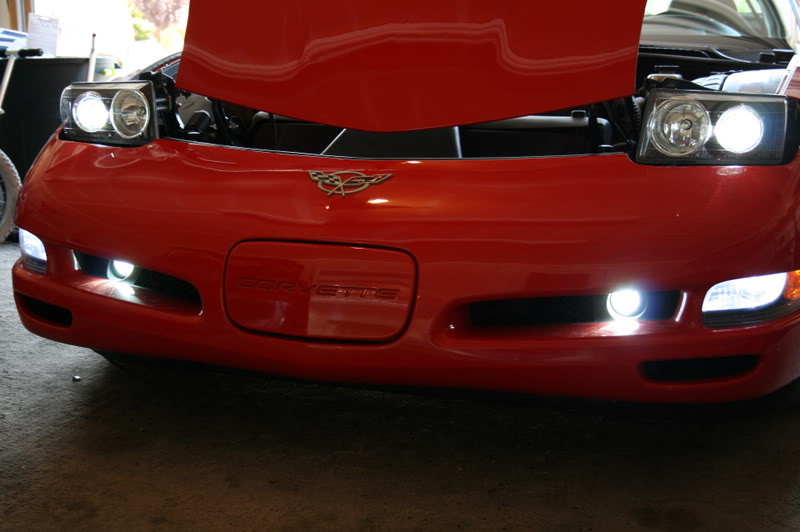
6000K is pure white, and only 300 lumens less than the 4300K. 4300K is the brightest, but has a slight yellow tint, same as stock halogens(but still almost 3 times brighter). Anything above 6000K looks blue, and the higher you go in the Kelvin scale, the more it will start to give off a purple light.


6000K is pure white, and only 300 lumens less than the 4300K. 4300K is the brightest, but has a slight yellow tint, same as stock halogens(but still almost 3 times brighter). Anything above 6000K looks blue, and the higher you go in the Kelvin scale, the more it will start to give off a purple light.
after driving with the 4300k HID's, I will never go back to 6000k bulbs again.
 03-27-2008, 07:20 PM
#62
Safety Car

Member Since: Jul 2007
Location: Louisville Kentucky
Posts: 4,333
Likes: 0
Received 6 Likes
on
4 Posts


4300K is the best for prolonged night driving. 5000-6000K tend to cause glare on white, gray surfaces (even with projectors). Concrete roads are a pain but asphalt is awesome. I don't even use my headlights unless on a poorly lit road. My 6000K HID fogs throw out enough light.
Mine too!
03-27-2008, 10:20 PM
#63
Night Owl for life

Member Since: Nov 2003
Location: Bugs Bunny should'a made a left turn here
Posts: 23,217
Received 3,256 Likes
on
1,675 Posts

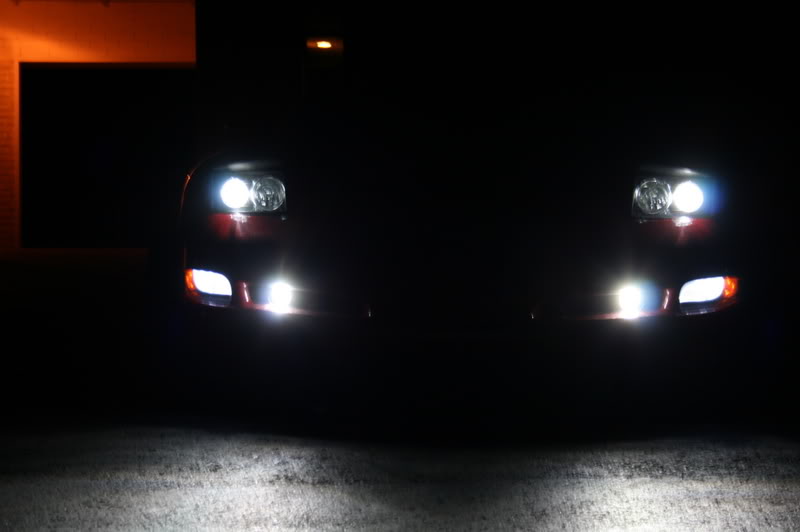
these are some comparison shots of the 4300k bulbs that come with the kits and some 6000k bulbs that i replaced mine with.
these photos show 4300k lows with 6000k fogs.


this photo shows the same thing above with closer detail.
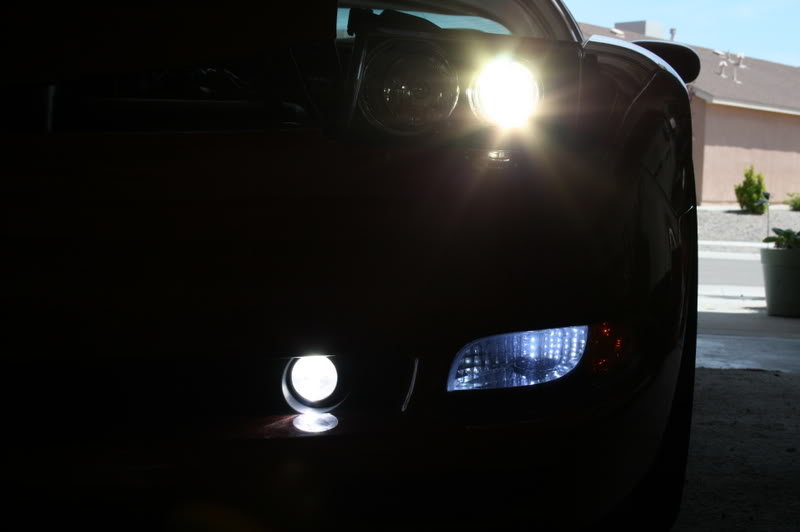
this photo shows the 6000k bulb with the 6000k fogs.
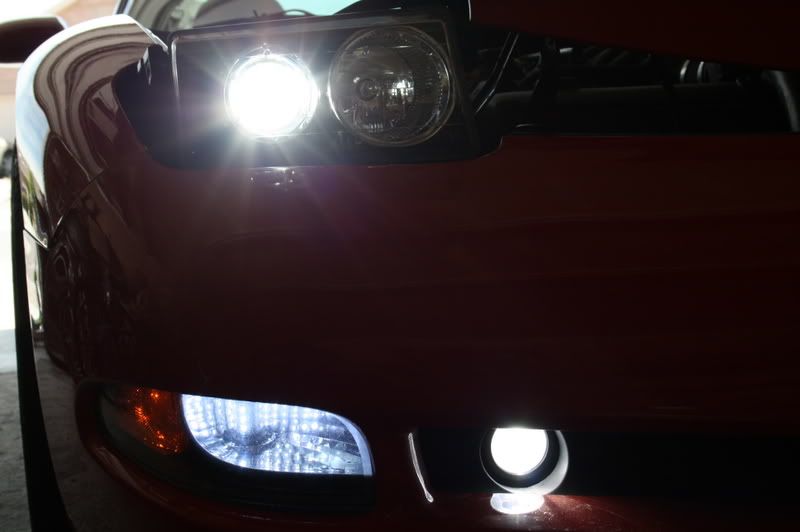
this next photo shows both 4300k & 6000k.
closeup of 4300k.
closeup of 6000k.
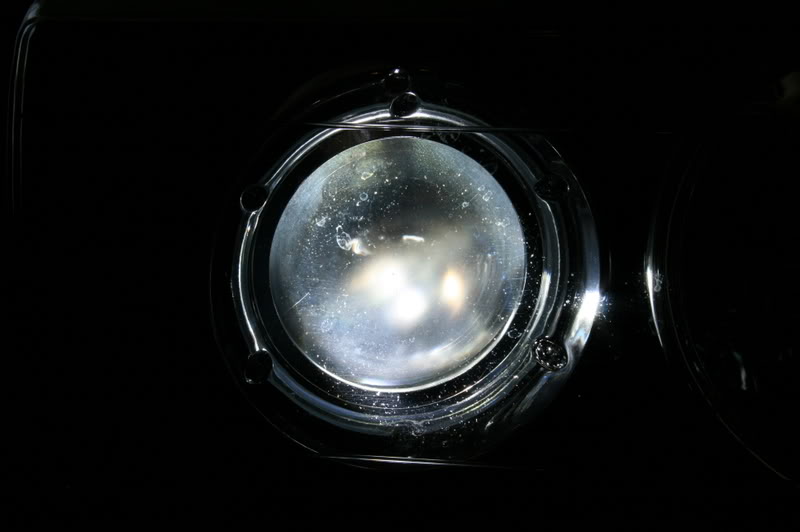
6000k together.

 04-30-2008, 01:29 AM
#67
Before installing, I made sure to put insulation around the bulb so it would not jiggle. Unfortunately that didn't work. So I'm going to have to open it up again and really tighten it. And recheck to make sure everything is as tight as they can be. Otherwise, very happy with the ACA lights.
 05-10-2008, 02:35 AM
#69
6th Gear


Member Since: Jul 2007
Posts: 6
Likes: 0
Received 0 Likes
on
0 Posts
Patches - I thank you so much to posting this, this helped big time with my install. Cause when I frist opened the hood and read the owners guide on how to replace the bulbs - I was thinking there is no way I'm going to get this done. By removing the light right out of the car made it way easier and I was then able to mount everything and clean up the wiring nice.
thanks again....
thanks again....
05-10-2008, 07:24 AM
#70
Safety Car
Member Since: Jul 2007
Location: Louisville Kentucky
Posts: 4,333
Likes: 0
Received 6 Likes
on
4 Posts
Patches - I thank you so much to posting this, this helped big time with my install. Cause when I frist opened the hood and read the owners guide on how to replace the bulbs - I was thinking there is no way I'm going to get this done. By removing the light right out of the car made it way easier and I was then able to mount everything and clean up the wiring nice.
thanks again....
thanks again....
Removing the headlights is not hard at all and makes working on them so much easier.
06-26-2008, 02:27 PM
#71
Drifting

I want to start this post with a �thanks� to �Patches� for the detailed instructions. As a recent buyer of the ACA lights, I found the images to be very helpful. I also want to thank my friends at the local body shop and another forum member (Powerlabs) for assisting with the install, which took us approx. eight hours� yes, eight (8) and not the typical 2-3 as others have claimed. I don�t think we�re dummies, but it was a bit more time consuming than I had anticipated.
I decided to go the extra route and pay the higher price for these lights after trying the cheaper route of simply installing 6000k HID bulbs in my low beam sockets. That �mod� turned out to be bitter-sweet. On one hand I had awesome lighting; much brighter than the stock halogen lights. However, on the down side, I was blinding everyone around me. Eventually, one of the lights started to turn pink (after one year of use) and I decided to upgrade to the ACA lights versus another attempt at just the HID ballasts and bulbs in my stock housings.
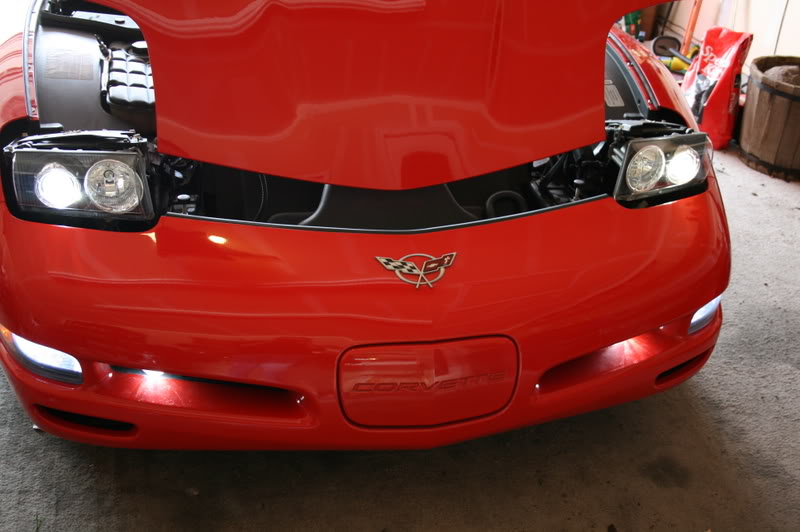
At first glance, the lights arrive in very professional packaging. Everything is neatly assembled and protected. The units themselves appear to be well built and nicer looking than the OEM lights.
However, the manner in which the HID bulb is mounted could use some engineering tweaks. The package includes some small rubber sheets to apply behind the bulb units, which appear to be an attempt to tighten the fit. However, it�s not enough. Therefore, following other posts in the forums (thanks again Patches), I decided to add additional support around the bulbs, using foam rubber weather stripping between the metal and plastic housing as well as to the back plate. Packing these tightly does make you wonder if the screws will hold as they simply screw into plastic. But, even with that �fix� in place, there is still some slight jiggle over rough road surfaces.
Moving on; as noted in the instructions, the stock light brackets (bottom frame) require modification in order to fit the ACA light housings. Reading both the forum posts and the instruction manual, this appears to be no big deal. After all, you are to simply cut a line along the ridges with a knife of some sort and then break the ridges off with small vice grips.
I would like to see someone do that in person! My brackets are made out of aluminum and those ridges are about 1/8� thick. I am not sure what type of knife would make a dent in these and not sure that I would want to take vice grips anywhere near them. So, instead, I took them to the local body shop, where they went through three grinding pads on each assembly in order to grind those ridges down, level with the others. They then repainted the frames. The result was professional and you can�t tell they have been modified. To me, this was not a trivial modification.
With my frames back at home, we then went back to assembling the units. From that point on, all went pretty well, until we got to the wiring. As was posted by another forum member, the terminal for the positive power connection is too small in diameter and does not fit. So, you can either cut the wires and solder in a new terminal, or open the diameter until it fits over the post.
After modifying that we then connected the wires and the lights came on. What�s interesting here is that the lights were NOT turned on. There was no key in the ignition, etc. So, we had a mystery to solve.
After a few minutes of trying to figure this out, we then took a look at the relays and found that unless they are mounted straight up and down (vertical / perpendicular to the road), they will close and activate. And, since this system is wired directly to the battery, the relays can turn on the headlights without user intervention and/or knowledge.
Upon closer inspection, we also found one of the relays to have a crack in the case. So, I popped it out and ran over to my local NAPA store to buy a replacement. But, my mission felt short. NAPA had no cross reference for a Song Chuan 804-1A-C1 relay and nothing similar to it in stock. Since it lacked a schematic on the relay, they were not able to easily find a match and nothing that would hook into the ACA wiring harness.
I then returned home and searched around on the Internet. Eventually I found one place that sells these relays. However, they are across the country. Of course, I also sent an email to the seller of these lights, outlining the problem with the relays. And, although he agreed to ship me a replacement, he also said something that was a bit surprising, and I quote: �Yes, we have a relay we can send you even though it is a warranty issue and should be addressed by the manufacturer. We will ship today.� To me that sounds like I took my car to GM for a bad alternator and they told me to go to AC-Delco. But, anyway, it�s been shipped and I did not have to deal with the �manufacturer� � whoever they may be (?). Would that be ACA or Song Chaun? Phew, I�m glad I escaped that adventure and thank the seller for shipping me a new relay.
With all that said; I am a bit leery of these relays and would like to see better ones used in this system. I will replace the cracked relay when it arrives and keep them mounted them inside the battery box with a bolt and double-sided tape to keep them vertical. But, I am not sure I have a great deal of confidence in them.
After that, we finished up, cleaned up and waited for dark. We then adjusted the height as well as side-to-side light aiming, until the lights were good (they were aimed way too high prior to adjustment). With all that done, we then hit the road to test them out. Of course, the HID lighting is awesome. But, the halogen high beams don�t offer much more than yellow�ish light. As mentioned, I still have some jiggle over bumps, but very small. I also have a great deal of purple lighting off the top of the passenger headlamp. You see it at the top edge of the beam, such as when approaching an overpass.
Overall, I personally think that these lights are about the best upgrade you can currently get to replace the stock halogens, maintain the pop-up mechanisms, not blind cars coming at you or in front of you and be �DOT approved.�. But, for the price, I do not feel they are engineered as well as could be. They are certainly not �plug-and-play� and do require some �mods� of their own and to the car to fit and work properly.
So, this is neither a complaint nor a raving review of how awesome these lights are. It�s just an outline of my experience with them (for what it�s worth) and a big �thanks� to the folks that helped me along the way.
Once again, thanks for the very detailed instructions and images. Thanks as well to the friends who stopped by and helped out, including a fellow forum member.
I decided to go the extra route and pay the higher price for these lights after trying the cheaper route of simply installing 6000k HID bulbs in my low beam sockets. That �mod� turned out to be bitter-sweet. On one hand I had awesome lighting; much brighter than the stock halogen lights. However, on the down side, I was blinding everyone around me. Eventually, one of the lights started to turn pink (after one year of use) and I decided to upgrade to the ACA lights versus another attempt at just the HID ballasts and bulbs in my stock housings.
At first glance, the lights arrive in very professional packaging. Everything is neatly assembled and protected. The units themselves appear to be well built and nicer looking than the OEM lights.
However, the manner in which the HID bulb is mounted could use some engineering tweaks. The package includes some small rubber sheets to apply behind the bulb units, which appear to be an attempt to tighten the fit. However, it�s not enough. Therefore, following other posts in the forums (thanks again Patches), I decided to add additional support around the bulbs, using foam rubber weather stripping between the metal and plastic housing as well as to the back plate. Packing these tightly does make you wonder if the screws will hold as they simply screw into plastic. But, even with that �fix� in place, there is still some slight jiggle over rough road surfaces.
Moving on; as noted in the instructions, the stock light brackets (bottom frame) require modification in order to fit the ACA light housings. Reading both the forum posts and the instruction manual, this appears to be no big deal. After all, you are to simply cut a line along the ridges with a knife of some sort and then break the ridges off with small vice grips.
I would like to see someone do that in person! My brackets are made out of aluminum and those ridges are about 1/8� thick. I am not sure what type of knife would make a dent in these and not sure that I would want to take vice grips anywhere near them. So, instead, I took them to the local body shop, where they went through three grinding pads on each assembly in order to grind those ridges down, level with the others. They then repainted the frames. The result was professional and you can�t tell they have been modified. To me, this was not a trivial modification.
With my frames back at home, we then went back to assembling the units. From that point on, all went pretty well, until we got to the wiring. As was posted by another forum member, the terminal for the positive power connection is too small in diameter and does not fit. So, you can either cut the wires and solder in a new terminal, or open the diameter until it fits over the post.
After modifying that we then connected the wires and the lights came on. What�s interesting here is that the lights were NOT turned on. There was no key in the ignition, etc. So, we had a mystery to solve.
After a few minutes of trying to figure this out, we then took a look at the relays and found that unless they are mounted straight up and down (vertical / perpendicular to the road), they will close and activate. And, since this system is wired directly to the battery, the relays can turn on the headlights without user intervention and/or knowledge.
Upon closer inspection, we also found one of the relays to have a crack in the case. So, I popped it out and ran over to my local NAPA store to buy a replacement. But, my mission felt short. NAPA had no cross reference for a Song Chuan 804-1A-C1 relay and nothing similar to it in stock. Since it lacked a schematic on the relay, they were not able to easily find a match and nothing that would hook into the ACA wiring harness.
I then returned home and searched around on the Internet. Eventually I found one place that sells these relays. However, they are across the country. Of course, I also sent an email to the seller of these lights, outlining the problem with the relays. And, although he agreed to ship me a replacement, he also said something that was a bit surprising, and I quote: �Yes, we have a relay we can send you even though it is a warranty issue and should be addressed by the manufacturer. We will ship today.� To me that sounds like I took my car to GM for a bad alternator and they told me to go to AC-Delco. But, anyway, it�s been shipped and I did not have to deal with the �manufacturer� � whoever they may be (?). Would that be ACA or Song Chaun? Phew, I�m glad I escaped that adventure and thank the seller for shipping me a new relay.
With all that said; I am a bit leery of these relays and would like to see better ones used in this system. I will replace the cracked relay when it arrives and keep them mounted them inside the battery box with a bolt and double-sided tape to keep them vertical. But, I am not sure I have a great deal of confidence in them.
After that, we finished up, cleaned up and waited for dark. We then adjusted the height as well as side-to-side light aiming, until the lights were good (they were aimed way too high prior to adjustment). With all that done, we then hit the road to test them out. Of course, the HID lighting is awesome. But, the halogen high beams don�t offer much more than yellow�ish light. As mentioned, I still have some jiggle over bumps, but very small. I also have a great deal of purple lighting off the top of the passenger headlamp. You see it at the top edge of the beam, such as when approaching an overpass.
Overall, I personally think that these lights are about the best upgrade you can currently get to replace the stock halogens, maintain the pop-up mechanisms, not blind cars coming at you or in front of you and be �DOT approved.�. But, for the price, I do not feel they are engineered as well as could be. They are certainly not �plug-and-play� and do require some �mods� of their own and to the car to fit and work properly.
So, this is neither a complaint nor a raving review of how awesome these lights are. It�s just an outline of my experience with them (for what it�s worth) and a big �thanks� to the folks that helped me along the way.
Once again, thanks for the very detailed instructions and images. Thanks as well to the friends who stopped by and helped out, including a fellow forum member.
06-26-2008, 03:37 PM
#72
Le Mans Master
[QUOTE=digivex;1566061906]I want to start this post with a ‘thanks” to “Patches” for the detailed instructions. Moving on; as noted in the instructions, the stock light brackets (bottom frame) require modification in order to fit the ACA light housings. Reading both the forum posts and the instruction manual, this appears to be no big deal. After all, you are to simply cut a line along the ridges with a knife of some sort and then break the ridges off with small vice grips.
I would like to see someone do that in person! My brackets are made out of aluminum and those ridges are about 1/8” thick. To me, this was not a trivial modification.
, we then took a look at the relays and found that unless they are mounted straight up and down (vertical / perpendicular to the road), they will close and activate. And, since this system is wired directly to the battery, the relays can turn on the headlights without user intervention and/or knowledge.
As mentioned, I still have some jiggle over bumps, but very small. I also have a great deal of purple lighting off the top of the passenger headlamp. You see it at the top edge of the beam, such as when approaching an overpass.
Overall, I personally think that these lights are about the best upgrade you can currently get to replace the stock halogens, maintain the pop-up mechanisms, not blind cars coming at you or in front of you and be “DOT approved.”. But, for the price, I do not feel they are engineered as well as could be. They are certainly not “plug-and-play” and do require some “mods” of their own and to the car to fit and work properly.
QUOTE]
My ACA install took about 2 hours per side with just myself doing the work
Frame rails: I used a full size vice grip and just popped off the ridges by wiggling back and forth......took about two minutes per side.
Relays: my ACA relays are mounted sideways and do not activate without current
Jiggle, Stock C5 lights jiggle due to slop in the way the pop up lights mount
Blue edge: normal with HID lights.......many love this effect
06-26-2008, 05:00 PM
#73
Supporting Vendor
Member Since: Jan 2000
Location: TX
Posts: 5,679
Likes: 0
Received 13 Likes
on
10 Posts
Cruise-In I Veteran
St. Jude Contributor '04
"We" are the "seller".
Not sure how to reply... we have had nothing but rave reviews on the kit. I checked sales and we have sold 149 kits in the last 2 years with little to no problems.
Im sorry for your frustration with issues you encountered.
We thank you for your business.
Nate
Not sure how to reply... we have had nothing but rave reviews on the kit. I checked sales and we have sold 149 kits in the last 2 years with little to no problems.
Im sorry for your frustration with issues you encountered.
We thank you for your business.
Nate
__________________
Corvette Garage Inc
Xtreme Motorsports
1.806.771.0205
Website: Click here for Corvette Parts and Accessories!
Email: sales@corvettegarage.com

---------------------------------------------------
Corvette Garage Inc
Xtreme Motorsports
1.806.771.0205
Website: Click here for Corvette Parts and Accessories!
Email: sales@corvettegarage.com
---------------------------------------------------
06-26-2008, 08:12 PM
#74
Drifting
"We" are the "seller".
Not sure how to reply... we have had nothing but rave reviews on the kit. I checked sales and we have sold 149 kits in the last 2 years with little to no problems.
Im sorry for your frustration with issues you encountered.
We thank you for your business.
Nate
Not sure how to reply... we have had nothing but rave reviews on the kit. I checked sales and we have sold 149 kits in the last 2 years with little to no problems.
Im sorry for your frustration with issues you encountered.
We thank you for your business.
Nate
I didn�t feel it necessary to list you as the seller as my post was not meant as a criticism or as praise. It was meant to be: 1) A thanks to Patches for his instructions in this post and; 2) An outline of my personal experience, trying to be non-biased in my summary, including the good and the bad... Ending with: �Overall, I personally think that these lights are about the best upgrade you can currently get to replace the stock halogens.� I apologize if you took my post any other way and/or felt it necessary to reply as I was sharing an experience and not requesting a response of any type.
Of course there is plenty of praise for this kit (it's one the reasons that I made the purchase) and I personally like these lights (repeating myself). But, I also think that people reading about products should be able to read something other than all perfect reviews � nothing is that perfect and we�re all individuals with our own unique experiences. So, why not share mine, even if someone comes back and tells me that I must be a mechanical idiot for taking so long to install these lights

I am sure there are others in this forum who read these posts when preparing to do an upgrade, modification, replacement, etc. I know I do and I read all the ACA light posts before buying the lights (the higher the price, the more I tend to read and review). As I mentioned, I had already gone the cheaper route of simply replacing the low beams with 6000K HID bulbs in my stock housings. That too was through a forum vendor and had great reviews.
I am glad to see that you have gone through about $150,000 worth of this product over the past two years without issue and am sure there are many happy customers out there as I (once again) am happy with the end result. I simply outlined what it took me, personally, to get to that result, along with a few friends who helped (from the forum and elsewhere).
I certainly was not the first to point out two of the issues that I encountered (i.e., the bulb jiggle and the positive terminal being too small in diameter). They still exist and I used those posts to assist in understanding and tackling those problems; as well as using this thread to assist with the actual install. I added that I found the modification needed for my bracket to be better accomplished (in my opinion) by using a grinding wheel versus a knife and vice grips and then outlined the problem I ran into with the relays. I also thanked you for shipping me a replacement.
I really enjoy mods and have done quite a few. Just click my icon and look at my homepage. This is not the first time that I purchased from you and I am sure it�s not the last (unless you prefer I go elsewhere).
Thanks,
Dave
06-27-2008, 01:38 AM
#76
Le Mans Master
Member Since: Oct 2007
Location: Greater Detroit Metro MI, when I'm not travelling.
Posts: 6,149
Likes: 0
Received 10 Likes
on
10 Posts
Nice write up Dave; I think it is objective and to the point.
My 2 cents worth: I have a C6 and these appear as bright if not brighter, so installation woes aside (Dave is not kidding; getting these in on his car was a major ordeal!) they do deliver.
The biggest difference between the light these put out and what I get from my C6 is that the high beams on my car go for miles, and these don't appear to do anything when compared to the ultra bright HIDs.
I would give the HIR 9011 / 9012 a try if they can fit this housing. You can find out about them here. I got them on Ebay for my C5 Z06's high beams a while ago... Not as good as HIDs, but they are the brightest Halogens you can get right now. Link: http://www.finemotoring.com/
Last edited by PowerLabs; 06-27-2008 at 01:44 AM.
06-27-2008, 09:05 AM
#77
Former Vendor
Member Since: Nov 2005
Location: Spring Texas
Posts: 8,995
Likes: 0
Received 2 Likes
on
2 Posts
St. Jude Donor '08
Nice write up Dave; I think it is objective and to the point.
My 2 cents worth: I have a C6 and these appear as bright if not brighter, so installation woes aside (Dave is not kidding; getting these in on his car was a major ordeal!) they do deliver.
The biggest difference between the light these put out and what I get from my C6 is that the high beams on my car go for miles, and these don't appear to do anything when compared to the ultra bright HIDs.
I would give the HIR 9011 / 9012 a try if they can fit this housing. You can find out about them here. I got them on Ebay for my C5 Z06's high beams a while ago... Not as good as HIDs, but they are the brightest Halogens you can get right now. Link: http://www.finemotoring.com/
My 2 cents worth: I have a C6 and these appear as bright if not brighter, so installation woes aside (Dave is not kidding; getting these in on his car was a major ordeal!) they do deliver.
The biggest difference between the light these put out and what I get from my C6 is that the high beams on my car go for miles, and these don't appear to do anything when compared to the ultra bright HIDs.
I would give the HIR 9011 / 9012 a try if they can fit this housing. You can find out about them here. I got them on Ebay for my C5 Z06's high beams a while ago... Not as good as HIDs, but they are the brightest Halogens you can get right now. Link: http://www.finemotoring.com/


