When you click on links to various merchants on this site and make a purchase, this can result in this site earning a commission. Affiliate programs and affiliations include, but are not limited to, the eBay Partner Network.
Yep, right on schedule. The first post on this thread was a 'vette with 128,000. My 2003 now has 134,400 miles and the rear window just fell out (partially). I am so glad I saw this! Why doesn't GM at least include a coupon for Rhino Glue in the owners packet? I'm just sayin'...
Yep, right on schedule. The first post on this thread was a 'vette with 128,000. My 2003 now has 134,400 miles and the rear window just fell out (partially). I am so glad I saw this! Why doesn't GM at least include a coupon for Rhino Glue in the owners packet? I'm just sayin'...
If it's any consolation mine fell out last summer and the rhino blue fix from this thread is been holding fine ever since. I'm betting the fabric will rip before the window ever fails again. I use rhino glue for everything now. 2004 - 109,000 mi n going strong
I�ve done lots of research on this site and others (including BMW, Audi and other convertible top postings). The results are that upholstery people usually say the sealing process is high pressure done under heat at the factory and there is no way to duplicate it in the field so you have to replace the top. Estimates for top replacement range from lows in the area of $500 to $1000 to a high of $3000 with the average being $1000 to $1500.
Some people report glue attempts with total failures after days or weeks. Others report glue success and the glue holding after much longer times.
Those reporting glue success used a variety of glues including: JB Weld, Black silicone RTV sealant, pure clear silicone sealer, 3M high black weatherstrip adhesive, and urethane windshield glue. One person posted that he used a cyanoacrylate glue that he got at a hobby shop. Super glue and its various other names are cyanoacrylate glues.
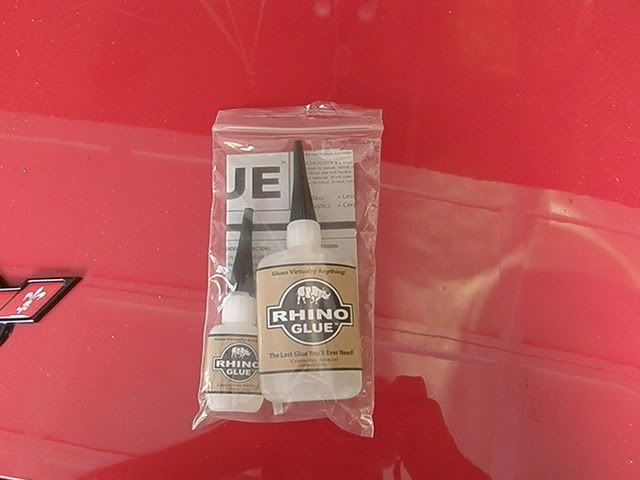
I did my own research and settled on Rhino Glue which is a specially formulated cyanoacrylate that is waterproof, weatherproof and completely resistant to heat and cold. See www.rhinoglue.com for more information.
I was not able to find this glue in any store and bought it online. This is a totally different glue than Liquid Nails Rhino Ultra Glue. Do not buy the Liquid Nails kind.
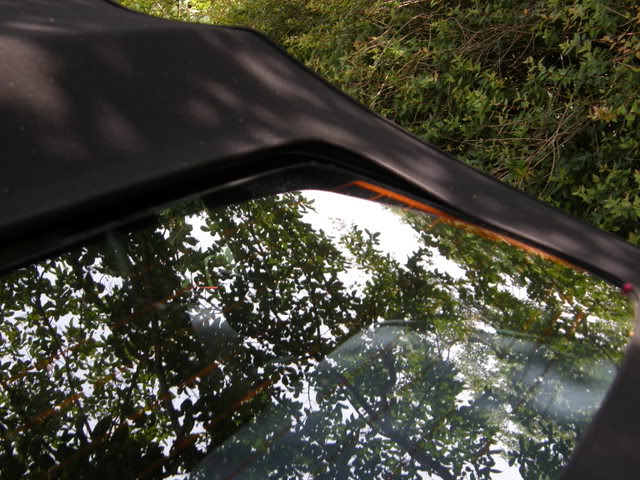
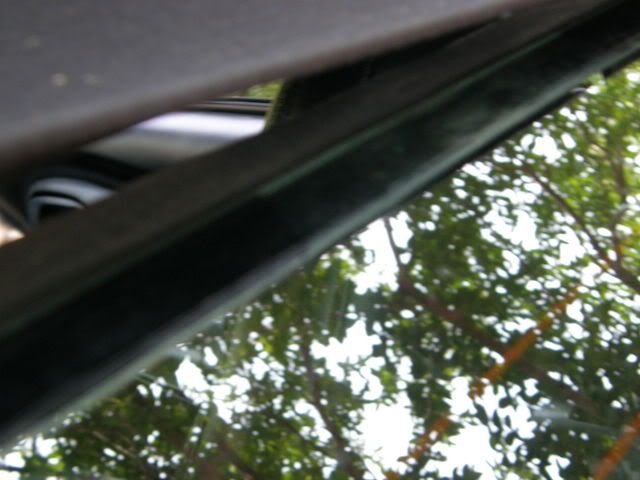
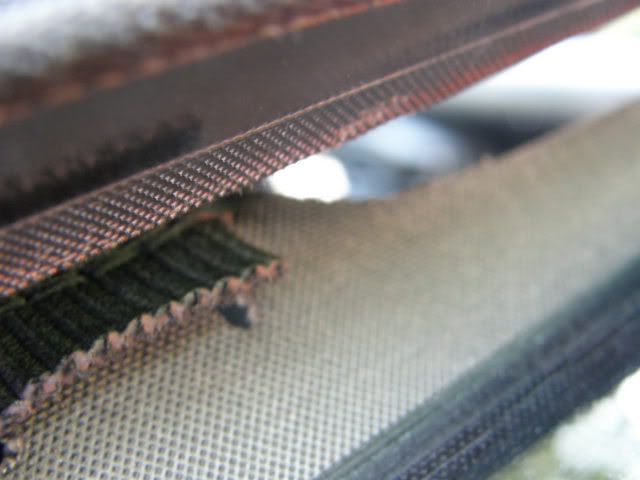
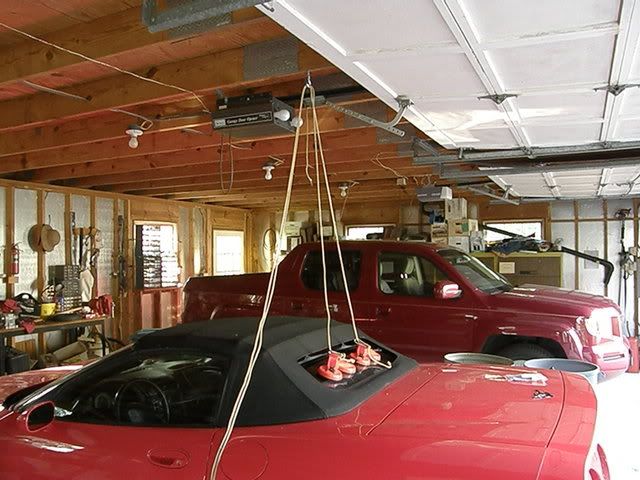
Here are pictures of what the separation looked like before I started gluing.
The first one was taken when the separation first started. Compare it with the ones below with the suction cups and you can see the progression of the separation down the side with just a little more driving.
My advice is to catch it before the window comes completely loose.
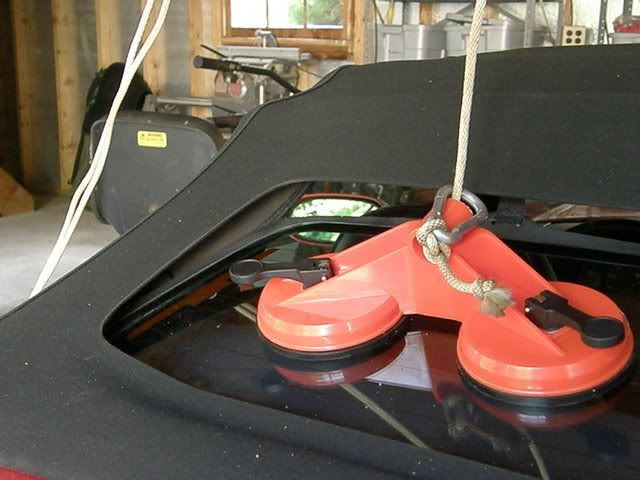
These round red things are suction dent pullers.
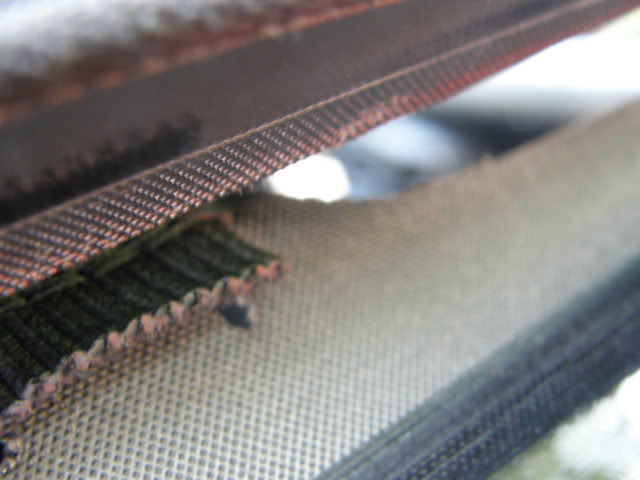
I found these online. They come in a 1, 2, 3 or 4 suction cup variety. www.cvfsupplycompany.com/sucusucupdep3.html. I bought the 4 cup variety without thinking. I got 2 of them (only needed one in the end) for $30 and that included the shipping. When they arrived, I realized that they were too large for the window so I cut them in half. A better choice would have been either the 2 cup or 3 cup ones. I then rigged up a way to pull them so that the glass would be pulled against the fabric. You can see that this simply involved screwing an eye into the rafter above.
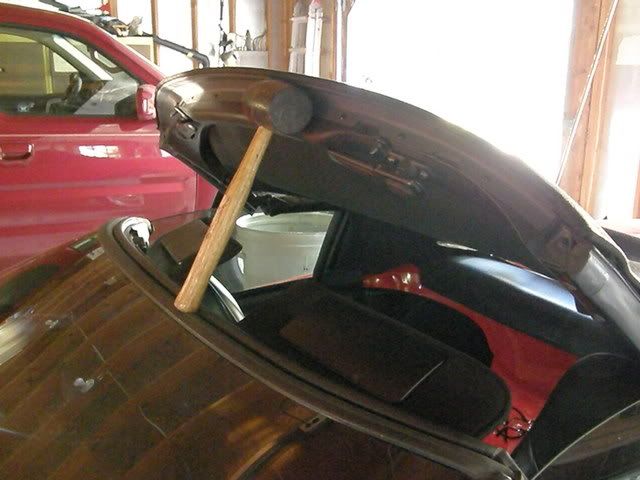
I found that if I unlatched the top and lifted it about a foot that it relieved the stretched fabric enough to manually push it against the glass. Note the rubber mallet I used to hold the front of the top up.
I then applied the glue around the glass about 3 to 6 inches at a time. Be careful and test this out before you apply the glue. I made the mistake of starting on the sides and moving toward the middle and was left with a significant bunching at the middle. The glue set up so fast that I actually had to cut the top away from the glass at the corner to smooth out the bunching. At the finish of the job, I was still left with a little bunching at the drivers side. As I�m not a perfectionist and it isn�t very noticeable, I haven�t tried to correct it.
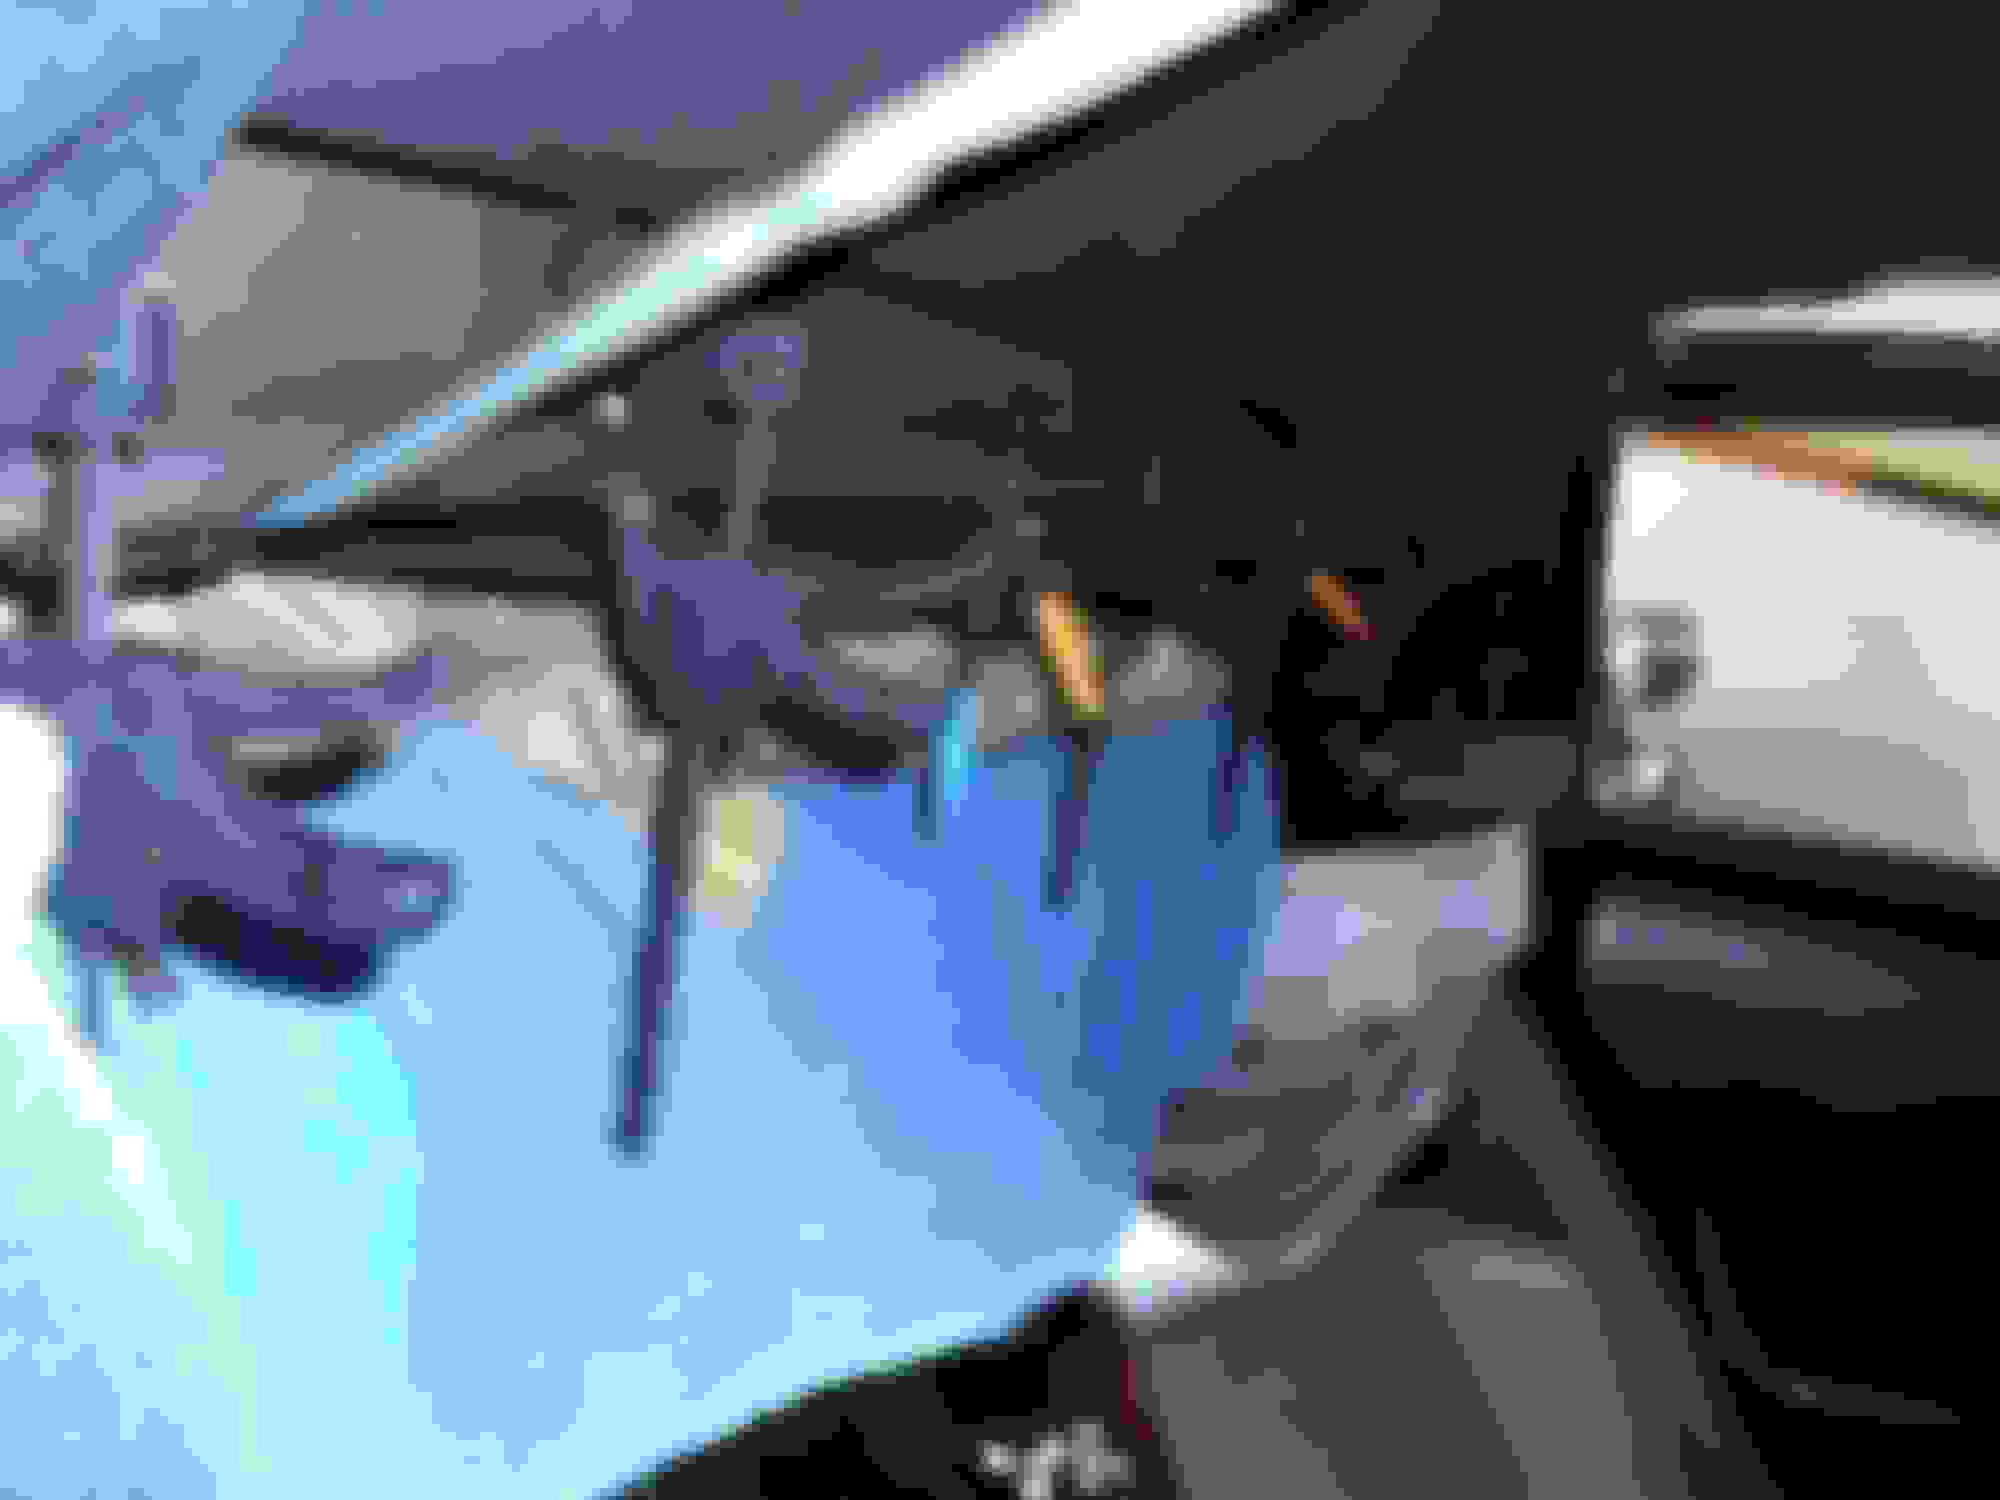
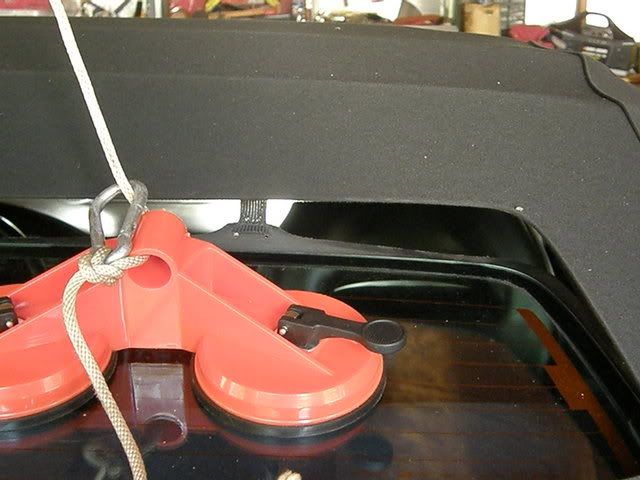
This is the finished job before I removed the dent pullers.
I did the job at 7 PM and left the suction cups attached until the next morning at about 8 AM. I then drove the car to an automated carwash which I figured would be a great test for the bonding strength. It came through with flying colors - no separation of the window from the top and no sign of leaking.
I then drove it 50 miles with no sign of any separation.
If the glue is as advertised, judging by the part I had to remove and redo, I expect it will hold up for a very long time.[/QUOTE]
Here's a solution I used on my 2003 convertible 2 years ago and ti is still holding strong and weather tight! Simply remove the glass all the way around the edge, and use 3M VHB Heavy Duty double-sided foam mounting tape to re-fasten the window in. Be sure to get it placed all around the window with no gaps, then have someone help you guide it in place. A word of caution...this stuff is super tacky and will stick to wherever you put it, so aim carefully. I held the window up and peeled sections of the backer away slowly, much like you would when installing a set of window visors. The result is a great looking, weather tight fix that should last for years, and requires no special tools. Literally took me less than 30 minutes. The tape does tell you to let it sit for a number of hours, so I just rolled up a blanket and pushed it onto the back deck applying pressure to the glass overnight. Has worked great ever since, even under a high pressure car wash, though I wouldn't intentionally shoot right at the seam. I've included a pic of the tape for your reference.
Here's a solution I used on my 2003 convertible 2 years ago and ti is still holding strong and weather tight! Simply remove the glass all the way around the edge, and use 3M VHB Heavy Duty double-sided foam mounting tape to re-fasten the window in. Be sure to get it placed all around the window with no gaps, then have someone help you guide it in place. A word of caution...this stuff is super tacky and will stick to wherever you put it, so aim carefully. I held the window up and peeled sections of the backer away slowly, much like you would when installing a set of window visors. The result is a great looking, weather tight fix that should last for years, and requires no special tools. Literally took me less than 30 minutes. The tape does tell you to let it sit for a number of hours, so I just rolled up a blanket and pushed it onto the back deck applying pressure to the glass overnight. Has worked great ever since, even under a high pressure car wash, though I wouldn't intentionally shoot right at the seam. I've included a pic of the tape for your reference.
This stuff really works!
I did the same thing about 2 years ago. It was a 3M product I found at Home Depot . Everyone here seems to be stuck on gorilla glue. What a mess and time . Took me 30 min as well.
I'm a professional wallpaper hanger so it was easier for me but anyone can do it. Both edges do have to be smooth and clean. And like you said the tape needs to be continuous all the way around. I just 45 it in all the corners . After you get one side stuck just peel the tape and make sure you hit the mark because it's gonna be stuck .
My glass still had the straps attached so I did it while the glass still hung in place which makes it easier by yourself .
And from the inside all I had to do is lift the glass till the straps were tight and then push into place .
Another little trick i did to make it waterproof on the outside was where the sm gap was on the edge of the canvas and glass I caulked it black to match the black canvas and seal that exposed edge because you can see the tape. And water might
Loosen it was my thought . Just make sure you make a very small cut on the caulking tube so
It leaves a perfect bead in the
Exposed edge . As a painter that was easy too. A five min job and
Looks good too. Silicone black
What made me focus on the Rhino Glue is that it set up so quickly that I could apply pressure by hand over a few seconds or minutes. All the other glues work best with clamping. You can apply pressure by pulling like I did or pushing like you did but neither really applies a lot of pressure.
How u doin gem? Let's say the vynel connected to the top is 1". What % of that 1 inch is the glue applied and how thick?
I did the same thing about 2 years ago. It was a 3M product I found at Home Depot . Everyone here seems to be stuck on gorilla glue. What a mess and time . Took me 30 min as well.
I'm a professional wallpaper hanger so it was easier for me but anyone can do it. Both edges do have to be smooth and clean. And like you said the tape needs to be continuous all the way around. I just 45 it in all the corners . After you get one side stuck just peel the tape and make sure you hit the mark because it's gonna be stuck .
My glass still had the straps attached so I did it while the glass still hung in place which makes it easier by yourself .
And from the inside all I had to do is lift the glass till the straps were tight and then push into place .
Another little trick i did to make it waterproof on the outside was where the sm gap was on the edge of the canvas and glass I caulked it black to match the black canvas and seal that exposed edge because you can see the tape. And water might
Loosen it was my thought . Just make sure you make a very small cut on the caulking tube so
It leaves a perfect bead in the
Exposed edge . As a painter that was easy too. A five min job and
Looks good too. Silicone black
Nice. I didn't think of this but will try it myself. I did the rhino glue method about 2 years ago, and it recently fell apart due to sitting outside between the extreme heat and cold of last summer I think was too much for the glue. I tried re-applying the glue but there is a middle layer of plastic between the canvas and the glass that is now shot so it didn't hold up the 2nd time longer than a day. So this will be potentially my last attempt before throwing in the towel to just install a new top.
I had the dreaded window problem 2 years ago just after getting the car. I have a brother in the auto body business and bought a tube of the 3m windshield adhesive they use to install windsheilds. Cleaned all the surfaces, put on the adhesion promoter and it has been great ever since. Simple fix.
With all due respect to the previous systems devised to re-glue C5 convertible top windows, I have charted a new path. Super glues, cyanoacrylates, have never worked well for me, and it bothered me that Rhino Glue posts NO SPECS, temperature, weather, tensile, shear, .., nothing. I tried emailing & phoning them to no avail.
An interesting note, GM had a TSB 06-08-57-002C + B for the 2006-2009 Solstice,that used 3M Urethane high viscosity sealer PN 08609 = WINDO WELD to fix the window, unfortunately it is black.
So I ended up on 3M's Scotch Weld site, a multitude of choices & specs. Using 3M's selector, with glass as a substrate & clear, it was all Surface Insensitive Instant Adhesives = cyanoacrylates, with the GEL being my choice, or DP 100+ Clear epoxy.
Per 3M design guide, Epoxies, both 1 part & 2 part, have highest strength & best resistance to temperature & weather.
Also need mixing NOZZLE; 50ML --> 62-9171-9153-8 = square gold or 62-9178-9150-9 = helical white I was planning on making my own gun using a caulk gun.
The 3M epoxy was ~$18.63 all in Amazon Prime, used ~10%.
Mixing nozzles were $24.66 for 6 all in, Allied Electronics.
As you are aware, the C5 top is a very clever unfolding design, with that in mind, I used 4 luggage shoulder straps, (I wanted a flat surface to spread the load), to merely keep it from unfolding, this proved inspirational, worked extremely well, and the straps are easy to adjust, be sure to position the metal ends strategically. With the top unfolded as shown in the photos, it is easy to CLAMP the entire top seam. However the window is NOT flat, so I used a Home Depot yardstick, (from the paint department $1), which seemed to have just the right bowing force, ripped 1/2" off, to make it easier to fit the clamps, and 5 small trigger clamps, $2 Harbor Freight. Just snug up the clamps as you do not want to squeeze out the epoxy, in my test clamp, I was able to insert a 5 mil feeler gauge just about right.
Window is also supported with pillow & towel to hold weight & support side loads.
For the sides I cut 2 x 4's & three 2.5 lb weights, the bottom edge was still attached.
I used blue painters tape to mark the canvas line around the window, using the dirt as a guide, BEFORE I cleaned the glass & glue strip with isopropyl alcohol.
Practice clamping, & have everything ready as the working time is 3 to 4 min, note that the clamp in the middle has been shortened as it was hitting the top cover hump.
08/28/15 glued, making sure spread was good, clamped & weighted, removed tape & let sit overnight. Inspection next day indicated gluing seems VERY successful, bonding seems to be over entire glue strip area.
Improvements: --------------------- 1) Passenger side off alignment by ~1/8" less tight, should have checked, ~ok. 2) Used default glue bead out of mixing nozzle, seemed to spread just about
perfect, however calculations:
1/16" bead over ~3/4" ==> 0.00307 sq in / 3/4" =~ 4 mils. Per 3M max shear 3 - 5 mil bond line. So might be just right, however EC-2216 B/A indicates max shear 3 - 5 mil,
but max peel 17 - 25 mil bond line !!! 3) Did NOT sacrifice a bit of glue at start to ensure was mixed, however did
add extra to first area dispensed & everything seems bonded, so probably ok.
Per 3M design guide page 10: 3M Scotch Weld Structural adhesives best for peel & shear & temperature.
I used this 3M ScotchWeld product to re-glue the front to back seams on my 2001 vert. Clamping was a real challenge, finally bought a deep reach clamp at harbor fright.
Another possible product is the 3M 5200 Urethane Marine adhesive. Only warning about the 5200 is that it is sticky like roofing tar on a hot day. So be really careful about masking and draping.
Can't say enough good stuff about most of the 3M solutions.
Last edited by Sam Handwich; 09-03-2015 at 01:37 PM.
Sam - glad you found another solution. I've successfully used the Rhino method but if it fails (which is has not) I'll be looking to your method. My top is 15 years old but looks next to new.
Very nice description. I did a similar repair on a Crossfire and I used 3m a window Weld and it worked great.
Originally Posted by gem
My 2001 convertible is my everyday car. I drive it in rain, snow and good weather. It is and always has been garaged. Three weeks ago at about 128,000 miles the back glass window separated from the top. The separation first started at the top and when it got to the sides and started separating at the bottom I stopped driving it.
I�ve done lots of research on this site and others (including BMW, Audi and other convertible top postings). The results are that upholstery people usually say the sealing process is high pressure done under heat at the factory and there is no way to duplicate it in the field so you have to replace the top. Estimates for top replacement range from lows in the area of $500 to $1000 to a high of $3000 with the average being $1000 to $1500.
Some people report glue attempts with total failures after days or weeks. Others report glue success and the glue holding after much longer times.
Those reporting glue success used a variety of glues including: JB Weld, Black silicone RTV sealant, pure clear silicone sealer, 3M high black weatherstrip adhesive, and urethane windshield glue. One person posted that he used a cyanoacrylate glue that he got at a hobby shop. Super glue and its various other names are cyanoacrylate glues.
I did my own research and settled on Rhino Glue which is a specially formulated cyanoacrylate that is waterproof, weatherproof and completely resistant to heat and cold. See www.rhinoglue.com for more information.
I was not able to find this glue in any store and bought it online. This is a totally different glue than Liquid Nails Rhino Ultra Glue. Do not buy the Liquid Nails kind.
Here are pictures of what the separation looked like before I started gluing.
The first one was taken when the separation first started. Compare it with the ones below with the suction cups and you can see the progression of the separation down the side with just a little more driving.
My advice is to catch it before the window comes completely loose.
These round red things are suction dent pullers.
I found these online. They come in a 1, 2, 3 or 4 suction cup variety. www.cvfsupplycompany.com/sucusucupdep3.html. I bought the 4 cup variety without thinking. I got 2 of them (only needed one in the end) for $30 and that included the shipping. When they arrived, I realized that they were too large for the window so I cut them in half. A better choice would have been either the 2 cup or 3 cup ones. I then rigged up a way to pull them so that the glass would be pulled against the fabric. You can see that this simply involved screwing an eye into the rafter above.
I found that if I unlatched the top and lifted it about a foot that it relieved the stretched fabric enough to manually push it against the glass. Note the rubber mallet I used to hold the front of the top up.
I then applied the glue around the glass about 3 to 6 inches at a time. Be careful and test this out before you apply the glue. I made the mistake of starting on the sides and moving toward the middle and was left with a significant bunching at the middle. The glue set up so fast that I actually had to cut the top away from the glass at the corner to smooth out the bunching. At the finish of the job, I was still left with a little bunching at the drivers side. As I�m not a perfectionist and it isn�t very noticeable, I haven�t tried to correct it.
This is the finished job before I removed the dent pullers.
I did the job at 7 PM and left the suction cups attached until the next morning at about 8 AM. I then drove the car to an automated carwash which I figured would be a great test for the bonding strength. It came through with flying colors - no separation of the window from the top and no sign of leaking.
I then drove it 50 miles with no sign of any separation.
If the glue is as advertised, judging by the part I had to remove and redo, I expect it will hold up for a very long time.
The window fell out of my 2002 convertible about a week ago, bang, all at once. All the top/upholstery places in town were telling me it couldn't be fixed - you need to give us $1100-1400 for a new top. Not being in the mood to do that, since the top and the glass were both in excellent shape, they just weren't connected to each other any more, I checked here and viola! GEM's fix from 2007 popped up. Looked pretty straightforward and several dozen folks had already tried it; since I had nothing to lose I tried it also. Bought the $8 vacuum cups at Harbor Freight, ordered the Rhino glue, cleaned the window and gluing surfaces very thoroughly with alcohol, etc. etc.
Helping me was a guy who had been a screenprinter for 30+ years and knew something about gluing surfaces together and stretching fabric. We started by gluing the bottom, about 6" at a time, first one half, then the other. I put the glue on the glass, not on the fabric side. We let the Rhino glue sit for about 15 minutes between gluing sessions. Then we did the top, one half, then the other, again about 6" at a time. Finally, we did the sides. We have NO wrinkles or puckers. And except for a little glue dribbling down the outside of the glass - which I'll remove with a single-edge razor blade in a couple of days when it's fully hardened - it looks like new.
I haven't tried to drop the top yet - will wait a few days before I try that. And I haven't tested for complete water-tightness yet and may let that go til spring. But as far as I can tell right this minute, this fix WORKS! Thank you GEM!! If you ever get to Rochester NY, I owe you a couple of cold malted beverages.
I used Rhino Glue the first time. I removed the top and used the window weight with some additional weight to hold the glass in place. It failed after a couple or three years. The second time, I noticed that there is a fabric strip the window was glued to that started separating from the top. The second time I did this I removed the top and removed the fabric strip, it was kind of stiff. I then used a bead of 3M black urethane windshield adhesive and bonded the window directly to the top. Seeing how my 98 Vert top is beginning to show it's age I figured I'd give it another shot to attach the glass back on. It's holding up fine now. Either way you go; with the Rhino Glue or the urethane adhesive, it can get on places you don't want it to if you're not careful. Masking tape helps. The urethane adhesive squeezed out a little along the visible edge after it dried. It still looks great, maybe I'm just picky but it's better than replacing the top for now. It's better to fix a top that's starting to get loose than waiting for it to completely separate. Just my .02 cents.

 05-22-2014, 03:37 PM


 are you