
Replacing Front left turn signal bulb???
 11-22-2006, 10:02 PM
#1
Burning Brakes

Thread Starter
Member Since: Sep 2004
Location: Carlisle PA
Posts: 843
Likes: 0
Received 0 Likes
on
0 Posts
Got in the vette today and when I went to make a left turn the front left signal didn't work. The turn arrow on dash blinked really fast but no turn signal on front (rear works fine although it is blinking faster than usual)
1. Is it the bulb that needs replaced? If so, I went to autozone and picked up a pair of replacement bulbs for $5.00. Got the part # from owner's manual (#3157).
If it is just the bulb can someone explain how you're supposed to get to it to replace it???? It doesn't look like an easy job. Probably have to take 1/2 the car apart to get at it.
BTW- My first stop was a Chevy dealer parts department in Shippensburg, PA. They looked it up on their parts computer and told me there was no single bulb and that I would have to buy the whole light assembly...$55. Can you believe that????
Any help replacing it would be greatly appreciated.
Thanks
 11-23-2006, 12:16 AM
#2

Your bulb is burned out. There are several ways to change it, but most have found that going through the front headlight is the quickest.
1) Turn headlights on and back off one knotch (Headlight stays up but no light)
2) Remove the 3 screws to the black cover around the headlight.
3) The cover has a lip on top, so be careful when removing the black cover
4) Stick your arm through the headlight hole and fill around for the turn signal bulb. It is a tight fit and you have to reach in fairly deep.
Shouldn't take to long.
11-23-2006, 12:34 AM
#3
Race Director


Originally Posted by corvettedoug
...Turn headlights on and back off one knotch (Headlight stays up but no light)
...
...
11-23-2006, 12:44 AM
#4
Team Owner

Member Since: Mar 2004
Location: Oklahoma City OK
Posts: 58,258
Received 1,674 Likes
on
1,297 Posts
C6 of Year Finalist (appearance mods) 2019

You can also remove the access panel below and get to it that way.
11-23-2006, 12:55 AM
#5
Burning Brakes

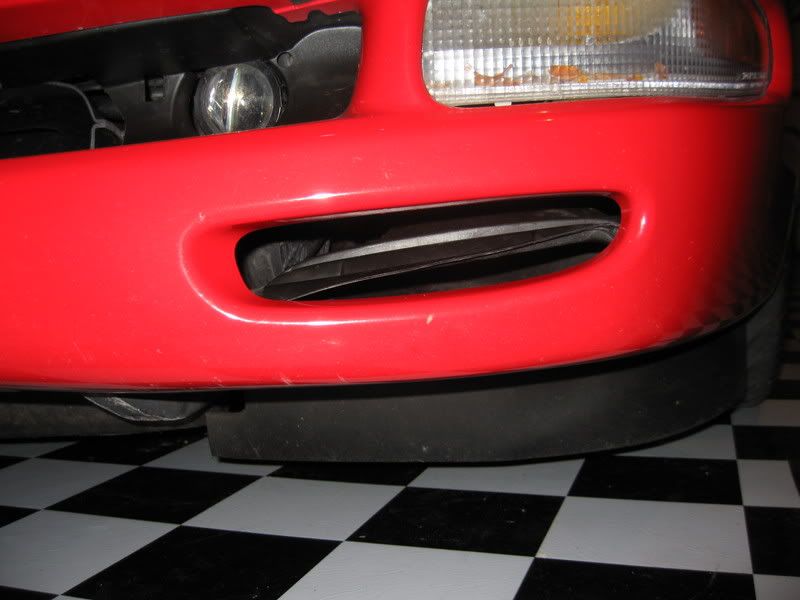
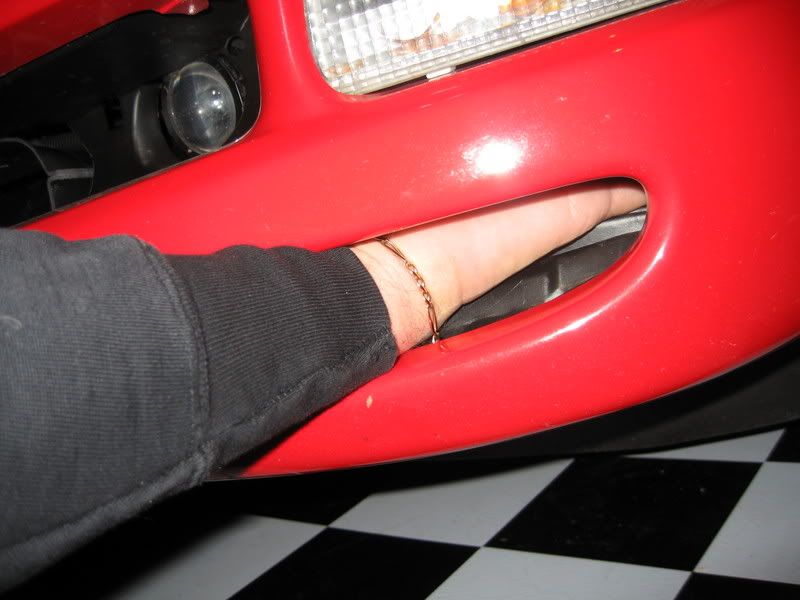
my drivers side goes out all the time, I need a new light, I use to change them the way SPIVET does, but the fastest way for me to change the bulb is to push the brake air duct in a little and then push it down out the way, then just reach your hand in through there, now it takes me litterally 1 to 2 minutes, it's real easy Ozzie
Ozzie
here you go I just went out and took a few pics to show what I do, you can also see how many times the bulb actually exploded, stuck inside the light. The plus side to doing it this way is once you unscrew socket, there is enough wire to pull out the duct and change bulb with 2 hands.
Before.............
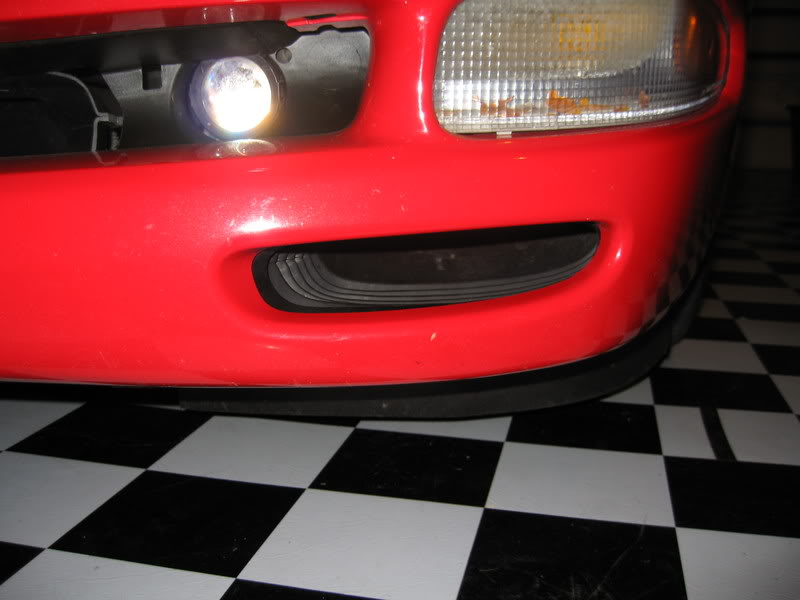
with brake duct down............

replacing bulb.................

Ozziehere you go I just went out and took a few pics to show what I do, you can also see how many times the bulb actually exploded, stuck inside the light. The plus side to doing it this way is once you unscrew socket, there is enough wire to pull out the duct and change bulb with 2 hands.
Before.............
with brake duct down............
replacing bulb.................
Last edited by chevyvette1; 11-23-2006 at 01:21 AM.
The following 2 users liked this post by chevyvette1:
barkingowl (06-09-2016),
Brickbuck (12-09-2017)
11-23-2006, 04:23 AM
#6
Administrator


Member Since: Mar 2001
Location: In a parallel universe. Currently own 2014 Stingray Coupe.
Posts: 342,888
Received 19,284 Likes
on
13,961 Posts
C7 of the Year - Modified Finalist 2021
MO Events Coordinator
St. Jude Co-Organizer
St. Jude Donor '03-'04-'05-'06-'07-'08-'09-'10-'11-'12-'13-'14-'15-'16-'17-'18-'19-
'20-'21-'22-'23-'24
NCM Sinkhole Donor
CI 5, 8 & 11 Veteran

What the heck was that GM parts person thinking? 
11-23-2006, 10:24 AM
#8
Burning Brakes
change bulb
--------------------------------------------------------------------------------
Good job chevyvette1. Thanks for taking the time and pic's to show us the trick.>George
--------------------------------------------------------------------------------
Good job chevyvette1. Thanks for taking the time and pic's to show us the trick.>George
your more than welcome, just trying to help contribute
 11-28-2006, 09:18 PM
#9
I just did both of mine on my 2001 coupe. What isn't mentioned on this page is that there's a tab you must push to be able to rotate the bulb. I had to take most of one headlight out to be able to tell that and then the bulb came right out. The other side only took 2 minutes because I was able to go in through the brake duct hole.
Bulb was a 3057 orange.
STW, Dave
Bulb was a 3057 orange.
STW, Dave
11-29-2006, 03:19 AM
#10
Race Director
Originally Posted by docohm
What isn't mentioned on this page is that there's a tab you must push to be able to rotate the bulb.
 11-29-2006, 08:37 AM
#12
Safety Car

Member Since: Jun 2004
Location: Palmdale CA
Posts: 3,717
Likes: 0
Received 0 Likes
on
0 Posts
St. Jude Donor '06

Originally Posted by VET IT B
What about the lense cover replacement? Mine are both cracked.
Probably much harder to replace. Mark
Mark
Probably much harder to replace.
Markhttp://www.corvetteflorida.com/forum...read.php?t=299
03-24-2011, 09:44 PM
#13
Heel & Toe

Member Since: Mar 2011
Posts: 22
Likes: 0
Received 0 Likes
on
0 Posts
my drivers side goes out all the time, I need a new light, I use to change them the way SPIVET does, but the fastest way for me to change the bulb is to push the brake air duct in a little and then push it down out the way, then just reach your hand in through there, now it takes me litterally 1 to 2 minutes, it's real easy Ozzie
here you go I just went out and took a few pics to show what I do, you can also see how many times the bulb actually exploded, stuck inside the light. The plus side to doing it this way is once you unscrew socket, there is enough wire to pull out the duct and change bulb with 2 hands.
Before.............

with brake duct down............
replacing bulb.................
Ozziehere you go I just went out and took a few pics to show what I do, you can also see how many times the bulb actually exploded, stuck inside the light. The plus side to doing it this way is once you unscrew socket, there is enough wire to pull out the duct and change bulb with 2 hands.
Before.............
with brake duct down............
replacing bulb.................
03-25-2011, 05:57 AM
#14
Safety Car
Dont have time to write it up properly but do a search on melted signal housings, there should be a lot of posts about it.
Basically whats happening is that we have very hot DRL's that over time can melt the top of the housing. Once they do, water can leak in. Water on the hot halogen bulbs will cause them to shatter.....replace bulb....happens again.
Looks like this:
[IMG]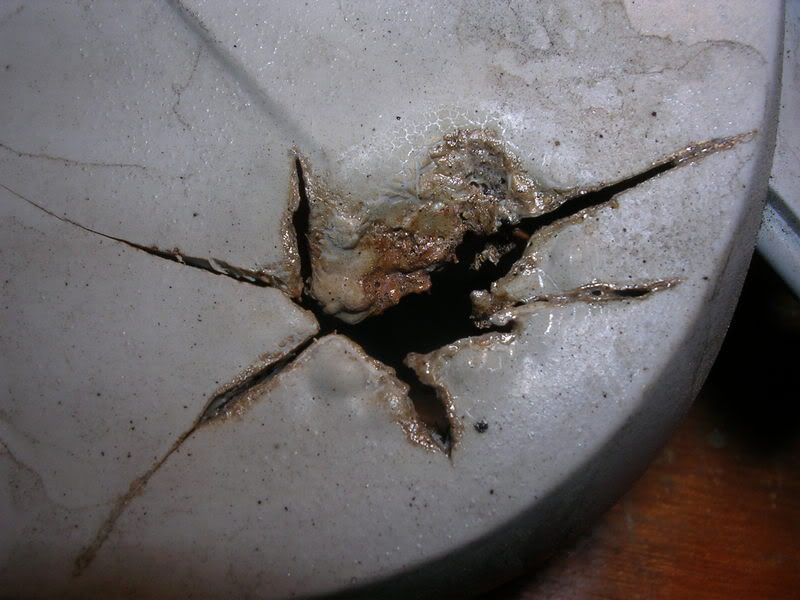 [/IMG]
What many people do is replace (or take the old ones out and seal them so water doesn't get in) the housings with clear ones and install LED bulbs
like these
[IMG]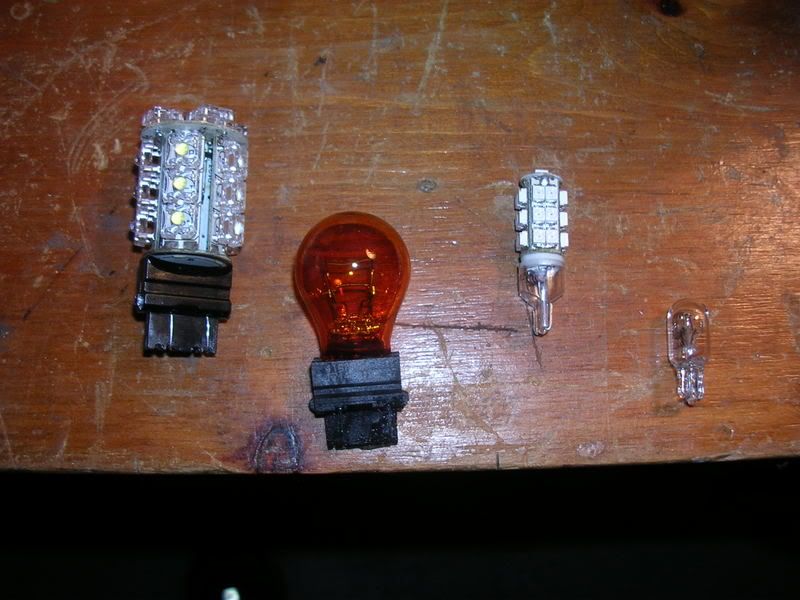 [/IMG]
When you're done it looks like this
[IMG]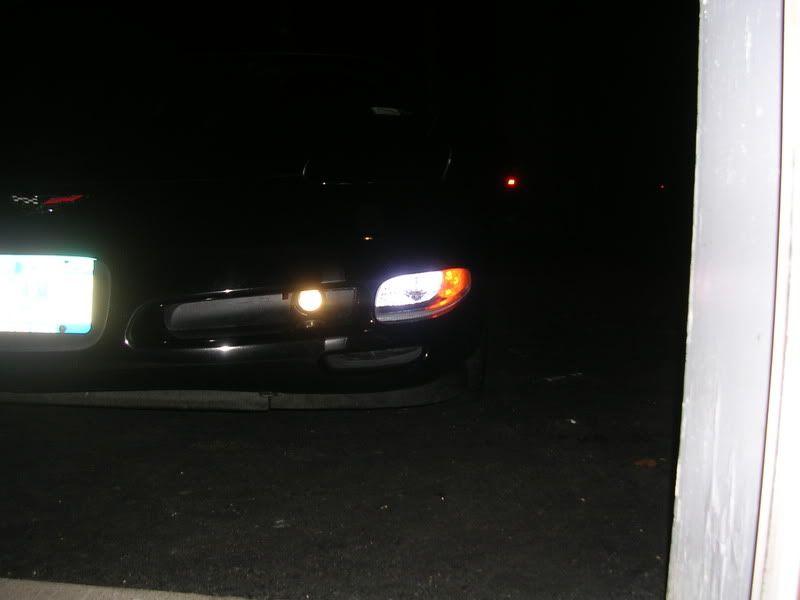 [/IMG]
The LEDs run cooler so it shouldn't happen again. If you change to LED's one thing that can happen is that the turn signal flasher may blink your signals faster. The lower voltage of the LED's makes the flasher think that the regular halogen bulb is burned out, so it flashes faster. Some people leave it like that, others install a flasher bypass (do a search, the vendors on the forum here sell them). Takes about 10 minutes to plug in under the dash and will also mean that you will never have to replace the oem flasher which resides behind the hazard switch in the center of the dash and can be a pain to change if it goes, the bypass....well....bypasses that so you never have that problem.
Good luck
Basically whats happening is that we have very hot DRL's that over time can melt the top of the housing. Once they do, water can leak in. Water on the hot halogen bulbs will cause them to shatter.....replace bulb....happens again.
Looks like this:
[IMG]
[/IMG]What many people do is replace (or take the old ones out and seal them so water doesn't get in) the housings with clear ones and install LED bulbs
like these
[IMG]
[/IMG]When you're done it looks like this
[IMG]
[/IMG]The LEDs run cooler so it shouldn't happen again. If you change to LED's one thing that can happen is that the turn signal flasher may blink your signals faster. The lower voltage of the LED's makes the flasher think that the regular halogen bulb is burned out, so it flashes faster. Some people leave it like that, others install a flasher bypass (do a search, the vendors on the forum here sell them). Takes about 10 minutes to plug in under the dash and will also mean that you will never have to replace the oem flasher which resides behind the hazard switch in the center of the dash and can be a pain to change if it goes, the bypass....well....bypasses that
so you never have that problem.Good luck
Last edited by Jistari; 03-25-2011 at 06:01 AM.

 03-25-2011, 02:37 PM
#17
Le Mans Master

Here ya go, it's a video that shows you the quickest and easiest way to do it.
http://www.youtube.com/watch?v=BaUEoD2CH4k
http://www.youtube.com/watch?v=BaUEoD2CH4k
03-25-2011, 02:50 PM
#18
Race Director

If you have the melted housing as shown above, you can repair it easily with a product called Super Copper. Then use the LED's as mentioned to prevent future issues.
 03-25-2011, 03:16 PM
#20
Melting Slicks

Your bulb is burned out. There are several ways to change it, but most have found that going through the front headlight is the quickest.
1) Turn headlights on and back off one knotch (Headlight stays up but no light)
2) Remove the 3 screws to the black cover around the headlight.
3) The cover has a lip on top, so be careful when removing the black cover
4) Stick your arm through the headlight hole and fill around for the turn signal bulb. It is a tight fit and you have to reach in fairly deep.
Shouldn't take to long.
1) Turn headlights on and back off one knotch (Headlight stays up but no light)
2) Remove the 3 screws to the black cover around the headlight.
3) The cover has a lip on top, so be careful when removing the black cover
4) Stick your arm through the headlight hole and fill around for the turn signal bulb. It is a tight fit and you have to reach in fairly deep.
Shouldn't take to long.