
Look Guys, NO MORE Coils(pics).....[Dial-up..SORRY]
 11-11-2006, 12:49 AM
#1
Drifting

Thread Starter
Member Since: Jun 2004
Location: St. louis, Missouri
Posts: 1,483
Likes: 0
Received 0 Likes
on
0 Posts

Well finally got around to relocating my coils. I tried something different last winter w/ the coils and valve cover,

but in the end I preferred to have the coils gone.
The kit I used is MSD #32079. You can see in the picture, they have the straight boot or 90* one, you figure what side you WANT to use and once your length is determined, cut it and crimp on the coil terminal and boot. The longest wire you see is around 48" and the shortest around 28". The wires are 40-ohms per foot. So my longest one I made is at 148ohms. Compared to the factory of 425ohms

Next I made the brackets for the coils. I used 1/4-20 threaded rod, w/ nylon nut and washer on one end. Then slipped the coil on and cut a 1/2 aluminum tube to 1 1/8" long to act as a spacer between the coils.
Then took my coil harness apart and remade that, so the connector could reach.

For mounting the coils, there is plenty of room in the corner behind the battery,

you might have to push some stuff out of the way, but they will fit.

ran the wires along the firewall and ,the same way the battery cable is going to the starter. Plenty of room and no interference


Driver side was tricky, I didn't want to mount them on the frame rail, due to the drainage hoses for the wiper cowl. I don't want to take a chance of water draining onto the coils. So I removed the inner wheel liner. Drilled a hole under the hood latch and passed a bolt through so the coils can be hanged. Then I ran the wires under the brake booster and steering shaft, to the engine block where the turn left and go to the respective spark plug


I'm hoping to be different here, by using the 90* boots on the plugs, that way the wires can stay between the headers and block, and it wont look like noodles everywhere. Secured the wires in place and Ta-Da


So since the MAgnason install, I went from this

TO

and finally to this....NOTICE..Lack of exposed wiring
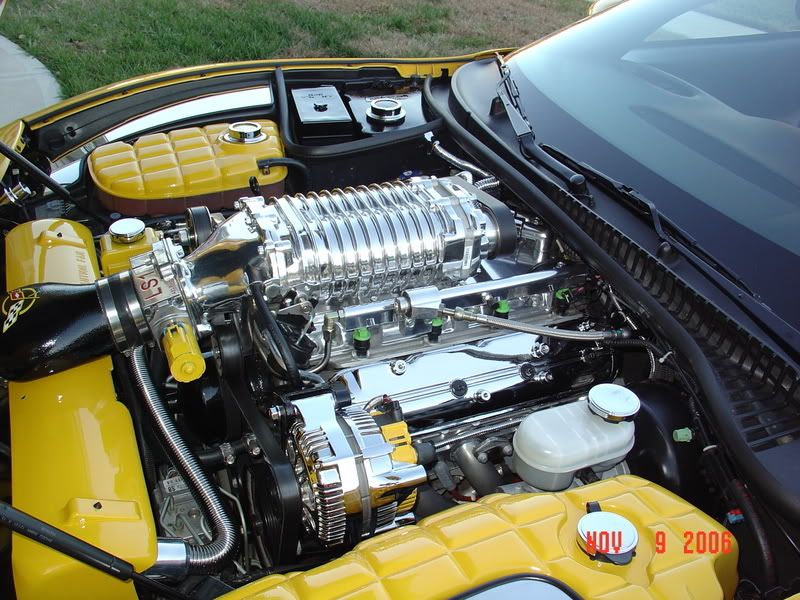

I had the valve covers chromed last year, and now w/ the coils gone I will be having the mounting bosses milled off and ground smooth, then re-chromed
So what do you people think?

Also, a little detail most might miss. I switched the the inter-cooler hoses at the blower so they dont cross over each other. Makes it look cleaner
but in the end I preferred to have the coils gone.
The kit I used is MSD #32079. You can see in the picture, they have the straight boot or 90* one, you figure what side you WANT to use and once your length is determined, cut it and crimp on the coil terminal and boot. The longest wire you see is around 48" and the shortest around 28". The wires are 40-ohms per foot. So my longest one I made is at 148ohms. Compared to the factory of 425ohms
Next I made the brackets for the coils. I used 1/4-20 threaded rod, w/ nylon nut and washer on one end. Then slipped the coil on and cut a 1/2 aluminum tube to 1 1/8" long to act as a spacer between the coils.
Then took my coil harness apart and remade that, so the connector could reach.
For mounting the coils, there is plenty of room in the corner behind the battery,
you might have to push some stuff out of the way, but they will fit.
ran the wires along the firewall and ,the same way the battery cable is going to the starter. Plenty of room and no interference
Driver side was tricky, I didn't want to mount them on the frame rail, due to the drainage hoses for the wiper cowl. I don't want to take a chance of water draining onto the coils. So I removed the inner wheel liner. Drilled a hole under the hood latch and passed a bolt through so the coils can be hanged. Then I ran the wires under the brake booster and steering shaft, to the engine block where the turn left and go to the respective spark plug
I'm hoping to be different here, by using the 90* boots on the plugs, that way the wires can stay between the headers and block, and it wont look like noodles everywhere. Secured the wires in place and Ta-Da
So since the MAgnason install, I went from this
TO
and finally to this....NOTICE..Lack of exposed wiring
I had the valve covers chromed last year, and now w/ the coils gone I will be having the mounting bosses milled off and ground smooth, then re-chromed
So what do you people think?
Also, a little detail most might miss. I switched the the inter-cooler hoses at the blower so they dont cross over each other. Makes it look cleaner


 11-11-2006, 01:06 AM
#6
Drifting
Thread Starter
Member Since: Jun 2004
Location: St. louis, Missouri
Posts: 1,483
Likes: 0
Received 0 Likes
on
0 Posts
Originally Posted by mike76002
Man, those look clean
Any issue if the wires are too long?
-Mike
Any issue if the wires are too long?
-Mike
11-11-2006, 02:38 AM
#10
Pro

it looks absolutely amazing.
As far as function, I like the idea of having the coil directly above each cylinder and each wire being equal in length... knowing that each wire is providing the same amount of resistance. No matter how you look at it, the shorter wire is providing a better spark than the longer.
As far as function, I like the idea of having the coil directly above each cylinder and each wire being equal in length... knowing that each wire is providing the same amount of resistance. No matter how you look at it, the shorter wire is providing a better spark than the longer.
11-11-2006, 02:48 AM
#11
Team Owner

Member Since: Mar 2001
Location: Virginia Beach
Posts: 25,889
Likes: 0
Received 5 Likes
on
5 Posts
CI 3-5-6-7-8 Veteran

Man I love it... it's been a winter project for awhile. The wiring is iffy, but the end result is so clean.
I custom painted my covers a few months back in my big mod project... I hated having to put the coils back on!

Here's how it looks all done.

I'm just worried about the wires hitting the headers when running HPDEs.
I custom painted my covers a few months back in my big mod project... I hated having to put the coils back on!
Here's how it looks all done.
I'm just worried about the wires hitting the headers when running HPDEs.
Last edited by Cobra4B; 11-11-2006 at 02:50 AM.

 11-11-2006, 06:54 AM
#15
Administrator


Member Since: Mar 2001
Location: In a parallel universe. Currently own 2014 Stingray Coupe.
Posts: 343,213
Received 19,359 Likes
on
14,010 Posts
C7 of the Year - Modified Finalist 2021
MO Events Coordinator
St. Jude Co-Organizer
St. Jude Donor '03-'04-'05-'06-'07-'08-'09-'10-'11-'12-'13-'14-'15-'16-'17-'18-'19-
'20-'21-'22-'23-'24
NCM Sinkhole Donor
CI 5, 8 & 11 Veteran


I love it. That engine looks so good. Congrats on a fine job.


 11-11-2006, 09:16 AM
#19
Race Director

Member Since: Oct 2002
Location: Vancouver
Posts: 11,945
Likes: 0
Received 11 Likes
on
6 Posts
2015 C5 of Year Finalist
St. Jude Donor '05-'06-'07-'08-'09-'10
Originally Posted by BiggieBoy
Now, that's the way a engine is suppost to look...Great job..
 Sweet!! That's such a clean look.