New Rear Paint Job Mod
 01-28-2006, 02:52 PM
#1
Pro


Thread Starter
Member Since: Dec 2005
Location: Vettemod.com For the C3 People
Posts: 699
Likes: 0
Received 0 Likes
on
0 Posts
St. Jude Donor '06

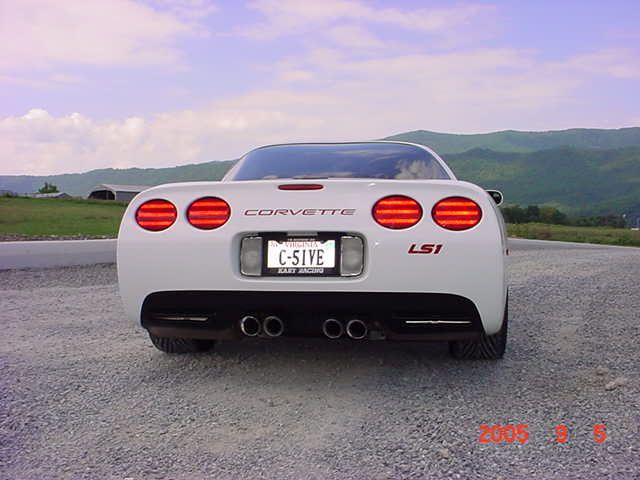
You gotta do this one, it is too easy. Prep-ed, painted in less than 1 hour.
Way Cool mod, that is CHEAP!
tt
Way Cool mod, that is CHEAP!
tt

 01-28-2006, 03:10 PM
#3
Race Director

Member Since: Apr 2004
Location: Bronson FL
Posts: 16,135
Likes: 0
Received 3 Likes
on
3 Posts
Cruise-In VIII Veteran
St. Jude Donor '07

Originally Posted by JoshVette
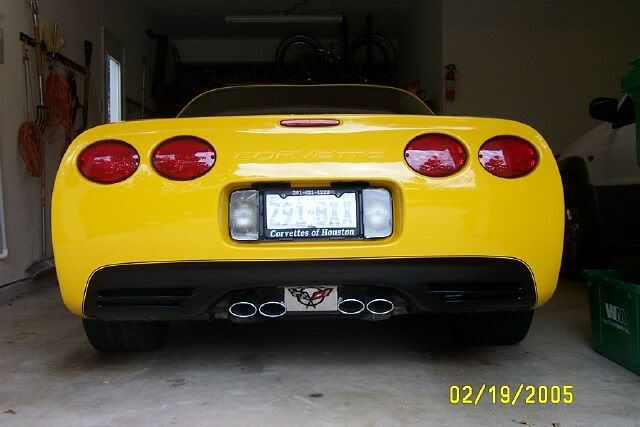
Lookin good, don't know how this would look on my black coupe though. 


I love that look on the silver and yellow vettes, would love to see red on a black vette.


 01-28-2006, 08:49 PM
#9
Team Owner

Member Since: Mar 2004
Location: Oklahoma City OK
Posts: 58,264
Received 1,680 Likes
on
1,302 Posts
C6 of Year Finalist (appearance mods) 2019

Originally Posted by JoshVette
Lookin good, don't know how this would look on my black coupe though.
01-28-2006, 09:12 PM
#10
Pro
Thread Starter
Member Since: Dec 2005
Location: Vettemod.com For the C3 People
Posts: 699
Likes: 0
Received 0 Likes
on
0 Posts
St. Jude Donor '06
Originally Posted by mph1972
I love that look on the silver and yellow vettes, would love to see red on a black vette.
01-28-2006, 09:13 PM
#11
Pro
Thread Starter
Member Since: Dec 2005
Location: Vettemod.com For the C3 People
Posts: 699
Likes: 0
Received 0 Likes
on
0 Posts
St. Jude Donor '06
Originally Posted by talon90
That looks great!  I guess I'm a little partial.
Paul

I guess I'm a little partial. Paul
tt
01-28-2006, 09:14 PM
#12
Pro
Thread Starter
Member Since: Dec 2005
Location: Vettemod.com For the C3 People
Posts: 699
Likes: 0
Received 0 Likes
on
0 Posts
St. Jude Donor '06
Originally Posted by mjmc1273
I like it, too......
01-28-2006, 09:32 PM
#13
Safety Car

Originally Posted by gr8vet
You gotta do this one, it is too easy. Prep-ed, painted in less than 1 hour.
Way Cool mod, that is CHEAP!
tt
Way Cool mod, that is CHEAP!
tt
What are the details? How'd you prep it, what paint etc? Me likey....
 01-28-2006, 09:35 PM
#15
Pro
Thread Starter
Member Since: Dec 2005
Location: Vettemod.com For the C3 People
Posts: 699
Likes: 0
Received 0 Likes
on
0 Posts
St. Jude Donor '06
Originally Posted by USARMYTTT
Give us your "How to".
Looks great!
Looks great!
The best tape off tape I have ever found is 3M electrical tape, you can do some nice curves while stretching it around.
Use some good body shop wax remover paint prep first, most important step.
Tape off, I went right to the edge of bend. Wax remover again.
Wet sand 1000 grit, 3M brand, lots of water. Make sure you get all the way to the tape. If you do not scuff up, the new paint will not stick.
Rinse, towel dry, allow to air dry, water will catch under the skirt, beware, beat out shake out e.t.c.
Remove tape, clean all areas again, apply new tape, same 3M electrical tape. Get some of that cheap masking tape with plastic already attached, makes for quick cover. Cover mufflers, tips, and cover entire car.
One more time with the wax remover, paint prep. Allow to air dry. Get paint ready, take a tac coth, wipe down.
Spray light to medium coat, working left to right, or vis a versa. Start in the vents, then underside where it is hard to get to.
Allow to dry about 10 minutes or so, until not tacky.
Apply another coat, just when it begins to gloss up move on.
I used "black trim paint", it is flexible and made to go on such a body part as this and provides a nice satin finish, drys quick, allows for touch up.
Allow about 15 mins +, remove tape, Your done!
I almost broke out the automotive spray gun, top of the line paint and fired up the ole Ingersol Rand, too much trouble for such an easy spray. Would have taken longer to clean everything up.
(I would like to see flat black on a black vet) or a really dark red on black.
There is always more than one way to do this, but this did work great for me. Hope this helps. Cost less than $10 and really makes your vet something different.
tt
Loved the pics from the other guys! Thanks!
01-28-2006, 09:37 PM
#16
Pro
Thread Starter
Member Since: Dec 2005
Location: Vettemod.com For the C3 People
Posts: 699
Likes: 0
Received 0 Likes
on
0 Posts
St. Jude Donor '06
Originally Posted by wicked 98z
Did you use glossy or flat black? WHat kind of paint was it
01-28-2006, 09:48 PM
#17
Safety Car

Member Since: Mar 2004
Location: Don't taze me 'Bro! VA
Posts: 4,703
Likes: 0
Received 1 Like
on
1 Post
Originally Posted by gr8vet
I used to do this stuff, before others thought it was cool. Now 30 years later I guess it is....
The best tape off tape I have ever found is 3M electrical tape, you can do some nice curves while stretching it around.
Use some good body shop wax remover paint prep first, most important step.
Tape off, I went right to the edge of bend. Wax remover again.
Wet sand 1000 grit, 3M brand, lots of water. Make sure you get all the way to the tape. If you do not scuff up, the new paint will not stick.
Rinse, towel dry, allow to air dry, water will catch under the skirt, beware, beat out shake out e.t.c.
Remove tape, clean all areas again, apply new tape, same 3M electrical tape. Get some of that cheap masking tape with plastic already attached, makes for quick cover. Cover mufflers, tips, and cover entire car.
One more time with the wax remover, paint prep. Allow to air dry. Get paint ready, take a tac coth, wipe down.
Spray light to medium coat, working left to right, or vis a versa. Start in the vents, then underside where it is hard to get to.
Allow to dry about 10 minutes or so, until not tacky.
Apply another coat, just when it begins to gloss up move on.
I used "black trim paint", it is flexible and made to go on such a body part as this and provides a nice satin finish, drys quick, allows for touch up.
Allow about 15 mins +, remove tape, Your done!
I almost broke out the automotive spray gun, top of the line paint and fired up the ole Ingersol Rand, too much trouble for such an easy spray. Would have taken longer to clean everything up.
(I would like to see flat black on a black vet) or a really dark red on black.
There is always more than one way to do this, but this did work great for me. Hope this helps. Cost less than $10 and really makes your vet something different.
tt
Loved the pics from the other guys! Thanks!