My '90 ZR-1 project update thread...
 04-25-2010, 12:06 AM
#1
Drifting

Thread Starter
Member Since: Jun 2007
Location: Prather, California -1990 ZR-1 White/Flame Red- -SOLD!!-
Posts: 1,261
Likes: 0
Received 2 Likes
on
2 Posts

Decided to keep a update thread going here in addition to the thread I have going over at the ZR-1 Registry forums for anyone here that was interested in my '90 ZR-1 restoration project that maybe don't go to those forums. I have copied all my previous updates & pics over from that thread except for the other guys' posts & my responses to them. I will continue to keep both threads updated on my progress with info and of course lots of pics!
If you want to see the very beginnings of this project from when I first bought the car, go here:
http://www.zr1.net/forum/showthread....ight=bdw18_123
(9/9/2009)
I'm still in the 'cleaning everything real good' stage, which is turning out to be a very large project just by itself. I just can't stand putting something back together dirty, even if it takes a lot of work to get it clean.
The previous owner replaced the fuel injectors, but I didn't know where he got them from. Then I happened to look in the bag of the old, original injectors and I found these:
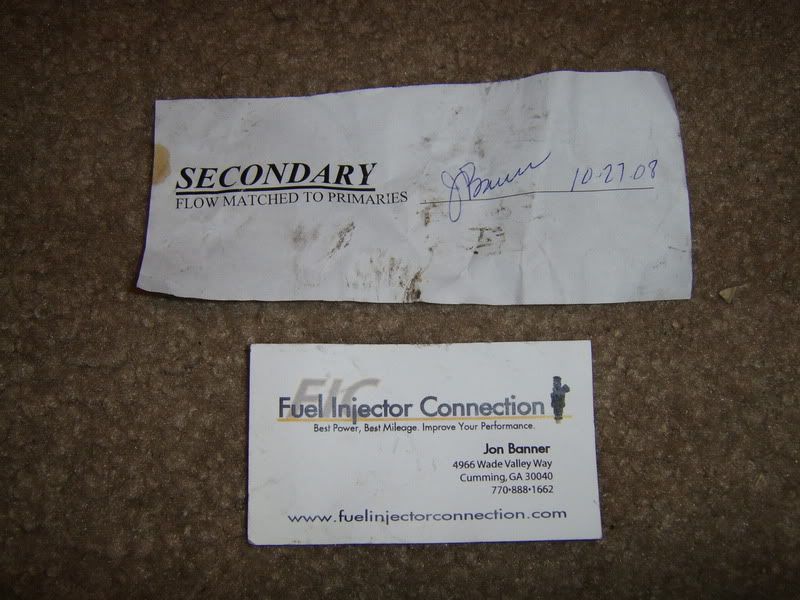
Which was a pleasant surprise as I have heard nothing but glowing reviews about FIC, so I know the injectors are good quality.
Here are a few before and after clean-up pics:
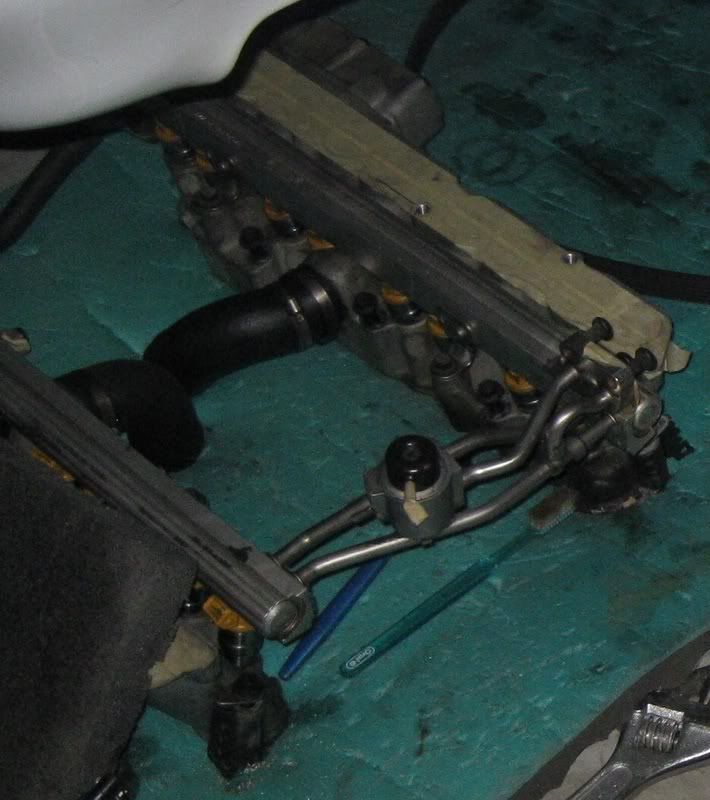
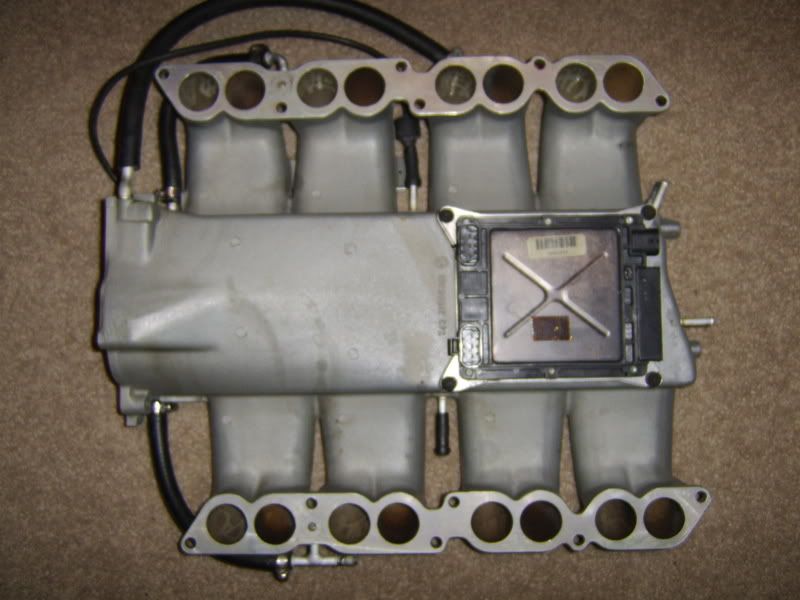
Fuel injector rails & IH's before
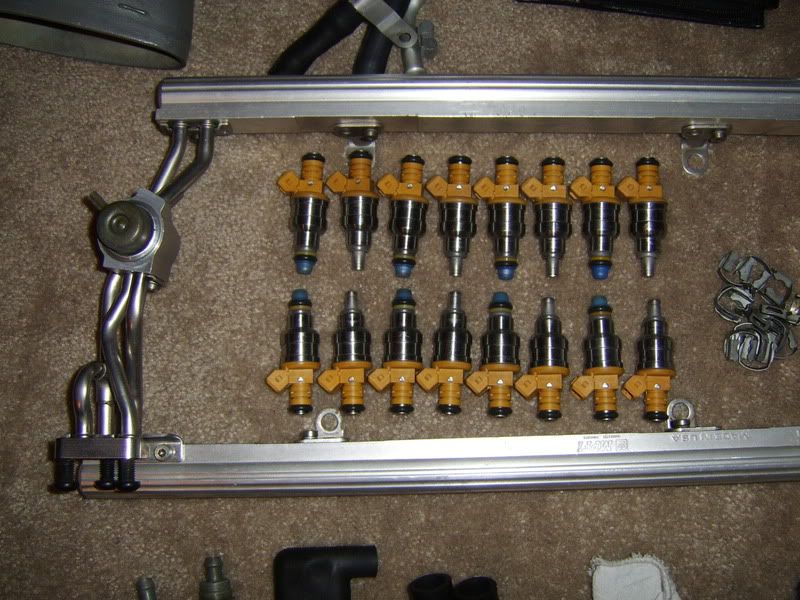
Fuel injectors & rails after (also installed the new fuel pressure regulator, which came with the car)
IH assemblies after
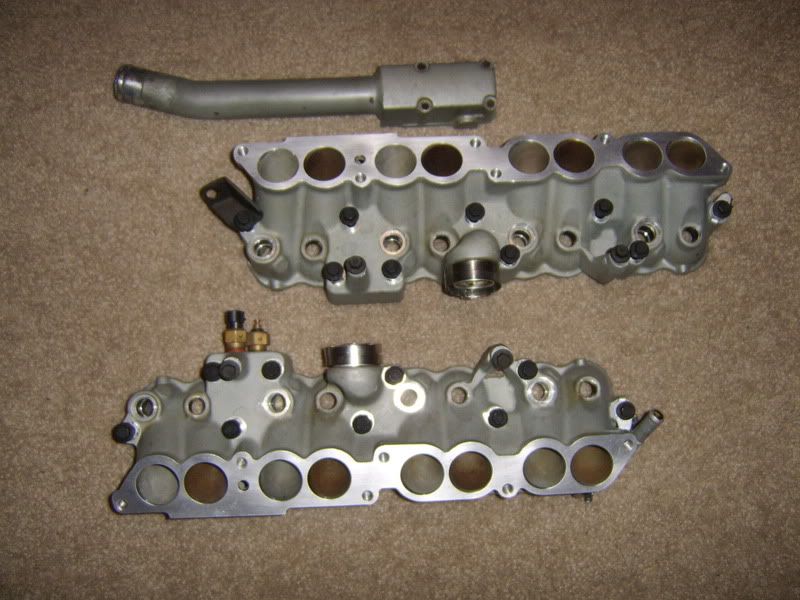
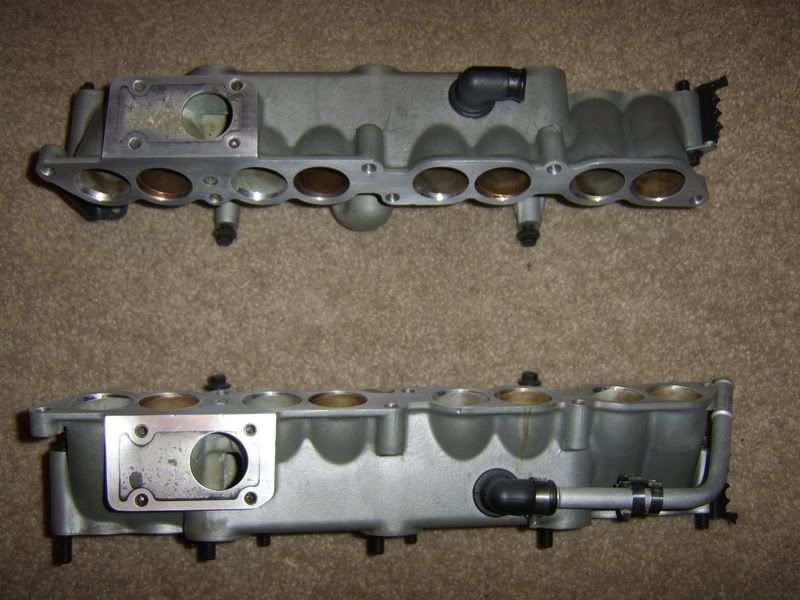
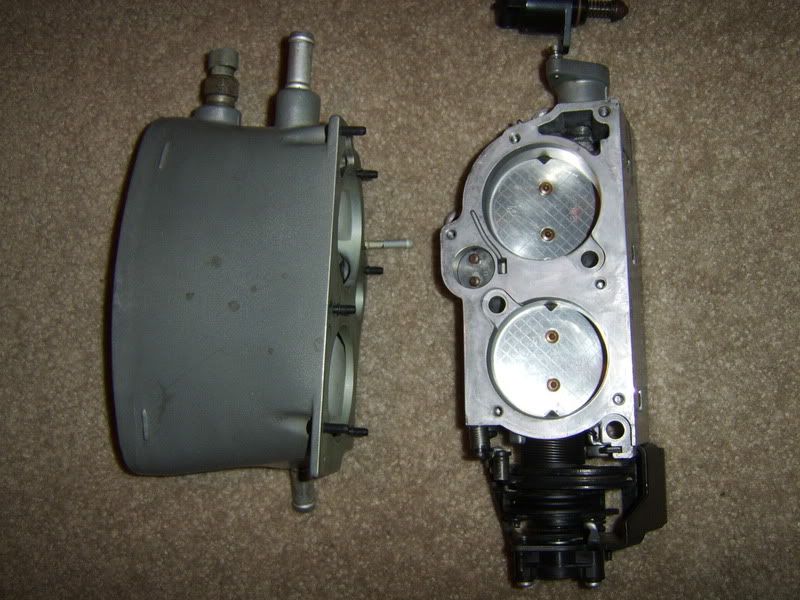
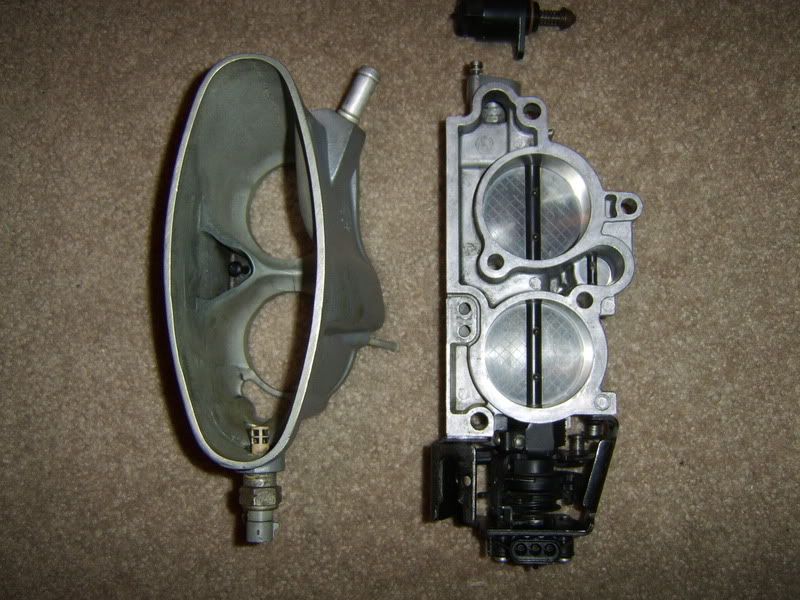
Plenum, throttle body & airhorn before
Plenum after
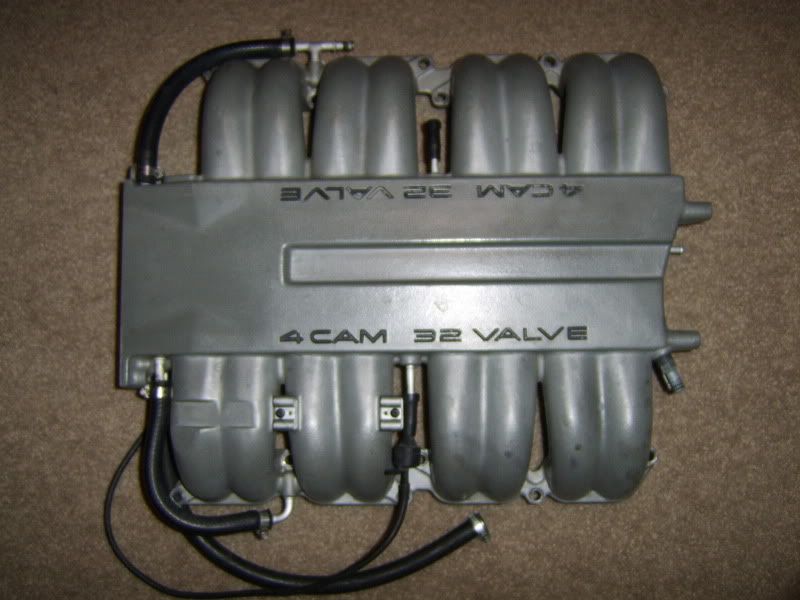
Throttle body & airhorn after
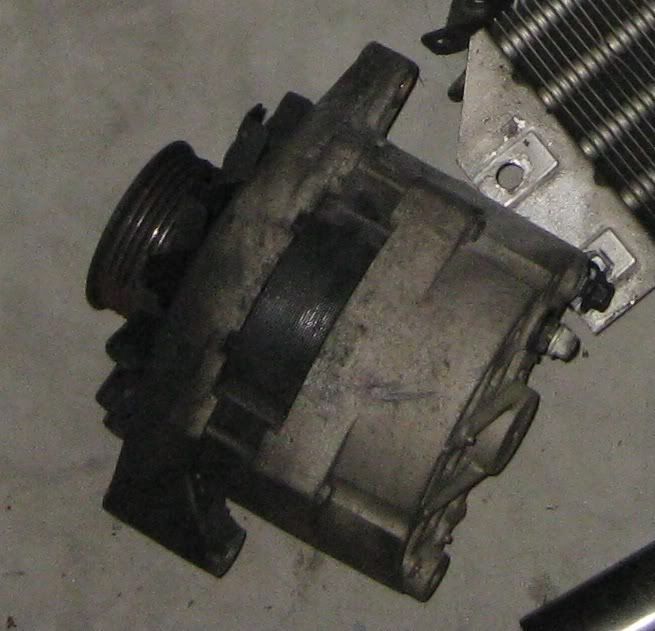
Alternator before
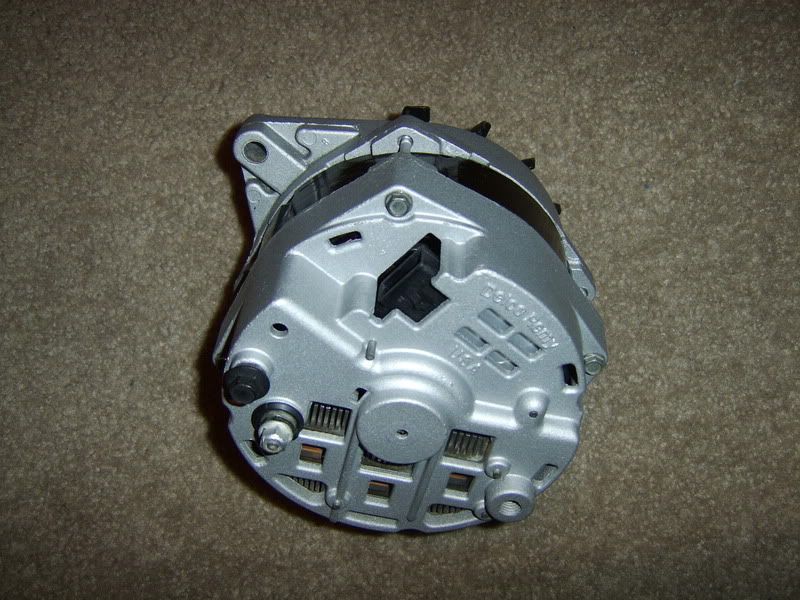
Alternator after (I painted the aluminum case halves with paint that imitates new cast aluminum look, cleaned interior of alternator also)

The plenum, IH's & airhorn/throttle body cleaned up pretty good. There are some stains I can't get out and the top of the throttle body has an area where the coating is missing, but they look much better than before.
That's it for now.
(9/16/2009)
Couple more before & after cleanup pics.
Before:
After:

Before (it was actually much more oily/dirty, I wiped the worst off before this pic):

After:
If you want to see the very beginnings of this project from when I first bought the car, go here:
http://www.zr1.net/forum/showthread....ight=bdw18_123
(9/9/2009)
I'm still in the 'cleaning everything real good' stage, which is turning out to be a very large project just by itself. I just can't stand putting something back together dirty, even if it takes a lot of work to get it clean.
The previous owner replaced the fuel injectors, but I didn't know where he got them from. Then I happened to look in the bag of the old, original injectors and I found these:
Which was a pleasant surprise as I have heard nothing but glowing reviews about FIC, so I know the injectors are good quality.
Here are a few before and after clean-up pics:
Fuel injector rails & IH's before
Fuel injectors & rails after (also installed the new fuel pressure regulator, which came with the car)
IH assemblies after
Plenum, throttle body & airhorn before
Plenum after
Throttle body & airhorn after
Alternator before
Alternator after (I painted the aluminum case halves with paint that imitates new cast aluminum look, cleaned interior of alternator also)
The plenum, IH's & airhorn/throttle body cleaned up pretty good. There are some stains I can't get out and the top of the throttle body has an area where the coating is missing, but they look much better than before.
That's it for now.
(9/16/2009)
Couple more before & after cleanup pics.
Before:
After:
Before (it was actually much more oily/dirty, I wiped the worst off before this pic):
After:
 04-25-2010, 12:14 AM
#2
Drifting
Thread Starter
Member Since: Jun 2007
Location: Prather, California -1990 ZR-1 White/Flame Red- -SOLD!!-
Posts: 1,261
Likes: 0
Received 2 Likes
on
2 Posts
(3/24/2010)
UPDATE:
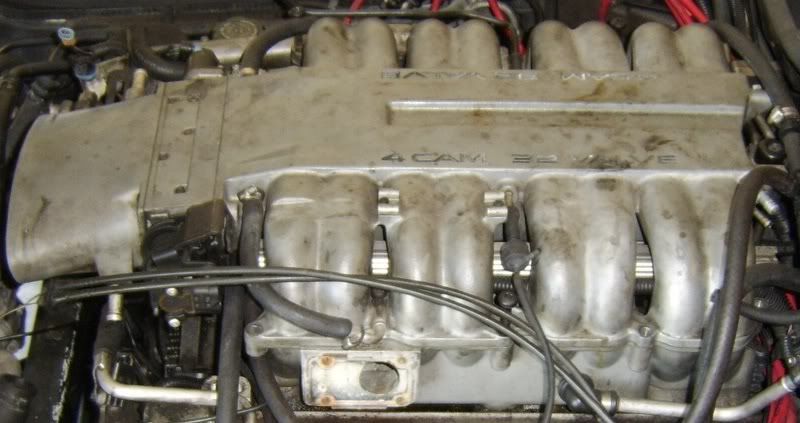
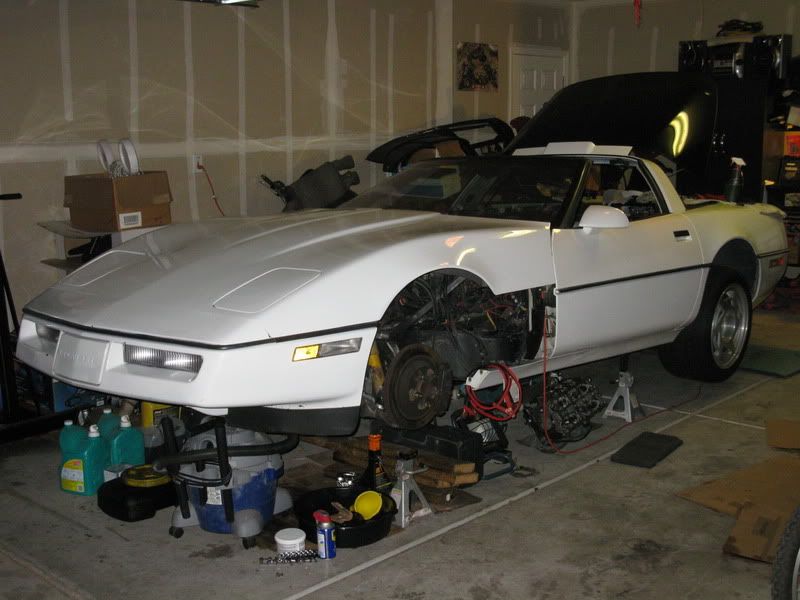
Thought I'd post a few pictures to show where this project is at since I haven't posted any updates in a long time. It's been slow going as I don't have much extra money right now to start buying everything for it. I've just been slowly buying small things here and there that I need. There is lots and lots of cleaning to do though to keep me busy in the meantime. I did some polishing of the paint with some 3M cutting compound, looks a lot better. Here is an exterior shot:
I decided to start doing some work on the interior and get the stock Bose system back in and working. I bought a full set of stock speakers/amps a couple months ago since mine had aftermarket speakers installed & I want to put the radio system back to stock. I'm going to do the elmer's woodglue trick to the stock speakers to make them have a more clean, crisp sound. Didn't have to buy the head unit or the CDM though, the originals came with the car.
I tested the head unit in the '93 I had before I sold it and it works fine except for the CD player which doesn't matter much since I don't really use CD's much anymore. Just going to hook my iPod up to it with a cassette adapter. The head unit has that "Delco Loc" feature, but it never had a code programmed in, so I don't have that headache to deal with.
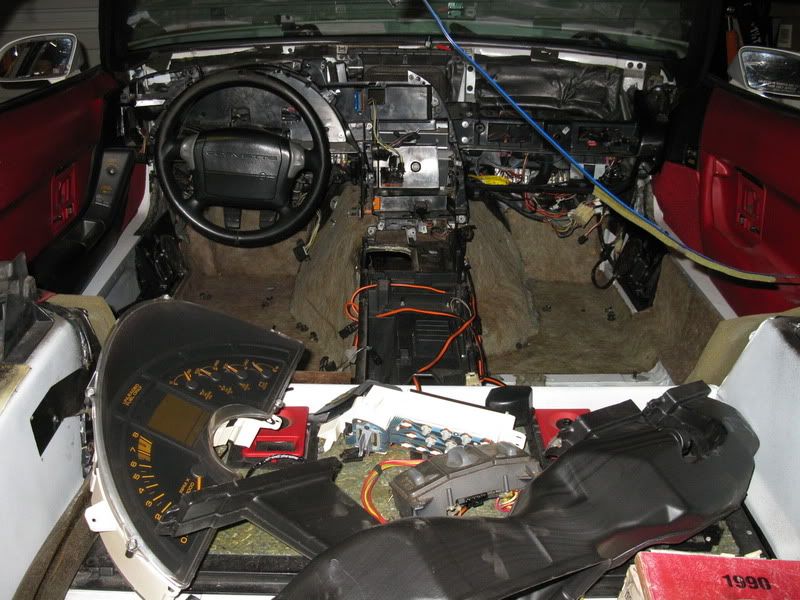
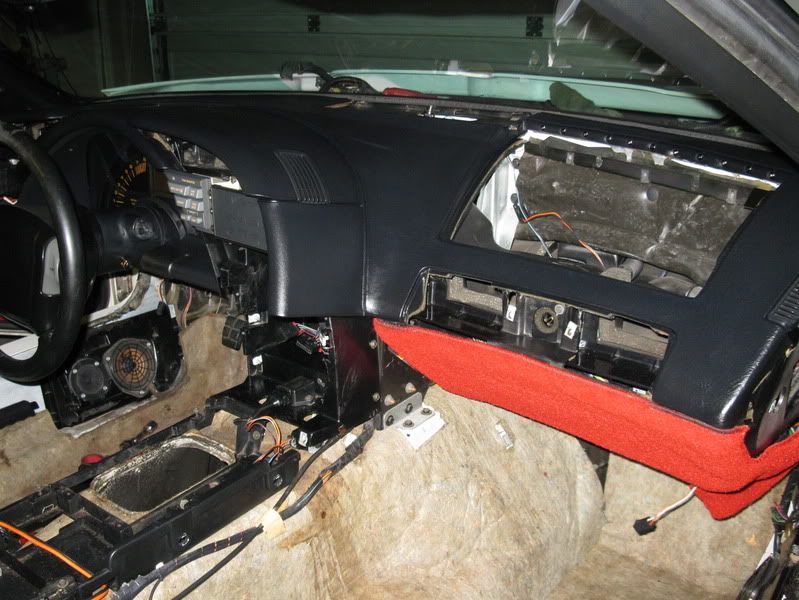
As you can see, I've removed pretty much the entire interior except for the door panels. Going to clean everything really good. I had to take apart the dash to replace the wire harness that goes from the radio head unit to the CDM. The previous owner cut it up when he installed the aftermarket radio. I also had to splice the stock rear speaker connectors back in since he cut those off too. I wrapped the repairs in electrical tape so you can't see them.
I have ZR-1 parts all over the place (including in my bedroom) :
:
I think something is missing here :...
:...

(4/22/2010)
UPDATE:
I've decided that I'm not going to replace the heater core. I pressure tested the heater core that is in the car and it did not leak, so I think it will work fine. Didn't feel like taking more stuff apart to get to it. I know I'm taking a gamble, but it's a gamble I'm willing to take.
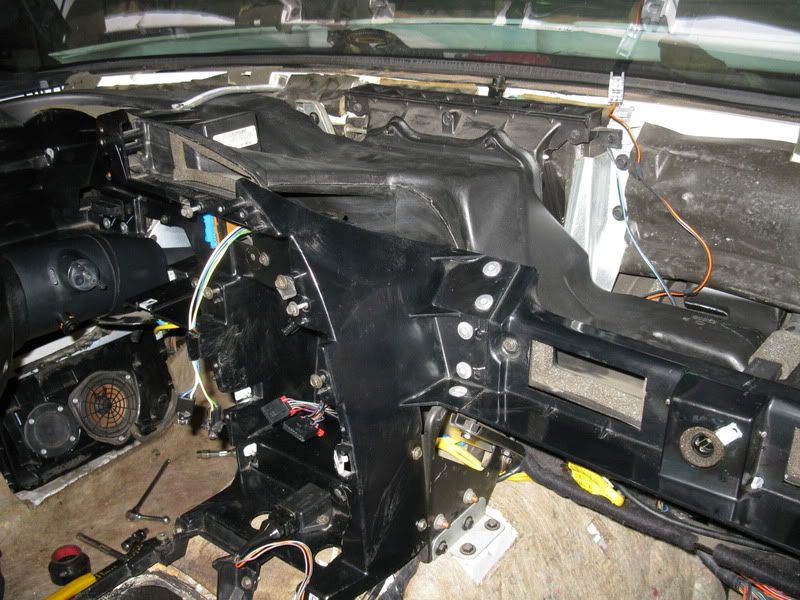
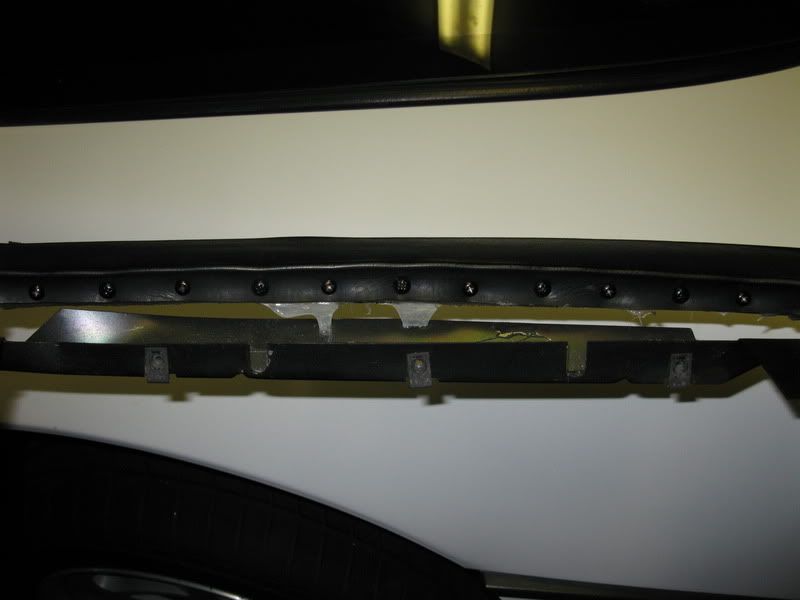
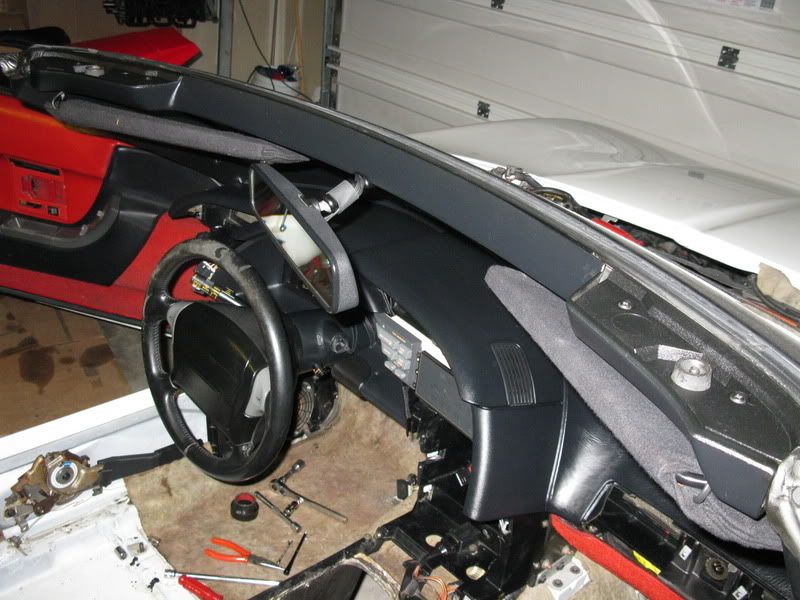
Anyway, I've got the dash vent ducting back in and bolted the dash skeleton back on.
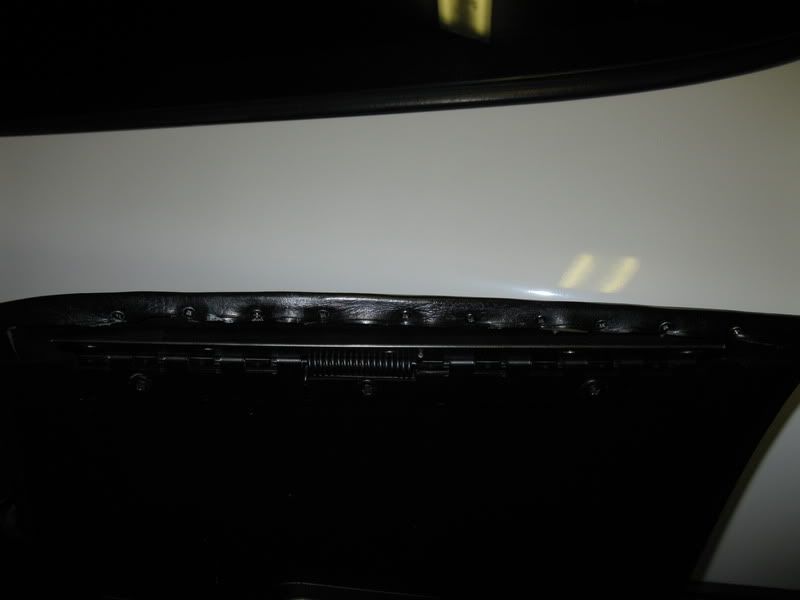
When I was taking the ducting out and had removed this piece (I put new foam on it, the stock stuff had crumbled away)...
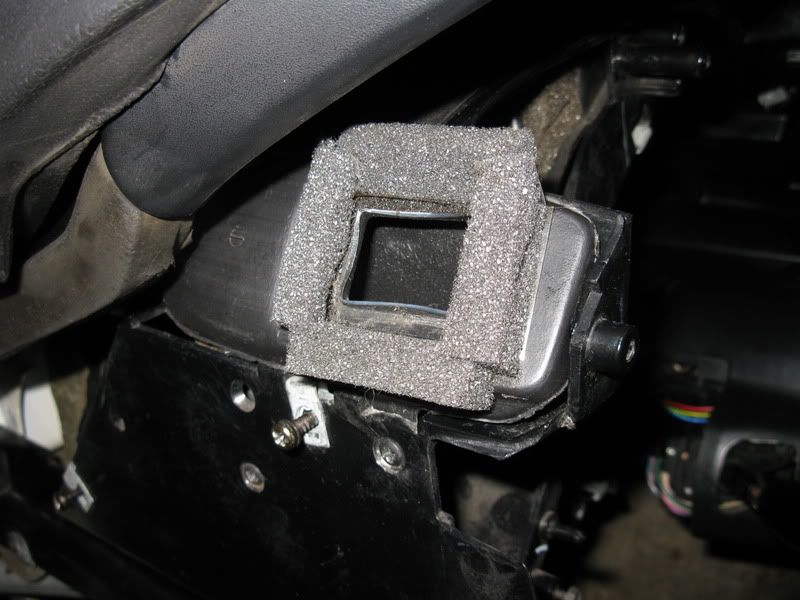
I found that GM messed up and forgot to completely remove the plug from the hole, so I removed it all the way. That vent sure wouldn't work very good with that plastic in the way!
Gauges have been reinstalled after removing the clear plastic and cleaning both sides with plastic polish. Also cleaned up the dust that had collected below the gauges behind the clear plastic. I also removed all the bulbs in the back one by one and cleaned them since I had found that they were really dusty.

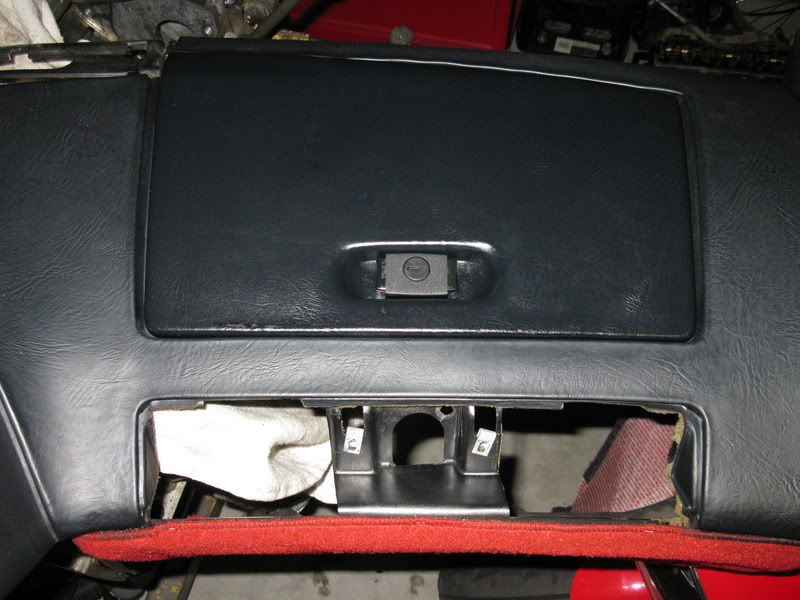
Dash pad had some issues around the top of the glovebox door...

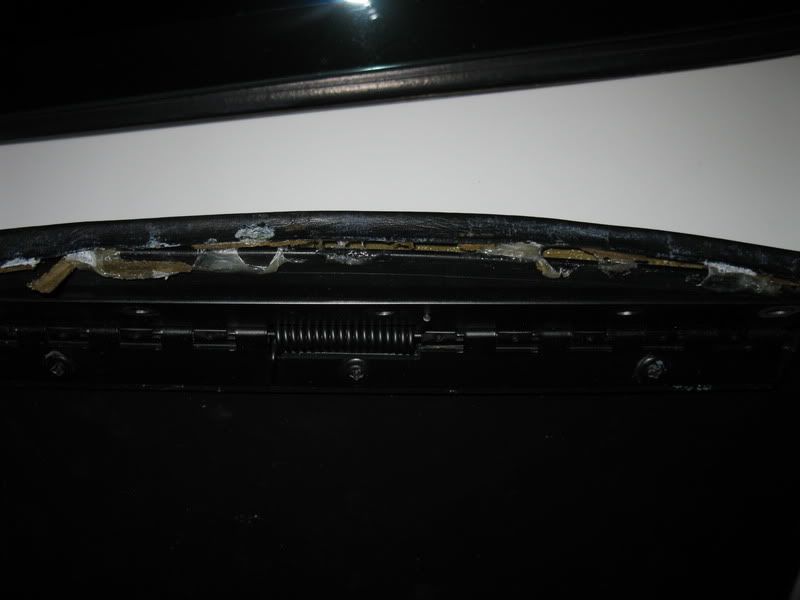
You can tell someone tried to glue it, but obviously that didn't last. I decided to use screws to hold the edges down since those areas are pretty much hidden from view. I drilled pilot holes and put the screws in. It's not perfect, but it looks a lot better. The door will also open and close better now.
I've been using Mother's "Back to Black" plastic restorer on all the non-painted plastic and vinyl interior parts. I love this stuff! What a difference it makes! The parts don't have to be black either. It makes the plastic look almost new again, as long as it isn't too oxidized or brittle. It takes away that dull, flat look that old plastic & vinyl has.
Here is an example. In this picture, I have applied "Back to Black" to the glove box door, but not the surrounding dash. You can see that the door is a lot blacker (the flash lightens the black somewhat, it's darker in person).
UPDATE:
Thought I'd post a few pictures to show where this project is at since I haven't posted any updates in a long time. It's been slow going as I don't have much extra money right now to start buying everything for it. I've just been slowly buying small things here and there that I need. There is lots and lots of cleaning to do though to keep me busy in the meantime. I did some polishing of the paint with some 3M cutting compound, looks a lot better. Here is an exterior shot:
I decided to start doing some work on the interior and get the stock Bose system back in and working. I bought a full set of stock speakers/amps a couple months ago since mine had aftermarket speakers installed & I want to put the radio system back to stock. I'm going to do the elmer's woodglue trick to the stock speakers to make them have a more clean, crisp sound. Didn't have to buy the head unit or the CDM though, the originals came with the car.
I tested the head unit in the '93 I had before I sold it and it works fine except for the CD player which doesn't matter much since I don't really use CD's much anymore. Just going to hook my iPod up to it with a cassette adapter. The head unit has that "Delco Loc" feature, but it never had a code programmed in, so I don't have that headache to deal with.
As you can see, I've removed pretty much the entire interior except for the door panels. Going to clean everything really good. I had to take apart the dash to replace the wire harness that goes from the radio head unit to the CDM. The previous owner cut it up when he installed the aftermarket radio. I also had to splice the stock rear speaker connectors back in since he cut those off too.
I wrapped the repairs in electrical tape so you can't see them.I have ZR-1 parts all over the place (including in my bedroom)
:I think something is missing here
:... (4/22/2010)
UPDATE:
I've decided that I'm not going to replace the heater core. I pressure tested the heater core that is in the car and it did not leak, so I think it will work fine. Didn't feel like taking more stuff apart to get to it. I know I'm taking a gamble, but it's a gamble I'm willing to take.
Anyway, I've got the dash vent ducting back in and bolted the dash skeleton back on.
When I was taking the ducting out and had removed this piece (I put new foam on it, the stock stuff had crumbled away)...
I found that GM messed up and forgot to completely remove the plug from the hole, so I removed it all the way. That vent sure wouldn't work very good with that plastic in the way!
Gauges have been reinstalled after removing the clear plastic and cleaning both sides with plastic polish. Also cleaned up the dust that had collected below the gauges behind the clear plastic. I also removed all the bulbs in the back one by one and cleaned them since I had found that they were really dusty.
Dash pad had some issues around the top of the glovebox door...
You can tell someone tried to glue it, but obviously that didn't last. I decided to use screws to hold the edges down since those areas are pretty much hidden from view. I drilled pilot holes and put the screws in. It's not perfect, but it looks a lot better. The door will also open and close better now.
I've been using Mother's "Back to Black" plastic restorer on all the non-painted plastic and vinyl interior parts. I love this stuff! What a difference it makes! The parts don't have to be black either. It makes the plastic look almost new again, as long as it isn't too oxidized or brittle. It takes away that dull, flat look that old plastic & vinyl has.
Here is an example. In this picture, I have applied "Back to Black" to the glove box door, but not the surrounding dash. You can see that the door is a lot blacker (the flash lightens the black somewhat, it's darker in person).
Last edited by bdw18_123; 04-25-2010 at 12:17 AM.


 04-25-2010, 12:51 PM
#7
Drifting
bdw18_123,
You've really done a great job so far. While you have a good ways to go it's apparent you have what it takes to finish the job. I hope you can get the engine repaired and the car back together soon so you can enjoy driving it!
I remember you posting a few pictures of what you found when you pulled the head. Do you now know full extent of damage and what you need to fix it? Do you now have everything you need to get the engine running again?
Great job and best of luck.
Last edited by hiznhrz; 04-25-2010 at 06:43 PM.
04-25-2010, 04:21 PM
#8
Drifting
Thread Starter
Member Since: Jun 2007
Location: Prather, California -1990 ZR-1 White/Flame Red- -SOLD!!-
Posts: 1,261
Likes: 0
Received 2 Likes
on
2 Posts
You guessed correctly! 
bdw18_123,
You've really done a great job so far. While you have a good ways to do it's apparent you have what it takes to finish the job. I hope you can get the engine repaired and the car back together soon so you can enjoy driving it!
I remember you posting a few pictures of what you found when you pulled the head. Do you now know full extent of damage and what you need to fix it? Do you now have everything you need to get the engine running again?
Great job and best of luck.
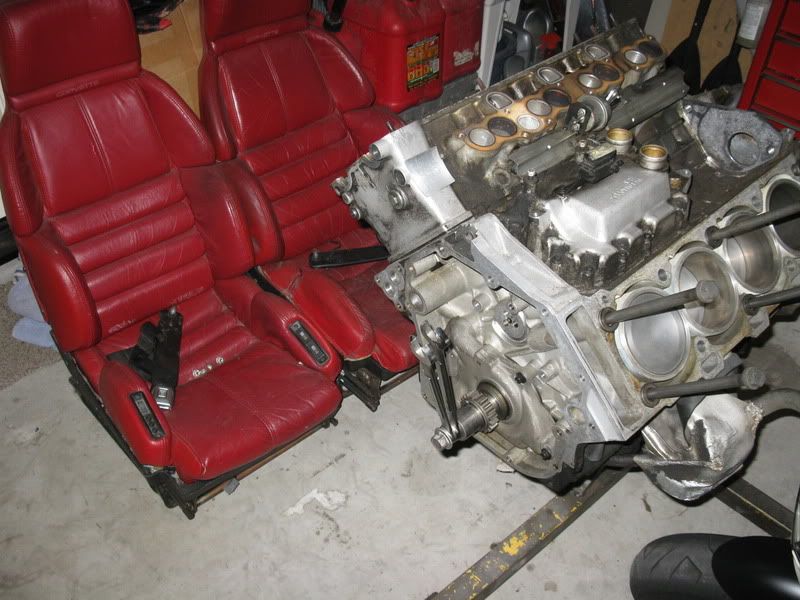
Front of the engine behind the timing cover has virtually no damage from the chain breaking except for some scoring on the top of the oil pump, but it's not cracked or broken so it's still usable. One piston liner needs to be replaced on the drivers side (#3, the one that looked like it had coolant in it at one point) because it has a few small spots where the nikasil lining has somehow chipped off.
I still haven't taken apart the bottom end or gotten the passenger side head off yet (that chain did not break, only the driver's side broke).
To be able to get the engine together & back in the car, I still need to buy the following:
1. Full LT5 gasket set from Jerry (except for head gaskets, already bought those from him).
2. 1 used piston liner from Jerry.
3. Power steering pump reservoir (mine has a hole in the bottom where a mounting tab has been ripped off.)
4. Get driver's side cam cover and coolant tube repaired.
5. Set of crankcase breather hoses.
6. New water pump (the impeller in mine is corroded badly & is worn down from rubbing on the timing cover).
7. Install oil catch can system and do the plenum coolant bypass mod (because the PCV hard line that runs along the driver's side of the plenum from the TB and the plenum coolant hard line on the other side are missing & since those lines are fairly expensive, I'd rather use that money to do those upgrade mods).
8. New camshaft sprocket bolts.
9. Any other misc things along the way that I discover need to be replaced.
These are the things that I have for the LT5 that came with the car:
1. Another timing chain cover (very good condition), the original one is scored badly from the waterpump.
2. Full used, timing chain setup from 50K mile LT5 with the camshaft sprockets, center timing chain idler gear, crankshaft gear and full set of timing chain guides with wearstrips.
Things I've already purchased for the engine:
1. Six used valves (4 exhaust, 2 intake).
2. Headgaskets.
3. Stainless steel LT5 bolt set.
I'm working on the interior right now because I don't have the extra money yet to start purchasing all the engine stuff I need. And yes, I will finish this project, I'm really itching to drive this thing! This car is going to be the cleanest high-mile ZR-1 you guys have ever seen!
.
Last edited by bdw18_123; 04-25-2010 at 04:31 PM.
04-25-2010, 06:32 PM
#9
Team Owner


Member Since: Oct 2004
Location: altered state
Posts: 81,242
Received 3,043 Likes
on
2,602 Posts
St. Jude Donor '05

Holy Smokes  boy does that bring back memories, disassembling a whole car and looking at the pile of parts thinking...

Dont let up on it keep at it steady but surely til its back on the road.
boy does that bring back memories, disassembling a whole car and looking at the pile of parts thinking...Dont let up on it keep at it steady but surely til its back on the road.

 04-26-2010, 02:38 AM
#12
Drifting
Thread Starter
Member Since: Jun 2007
Location: Prather, California -1990 ZR-1 White/Flame Red- -SOLD!!-
Posts: 1,261
Likes: 0
Received 2 Likes
on
2 Posts
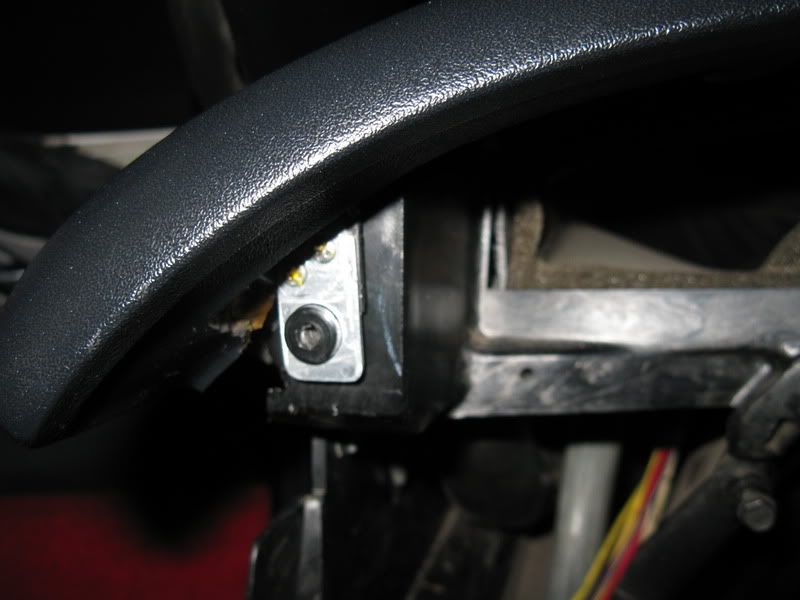
Continued work on the dash pad. Part of the hold down tab above the headlight switch assembly was broken...
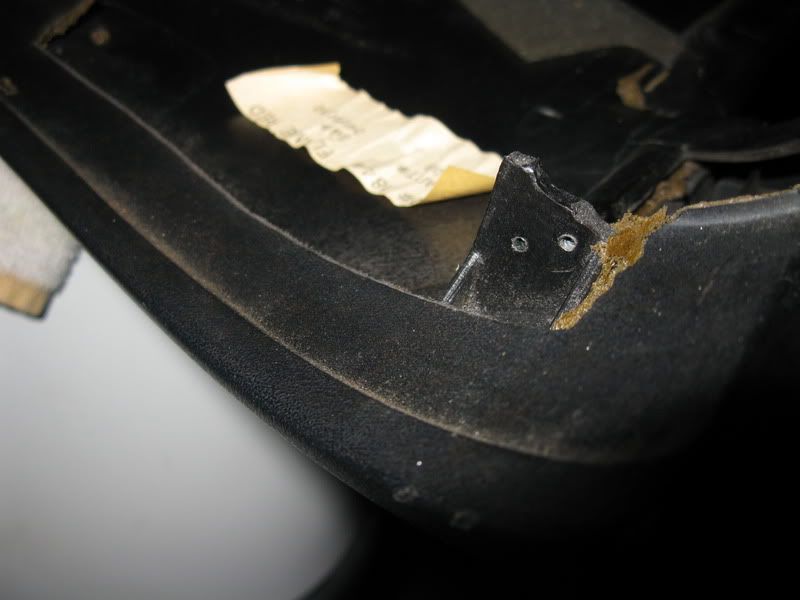
...so I cut out a small piece of thin aluminum sheet metal, drilled pilot holes in the remaining part of the plastic and attached the aluminum with screws (I have scraps of aluminum sheet metal from when I used to work on aircraft).
After I cleaned and detailed the dash pad (including the carpet section) & gauges surround piece, I reinstalled them.
Windshield interior pieces have also been cleaned & detailed.
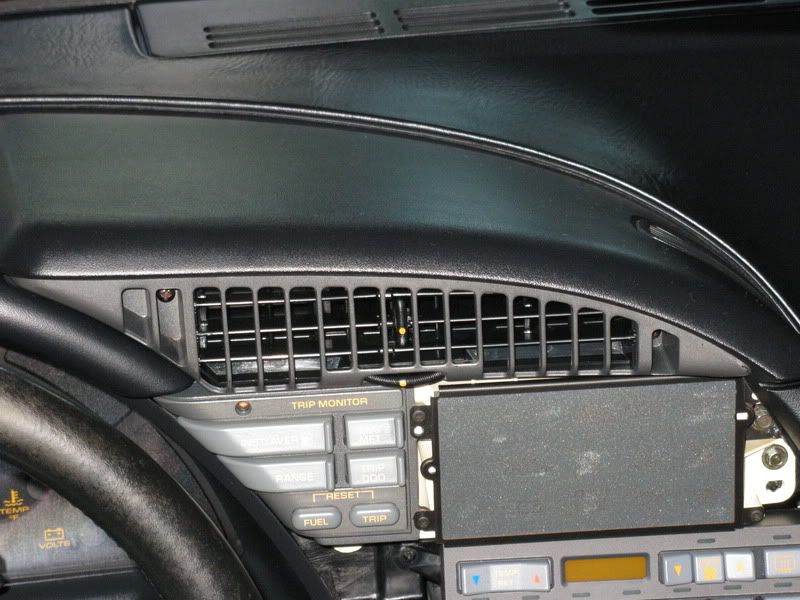
Cleaned and reinstalled DIC & A/C control head.
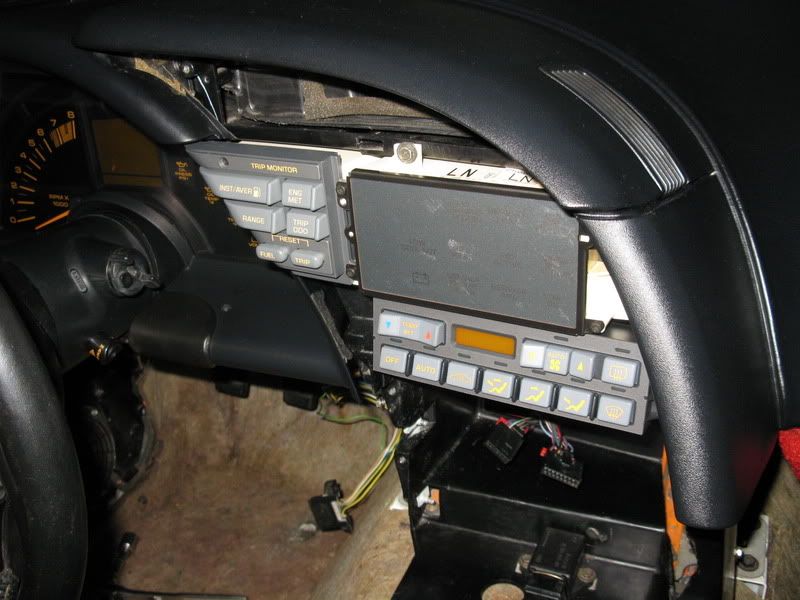
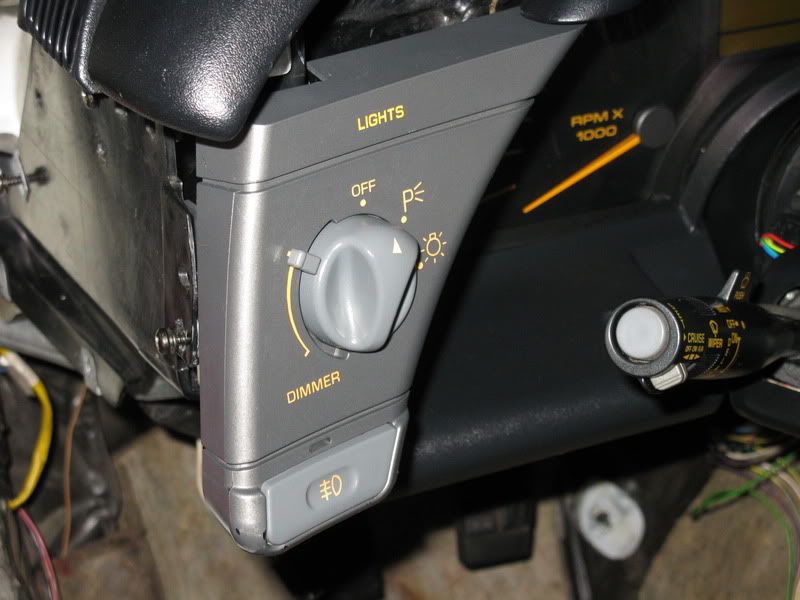
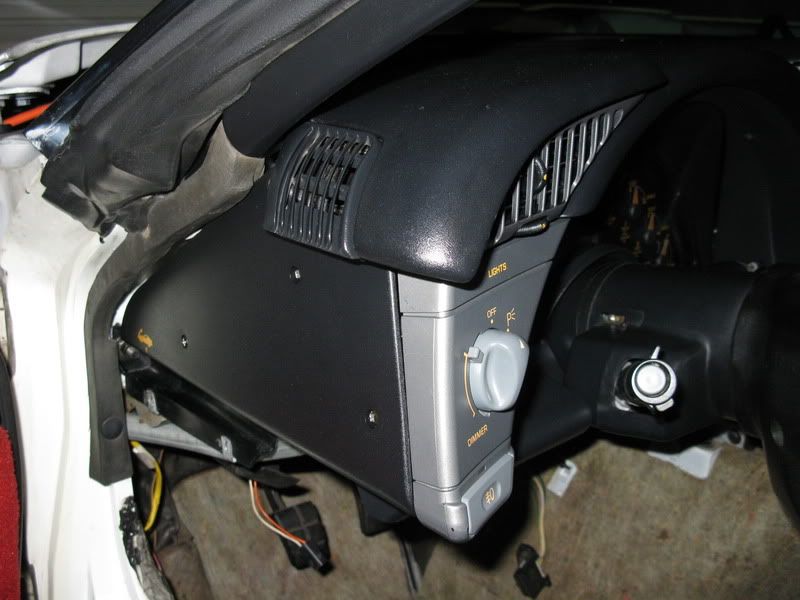
Cleaned and reinstalled headlight switch assembly.
...so I cut out a small piece of thin aluminum sheet metal, drilled pilot holes in the remaining part of the plastic and attached the aluminum with screws (I have scraps of aluminum sheet metal from when I used to work on aircraft).
After I cleaned and detailed the dash pad (including the carpet section) & gauges surround piece, I reinstalled them.
Windshield interior pieces have also been cleaned & detailed.
Cleaned and reinstalled DIC & A/C control head.
Cleaned and reinstalled headlight switch assembly.
04-30-2010, 04:56 PM
#13
Drifting
Thread Starter
Member Since: Jun 2007
Location: Prather, California -1990 ZR-1 White/Flame Red- -SOLD!!-
Posts: 1,261
Likes: 0
Received 2 Likes
on
2 Posts
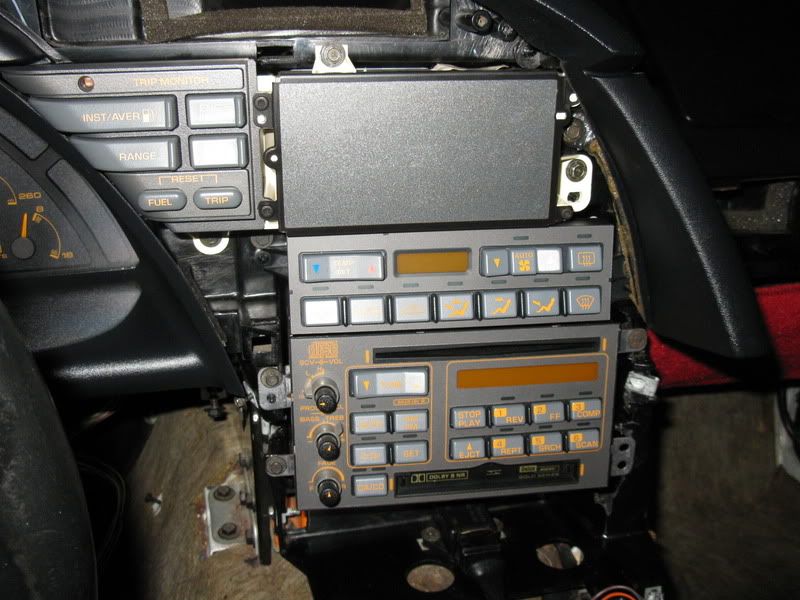
Got the Bose deck reinstalled and tested. Sounds really good for a 20 year-old sound system! The replacement stock speakers/amps I bought work great, those rear speakers put out a lot of bass for what they are.
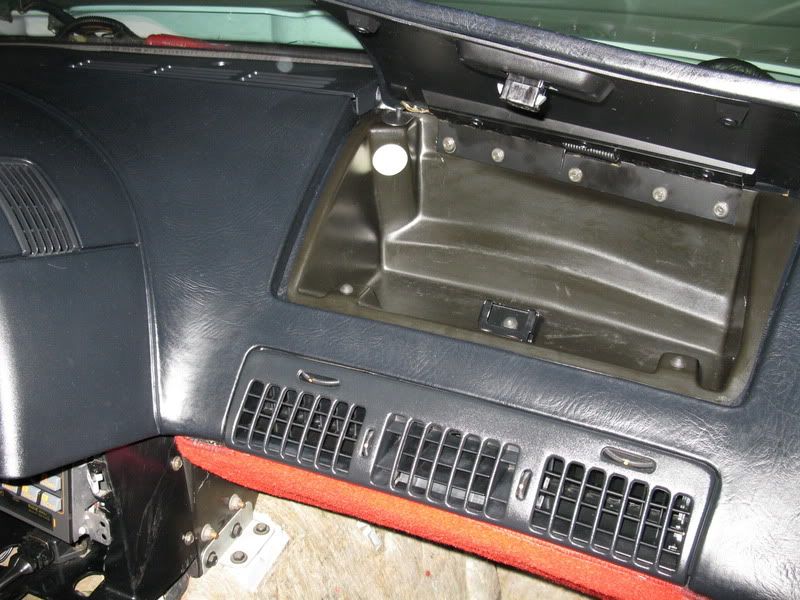
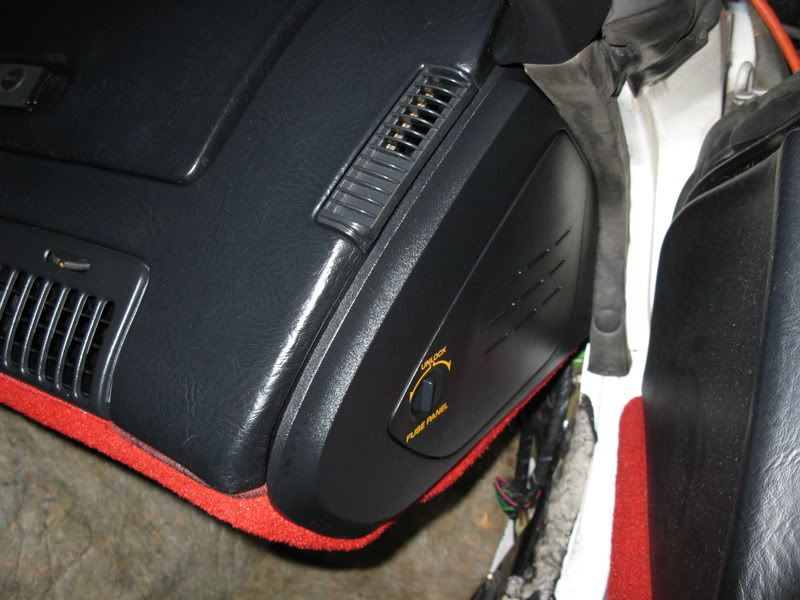
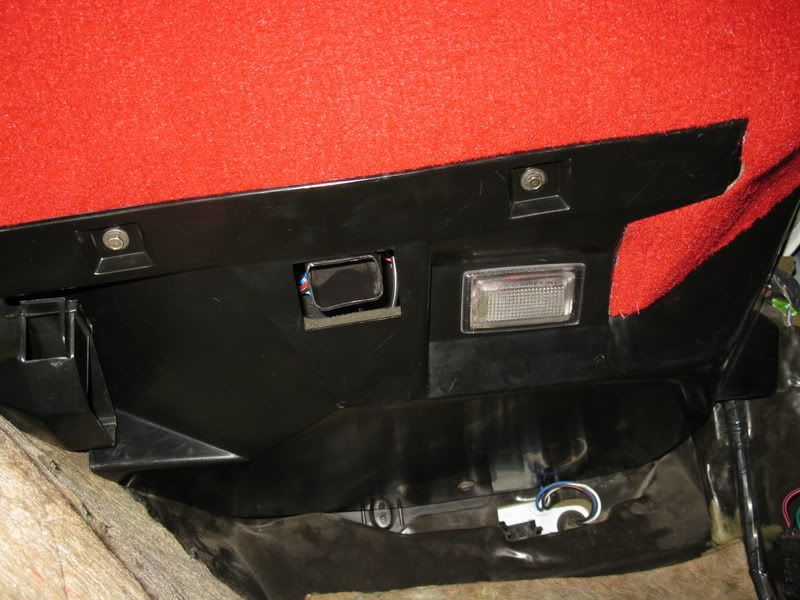
Glovebox, center windshield defrost vent cover, passenger side vents, fusebox cover and plastic cover side-piece above the hood-opening latch have all been cleaned, detailed and reinstalled.
Passenger side kickpanel cleaned & reinstalled.
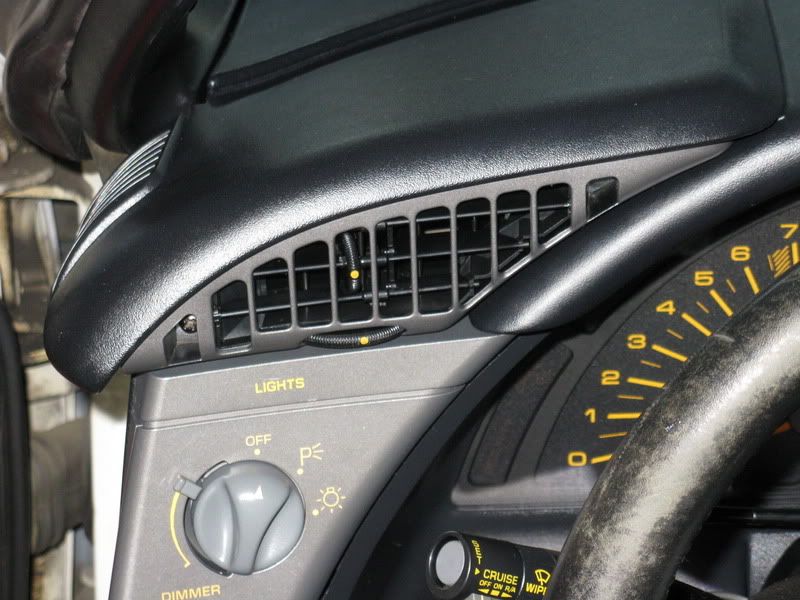
Driver's side vents cleaned & reinstalled.
Glovebox, center windshield defrost vent cover, passenger side vents, fusebox cover and plastic cover side-piece above the hood-opening latch have all been cleaned, detailed and reinstalled.
Passenger side kickpanel cleaned & reinstalled.
Driver's side vents cleaned & reinstalled.
Last edited by bdw18_123; 04-30-2010 at 05:05 PM.
04-30-2010, 08:23 PM
#14
Drifting
bdw8_123
What a great job. Your ZR-1 will be as nice as any when you're done. Stick with it!
What a great job. Your ZR-1 will be as nice as any when you're done. Stick with it!
05-02-2010, 08:44 AM
#15
Racer

Keep up the same type of informational pictures and comments when you begin working on the engine and other sections of the car...your posts are not only informative, but they are inspirational.
Speaking of inspiration...there are not to many ZR-1's out there that couldn't do with some detailing/cleaning, minor repairs and even some major repairs. Posts like your instill that inspiration. Heck, I'm thinking about getting some LT5 grease under my finger nails and some ZR-1 dirt/dust all over the rest of me.
Good job on bringing your Z back to life.
05-02-2010, 08:53 AM
#16
1994 Admiral Blue ZZZZZR1

Keep up the same type of informational pictures and comments when you begin working on the engine and other sections of the car...your posts are not only informative, but they are inspirational.
Speaking of inspiration...there are not to many ZR-1's out there that couldn't do with some detailing/cleaning, minor repairs and even some major repairs. Posts like your instill that inspiration. Heck, I'm thinking about getting some LT5 grease under my finger nails and some ZR-1 dirt/dust all over the rest of me.
Good job on bringing your Z back to life.
Speaking of inspiration...there are not to many ZR-1's out there that couldn't do with some detailing/cleaning, minor repairs and even some major repairs. Posts like your instill that inspiration. Heck, I'm thinking about getting some LT5 grease under my finger nails and some ZR-1 dirt/dust all over the rest of me.
Good job on bringing your Z back to life.
 Incredible inspiration!
David
05-02-2010, 01:54 PM
#17
Drifting
Thread Starter
Member Since: Jun 2007
Location: Prather, California -1990 ZR-1 White/Flame Red- -SOLD!!-
Posts: 1,261
Likes: 0
Received 2 Likes
on
2 Posts
Thanks for all the encouraging comments, guys! They are inspiration back to me too!
During the course of this restoration, I've found it really helps to keep my focus only on the specific thing I'm doing at the moment. If I let my mind wander and start thinking about everything that needs to be done, all at once, it gets overwhelming and I start to lose the drive to finish. So I just take it one step at a time.
And yes, I will be documenting with the same type of pics and info on the rest of the car also, especially the engine. I know that a lot of ZR-1 guys haven't ever been this deep into the LT5, so if I can help out by posting pics/info about my restoration, I'm happy to do it.
And the crazy thing is, I've only been familiar with the ZR-1 for a year now (bought my Z in April 2009). But I'm very mechanically/electrically inclined and am able to learn new things pretty quickly. A good dose of common sense and forums like this one and ZR-1 Registry forum help a lot too!
05-02-2010, 02:28 PM
#18
Team Owner

Member Since: Aug 2005
Location: Riverside County Southern California
Posts: 34,988
Received 501 Likes
on
342 Posts
Co-winner 2020 C4 of the Year - Modified
2018 Corvette of Year Finalist
2017 C4 of Year
2016 C7 of Year Finalist
St. Jude Donor '09-'10-'11-'12-'13-'14-'15-'16-'17-'18-'19-'20

Ben,
The Z is coming along great. It's all good man, take your time
What is the LT5's fate?
The Z is coming along great. It's all good man, take your time
What is the LT5's fate?
05-02-2010, 07:06 PM
#19
Drifting
Thread Starter
Member Since: Jun 2007
Location: Prather, California -1990 ZR-1 White/Flame Red- -SOLD!!-
Posts: 1,261
Likes: 0
Received 2 Likes
on
2 Posts
I'm not going to do any major engine mods; yes I know, it's a good time to do them since I have the engine all apart. But I just don't have the extra money right now to do that, I just want to get it back together so I can drive it!
05-05-2010, 12:51 PM
#20
Drifting
Thread Starter
Member Since: Jun 2007
Location: Prather, California -1990 ZR-1 White/Flame Red- -SOLD!!-
Posts: 1,261
Likes: 0
Received 2 Likes
on
2 Posts
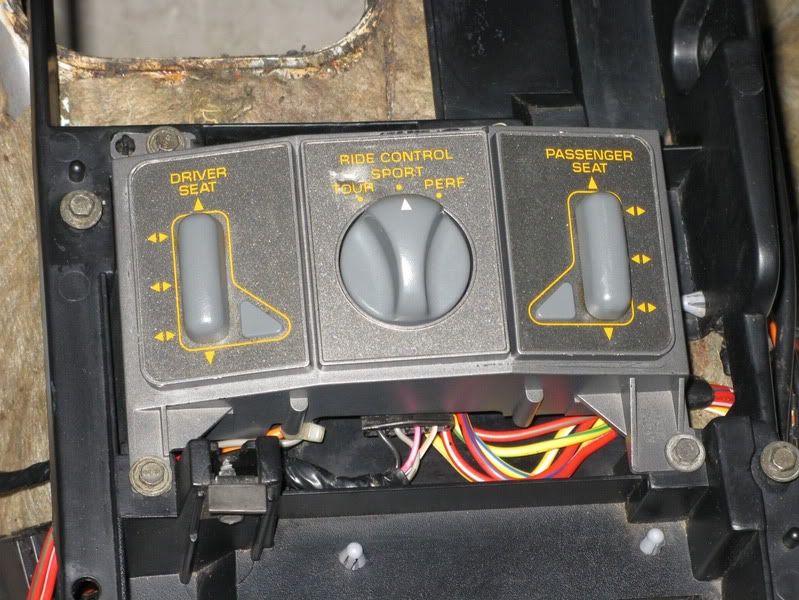
FX-3/seat controls are cleaned and reinstalled.
They were extremely filthy, had to take them apart to fully clean them. Looked like the PO at some point spilled something all over the center console and down both sides to the carpet below the seats (and didn't bother to wipe it up).
I cleaned the controls with Simple Green, but the top part with the switches got etched by whatever got spilled. So I also polished the top area with clear plastic polish (because the paint and lettering is bonded to the bottom side of the clear plastic). Looks a LOT better.
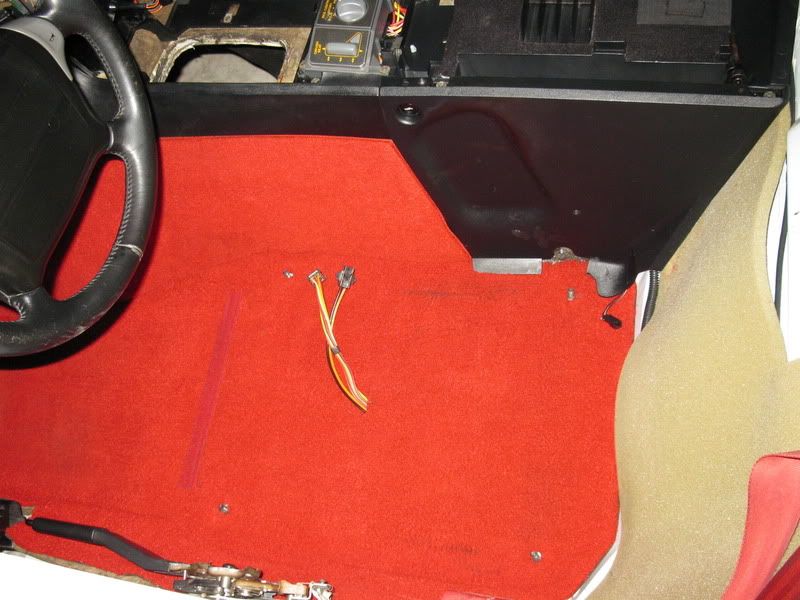
Driver's side floor and console side carpet are cleaned and back in. Cleaned and detailed the plastic/vinyl areas.
For the carpet, I first vacuum it real good to remove all the loose stuff. Then I apply the "Turtle Wax Power Out" carpet cleaner with the built-in scrub brush. For the really bad stains, several applications are needed. Do one small area at a time, blotting the area with a clean, dry towel after using the cleaner.
That cleaner works really well, there were some really dark, nasty stains on the carpet. Unless you look really close, you can't hardly tell there were any stains.
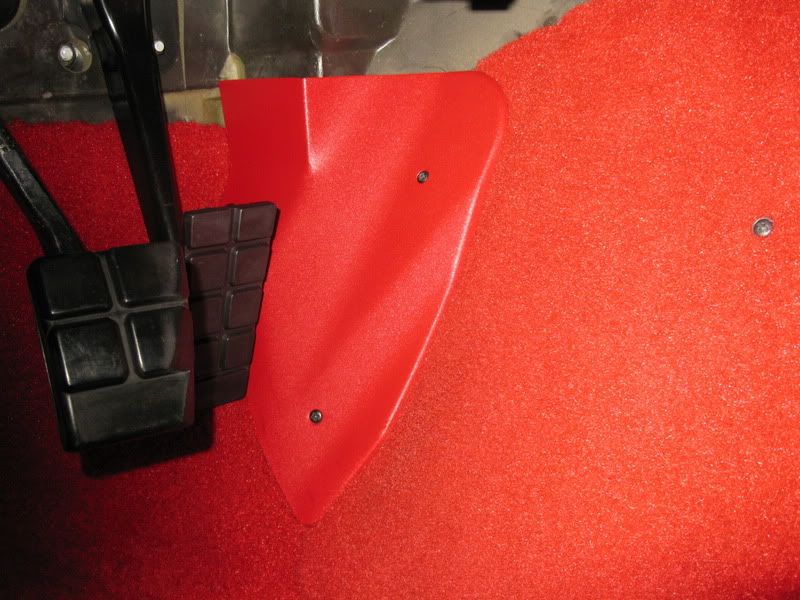
Cleaned, detailed and reinstalled the plastic piece to the right of the gas pedal. Also cleaned all the pedals.
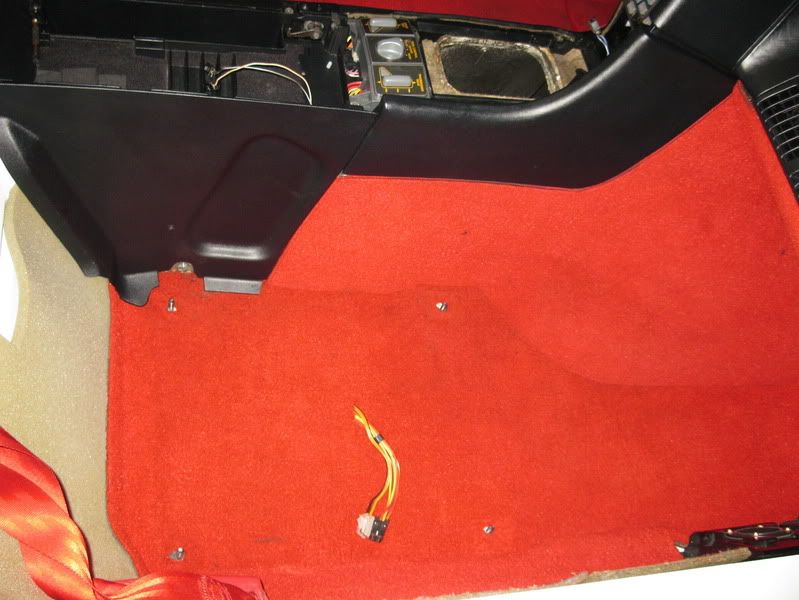
Passenger side floor and console side carpet cleaned and reinstalled. Cleaned and detailed the plastic/vinyl areas.
They were extremely filthy, had to take them apart to fully clean them. Looked like the PO at some point spilled something all over the center console and down both sides to the carpet below the seats (and didn't bother to wipe it up).
I cleaned the controls with Simple Green, but the top part with the switches got etched by whatever got spilled. So I also polished the top area with clear plastic polish (because the paint and lettering is bonded to the bottom side of the clear plastic). Looks a LOT better.
Driver's side floor and console side carpet are cleaned and back in. Cleaned and detailed the plastic/vinyl areas.
For the carpet, I first vacuum it real good to remove all the loose stuff. Then I apply the "Turtle Wax Power Out" carpet cleaner with the built-in scrub brush. For the really bad stains, several applications are needed. Do one small area at a time, blotting the area with a clean, dry towel after using the cleaner.
That cleaner works really well, there were some really dark, nasty stains on the carpet. Unless you look really close, you can't hardly tell there were any stains.
Cleaned, detailed and reinstalled the plastic piece to the right of the gas pedal. Also cleaned all the pedals.
Passenger side floor and console side carpet cleaned and reinstalled. Cleaned and detailed the plastic/vinyl areas.

