When you click on links to various merchants on this site and make a purchase, this can result in this site earning a commission. Affiliate programs and affiliations include, but are not limited to, the eBay Partner Network.
Trying to get smart on this issue before I confront repair shop. Had AC problem where air was not cold in 1996 vette. Brought it to the shop, they did a complete HVAC test with no leak found, just a top off of AC. Now AC cold, but no air coming out of front vents, just floor and defrost. Is this just a coincidence or do they have to disconnect something to do the HVAC test which they failed to reconnect properly which is now causing the top vents to not work? Appreciate any help as I don't want to be one of those "it was working before" customers, but I think they must have done something since it was operational prior to the repair. I called and spoke to some tool and they said all of the AC work is done under the hood, not in the car, but I think he is wrong as I believe the go under the driver side floor, etc. Appreciate any input..
The ONLY time I have done ac work was on the wifes Grand Am. The dye was inserted under the hood into the schreder valve next to the fire wall. Using yellow sunglasses and a special flashlight, I found an o ring leak. Don't know why underdash work is called for on your car, but I wouldn't put it on them. Hopefully someone who has done vette ac work will chime in. Oh. my scheder valve on my 86 in under the hood, as every chevy I have seen.
They may have been inside the car using a scan too connected to the diagnostic link actuating the blend doors and performing other A/C tests and functions. They probably did an underhood inspection as well, sniffing for leaks and visually making sure everything seemed in order.
The defrost and floor positions which you are experiencing is the "default" mode. This is a design intent on some cars to prevent the windshield from fogging over in case of a mode system failure, so you can still see to drive the car. Not a Corvette expert so don’t know if it applies to our platform or not but it appears that you are in the default mode.
I think the mode doors are vacuum controlled and my guess is that during the underhood inspection, that the intake manifold vacuum source to the A/C controller has been compromised – you have a vacuum hose disconnected. On my ride, the vacuum hose connection to the HVAC is on the rear area of the engine near the distributor. It is a relatively small diameter hose, kind of thin and flexible. Be sure there are no loose hoses dangling around back there.
There is a vacuum reservoir in the left front of my car near the headlamp so might want to take a look to be sure all hoses care connected there as well – trace the hoses back to the intake manifold source – eliminate all vacuum leaks. This is a long shot because I think the HVAC vacuum source is plumbed directly from the rear of the intake manifold.
Appreciate all the feedback. Will cheek rail line and see if that works. I also saw a post about disconnecting the positive battery cable to reset some solenoid or something.. anyone have an input on that? Something to do with a box under the driver side above the gas pedal?
Appreciate all the feedback. Will cheek rail line and see if that works. I also saw a post about disconnecting the positive battery cable to reset some solenoid or something.. anyone have an input on that? Something to do with a box under the driver side above the gas pedal?
Disconnecting the battery will cause the C68 to recalibrate the position of the blend door. That won't solve your problem.
You problem appears to be a loss of vacuum to the HVAC Programmer.
With no vacuum the Programmer can't direct the vacuum to operate
the actuators which direct the air flow to the different vents.
If your cruise control doesn't work and it used to it could indicate a vacuum hose or check valve are bad located under the passenger side fuel rail cover.
If you look under the passenger side fuel rail cover you will see a vacuum hose from the intake plenum going to a plastic check valve. Out of the check valve one hose goes to the cruise control round storage tank and the cruise control servo. The other hose goes to the HVAC Programmer which you mentioned is above the gas pedal. Verify the hose and check valve are in good condition.
The 96 also had a common problem with the HVAC Programmer.
The manifold port where the vacuum hoses attach collapse
causing no vacuum so the actuators don't work.
I looked under the passenger rail cover and don't see any cracks or missing hoses. Pics attached. I also checked by headlamp and don't see any hoses rotted or disconnected?
Is this the part that is a pain in the a to get to under the driver side foot panel behind the gas pedal? Can an amateur do this?
If you're a big person it may be difficult working on you back.
Other wise remove the driver seat lay a nice thick blanket down and
go for it. Read the thread and choose the way you want to proceed.
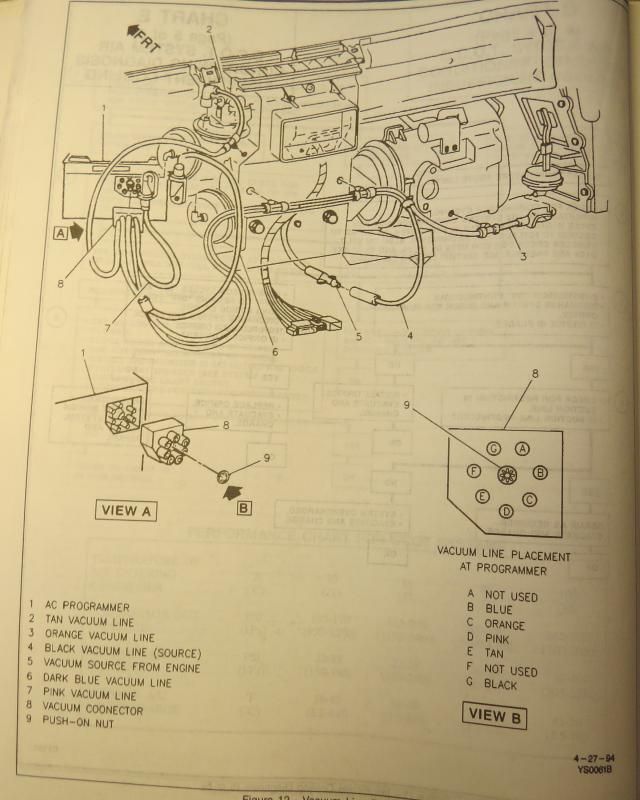
If I was doing the repair, I would cut the vacuum hoses at the input to the Programmer. Unplug the electrical
connector then unbolt the Programmer from the firewall. Open the Programmer up and unbolt the vacuum
manifold port from the box and don't use it anymore. Run a foot of new vacuum hose to each vacuum solenoid.
Put the cover back on and attach the other end of the vacuum hoses to the cut vacuum hoses while observing
the colors of the vacuum line. Reconnect the electrical connector, bolt the box backup, and you're done.
Note: If you test the Programmer it must be in the upright position or the vacuum solenoids may not function properly.
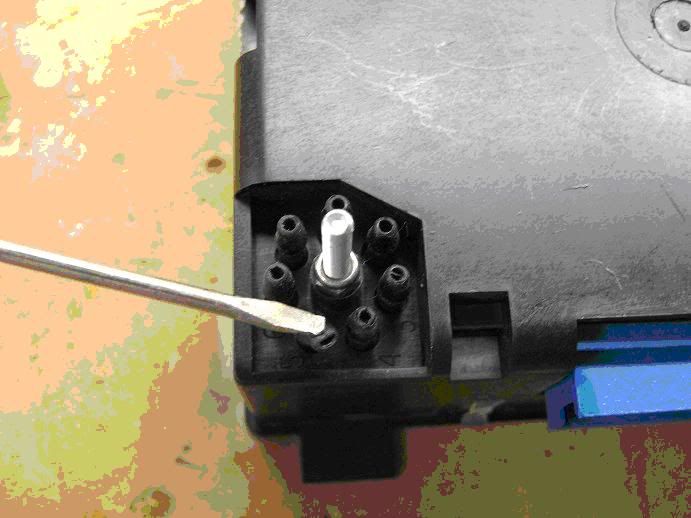
Here's a picture of the vacuum hoses. Item 9 is the push on clip that people have problems getting off and is why I
would just cut the vacuum hoses.
Last edited by Hooked on Vettes; 07-27-2014 at 07:33 PM.
Cruise control does not work? So now what? I guess that means its an easier fix, i.e. not the nipple issue on the HVAC system..
Originally Posted by Hooked on Vettes
If you're a big person it may be difficult working on you back.
Other wise remove the driver seat lay a nice thick blanket down and
go for it. Read the thread and choose the way you want to proceed.
If I was doing the repair, I would cut the vacuum hoses at the input to the Programmer. Unplug the electrical
connector then unbolt the Programmer from the firewall. Open the Programmer up and unbolt the vacuum
manifold port from the box and don't use it anymore. Run a foot of new vacuum hose to each vacuum solenoid.
Put the cover back on and attach the other end of the vacuum hoses to the cut vacuum hoses while observing
the colors of the vacuum line. Reconnect the electrical connector, bolt the box backup, and you're done.
Note: If you test the Programmer it must be in the upright position or the vacuum solenoids may not function properly.
Here's a picture of the vacuum hoses. Item 9 is the push on clip that people have problems getting off and is why I
would just cut the vacuum hoses.
Cruise control does not work? So now what? I guess that means its an easier fix, i.e. not the nipple issue on the HVAC system..
If you are positive the cruise control did work try the following.
At the cruise control servo located above the battery there are two
vacuum hoses. One hose goes into the interior. Disconnect the other hose that goes to a T where one end of the hose goes to the vacuum storage tank and the other end goes to the output of the vacuum check valve located under the passenger side fuel rail cover.
Start the engine. Place you finger over the disconnected hose and verify there is a strong vacuum. Weak or no vacuum indicates a leak
some where.
If you have a hand held vacuum pump you could disconnect the vacuum hose at the input of the check valve and verify you can pull
a vacuum. If you can pull a vacuum that indicates all the vacuum lines are good but does not eliminate the nipple collapsing problem.
To eliminate the check valve you can disconnect it. You should be able
to blow thru it but not suck air into it because a rubber flap should close.
It's highly likely that your problem is at the vacuum check valve shown in the first picture of post #6. Check all the vacuum lines associated with the vacuum check valve.
These things cost less than $5 at any auto parts store, so it's easy to just replace it if you suspect it might be bad.
Did you verify you have a strong vacuum at the cruise control servo hose when the engine is running?
If not you have a leak.
At the output of the check valve are two vacuum hoses one goes towards the cruise control servo. The other hose runs thru the firewall. Physically trace that hose to the firewall and verify it's not broken.
If you disconnect that hose at the check valve you should also be able to suck on that hose and pull a small vacuum but not blow air into the hose. That will tell you the hose going thru the firewall is not leaking and is connected to the AC Programmer.
Strong vacuum, and I was wrong, the cruise control does work. It appears, and was verified by my local, non specialist shop to be the programmer.. will find a way to repair myself or ask for help from local members.. Thanks for the input..
Originally Posted by Hooked on Vettes
Did you verify you have a strong vacuum at the cruise control servo hose when the engine is running?
If not you have a leak.
At the output of the check valve are two vacuum hoses one goes towards the cruise control servo. The other hose runs thru the firewall. Physically trace that hose to the firewall and verify it's not broken.
If you disconnect that hose at the check valve you should also be able to suck on that hose and pull a small vacuum but not blow air into the hose. That will tell you the hose going thru the firewall is not leaking and is connected to the AC Programmer.
Update... it was the programmer.. got one used obviously, but still $618 to fix.. yikes... thanks for all the input.
Originally Posted by volavet
Strong vacuum, and I was wrong, the cruise control does work. It appears, and was verified by my local, non specialist shop to be the programmer.. will find a way to repair myself or ask for help from local members.. Thanks for the input..
 07-27-2014, 06:30 AM