Had an "oops" last night - need advice
 07-11-2014, 10:48 PM
#1
Instructor

Thread Starter

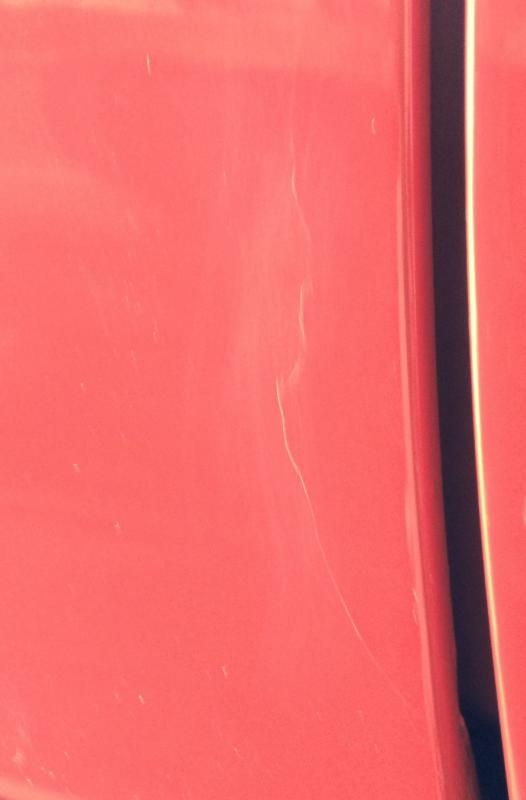
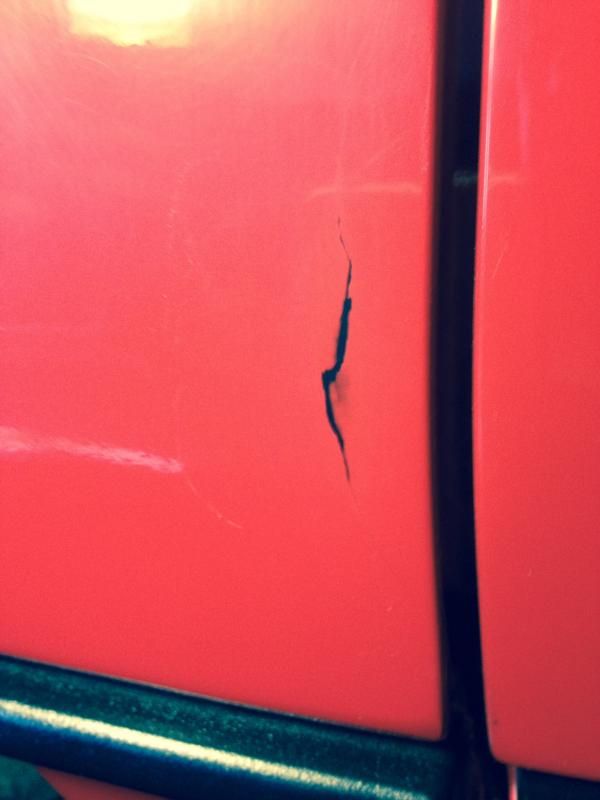
Did some spirited driving last night with the top off and ended up with what I think is a stress crack just behind the passenger door. What do I need to do about this? One can hardly notice but I don't want it to spread or get worse. Does it need to be sealed or completely repaired?
Long time since last post but I find 99% of my questions are answered using the search function.

Long time since last post but I find 99% of my questions are answered using the search function.
 07-12-2014, 01:01 AM
#2
Safety Car

Could it possibly be an abrasion rather than a stress crack? Did you hit any cones in your spirited funfest? I see a similar colored area just at the edge of the door opening above the larger mark. Try some polishing compound before you get stressed out.

07-12-2014, 02:08 AM
#3
Instructor
Thread Starter
thanks for responding. It feels like a crack. Wither it's a crack in the clear coat, paint or SMC I'm not sure but when I run my finger over it I can feel one side is raised above the other side. I'm afraid to try to polish it since I was told that the worst thing you can do to exposed SMC is get it wet.
At first I thought someone hit my door but when I looked it up I found that impact fractures radiate out from the point of impact.
I have no problem getting it fixed but I just want to go in armed with some knowledge

At first I thought someone hit my door but when I looked it up I found that impact fractures radiate out from the point of impact.
I have no problem getting it fixed but I just want to go in armed with some knowledge
07-12-2014, 02:37 PM
#5
Instructor
Thread Starter
Do you think it is something I can seal and forget about or is the SMC like the C3 fiberglass and I need to get repaired or it will get worse?
07-12-2014, 04:04 PM
#6
Instructor
Member Since: Jun 2011
Location: Brunswick Georgia
Posts: 216
Likes: 0
Received 0 Likes
on
0 Posts
Pretty sure. That was the only time I drove it since I waxed it the day before. I just checked for other cracks and couldn't find any.
Do you think it is something I can seal and forget about or is the SMC like the C3 fiberglass and I need to get repaired or it will get worse?
Do you think it is something I can seal and forget about or is the SMC like the C3 fiberglass and I need to get repaired or it will get worse?
Did you hit any big bumps or potholes during spirited run?
You can mark area with something temporary to see if it "runs".
I repaired a small impact area on front bumper by PO. I would call it a "spider crack". It involved a tedious process, but did not have to repaint. I got 95% of it out. It will probably not show in a pic.
You know:
If you have a older steel bodied car, it is not if you will get rust, but when.
I you have a older fiberglassed bodied car, it is not if you will get a crack, but when.
The above pertains to "drivers" not "trailer queens", of course.
07-12-2014, 04:18 PM
#7

Unless you have a loose body brace or bracket in or under the rear wheel well that would allow the body panel to really flop around, I'd say that is a scratch. Cracks do happen but it has to be able to have a LOT of flexing in the body panel for a crack to suddenly appear.
I've got a couple 'spider' cracks myself, in repaired areas where the paint was replaced or repaired. The "new" paint was not nearly as flexible as the factory stuff. Mine are in the surface only. Can't 'feel' the crack but you can see it.
Even driving into a sinkhole (Texas freeways, Thank you Rick!, tax dollars not spent) that bends suspension usually doesn't create body cracks.
Having a 'raised edge' is not indicative of a crack.....
Try to see behind the panel. Surface 'only' cracks....just don't.
SMC is pretty tough ****.
Last edited by leesvet; 07-12-2014 at 04:21 PM.
07-12-2014, 04:49 PM
#8
Racer
I'm not the authority on this for sure, but I've been working a lot with fiberglass lately so the issue caught my attention.
If it were my car I'd think that, whether its a stress crack or just something in the clearcoat, some touch-up is going to be required. So I'd probably find the thinnest, sharpest razor blade I could and just see if it will slip under a layer of whatever is there. Like, if its gel coat, I'd think the razor blade would be able to slip under where the crack is. If it's fiberglass that has separated under stress, It seems like the same thing is relevant. If its just a clearcoat, gel coat, or paint scratch, there won't be anyplace for the blade to go.
Once you know if its really a stress crack or not, you'll be clear on what needs to happen next. Unfortunately there isn't any way I'm aware of to properly fix the surface of a stress crack or other fiberglass issue and not have it break out again. Anything you do will just lay on top and crack again for sure (I believe this to be true from experience).
If it's fiberglass, you have to widen the void for material to be added in the repair. You'll need to get behind it too to add material that will span the area and reinforce the crack. Once that's done, you'll sand the area down with 120 grit to remove all paint/primer and to give the topcoat something to mechanically bind to. Add resin or other finishing goo on top. The widened crack repair and additional fiberglass should support whatever is applied on top to level it. In addition to resin and in lieu of plastic filler (Bondo), I've used a plastic repair product on fiberglass that 3M makes. I can't recall the name or number of it (I can get that for you if you're interested), but its two small tubes in a small red box. You mix them and apply to raw material. It is extremely sticky and hardens to a point that sanding is a breeze. However, it stays very flexible so it will move with the surface it's sitting on under use and in a wide temperature swing.
I've repaired numerous motorcycle fairings using the method and material described above.
Once all that's done, you simply sand again moving incrementally up to 600 grit, prime, paint, and clearcoat (sand before the clearcoat).
If there is an effective way that doesn't require those steps, I'd sure like to know what it is because I've spent many, many hours dealing with this sort of thing and would LOVE to learn how to save time.
07-12-2014, 08:55 PM
#10
Instructor
Thread Starter
Was the car jacked up or put on a lift recently?
Did you hit any big bumps or potholes during spirited run?
You can mark area with something temporary to see if it "runs".
I repaired a small impact area on front bumper by PO. I would call it a "spider crack". It involved a tedious process, but did not have to repaint. I got 95% of it out. It will probably not show in a pic.
You know:
If you have a older steel bodied car, it is not if you will get rust, but when.
I you have a older fiberglassed bodied car, it is not if you will get a crack, but when.
The above pertains to "drivers" not "trailer queens", of course.
07-12-2014, 09:32 PM
#11
Racer
Naw... Try some good rubbing compound on it. If its just a scratch, some of that will go away. If that's the case, PM me and maybe I can give you some pointers of what to do to make the blemish go away. Of course the first I think of is, "what kind of sticker can I put over this?" Lol.
Seriously, though, if you see the compound working, let me know and you can easily touch that car up so you'll hardly know anything ever happened.
Good luck with that.
Seriously, though, if you see the compound working, let me know and you can easily touch that car up so you'll hardly know anything ever happened.
Good luck with that.
07-12-2014, 11:09 PM
#12
Instructor
Thread Starter
Thanks Bluezman!
I did that and it might not be as bad as I feared. It looks worse but it FEELS better. I can't feel the ridge anymore with my finger. I can with my nail but I'm hoping it is just be a crack in the paint.
What do you think? this is what it looks like now:
I did that and it might not be as bad as I feared. It looks worse but it FEELS better. I can't feel the ridge anymore with my finger. I can with my nail but I'm hoping it is just be a crack in the paint.
What do you think? this is what it looks like now:
 07-13-2014, 02:49 AM
#14
Racer
That's the oddest things I've seen for a while on paint. At least on fiberglass. I can't see where the crack is anymore. I'm trying to think what occurred to cause that. I mean, you said you had just been polishing the car up and then took it for a spirited drive. I can visualize stress cracks occurring in certain areas of the car. A few others have asked about having it jacked up or on a lift recently. Those are all valid questions. But the location of it seems more like you encountered something in the road that you weren't aware of and got scratched.
Was your car repainted at one point? Recently? What about temperature there; has it been extreme? I just can't envision the fiberglass flexing and stretching more than the paint can handle without showing signs of the same in the fiberglass. It's just so strange and compelling. Oh, well... Back to the task at hand.
You can get small touch up kits as well as rattle cans and sprayable quarts of paint to match your car at: http://www.automotivetouchup.com/ They are very good and actually do some things to artificially "age" the paint color so it will be a closer match to what you really have on your car. If you enter the year of your C4 in their search boxes and it doesn't come up with the appropriate color, I think you can enter in other years to find the right one. It's my belief that Corvette has stuck with the same colors for a very long time. If that isn't the case, just call them. They matched a Triumph color for me that was not listed anywhere on their website.
The reality is you are going to need some touch up there. If you get a small touch up kit, just use some sand-able primer that has a high solid content and build up the area you've repaired. Knock it down level with 600-grit, use some adhesion promoter in that area and apply the kit. Touch up paint is made to cure rapidly so you can use 2000 grit paper or so afterward to block-sand it flat, then buff and polish. It won't be flawless but it will look good at 5'.
A step beyond that is to sand and feather out the scratches. At this point you need to consider what you want to do about the old paint. You can try to spray the area with color and dust into the older painted section. On the jamb side, it's easy to just tape a line where it will be hidden. Everywhere else, you'll need to plume/feather the paint out. It all needs to be flat so always use a block sander. You can get some firm foam blocks that will work well on the arched surface. Go to an automotive paint store for that, not a box hardware store. Then buy a few sheets of various grits of wet and dry sand paper (usually black in color) from 220 to 1500. Sand the area flat in broad, uniform strokes. Don't concentrate on the stripe that WAS your original defect. I'd guess an area about 6"-8" will be required to feather it out appropriately (That would be a vertical stripe along the jamb about 8" wide and as high and low as is necessary to get a really flush repair.).
When that's complete, tape off the area. Cover high above the area, the door, the wheel, etc. Dry everything and use a tack cloth to eliminate all the dust and anything hanging onto the body. The sanded area should be finished to about 400-grit. Have a can of gray sand-able primer mixed and apply a thin coat over the area to cover where you've gone thru the paint. Get a block sander with 600-grit, and go over the cured primer dry (Don�t use water). At this point, you are just scuffing the area with the sandpaper to see if you have any evident low spots. What you'll see if more sanding is necessary, are patchy areas where the primer is absent (It will be black there). Other areas where the primer is still covering it gray means is there is a low spot. If it isn't too bad, you can simply build it up with the sand-able primer, let it cure and sand it flat. Then use another color of primer to check level on that coat. Repeat until you are persuaded that the repair is flush enough for your discrimination. Red can be a challenging color to fix and, like black, it shows imperfections.
When you have it flat enough, remove old masking tape and paper. Use 600-grit and wet-sand one last time to level everything. Then dry, clean, and re-mask. Spray a thin coat of primer or, better yet, spray with adhesion promoter. It is clear. Just put a few thin coats on and let it set up. Frequently the manufacturer wants you to top coat as soon as you can. Once it�s had time to flash, get your color coat ready.
Mask it again. A trick I use is the fold/roll the tape back on itself in a way that it is partly lifted off the body. By doing that, you avoid any chance of having a tight paint line to deal with when you're finished. In any case, you shouldn't be painting up to your mask anyway. The repair just isn�t that big in this case.
Apply 2-3 color coats. The first will be a thin �adhesion� coat and the next two will be heavier; just to cover the primer and body with RED. You aren't trying to get anything to gloss at this point. Just get it well covered and be patient to prevent runs!! Crack a beer and have a few sandwiches ready to occupy your attention between coats. You need about 10 minutes between coats to reliably avert sags and runs. A beer and half a sandwich is just about perfect timing.
When that's finished, I like to remove the mask again, wipe everything with a clean lint-free cloth and get ready for the clear coat. In your case, you are trying to feather and match the existing paint on the quarter panel. To do that, I'd take a gray Scotchbrite pad and scuff over the entire quarter that will (and could) get painted. The gray pad is equivalent to a very fine-grit sandpaper. The clearcoat will stick to it well and regions that won't get clear on it can be easily buffed out again. Go over it with the Scotchbrite and then tack off everything again. Tape and mask off the car. Use the tip I mentioned above again where you roll back the masking tape a bit. Wipe it down one last time and get your clear prepared.
You will be clear coating focusing on both coverage and sheen. Put the first coat on thin, followed by a few heavier coats. I assume you'll be using rattle cans so you aren't able to thin the paint. It is what it is. Paint to shine and don't run. Put on a few more coats than would be typical to give yourself something to sand down during the next step. Feather the clearcoat into the old paint by wisping or �throwing� the paint outward. Be patient. When you're done it will look odd! Remove the mask material as soon as practical, meaning not when everything is wet but as soon as it is stable and tacky.
Let the paint cure. Rattle cans need more time so don't do anything else for a few warm days. (More sandwiches and beer??)
You can use 1500 grit wet and dry to cut the paint. Use a block sander and stay off any edges, such as the door jamb. They cut quickly and will clean up when you polish the car. Sand out dust or little defects the best you can and wet-sand any over-spray. (Don't get too crazy with your sandpaper. I want to mention to you that as you are sanding, the water dripping off the car should be clear. If it turns red, you've gone through the clearcoat. That isn't a good thing. You're just trying to remove over-spray that has adhered to the surface and fine dust or insect legs . Some people will mix a little dish soap in a bucket of warmish water and dip the sandpaper in that when doing this. The soap keeps the fresh paint from balling up) then wipe it down and start polishing and buffing. I'd use a mild-cut compound and switch to polishing compound straightaway. If you've let the paint cure for a few days, you can probably wax the area too. If this were my car, I'd use the compound, polish, and wax to do the entire car as well. A few coats of wax would be impeccable. Be sure to do all the work with the compound liquids in the shade. The sun will make you hate the project because it will be nearly impossible to buff off.
When you're done, it will be perfect!
Was your car repainted at one point? Recently? What about temperature there; has it been extreme? I just can't envision the fiberglass flexing and stretching more than the paint can handle without showing signs of the same in the fiberglass. It's just so strange and compelling. Oh, well... Back to the task at hand.
You can get small touch up kits as well as rattle cans and sprayable quarts of paint to match your car at: http://www.automotivetouchup.com/ They are very good and actually do some things to artificially "age" the paint color so it will be a closer match to what you really have on your car. If you enter the year of your C4 in their search boxes and it doesn't come up with the appropriate color, I think you can enter in other years to find the right one. It's my belief that Corvette has stuck with the same colors for a very long time. If that isn't the case, just call them. They matched a Triumph color for me that was not listed anywhere on their website.
The reality is you are going to need some touch up there. If you get a small touch up kit, just use some sand-able primer that has a high solid content and build up the area you've repaired. Knock it down level with 600-grit, use some adhesion promoter in that area and apply the kit. Touch up paint is made to cure rapidly so you can use 2000 grit paper or so afterward to block-sand it flat, then buff and polish. It won't be flawless but it will look good at 5'.
A step beyond that is to sand and feather out the scratches. At this point you need to consider what you want to do about the old paint. You can try to spray the area with color and dust into the older painted section. On the jamb side, it's easy to just tape a line where it will be hidden. Everywhere else, you'll need to plume/feather the paint out. It all needs to be flat so always use a block sander. You can get some firm foam blocks that will work well on the arched surface. Go to an automotive paint store for that, not a box hardware store. Then buy a few sheets of various grits of wet and dry sand paper (usually black in color) from 220 to 1500. Sand the area flat in broad, uniform strokes. Don't concentrate on the stripe that WAS your original defect. I'd guess an area about 6"-8" will be required to feather it out appropriately (That would be a vertical stripe along the jamb about 8" wide and as high and low as is necessary to get a really flush repair.).
When that's complete, tape off the area. Cover high above the area, the door, the wheel, etc. Dry everything and use a tack cloth to eliminate all the dust and anything hanging onto the body. The sanded area should be finished to about 400-grit. Have a can of gray sand-able primer mixed and apply a thin coat over the area to cover where you've gone thru the paint. Get a block sander with 600-grit, and go over the cured primer dry (Don�t use water). At this point, you are just scuffing the area with the sandpaper to see if you have any evident low spots. What you'll see if more sanding is necessary, are patchy areas where the primer is absent (It will be black there). Other areas where the primer is still covering it gray means is there is a low spot. If it isn't too bad, you can simply build it up with the sand-able primer, let it cure and sand it flat. Then use another color of primer to check level on that coat. Repeat until you are persuaded that the repair is flush enough for your discrimination. Red can be a challenging color to fix and, like black, it shows imperfections.
When you have it flat enough, remove old masking tape and paper. Use 600-grit and wet-sand one last time to level everything. Then dry, clean, and re-mask. Spray a thin coat of primer or, better yet, spray with adhesion promoter. It is clear. Just put a few thin coats on and let it set up. Frequently the manufacturer wants you to top coat as soon as you can. Once it�s had time to flash, get your color coat ready.
Mask it again. A trick I use is the fold/roll the tape back on itself in a way that it is partly lifted off the body. By doing that, you avoid any chance of having a tight paint line to deal with when you're finished. In any case, you shouldn't be painting up to your mask anyway. The repair just isn�t that big in this case.
Apply 2-3 color coats. The first will be a thin �adhesion� coat and the next two will be heavier; just to cover the primer and body with RED. You aren't trying to get anything to gloss at this point. Just get it well covered and be patient to prevent runs!! Crack a beer and have a few sandwiches ready to occupy your attention between coats. You need about 10 minutes between coats to reliably avert sags and runs. A beer and half a sandwich is just about perfect timing.
When that's finished, I like to remove the mask again, wipe everything with a clean lint-free cloth and get ready for the clear coat. In your case, you are trying to feather and match the existing paint on the quarter panel. To do that, I'd take a gray Scotchbrite pad and scuff over the entire quarter that will (and could) get painted. The gray pad is equivalent to a very fine-grit sandpaper. The clearcoat will stick to it well and regions that won't get clear on it can be easily buffed out again. Go over it with the Scotchbrite and then tack off everything again. Tape and mask off the car. Use the tip I mentioned above again where you roll back the masking tape a bit. Wipe it down one last time and get your clear prepared.
You will be clear coating focusing on both coverage and sheen. Put the first coat on thin, followed by a few heavier coats. I assume you'll be using rattle cans so you aren't able to thin the paint. It is what it is. Paint to shine and don't run. Put on a few more coats than would be typical to give yourself something to sand down during the next step. Feather the clearcoat into the old paint by wisping or �throwing� the paint outward. Be patient. When you're done it will look odd! Remove the mask material as soon as practical, meaning not when everything is wet but as soon as it is stable and tacky.
Let the paint cure. Rattle cans need more time so don't do anything else for a few warm days. (More sandwiches and beer??)
You can use 1500 grit wet and dry to cut the paint. Use a block sander and stay off any edges, such as the door jamb. They cut quickly and will clean up when you polish the car. Sand out dust or little defects the best you can and wet-sand any over-spray. (Don't get too crazy with your sandpaper. I want to mention to you that as you are sanding, the water dripping off the car should be clear. If it turns red, you've gone through the clearcoat. That isn't a good thing. You're just trying to remove over-spray that has adhered to the surface and fine dust or insect legs
. Some people will mix a little dish soap in a bucket of warmish water and dip the sandpaper in that when doing this. The soap keeps the fresh paint from balling up) then wipe it down and start polishing and buffing. I'd use a mild-cut compound and switch to polishing compound straightaway. If you've let the paint cure for a few days, you can probably wax the area too. If this were my car, I'd use the compound, polish, and wax to do the entire car as well. A few coats of wax would be impeccable. Be sure to do all the work with the compound liquids in the shade. The sun will make you hate the project because it will be nearly impossible to buff off.When you're done, it will be perfect!
07-13-2014, 03:03 PM
#15
Instructor
Thread Starter
I wish I had your paint advice when I fixed some rust on my other car this spring. I read some of that and thought "ah, that's why my repair looks like crap..."
Way back in 1990 I bought the car from a dealership that was using it as a demo car. To the best of my knowledge it was always red and never has been repainted. I've jacked it up a lot but the only thing that happened since I waxed it was that it sat in the same spot in the garage. If the crack was there before I waxed it I would have noticed since wet wax would have stuck in the crack.
I'm going to try the touch up route first and see if the crack comes back. If it does I know I have bigger issues.
Thanks for all your help!! This place is awesome