86' L98 Distributior and timing question
 03-11-2014, 10:04 PM
#1
Melting Slicks

Thread Starter


late 86' coupe, aluminum heads.
I have recently finished replacing valve stem seals and a lower intake manifold gasket.
I put the distributor in 180 degrees off on the first try, and I have since removed and reinserted the distributor.
When I tried to start it the second time, it sputtered, but didn't fire (which was better than the loud "pop" when it was 180 off). I tried to hook up a timing light and set the timing with the fuel pump disconnected, but the timing light would not flash with just the starter turning the engine (I don't quite understand why since spark should still be present).
Is there a way to set correct timing before I try to start the engine?
If the engine sputters but doesn't fire, is there a technique to adjust the distributor to make sure I am moving closer to "correct" and not farther away?
Thanks
 03-11-2014, 10:13 PM
#2
Melting Slicks

as long as you know it is close you could just turn it a little until it runs. once you have it at that point you need to disconnect the spark advance wire and set the timing to 6deg dubble check me on thhe 6 deg part. I helps if you have some one turning the dist while you crank it.
03-11-2014, 10:36 PM
#3
Drifting


One way to nail it for sure is to pull the driver valve cover. Turning engine in direction of rotation watch the intake valve come up and go down bringing timing mark to zero on number one cylinder. This is tdc. Insert distributor and set to number one too fire. It will start now assuming everything is operational. Set timing to 6 degree btdc and you should be good.


 03-12-2014, 04:05 AM
#5
Race Director


Check for power getting to the distributor. You should have 12 volts on the pink BATT wire when the ignition is on. If that is present then there is a problem inside the distributor.
03-12-2014, 08:26 AM
#6
Burning Brakes

as long as you know it is close you could just turn it a little until it runs. once you have it at that point you need to disconnect the spark advance wire and set the timing to 6deg dubble check me on thhe 6 deg part. I helps if you have some one turning the dist while you crank it.
if it sputters it is retarded, so turn it counterclockwise slightly to advance. if you go too far -you should turn it so the base, where the clamp is, rotates about a quarter inch- it will hesitate like low voltage to starter. once it runs, disconnect the wire to the ecm as hooked073 said before setting base timing to 6 degrees.
be aware that an open valve will cause similar symptoms.
03-12-2014, 11:19 PM
#7
Melting Slicks
Thread Starter
Thanks for all the help guys!
One more question and bit of info. When I pulled the distributor from what I believe was 180 degrees off, and reinserted it, it would easily drop all the way in 2 positions, but not in what felt like 4 other possible positions. I turned the crank a bit back and fourth and a friend was able to get ti to drop in all the way in a third position, but I am pretty sure it is 1 "tooth" or position from the ideal location. If you are looking down at the distributor with the front of the car at 12 O'clock, I want to put the rotor at about 11 O'clock, but I can only get it to drop in at closer to 9:30.
Question: Should I be able to drop the distributor in all the way on each tooth, or is it more complicated than that?
03-12-2014, 11:41 PM
#8
Drifting
Thanks for all the help guys!
One more question and bit of info. When I pulled the distributor from what I believe was 180 degrees off, and reinserted it, it would easily drop all the way in 2 positions, but not in what felt like 4 other possible positions. I turned the crank a bit back and fourth and a friend was able to get ti to drop in all the way in a third position, but I am pretty sure it is 1 "tooth" or position from the ideal location. If you are looking down at the distributor with the front of the car at 12 O'clock, I want to put the rotor at about 11 O'clock, but I can only get it to drop in at closer to 9:30.
Question: Should I be able to drop the distributor in all the way on each tooth, or is it more complicated than that?
One more question and bit of info. When I pulled the distributor from what I believe was 180 degrees off, and reinserted it, it would easily drop all the way in 2 positions, but not in what felt like 4 other possible positions. I turned the crank a bit back and fourth and a friend was able to get ti to drop in all the way in a third position, but I am pretty sure it is 1 "tooth" or position from the ideal location. If you are looking down at the distributor with the front of the car at 12 O'clock, I want to put the rotor at about 11 O'clock, but I can only get it to drop in at closer to 9:30.
Question: Should I be able to drop the distributor in all the way on each tooth, or is it more complicated than that?
03-13-2014, 08:30 AM
#9
Burning Brakes
FIRST thing is to set mark on balancer to 0 with #1 on compression. then you can turn the oil pump shaft so that the shaft slot is pointing to where you want the rotor to be. turn rotor back counterclockwise towards #2 firing pin, about 2/3 of the way, and rotor will come back to #1 as the cam gear mates with dist gear.
03-14-2014, 03:28 AM
#10
Safety Car

Watching for #1 valve movement is the most positive way to tell you are on the firing stroke. I agree about the oil pump drive being in the right position as well. When I did my heads recently I marked the position of the rotor before removing anything and was very careful about not moving anything so I had no difficulty.
If you look at the spark plug retainer on the cap it will show which plug wire goes to #1 so when you drop the dizzy in the rotor should more or less correspond to this spot. As I recall the rotor was more or less pointed at the #1 cylinder.
If you look at the spark plug retainer on the cap it will show which plug wire goes to #1 so when you drop the dizzy in the rotor should more or less correspond to this spot. As I recall the rotor was more or less pointed at the #1 cylinder.
03-14-2014, 08:03 AM
#11
Le Mans Master

Watching for #1 valve movement is the most positive way to tell you are on the firing stroke. I agree about the oil pump drive being in the right position as well. When I did my heads recently I marked the position of the rotor before removing anything and was very careful about not moving anything so I had no difficulty.
If you look at the spark plug retainer on the cap it will show which plug wire goes to #1 so when you drop the dizzy in the rotor should more or less correspond to this spot. As I recall the rotor was more or less pointed at the #1 cylinder.
If you look at the spark plug retainer on the cap it will show which plug wire goes to #1 so when you drop the dizzy in the rotor should more or less correspond to this spot. As I recall the rotor was more or less pointed at the #1 cylinder.
 .....WW
Last edited by WW7; 03-14-2014 at 08:19 AM.
03-14-2014, 08:33 AM
#12

thought I'd throw in my 2 cents here - if I'm not mistaken, but the slot on the oil pump shaft is normally aligned with the rotor on the distributor. position the oil pump shaft to the front LH fuel rail mounting bolt, and rotate the rotor assembly CCW about 15 degrees, from that bolt position. the distributor assembly should drop in place (with the engine at zero degree, TDC, #1 cylinder on compression). all the electrical connections should be squarely 90 degrees to the centerline of the engine (LH side), along with two screws of the distributor cap mounting screws. when done, the rotor should be pointing to the front LH fuel rail mounting bolt, and the distributor squarely positioned on the engine's CL. if done correctly, you should be within a few degrees of timing spec - engine should start without issues.
here's a pic of my L98 - if you look closely, you can see the slot on the oil pump shaft. it is pointing to the forward fuel rail mounting bolt w/ the engine at zero degrees TDC-#1 compression -
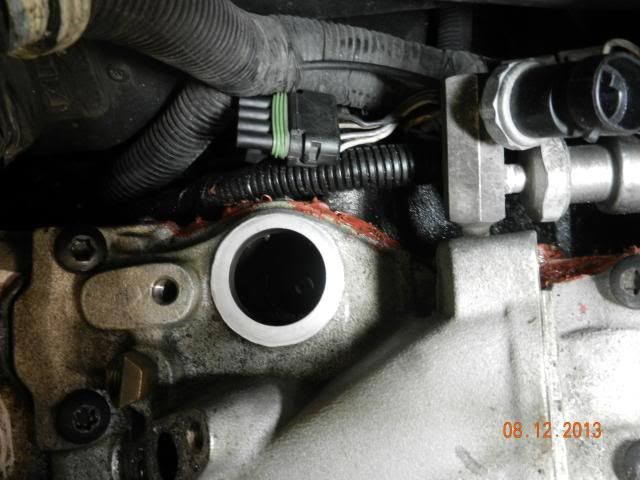
BTW, how do you like the rear china wall, mickey mouse oil leak repair -
here's a pic of my L98 - if you look closely, you can see the slot on the oil pump shaft. it is pointing to the forward fuel rail mounting bolt w/ the engine at zero degrees TDC-#1 compression -
BTW, how do you like the rear china wall, mickey mouse oil leak repair -
Last edited by Joe C; 03-14-2014 at 11:04 AM.
03-14-2014, 08:35 AM
#13
Instructor

I have found that you don't really need to position the oil pump drive shaft, after dropping the distributor in, just rotate the engine with the starter and the distributor will fall all the way down to the intake. Coil wire not connected, of course.
03-14-2014, 11:34 AM
#14
no flames, and no real comment on that procedure, but personally, I would never do that...
03-14-2014, 12:01 PM
#15
Instructor
I had may doubts about it also, but others told me it worked so I tried it. I have done it many times that way since, and never had a problem. Since the cam gear is engaged with the distributor gear, they stay together when it drops in. Beats crawling over your engine with a flashlight and long screwdriver to turn the oil pump.
03-14-2014, 02:49 PM
#16
Le Mans Master
I had may doubts about it also, but others told me it worked so I tried it. I have done it many times that way since, and never had a problem. Since the cam gear is engaged with the distributor gear, they stay together when it drops in. Beats crawling over your engine with a flashlight and long screwdriver to turn the oil pump.
 .. I just turn the balancer bolt with one hand holding the distributor down until it drops.. You can't really mess anything up doing it this way because like mentioned above, the cam and distributor gears are already messed .....WW
03-14-2014, 11:43 PM
.. I just turn the balancer bolt with one hand holding the distributor down until it drops.. You can't really mess anything up doing it this way because like mentioned above, the cam and distributor gears are already messed .....WW
03-14-2014, 11:43 PM
#17
Melting Slicks
Thread Starter
Just wanted to says thanks to everyone!
I used the long screwdriver method to get the oil pump where I needed it so the distributor would line up correctly.
After I did this, it sputtered around a bit and I kept moving the distributor one way and then another (separate start attempts), and one of the ways was much better than the other, so I moved the distributor more in that direction until it would run (rough, but running) without me feathering the gas. Then I used the timing light (which worked as soon as the engine started), and I was able to set base timing.
I need to change plugs and wires and check a bunch of other things, but thanks to all of your help, I was able to change the vette's classification back to "drive-able project", from it's 4 month long classification of "shop ornament".
Thanks again!
03-15-2014, 01:44 AM
#18
Race Director
I was thinking of suggesting it in this thread but I thought it would get complex to explain how it works. ...And some people react negatively to "politically incorrect" methods.
03-15-2014, 07:50 AM
#19


 03-16-2014, 03:24 AM
#20
Race Director
The thing is that everybody tells you to align the oil pump with a screwdriver. If you suggest some other method then people freak out. That's why I put "politically incorrect" in quotes.
My experience is that if you get the rotor headed in the right direction then you know the gears are meshed correctly. The distributor will sit about 1/4" too high because the pin in the distributor gear is not down in the slot in the shaft of the oil pump. Tapping the starter will allow the distributor to drop into position and then you can just time as usual.
If you have a small mirror you can insure that the distributor in in correctly by lining up these marks put there by the factory after the timing is set: