87 Corvette Brake Failure
 12-07-2013, 09:43 PM
#1
Pro


Thread Starter

I was getting my 87 convertible ready to go on a 400-mile road trip across Florida so I took it in for a 4-wheel alignment, checked all the fluids, gave the car a good wash and cleanup and headed over to the local gas station to fill the tank. On the way home I stopped for a red light and just as the car was coming to a complete stop I lifted off the brake pedal a little (like usual). Instead of releasing the brakes, the car continued to slow. When the light turned green, it was obvious the front brakes were dragging quite a bit. I pulled over, shut the car off and waited a minute. When I re-started the car, the brakes were still stuck so I tried pumping them. That just made it worse and I drove the last half-mile home creeping along at less than 5 mph with the engine straining to move the car.
I’m actually feeling pretty lucky. If this failure had occurred on an Interstate, the initial slowing down would have included my brake lights being on but when I let off on the pedal, the brake lights would have gone off while the car was still slowing down. Slowing down with no brake lights on an interstate full of texting, talking and otherwise preoccupied (take your pick – really old or really young) drivers behind me would not have ended well.
I had already ordered a new master cylinder with front and rear reservoirs (stock ’87 master has only a rear one) because the pedal had gone soft once in the driveway a month ago. The brakes seemed fine after that episode but obviously they weren’t.
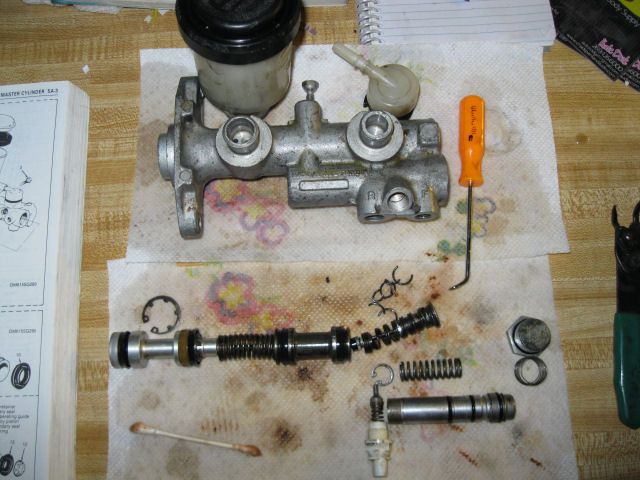
I wanted to know what went wrong so I took the old master cylinder apart. First thing I removed was the Warning switch assembly, Primary piston stop and Combination piston (it’s the piston behind the hex-head plug on the outer end of the master cylinder).
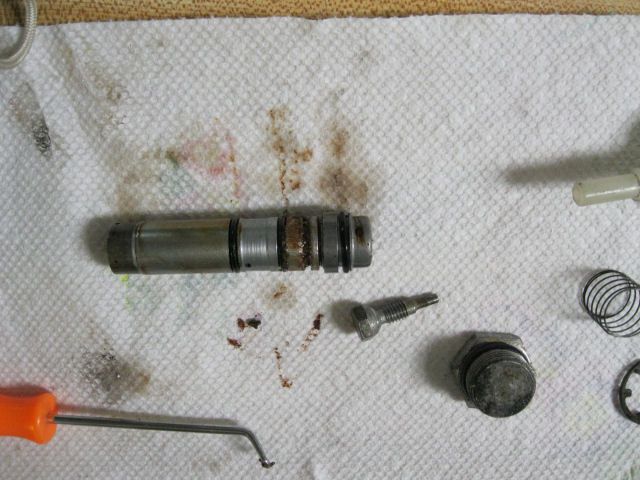
The rear brake section of the piston was clean but the front brake section had dark red paste in it. I thought it might be rust but when I put a magnet right on the blobs on the paper towel, it didn’t stick to the magnet at all. I believe it’s varnish from old brake fluid.
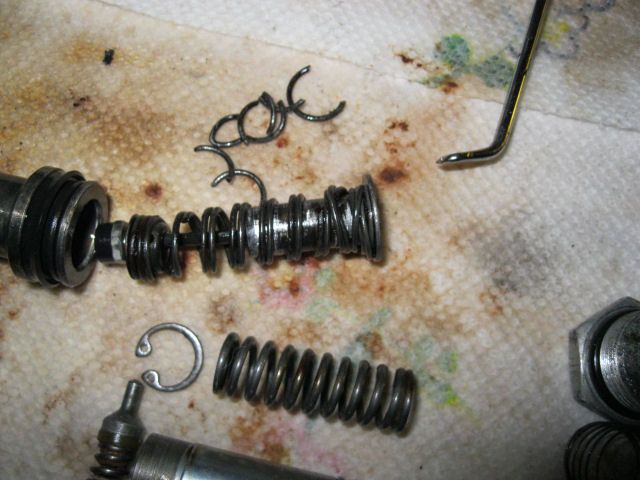
I removed the Primary piston after removing the snap ring. The Primary piston came right out but the secondary piston was quite a bit harder to remove. The last part, the Center valve assembly came out real easy but it was in pieces. I believe this was the cause of the failure. The spring broke apart and wasn’t strong enough to return the Secondary piston assembly to its normal position. There was no way for the front brake pressure to be relieved, keeping the brake calipers engaged.
I thought this was a relatively new master cylinder but I found the record in Quicken and it was purchased in 2000 at a local parts store. While I had it out, I pulled the bias spring out of the Combination piston just to see how hard it was to remove. It was easy to remove and re-install.
I decided to go through the whole system and ordered new front calipers and pads along with a DRM (Doug Rippie Motorsports) brake bias spring for the new master cylinder.
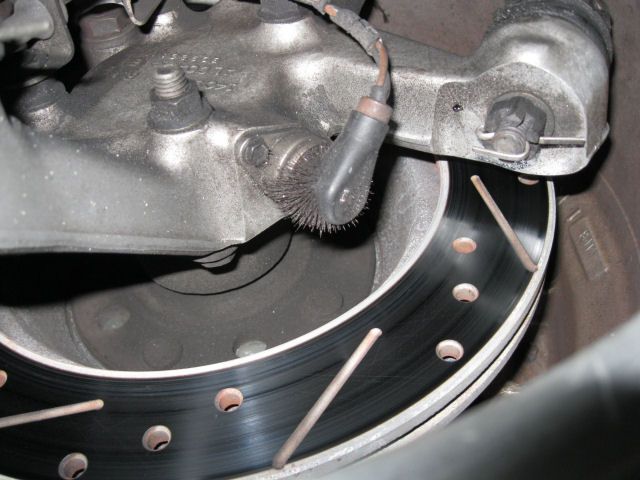
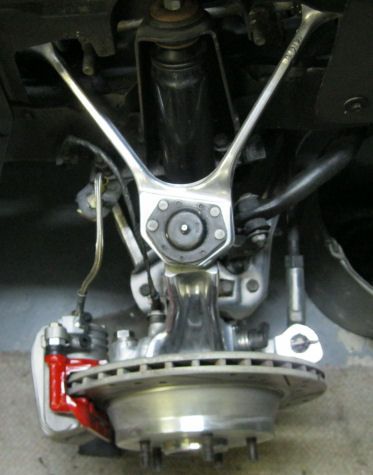
I started with the passenger side front brake. First thing I noticed was metal whiskers on the ABS Sensor. Metal whiskers tell me I ground off a fair amount from the sintered metal pads and the metallic dust is attracted to the magnet in the sensor. Even though the rotor is heat scorched and has some pad residue, I can still make out the original surface grinder marks on the rotor.
I removed the caliper and pads and the pads were quite worn. I don’t think they have 5000 miles of gentle driving on them so this is another problem to solve. The piston seemed to be pretty hard to move so I cut the rubber boot away and there was no sign of fluid but there was some white residue on the piston. Considering how hot the brakes got, it might be minerals left behind by water that boiled off. When I removed the driver side caliper it was obvious there is a problem with the passenger side front caliper.
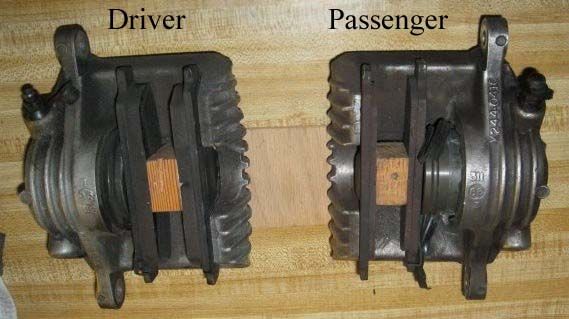
I rebuilt the calipers and replaced the flexible lines, pads and rotors in 2008. I took the calipers apart and even though I found nothing wrong, I decided to replace the front calipers as a pair. I also decided to replace the pads with a complete set of EBC Red pads. I had some down time waiting for the brown truck to deliver my parts so I wasted some time polishing and painting a few things. It went together quick with no problems to this point...
I didn’t want to screw up the brakes again so I followed the Factory Service Manual procedures closely. Near the end of the caliper replacement procedure, page 5B-3, step 11 says to:
“Install inlet fitting with two new washers and torque to 44-54 N-m (32-40 lb-ft).”
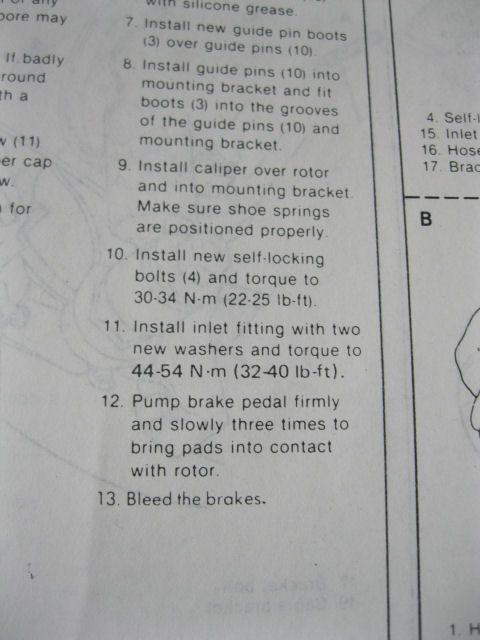
To me that looks like a mistake. I can’t believe a bolt with one hole drilled through its center and another drilled through its diameter could handle that much torque. I flipped to the back of the brake section to the Specification page (5F-1) and it confirms the “Brake Hose to Caliper” torque specification is 32 ft. lbs.
Never let it be said I can’t follow directions. I torqued that sucker down and even before the wrench clicked, the bolt gave up.
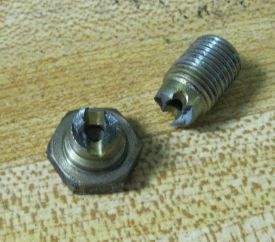
There is no way this bolt can handle 32 ft. lbs. of torque. Besides, it is a steel bolt going into aluminum. Luckily there was enough of the failed bolt sticking out of the caliper so I could grab it and remove it by hand.
Now I’m waiting for a couple of new banjo bolts from Zip Corvettes. The local Advance Auto is going to supply a couple of new copper washers. I’m going to replace that bias spring while I’m waiting.
I’m actually feeling pretty lucky. If this failure had occurred on an Interstate, the initial slowing down would have included my brake lights being on but when I let off on the pedal, the brake lights would have gone off while the car was still slowing down. Slowing down with no brake lights on an interstate full of texting, talking and otherwise preoccupied (take your pick – really old or really young) drivers behind me would not have ended well.
I had already ordered a new master cylinder with front and rear reservoirs (stock ’87 master has only a rear one) because the pedal had gone soft once in the driveway a month ago. The brakes seemed fine after that episode but obviously they weren’t.
I wanted to know what went wrong so I took the old master cylinder apart. First thing I removed was the Warning switch assembly, Primary piston stop and Combination piston (it’s the piston behind the hex-head plug on the outer end of the master cylinder).
The rear brake section of the piston was clean but the front brake section had dark red paste in it. I thought it might be rust but when I put a magnet right on the blobs on the paper towel, it didn’t stick to the magnet at all. I believe it’s varnish from old brake fluid.
I removed the Primary piston after removing the snap ring. The Primary piston came right out but the secondary piston was quite a bit harder to remove. The last part, the Center valve assembly came out real easy but it was in pieces. I believe this was the cause of the failure. The spring broke apart and wasn’t strong enough to return the Secondary piston assembly to its normal position. There was no way for the front brake pressure to be relieved, keeping the brake calipers engaged.
I thought this was a relatively new master cylinder but I found the record in Quicken and it was purchased in 2000 at a local parts store. While I had it out, I pulled the bias spring out of the Combination piston just to see how hard it was to remove. It was easy to remove and re-install.
I decided to go through the whole system and ordered new front calipers and pads along with a DRM (Doug Rippie Motorsports) brake bias spring for the new master cylinder.
I started with the passenger side front brake. First thing I noticed was metal whiskers on the ABS Sensor. Metal whiskers tell me I ground off a fair amount from the sintered metal pads and the metallic dust is attracted to the magnet in the sensor. Even though the rotor is heat scorched and has some pad residue, I can still make out the original surface grinder marks on the rotor.
I removed the caliper and pads and the pads were quite worn. I don’t think they have 5000 miles of gentle driving on them so this is another problem to solve. The piston seemed to be pretty hard to move so I cut the rubber boot away and there was no sign of fluid but there was some white residue on the piston. Considering how hot the brakes got, it might be minerals left behind by water that boiled off. When I removed the driver side caliper it was obvious there is a problem with the passenger side front caliper.
I rebuilt the calipers and replaced the flexible lines, pads and rotors in 2008. I took the calipers apart and even though I found nothing wrong, I decided to replace the front calipers as a pair. I also decided to replace the pads with a complete set of EBC Red pads. I had some down time waiting for the brown truck to deliver my parts so I wasted some time polishing and painting a few things. It went together quick with no problems to this point...
I didn’t want to screw up the brakes again so I followed the Factory Service Manual procedures closely. Near the end of the caliper replacement procedure, page 5B-3, step 11 says to:
“Install inlet fitting with two new washers and torque to 44-54 N-m (32-40 lb-ft).”
To me that looks like a mistake. I can’t believe a bolt with one hole drilled through its center and another drilled through its diameter could handle that much torque. I flipped to the back of the brake section to the Specification page (5F-1) and it confirms the “Brake Hose to Caliper” torque specification is 32 ft. lbs.
Never let it be said I can’t follow directions. I torqued that sucker down and even before the wrench clicked, the bolt gave up.
There is no way this bolt can handle 32 ft. lbs. of torque. Besides, it is a steel bolt going into aluminum. Luckily there was enough of the failed bolt sticking out of the caliper so I could grab it and remove it by hand.
Now I’m waiting for a couple of new banjo bolts from Zip Corvettes. The local Advance Auto is going to supply a couple of new copper washers. I’m going to replace that bias spring while I’m waiting.
 12-07-2013, 11:32 PM
#2


Excellent writeup so far! I am sure you are on track to fix your brakes. Use your instinct on the torque and it will be perfect.
12-08-2013, 12:48 AM
#3
Burning Brakes

Member Since: Dec 2008
Location: Morgan Hill and Marina California
Posts: 1,021
Likes: 0
Received 6 Likes
on
5 Posts
NO minerals came along with it.
I'd be thinking aluminum oxide, perhaps related to dissimilar metals.
12-08-2013, 09:46 AM
#4
Team Owner


I just looked at my '87 FSM and it does say 32-40 ft-lbs  . But I also checked my '92 FSM and that book calls for a 30 ft-lbs tightening spec on that same (front caliper) brake line bolt.
I would think that you could use a lesser amount of torque. The copper crush washers should be leak-free if you just used a small wrench and tighten the bolt with that using hand strength. Even if there is some leakage from less tightening force, it would be easy to simply remove the bolt, replace the crush washers and use more strength to tighten the bolt.
. But I also checked my '92 FSM and that book calls for a 30 ft-lbs tightening spec on that same (front caliper) brake line bolt.I would think that you could use a lesser amount of torque. The copper crush washers should be leak-free if you just used a small wrench and tighten the bolt with that using hand strength. Even if there is some leakage from less tightening force, it would be easy to simply remove the bolt, replace the crush washers and use more strength to tighten the bolt.
12-09-2013, 03:35 PM
#5
Pro
Thread Starter
Sorry for my delay in posting. It's the Holiday honey-do season so sitting down at the computer is a challenge...
Thanks, I've done a fair number of brake jobs over the past 50 years and never had problems like this. I'm going to use my stubby combo wrench and I know it won't break or leak.
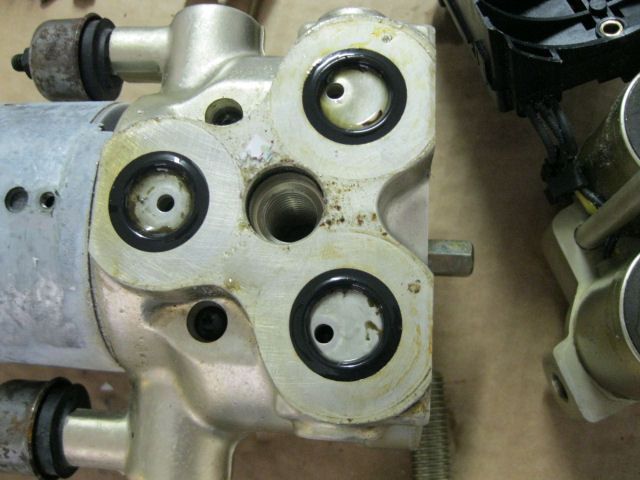
I'm sure you're right. When I popped the piston out, the caliper bore looked like new. The white stuff must have formed outside the seal and under the boot. Here's what the piston and bore looked like and I can see some oxidation and pitting on the outermost land, beyond the seal. Please ignore the condition of the outer edges of the piston -- knowing new calipers were on the way, I went a little midieval on it when It didn't slide right out ("calm down and hook up the air line, it isn't a living thing that needs to answer for its crimes against humanity").
I think I'll lean toward a slight leak and tighten it a bit more. Maybe the brake fluid will act as a lubricant on the copper washers.
Bolts are scheduled to arrive some time tomorrow. The past few weeks the UPS guy has been delivering in the dark at my house.
I just looked at my '87 FSM and it does say 32-40 ft-lbs . But I also checked my '92 FSM and that book calls for a 30 ft-lbs tightening spec on that same (front caliper) brake line bolt.
I would think that you could use a lesser amount of torque. The copper crush washers should be leak-free if you just used a small wrench and tighten the bolt with that using hand strength. Even if there is some leakage from less tightening force, it would be easy to simply remove the bolt, replace the crush washers and use more strength to tighten the bolt.
. But I also checked my '92 FSM and that book calls for a 30 ft-lbs tightening spec on that same (front caliper) brake line bolt.I would think that you could use a lesser amount of torque. The copper crush washers should be leak-free if you just used a small wrench and tighten the bolt with that using hand strength. Even if there is some leakage from less tightening force, it would be easy to simply remove the bolt, replace the crush washers and use more strength to tighten the bolt.
Bolts are scheduled to arrive some time tomorrow. The past few weeks the UPS guy has been delivering in the dark at my house.
Last edited by Bob Heine; 01-14-2017 at 04:20 PM.
12-09-2013, 04:34 PM
#6

good stuff with pics !
That old MC was likely suffering from a broken spring for a long time. The things finally got a slice sandwiched between to bind it and cause it to break to a million pieces. I'[ve seen broken springs before, but never in that many chunks....
Knowing the MC is simply a pump, its impressive that the seals lasted this long with broken metal floating around inside the piston/plunger assy and bore.
IIWM, I'd take the step of d/c all the hyd lines, and blowing each clean with brake cleaner and high pressure air. There may be residue inside or varnish AND now the possibility of metal fragments that can move into the new calipers or the ABS module and cause all kinds of new and costly problems....
Great write up !
12-10-2013, 12:27 AM
#7
Pro
Thread Starter
good stuff with pics !
That old MC was likely suffering from a broken spring for a long time. The things finally got a slice sandwiched between to bind it and cause it to break to a million pieces. I'[ve seen broken springs before, but never in that many chunks....
Knowing the MC is simply a pump, its impressive that the seals lasted this long with broken metal floating around inside the piston/plunger assy and bore.
IIWM, I'd take the step of d/c all the hyd lines, and blowing each clean with brake cleaner and high pressure air. There may be residue inside or varnish AND now the possibility of metal fragments that can move into the new calipers or the ABS module and cause all kinds of new and costly problems....
Great write up !
That old MC was likely suffering from a broken spring for a long time. The things finally got a slice sandwiched between to bind it and cause it to break to a million pieces. I'[ve seen broken springs before, but never in that many chunks....
Knowing the MC is simply a pump, its impressive that the seals lasted this long with broken metal floating around inside the piston/plunger assy and bore.
IIWM, I'd take the step of d/c all the hyd lines, and blowing each clean with brake cleaner and high pressure air. There may be residue inside or varnish AND now the possibility of metal fragments that can move into the new calipers or the ABS module and cause all kinds of new and costly problems....
Great write up !
I too was surprised at the complete failure of that spring. The rubber piston seals look just fine but the metal of the piston was chewed up quite a bit.
I already have an additional quart of brake fluid and a gallon of denatured alcohol. I plan to drain the new master cylinder and flush the lines with alcohol (to remove any varnish). I have to remove the CD changer from the driver side compartment to get to the ABS unit but I plan to disconnect and flush the inlet lines, and then flush the outlet lines with the calipers disconnected. The new front calipers have yet to see fluid so I only need to flush the rear calipers.
I also bought a used ABS unit that I've opened up and cleaned so that will replace the original ABS. In a panic stop in 2000 the ABS light came on so I flushed the system and installed the master cylinder that just failed. When it's finished, the whole system should be clean and good to go.
12-14-2013, 09:42 PM
#8
Pro
Thread Starter
I have made a little progress on the brake system but am waiting for a set of metric flare nut wrenches to arrive so I can disconnect the ABS unit. Decades ago I bought SAE flare nut wrenches but never seemed to need them in metric, until now.
I bought this car when it was 4 years old and the original owner had replaced the Bose stereo system. The 1.0 DIN Sony Cassette head and 0.5 DIN Sony equalizer filled the original hole nicely but there was a giant box in the rear of the car that contained a pair of 5-1/4" speakers, a CD changer, amplifier and subwoofer. Aside from having absolutely no storage space in the car, every once in a while a puff of smoke came out of the dash and the stereo would shut off. Even though the stereo would come back on, I decided to track down the source of the smoke and found a rat's nest of wiring with crimp connectors, cut wires and not a fuse in sight. In time I replaced the whole system and got rid of the wooden coffin. Unfortunately the wooden coffin covered the chambers where the Bose speakers once resided. The chambers are not particularly attractive so I chose a fairly simple solution.
I bought a rear compartment frame and doors for a C4 coupe. The doors didn't come with carpet so I made a couple of mahogany plywood panels, attached them with aluminum binding posts and covered them with casting resin.
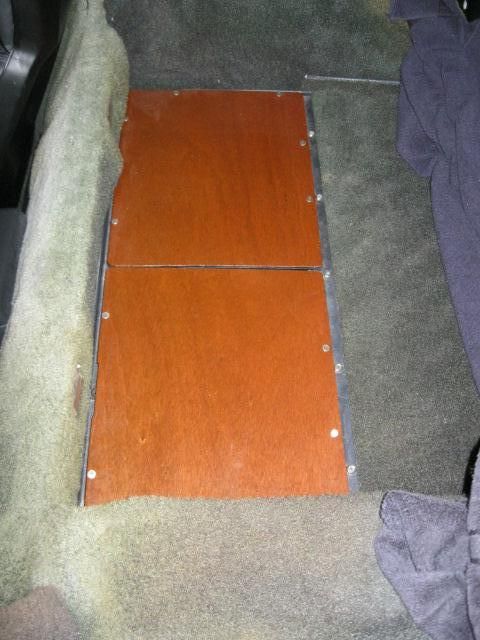
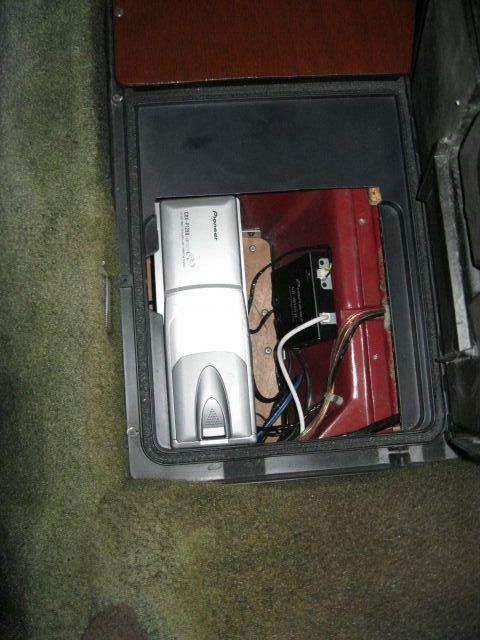
The speaker holes were put to use. The driver side hole is partially filled with a Pioneer CD changer and iPod adapter. The passenger side is filled with "Stuff."
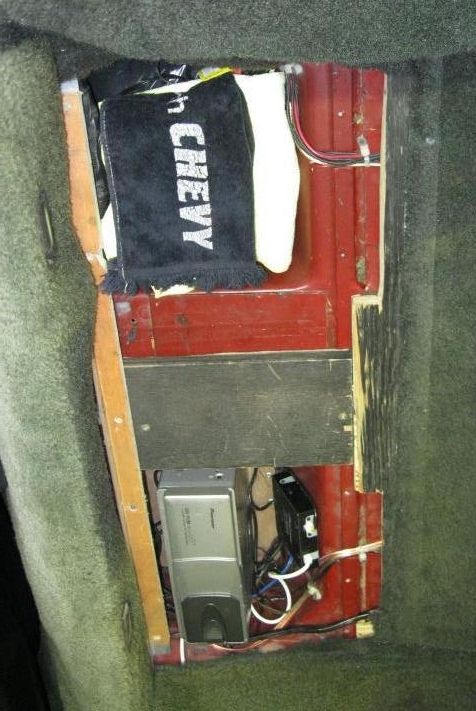
The CD Changer is mounted to a plywood panel that rests on the ABS Unit. The plywood is also attached to the walls of the hole with self-tapping screws.
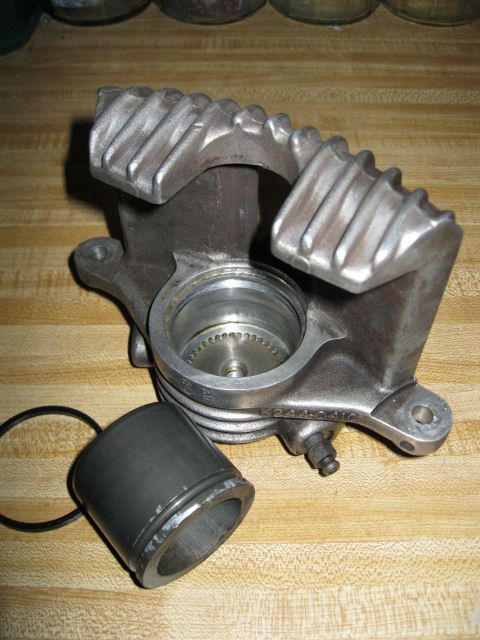
After removing the CD Changer, I tried disconnecting the brake lines and quickly realized the steel fittings were solidly attached to the aluminum housing. Before I rounded off the fittings using an open-end wrench, I stopped and ordered the flare nut wrenches. While I was waiting for Fedex, I decided to open up the used ABS unit.
First step is to remove the cap that conceals the main bolt holding the ABS unit together. I tried prying it off but there's no space to fit anything but a razor blade. I drilled a 3/32" hole in the cap and used a hose pick to pry the cap off.
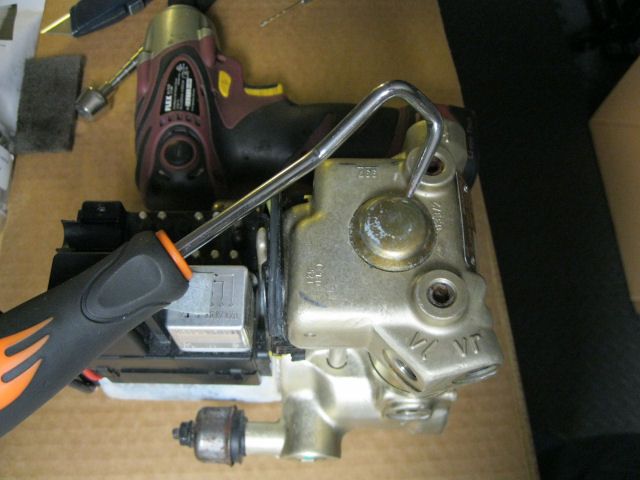
Removed the clip (T15 Torx), two relays, two mounting screws and the positive lead to the motor (all T20 Torx). Apparently I have now violated Bosch and GM warnings never to remove anything but the relays. Disturbed lime green paint is proof of my crime.
Next step was more difficult than I expected. The main bolt is a 12mm allen head and because it has been undisturbed for more than 25 years, my even older Rockwell impact wrench wouldn't break it free. I'm not sure how much more powerful my new 'Earthquake' (Harbor Freight) impact is but it make quick work of that bolt.
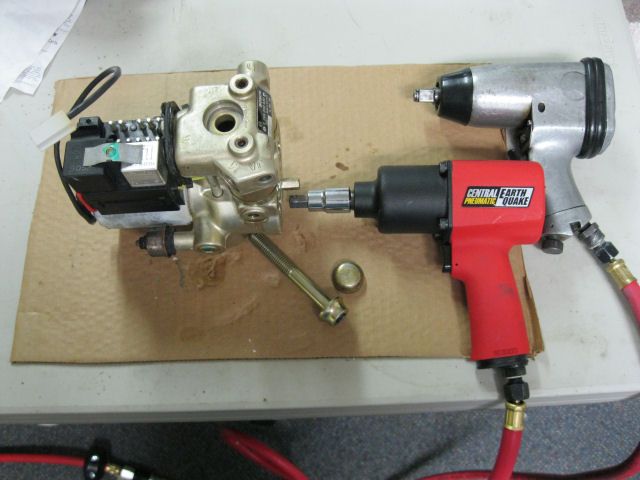
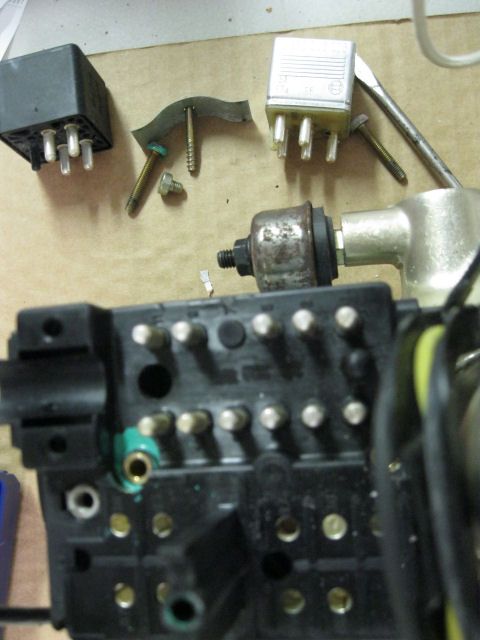
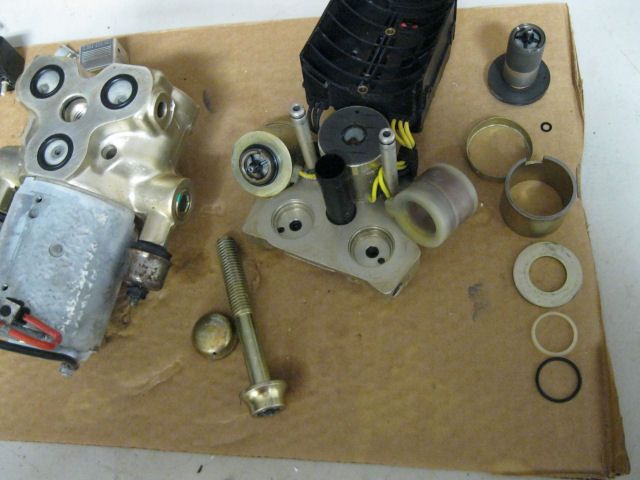
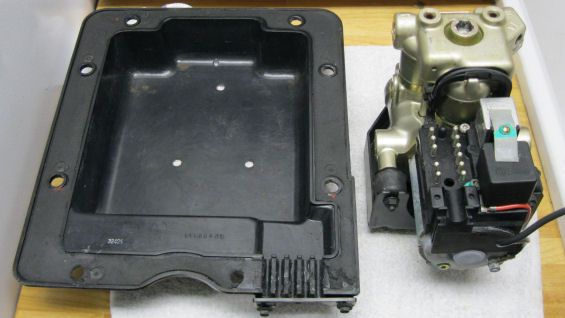
With a little gentle prying on all three solenoids, the upper assembly can be removed (connector comes along with it).

With the solenoids removed, the lower housing shows some contamination (and a fair amount of debris in the hard to get to areas of the housing. I'll be spending some time cleaning all the stuff up with denatured alcohol.
I removed one of the solenoids to see if there was any crud on the other end. It looks pretty clean but I'll give it a rinse anyway.
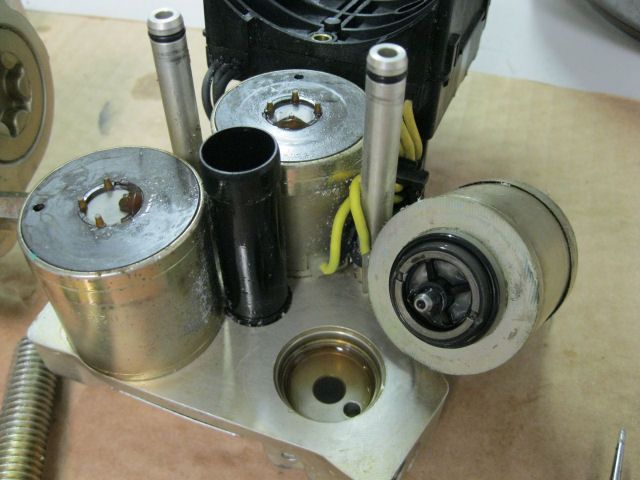
As long as I've taken it apart this far, I thought I'd try disassembling the solenoids (one at a time). I managed to get it apart except for the solenoid plunger. It appears to be staked and I just don't want to have metal shavings introduced to what appears to be a pretty clean assembly.
Rooves in Florida are perfect mold and mildew farms so I decided to take a break from the brakes and pressure-clean the roof this weekend. When I mentioned this, my wife looked at me like I was an idiot, went to her drawer and pulled out a business card from a box. It took me 4 minutes on the phone and $250 to pressure clean the house roof, the shop roof, the pool patio, the 125' walkway to the shop, the 75'x25' driveway and the 100 feet of sidewalk in front of the house. I'm having a sympathy backache just thinking about doing it myself.
I bought this car when it was 4 years old and the original owner had replaced the Bose stereo system. The 1.0 DIN Sony Cassette head and 0.5 DIN Sony equalizer filled the original hole nicely but there was a giant box in the rear of the car that contained a pair of 5-1/4" speakers, a CD changer, amplifier and subwoofer. Aside from having absolutely no storage space in the car, every once in a while a puff of smoke came out of the dash and the stereo would shut off. Even though the stereo would come back on, I decided to track down the source of the smoke and found a rat's nest of wiring with crimp connectors, cut wires and not a fuse in sight. In time I replaced the whole system and got rid of the wooden coffin. Unfortunately the wooden coffin covered the chambers where the Bose speakers once resided. The chambers are not particularly attractive so I chose a fairly simple solution.
I bought a rear compartment frame and doors for a C4 coupe. The doors didn't come with carpet so I made a couple of mahogany plywood panels, attached them with aluminum binding posts and covered them with casting resin.
The speaker holes were put to use. The driver side hole is partially filled with a Pioneer CD changer and iPod adapter. The passenger side is filled with "Stuff."
The CD Changer is mounted to a plywood panel that rests on the ABS Unit. The plywood is also attached to the walls of the hole with self-tapping screws.
After removing the CD Changer, I tried disconnecting the brake lines and quickly realized the steel fittings were solidly attached to the aluminum housing. Before I rounded off the fittings using an open-end wrench, I stopped and ordered the flare nut wrenches. While I was waiting for Fedex, I decided to open up the used ABS unit.
First step is to remove the cap that conceals the main bolt holding the ABS unit together. I tried prying it off but there's no space to fit anything but a razor blade. I drilled a 3/32" hole in the cap and used a hose pick to pry the cap off.
Removed the clip (T15 Torx), two relays, two mounting screws and the positive lead to the motor (all T20 Torx). Apparently I have now violated Bosch and GM warnings never to remove anything but the relays. Disturbed lime green paint is proof of my crime.
Next step was more difficult than I expected. The main bolt is a 12mm allen head and because it has been undisturbed for more than 25 years, my even older Rockwell impact wrench wouldn't break it free. I'm not sure how much more powerful my new 'Earthquake' (Harbor Freight) impact is but it make quick work of that bolt.
With a little gentle prying on all three solenoids, the upper assembly can be removed (connector comes along with it).
With the solenoids removed, the lower housing shows some contamination (and a fair amount of debris in the hard to get to areas of the housing. I'll be spending some time cleaning all the stuff up with denatured alcohol.
I removed one of the solenoids to see if there was any crud on the other end. It looks pretty clean but I'll give it a rinse anyway.
As long as I've taken it apart this far, I thought I'd try disassembling the solenoids (one at a time). I managed to get it apart except for the solenoid plunger. It appears to be staked and I just don't want to have metal shavings introduced to what appears to be a pretty clean assembly.
Rooves in Florida are perfect mold and mildew farms so I decided to take a break from the brakes and pressure-clean the roof this weekend. When I mentioned this, my wife looked at me like I was an idiot, went to her drawer and pulled out a business card from a box. It took me 4 minutes on the phone and $250 to pressure clean the house roof, the shop roof, the pool patio, the 125' walkway to the shop, the 75'x25' driveway and the 100 feet of sidewalk in front of the house. I'm having a sympathy backache just thinking about doing it myself.
Last edited by Bob Heine; 12-14-2013 at 09:47 PM.
12-16-2013, 10:26 AM
#10
outstanding !
sounds like you got a "keeper".
My 'ex' would hide a business card and go find the life insurance policies if she thought I was climbing on the roof !
of course, that's why shes an "ex"...
sounds like you got a "keeper".
My 'ex' would hide a business card and go find the life insurance policies if she thought I was climbing on the roof !
of course, that's why shes an "ex"...
12-16-2013, 02:44 PM
#11
Pro
Thread Starter
Thanks guys, I'm retired with some time on my hands and I enjoy writing up my projects.
Brian,
I'm not sure where these c-clips and caliper rods are located. While waiting for the HF wrenches, I polished up the rear calipers and smoothed the mount for some red paint. This is all the mounting hardware I have (one caliper bracket bolt not pictured) and it doesn't include any clips or appear to be worn, although there is still some old grease on one of the rods.
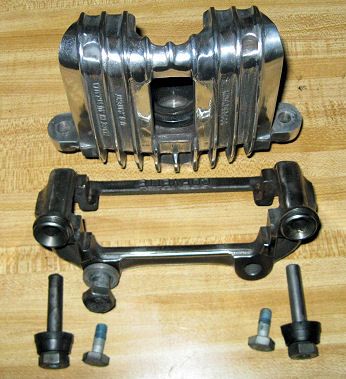
I'm planning to re-use the mounting bolts and pins, with a little red Loctite on the threads and some silicone grease on the caliper alignment pins.
Lee,
I hope you're right -- we've been married 51 years, 267 days but it's a day-to-day thing. She introduces me as her "First Husband" and I call her my "Last Wife".
I'm not sure where these c-clips and caliper rods are located. While waiting for the HF wrenches, I polished up the rear calipers and smoothed the mount for some red paint. This is all the mounting hardware I have (one caliper bracket bolt not pictured) and it doesn't include any clips or appear to be worn, although there is still some old grease on one of the rods.
I'm planning to re-use the mounting bolts and pins, with a little red Loctite on the threads and some silicone grease on the caliper alignment pins.
I hope you're right -- we've been married 51 years, 267 days but it's a day-to-day thing. She introduces me as her "First Husband" and I call her my "Last Wife".
12-16-2013, 03:19 PM
#12
Pro
Thread Starter
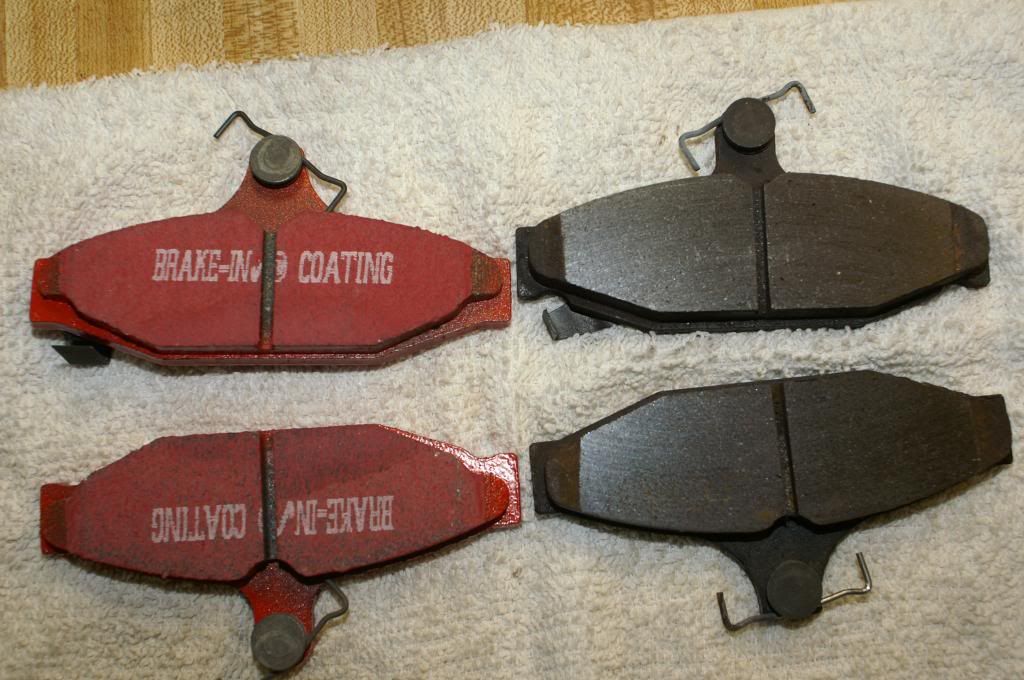
The pads I have had on the car since 2008 came with the new drilled and slotted rotors and I don't recall any brand name on their boxes. The front pads look like the heat from that short crawl home caused them to disintegrate. I expected wear but I didn't expect the pitting.
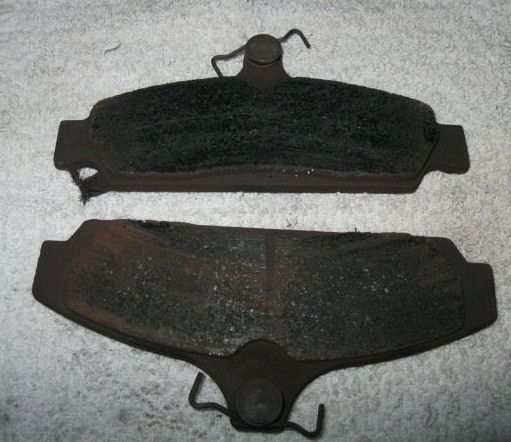
The rear pads have obviously fared much better. They show no sign of wear at all in fact they only have a polished look to the pad surface.

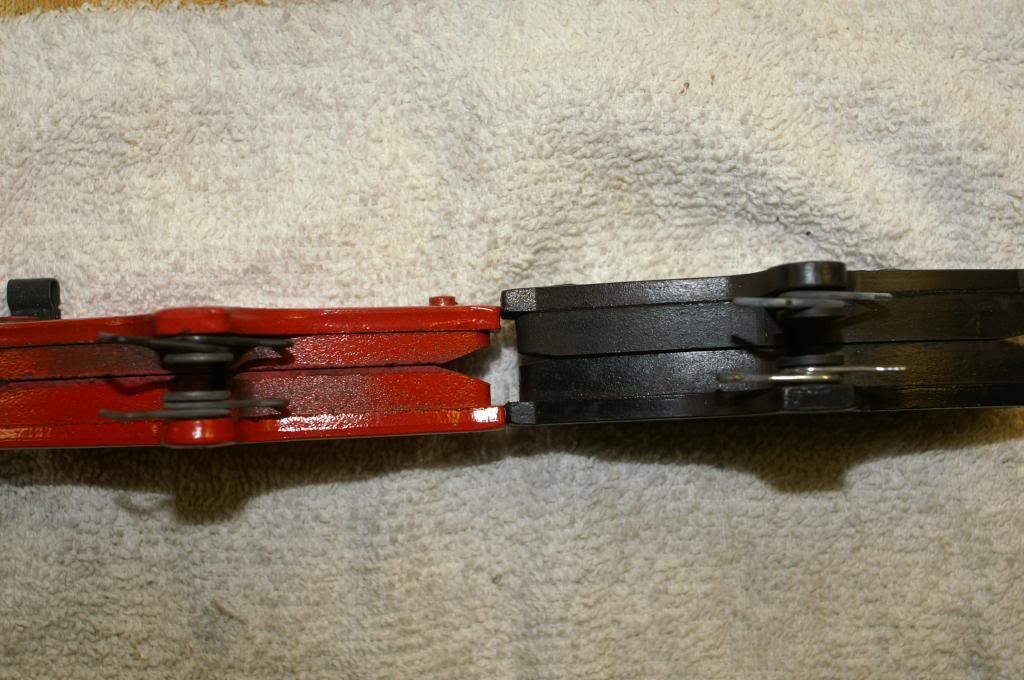
Even though the rear pads aren't worn, I am replacing the front set with EBC red pads so I ordered matching rear pads as well. Because of the severe wear on the front pads, I couldn't compare them to the new pads from EBC. By chance I had the rear pads sitting next to the EBC pads and noticed that the pad that goes against the piston is quite a bit thinner than the other one. The red pads are the brand new ones and the black pads are the 5-year old ones.
The new pads haven't been touched so I guess there is a reason why they are so much thinner. I'll contact EBC to see what the reasoning is.
The rear pads have obviously fared much better. They show no sign of wear at all in fact they only have a polished look to the pad surface.
Even though the rear pads aren't worn, I am replacing the front set with EBC red pads so I ordered matching rear pads as well. Because of the severe wear on the front pads, I couldn't compare them to the new pads from EBC. By chance I had the rear pads sitting next to the EBC pads and noticed that the pad that goes against the piston is quite a bit thinner than the other one. The red pads are the brand new ones and the black pads are the 5-year old ones.
The new pads haven't been touched so I guess there is a reason why they are so much thinner. I'll contact EBC to see what the reasoning is.
01-05-2014, 10:50 PM
#13
Pro
Thread Starter
The holidays are over so I can get back to work on the brakes. I ordered a few additional parts so the time off wasn't a complete bust.
First thing I ordered were new rear brake pads. When I e-mailed EBC about the mismatch they immediately responded with the solution -- order the right pads. I found the front pads on eBay and verified that they fit but apparently didn�t verify that the rear pads fit. I have a set of DP31167C rear pads that fit 88-96 Corvettes, a bunch of Camaros and Firebirds as well as the 93-94 Aston Martin Virage. The pads I need are DP31165C and they arrived during the holidays.
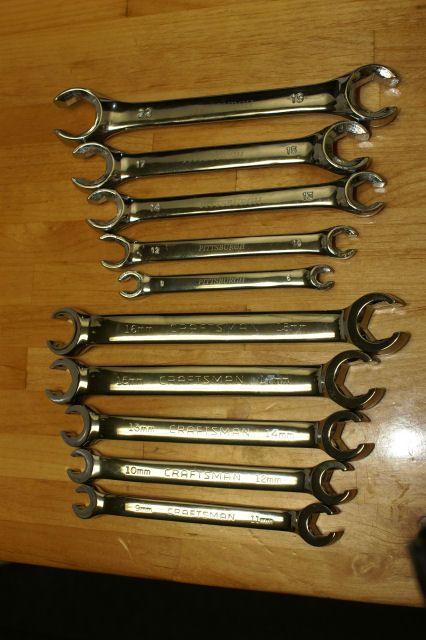
My Harbor Freight flare nut wrenches finally arrived and at $15.46 ($7.99 for the wrenches plus $6.99 shipping and $0.48 tax) it seemed like a good deal. Not sure I'll ever use the 22mm size but it has the 12mm size I need (6mm x 8mm, 10mm x 12mm, 13mm x 14mm, 15mm x 17mm, 19mm x 22mm).
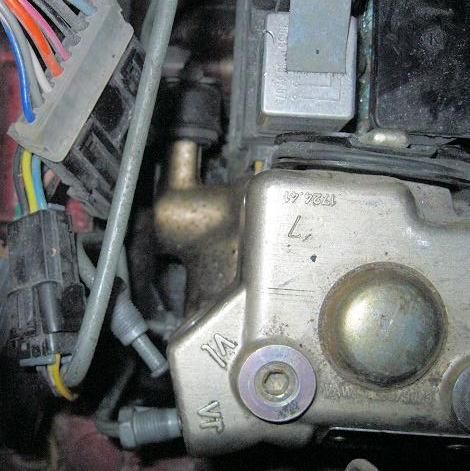
I successfully loosened four of the flare nuts on the ABS unit but the fifth one wouldn't budge. I had soaked all the fittings with PB-Blaster the week before but just to be sure it would loosen, I soaked the stubborn one with Kroil and waited another day. The fitting that won�t budge is also the hardest to see and get to. It�s the one down on the bottom that you can see next to the Vl outlet.
I was able to get the 12 mm wrench locked on the fitting and gave it all I had. It felt like the fitting had broken free but on closer inspection it was the wrench that had broken.
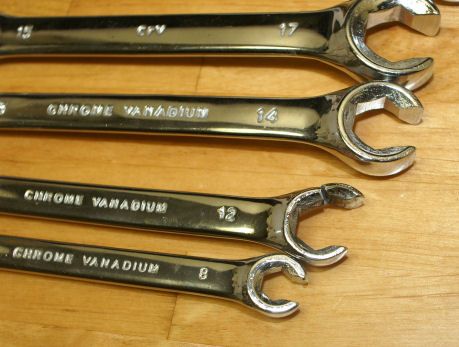
It has a lifetime guarantee but I don�t feel like getting another one of these just so I can prove more than one Pittsburgh wrench can fail. I'll put it in the car so next time I'm at HF they can replace it. On a weird wrench note, the 15/17mm wrench in the set has �CrV� stamped in the handle instead of �CHROME VANADIUM� like the rest of the set.
I drove to my nearby Sears and bought a set of Craftsman flare wrenches. By re-activating my old Sears credit card I paid only $25.27 (instead of $42) for their 5-piece set. The Craftsman set includes 9 x 11mm, 10 x 12mm, 13 x 14mm, 15 x 17mm and 16 x 18mm so between the two I have a wrenches to fit 14 different size flare nuts.
Eager to conquer the frozen fitting, I put the new 12mm wrench to work but all it did was round off the frozen fitting a bit more. I guess it�s time for the Vise-Grips and another messed up fitting. It was also time to take a holiday break so I turned off the lights and forgot about the car for a few days.
First thing I ordered were new rear brake pads. When I e-mailed EBC about the mismatch they immediately responded with the solution -- order the right pads. I found the front pads on eBay and verified that they fit but apparently didn�t verify that the rear pads fit. I have a set of DP31167C rear pads that fit 88-96 Corvettes, a bunch of Camaros and Firebirds as well as the 93-94 Aston Martin Virage. The pads I need are DP31165C and they arrived during the holidays.
My Harbor Freight flare nut wrenches finally arrived and at $15.46 ($7.99 for the wrenches plus $6.99 shipping and $0.48 tax) it seemed like a good deal. Not sure I'll ever use the 22mm size but it has the 12mm size I need (6mm x 8mm, 10mm x 12mm, 13mm x 14mm, 15mm x 17mm, 19mm x 22mm).
I successfully loosened four of the flare nuts on the ABS unit but the fifth one wouldn't budge. I had soaked all the fittings with PB-Blaster the week before but just to be sure it would loosen, I soaked the stubborn one with Kroil and waited another day. The fitting that won�t budge is also the hardest to see and get to. It�s the one down on the bottom that you can see next to the Vl outlet.
I was able to get the 12 mm wrench locked on the fitting and gave it all I had. It felt like the fitting had broken free but on closer inspection it was the wrench that had broken.
It has a lifetime guarantee but I don�t feel like getting another one of these just so I can prove more than one Pittsburgh wrench can fail. I'll put it in the car so next time I'm at HF they can replace it. On a weird wrench note, the 15/17mm wrench in the set has �CrV� stamped in the handle instead of �CHROME VANADIUM� like the rest of the set.
I drove to my nearby Sears and bought a set of Craftsman flare wrenches. By re-activating my old Sears credit card I paid only $25.27 (instead of $42) for their 5-piece set. The Craftsman set includes 9 x 11mm, 10 x 12mm, 13 x 14mm, 15 x 17mm and 16 x 18mm so between the two I have a wrenches to fit 14 different size flare nuts.
Eager to conquer the frozen fitting, I put the new 12mm wrench to work but all it did was round off the frozen fitting a bit more. I guess it�s time for the Vise-Grips and another messed up fitting. It was also time to take a holiday break so I turned off the lights and forgot about the car for a few days.
01-05-2014, 11:02 PM
#14
Pro
Thread Starter
"While I'm at it" strikes again.
As BrianCunningham (and the Factory Service Manual) suggested, I ordered new mounting pins and bolts for the rear calipers (the new front calipers came with these). Rock Auto had some close-out inventory so they were really cheap.
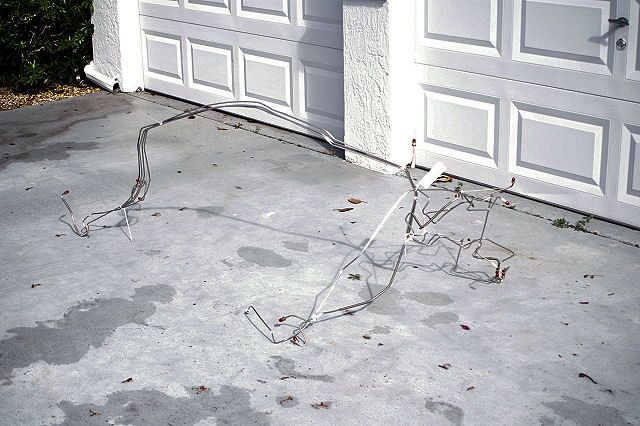
I also agree with leesvet about disconnecting and cleaning all the lines but I decided to take it a step further. While searching for a single line to replace the one I was about to mangle, I found some eBay listings for lines but they were just lengths of pre-flared lines and you choose which length you need and bend it up yourself. I checked Inline Tube, where I had purchased brake lines for my 72 but they had no listing for 87 Corvettes. The Right Stuff Detailing site (http://www.getdiscbrakes.com/vbs8601) has the complete 8-piece pre-bent brake line set for the Power Brake/ABS system on 86-89 Corvettes for $175 (O.E.) or $235 (Stainless Steel) including shipping and handling. The lines arrive in a huge 5-foot long box with the longest lines bent in a gentle curve to fit in the box.
The site doesn�t have a picture of these brake lines so I thought I would post a couple of pictures of the stainless steel set. I straightened the long lines a bit but left the set zip-tied together.
It�s hard to capture the whole set in one photo so here�s a close-up of some of the really nice bends.
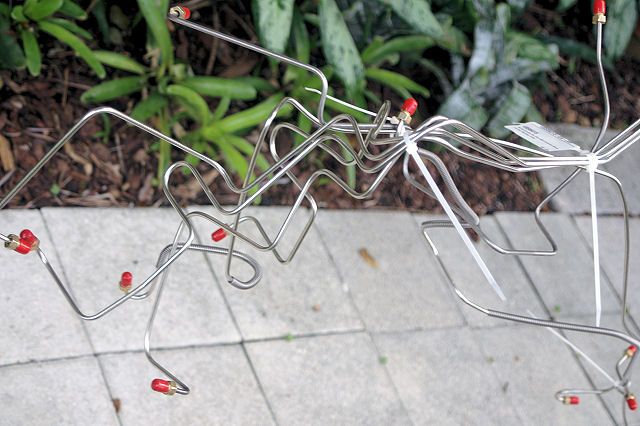
I�m sure there are lots of guys and gals who can bend stainless brake lines as nice as these and even a few who can remember where and how much armor coil to include but I�m not one of them. I can put one maybe two bends in a piece of stainless tubing and even put single flares on the ends but ten bends, bubble flares and armor coils is way beyond my abilities. I have trouble figuring out which to do first: bend the end and flare it or flare the end and then bend it.
I decided to start with the driver side rear just because it uses the shortest line.
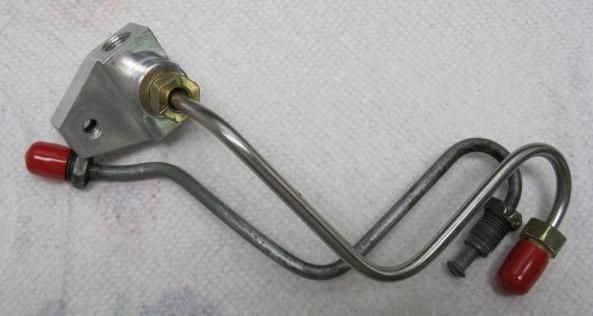
After disconnecting the three lines at the junction block and removing the stainless flex line it was time for a little cleaning. Here�s the aluminum junction block and new line along with the old line. The old line shows evidence of my shortage of flare fitting wrenches. Even though they work, Vise-Grips are not the best tool for this job. Notice that the flare nuts on the new line are quite a bit beefier than the originals. That may help preserve the hex shape of the fittings in the future.
As BrianCunningham (and the Factory Service Manual) suggested, I ordered new mounting pins and bolts for the rear calipers (the new front calipers came with these). Rock Auto had some close-out inventory so they were really cheap.
I also agree with leesvet about disconnecting and cleaning all the lines but I decided to take it a step further. While searching for a single line to replace the one I was about to mangle, I found some eBay listings for lines but they were just lengths of pre-flared lines and you choose which length you need and bend it up yourself. I checked Inline Tube, where I had purchased brake lines for my 72 but they had no listing for 87 Corvettes. The Right Stuff Detailing site (http://www.getdiscbrakes.com/vbs8601) has the complete 8-piece pre-bent brake line set for the Power Brake/ABS system on 86-89 Corvettes for $175 (O.E.) or $235 (Stainless Steel) including shipping and handling. The lines arrive in a huge 5-foot long box with the longest lines bent in a gentle curve to fit in the box.
The site doesn�t have a picture of these brake lines so I thought I would post a couple of pictures of the stainless steel set. I straightened the long lines a bit but left the set zip-tied together.
It�s hard to capture the whole set in one photo so here�s a close-up of some of the really nice bends.
I�m sure there are lots of guys and gals who can bend stainless brake lines as nice as these and even a few who can remember where and how much armor coil to include but I�m not one of them. I can put one maybe two bends in a piece of stainless tubing and even put single flares on the ends but ten bends, bubble flares and armor coils is way beyond my abilities. I have trouble figuring out which to do first: bend the end and flare it or flare the end and then bend it.
I decided to start with the driver side rear just because it uses the shortest line.
After disconnecting the three lines at the junction block and removing the stainless flex line it was time for a little cleaning. Here�s the aluminum junction block and new line along with the old line. The old line shows evidence of my shortage of flare fitting wrenches. Even though they work, Vise-Grips are not the best tool for this job. Notice that the flare nuts on the new line are quite a bit beefier than the originals. That may help preserve the hex shape of the fittings in the future.
01-05-2014, 11:41 PM
#15
Drifting


Great thread and please keep updating. It was a good idea to get the stainless steel lines (which I'll keep in mind for the future) but you may also want to consider getting a much higher quality flare wrench from Snap On. Instead of getting a whole set you can get an individual wrench on Ebay. In your case you need a 12mm and here are a couple listings -
http://www.ebay.com/itm/NEW-Snap-On-RXSM12B-Flare-Nut-Open-End-12mm-Combo-Wrench-Made-in-USA-tool-/360811012395?pt=Motors_Automotive_Tools&hash=item540203212b&vxp=mtr
Use lightly - http://www.ebay.com/itm/Snap-on-12mm-Flare-Nut-Open-End-Wrench-RXSM12-Made-in-USA-MINTY-/251407563586?pt=Motors_Automotive_Tools&hash=item3a890efb42&vxp=mtr
The quality is there and the chance of rounding off a fitting is almost nonexistent.
 01-06-2014, 01:18 AM
#17
Pro
Thread Starter
Great thread and please keep updating. It was a good idea to get the stainless steel lines (which I'll keep in mind for the future) but you may also want to consider getting a much higher quality flare wrench from Snap On. Instead of getting a whole set you can get an individual wrench on Ebay. In your case you need a 12mm and here are a couple listings -
The quality is there and the chance of rounding off a fitting is almost nonexistent.
The quality is there and the chance of rounding off a fitting is almost nonexistent.
Thanks for the links. I bought the lower priced one just to see what I've been missing (Snap-On sells that wrench brand new for $38.25 so I couldn't see paying $32.95 for a used one). It's been a long time since I rounded off an SAE fitting but I have an old set of Craftsman flare nut wrenches that have always worked fine for me.
Thanks for the compliment. I was impressed with these lines and am relieved I don't have to try to bend them up.
I'm trying to fix these brakes once and for all. The car has never impressed me with its stopping ability and I am pretty sure it isn't the design. The pedal has always felt more spongy than I like. Of course I'm comparing them to the manual 4-wheel disk brakes on the 74 Fiat X1/9 I used to drive (parts chaser for the Corvettes).
01-07-2014, 08:19 PM
#18
Pro
Thread Starter
I started yesterday afternoon by disconnecting the passenger side and tracing the brake line path. It crosses the car behind the batwing.
I removed the shock absorbers and spare tire carrier to gain some wiggle room and easier access to the two clips on the crossmember.
The first two lines I am working on do not connect to the ABS unit. This would be an easy job if the body was off the frame but after gently un-bending the line I was able to remove it from the passenger side. The third line in the rear involves the ABS unit so that had to come out next.
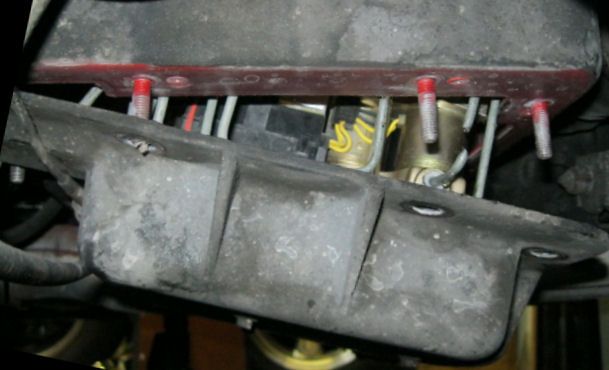
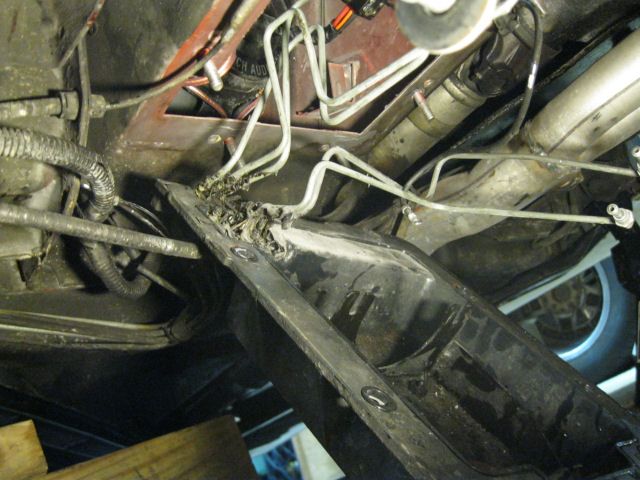
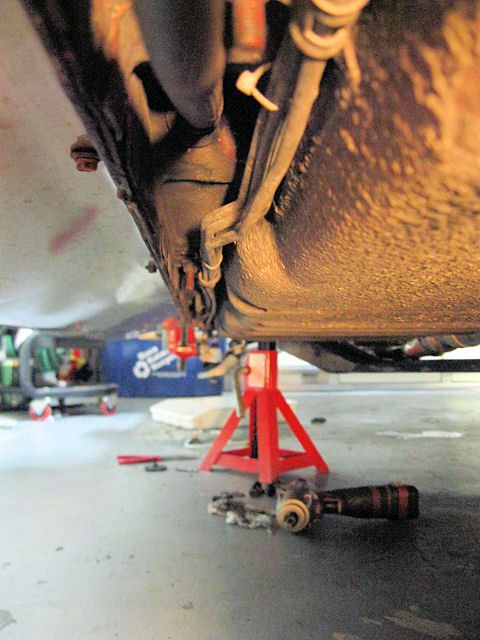
I disconnected the main cable to the ABS unit and tried to cut the frozen brake line. It was next to impossible to get to it from the top so I removed the nuts holding the ABS access cover under the car. I also removed the clip on the cover that captures the five lines entering the ABS compartment. With the access cover lowered, the line was right there and was a piece of cake to cut.
I thought I�d be able to drop the unit right out the bottom but the crossover e-brake cable is in the way. I loosened the nut on the equalizer assembly until the two cables separated. I ended up removing the ABS unit from the top and then dropping the housing. It turns out the five lines are glued to the housing with some kind of rubber cement or RTV. I slowly and carefully separated the lines and removed the cover.
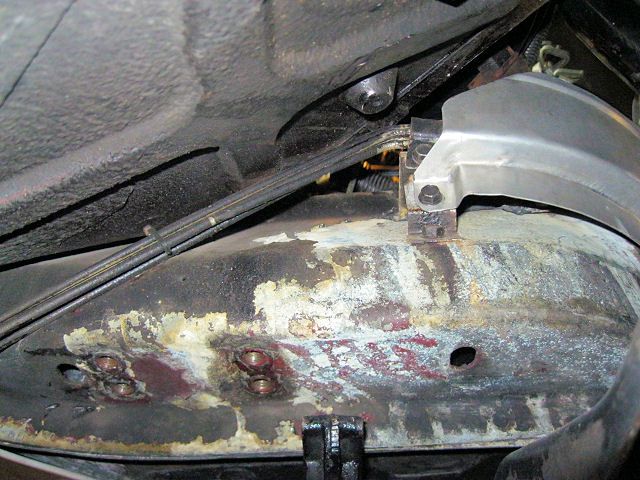
I finished up the day cleaning stuff. I removed the ABS mounting bracket from the housing cover, making the inside of the housing easy to clean up. The only hard part on the inside is the RTV because it really sticks to the fiberglass. A little time spent with Xacto knives and metal pics got rid of it.
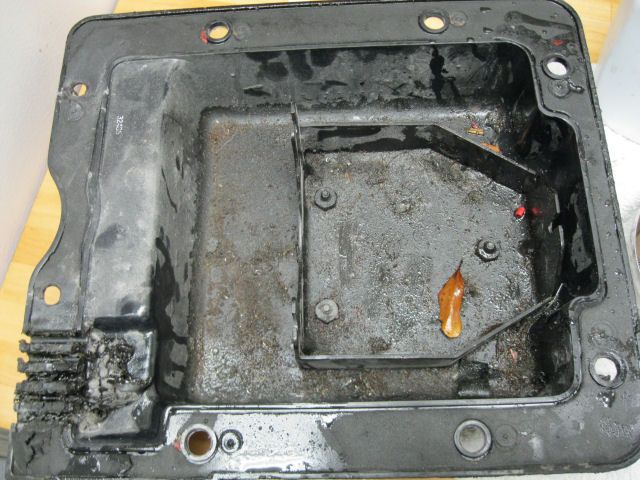
The outside was a different story because it is covered in a gummy coating sound deadener or undercoating. Once you scrape the heavy stuff off, paper towels and paint thinner or gasoline does a pretty good job cleaning it up. This is where I finished up yesterday.
I removed the shock absorbers and spare tire carrier to gain some wiggle room and easier access to the two clips on the crossmember.
The first two lines I am working on do not connect to the ABS unit. This would be an easy job if the body was off the frame but after gently un-bending the line I was able to remove it from the passenger side. The third line in the rear involves the ABS unit so that had to come out next.
I disconnected the main cable to the ABS unit and tried to cut the frozen brake line. It was next to impossible to get to it from the top so I removed the nuts holding the ABS access cover under the car. I also removed the clip on the cover that captures the five lines entering the ABS compartment. With the access cover lowered, the line was right there and was a piece of cake to cut.
I thought I�d be able to drop the unit right out the bottom but the crossover e-brake cable is in the way. I loosened the nut on the equalizer assembly until the two cables separated. I ended up removing the ABS unit from the top and then dropping the housing. It turns out the five lines are glued to the housing with some kind of rubber cement or RTV. I slowly and carefully separated the lines and removed the cover.
I finished up the day cleaning stuff. I removed the ABS mounting bracket from the housing cover, making the inside of the housing easy to clean up. The only hard part on the inside is the RTV because it really sticks to the fiberglass. A little time spent with Xacto knives and metal pics got rid of it.
The outside was a different story because it is covered in a gummy coating sound deadener or undercoating. Once you scrape the heavy stuff off, paper towels and paint thinner or gasoline does a pretty good job cleaning it up. This is where I finished up yesterday.
01-07-2014, 08:59 PM
#19
Pro
Thread Starter
Started again this afternoon and decided NOT to lower the batwing to make the job �easier.� Instead I gently un-bent the original line crossing the rear and gently tugged, twisted, pushed and eventually got it out in one piece. I eyeballed the un-bending required to get the old piece out and gently duplicated it on the new line. It was surprisingly easy to bend and I managed to snake it across the rear. Only problem was the line came out behind the sway bar so I had to disconnect the link to re-bend the new line into its original position. I went back and connected the passenger side, only using my fingers to tighten the connections. Passenger side is looking pretty good.
Working my way across the car to the driver side, I re-bent the line and installed the clamps. I will be installing some zip ties to keep the fuel vent line from rattling around.
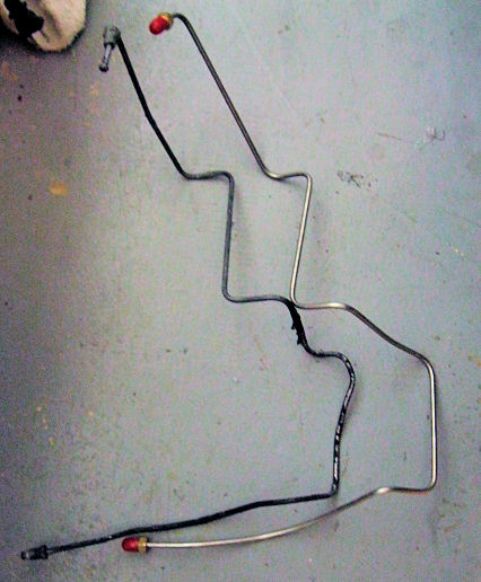
I pulled the third line. It connects the two rear calipers to the ABS unit and completes the rear brake plumbing runs (except for the master cylinder to ABS line). Here�s the comparison of old to new.
With a little fishing and tweaking I was able to make the driver side connections. One again they are only finger tight but I am absolutely certain none of the connections are cross-threaded.

This is where I finished this evening. Not a huge amount of progress but I�m doing this project with the car 14-inches off the ground on jackstands.
Next up is either the two front brake lines from the ABS unit or the master cylinder lines to the ABS unit.
Working my way across the car to the driver side, I re-bent the line and installed the clamps. I will be installing some zip ties to keep the fuel vent line from rattling around.
I pulled the third line. It connects the two rear calipers to the ABS unit and completes the rear brake plumbing runs (except for the master cylinder to ABS line). Here�s the comparison of old to new.
With a little fishing and tweaking I was able to make the driver side connections. One again they are only finger tight but I am absolutely certain none of the connections are cross-threaded.
This is where I finished this evening. Not a huge amount of progress but I�m doing this project with the car 14-inches off the ground on jackstands.
Next up is either the two front brake lines from the ABS unit or the master cylinder lines to the ABS unit.
01-12-2014, 12:11 AM
#20
Pro
Thread Starter
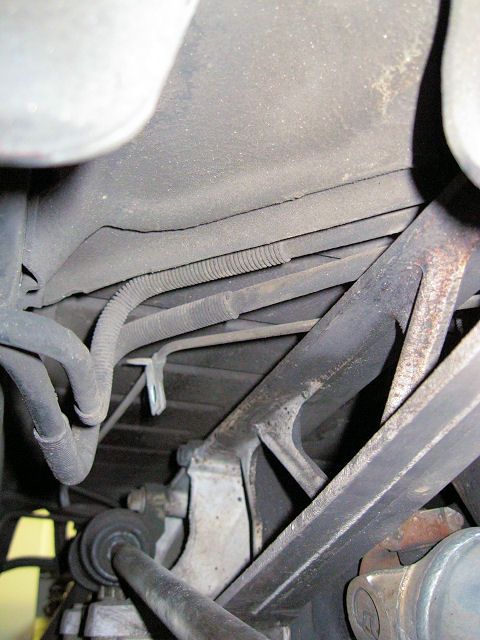
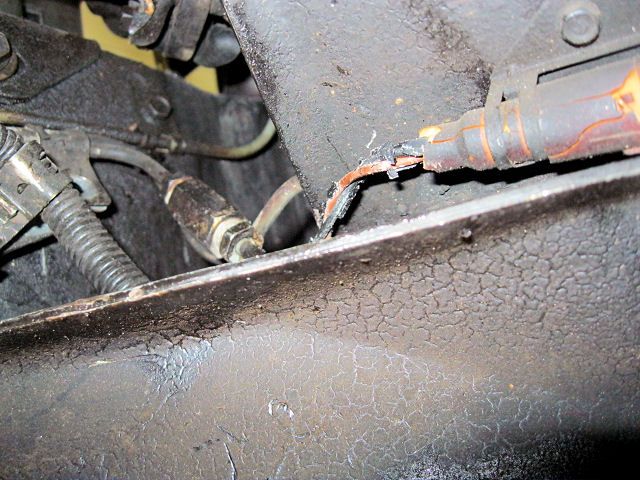
Five lines are bundled together and run from the ABS unit, along the driver side rocker and then follows the frame before turning up, left, right and straight. Four are brake lines and the other one is a vapor line that goes to the vapor canister up front. The metal sections of the vapor line are connected with rubber hoses and the rear one on my car has disintegrated. I'll fix that when the brakes lines are done.
Because mine is a convertible, the x-brace has to be removed first but if you have a convertible you�ve done this before.
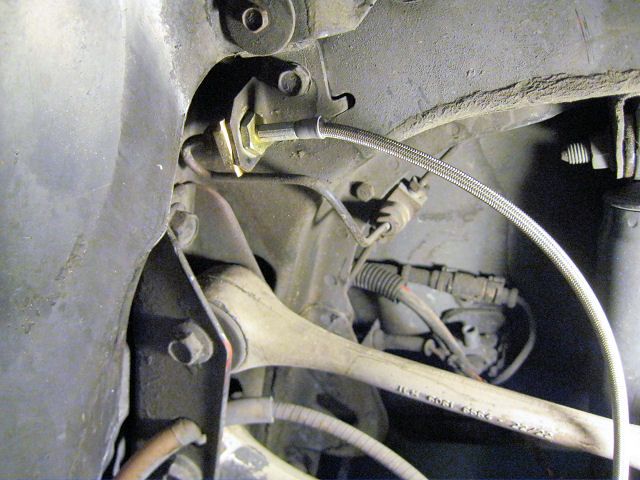
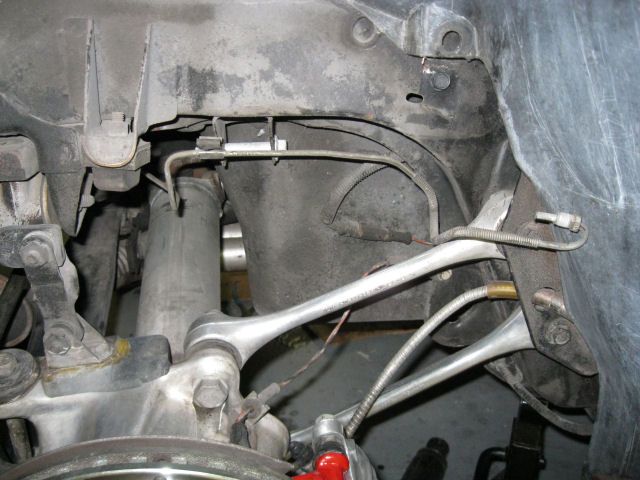
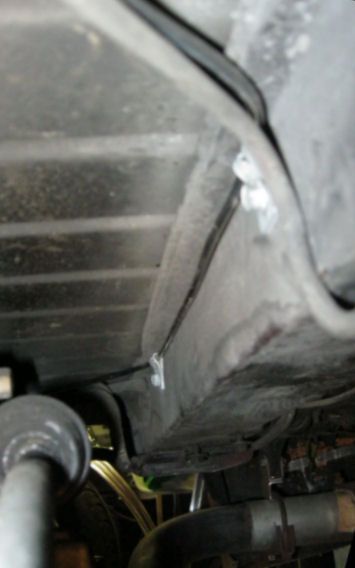
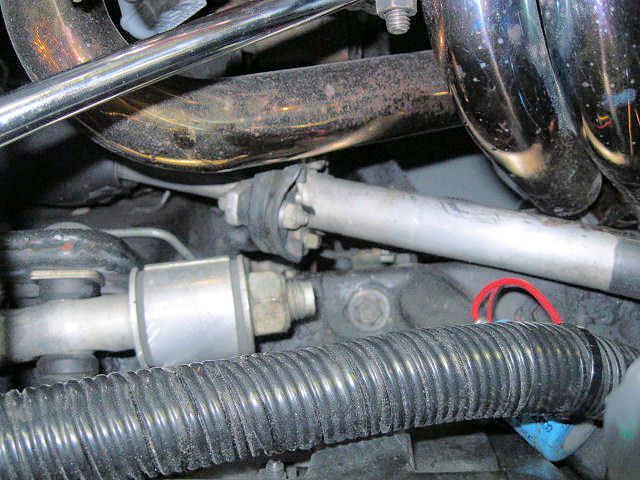
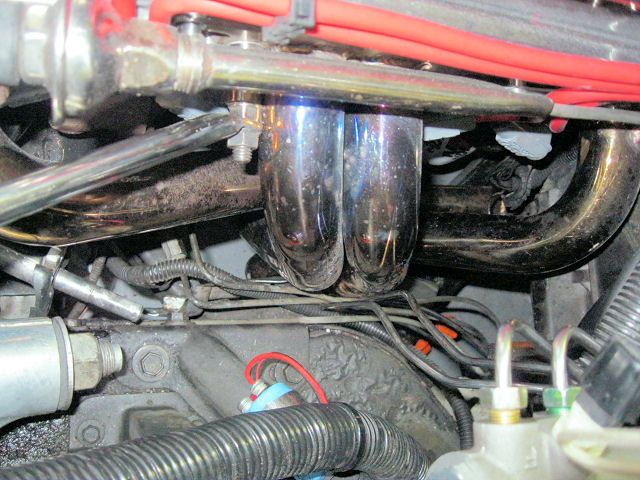
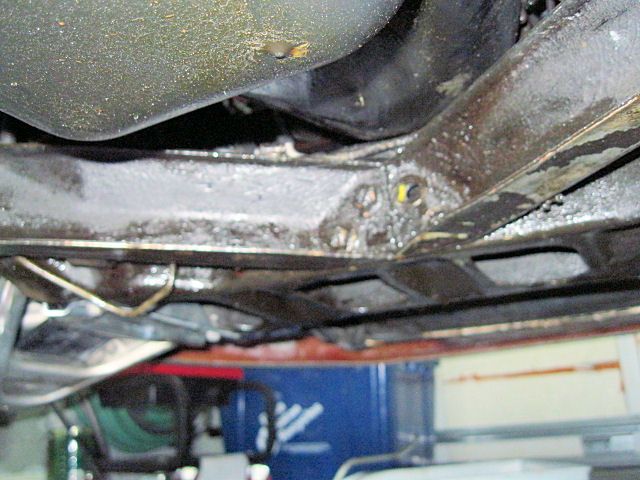
When I traced the lines it looks like the master cylinder to ABS lines need to be swapped out next. I have long tube headers so there are no pre-cats in my system. Not sure if the headers make it harder but I have already modified the brake line heat shield so my photos may not look familiar. The heat shield bolt and the bake line clip above it have to come out, along with the bolt at the front of the heat shield.
There are a number of clips holding the bundle of lines along the rocker panel. I�m not sure if this is unique to my car but there are also quite a few zip ties on the bundle.
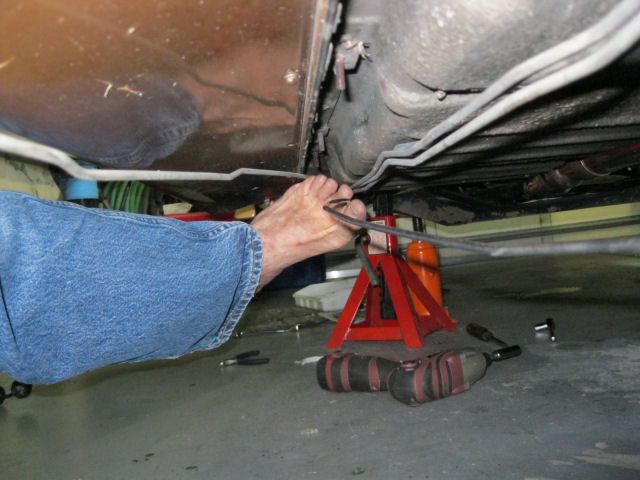
It would be quicker to just cut the lines and pull out the pieces but I wanted to see how much bending was needed to get the old ones out so I didn�t do unnecessary bending of the new lines. I moved the vapor line out of the way and wiggled the first new line in place. The line still had quite a long bend so I teased it into place with my foot. I can do most things one-handed but in Florida I spend a lot of time barefoot, unless my project involves chainsaws or heavy stuff.
I won�t bore you with the routine stuff but I did have to undo the ABS to rear brake line because it crosses over all the other lines.
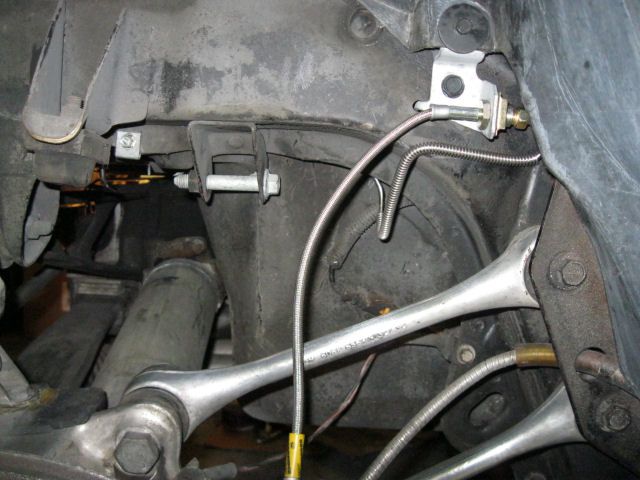
After I had the master cylinder to ABS lines loosely connected, I had to disconnect them and move them out of the way to remove the ABS to front left brake line. I ended up bending the line more than I wanted and realized the steering column was in the way.
With the column removed, it�s no picnic but at least you can see the clips and connectors that have to be removed. It also looks like the wiring and that vapor line can be better routed.
With some patience the old line came out and the new one went in. The last long line was easier but before the old one would come out, it had to be disconnected from the short line that goes to the driver side front caliper. Not easy to get two wrenches into the space but I was able to get the short line disconnected from below.
I thought I was home free but that last line going across the front of the car snakes up and down and all around the two braces for the front crossmember. After I got the first one out, I decided to quit for the day.
Because mine is a convertible, the x-brace has to be removed first but if you have a convertible you�ve done this before.
When I traced the lines it looks like the master cylinder to ABS lines need to be swapped out next. I have long tube headers so there are no pre-cats in my system. Not sure if the headers make it harder but I have already modified the brake line heat shield so my photos may not look familiar. The heat shield bolt and the bake line clip above it have to come out, along with the bolt at the front of the heat shield.
There are a number of clips holding the bundle of lines along the rocker panel. I�m not sure if this is unique to my car but there are also quite a few zip ties on the bundle.
It would be quicker to just cut the lines and pull out the pieces but I wanted to see how much bending was needed to get the old ones out so I didn�t do unnecessary bending of the new lines. I moved the vapor line out of the way and wiggled the first new line in place. The line still had quite a long bend so I teased it into place with my foot. I can do most things one-handed but in Florida I spend a lot of time barefoot, unless my project involves chainsaws or heavy stuff.
I won�t bore you with the routine stuff but I did have to undo the ABS to rear brake line because it crosses over all the other lines.
After I had the master cylinder to ABS lines loosely connected, I had to disconnect them and move them out of the way to remove the ABS to front left brake line. I ended up bending the line more than I wanted and realized the steering column was in the way.
With the column removed, it�s no picnic but at least you can see the clips and connectors that have to be removed. It also looks like the wiring and that vapor line can be better routed.
With some patience the old line came out and the new one went in. The last long line was easier but before the old one would come out, it had to be disconnected from the short line that goes to the driver side front caliper. Not easy to get two wrenches into the space but I was able to get the short line disconnected from below.
I thought I was home free but that last line going across the front of the car snakes up and down and all around the two braces for the front crossmember. After I got the first one out, I decided to quit for the day.