VATS decoder code ID?
 06-30-2012, 10:05 PM
#1
Safety Car

Thread Starter

I had to buy a used decoder module for my 87 off of fleabay.
Mine is AFU and the car won;t start without the module being jumped as directed by the FSM...
Not willing to leave it like that so I found the used one.
Question is,
I know it'll be a different key code, and I will have to get a new key thats correct for this module and have it cut to fit my ign switch.
how do I find out what the code is for the replacement decoder module?
Is the key code listed as the part number for each different module? or is this ID'd some other way?
How do I get the code for this module?
I cannot find new theft modules anywhere...that in itself seems odd.
 07-01-2012, 08:30 AM
#2


Where are you located?
I'd think the ideal way to determine the VATS resistance for the module would be to use a VATS Interrogator and a VATS "work key". The "work key" has no chip and could be cut to match your present key for mechanical operation of the cylinder. Install module and go through the available resistance checks until you acquire "crank"! Get new key cut using the newer determined VATS resistance.
I've access to an interrogator and I believe "Toptech6" does also. I'd maybe do a new post: Who's got a VATS Interrogator? You might find a local locksmith who might rent one for you!
GM # VATS work key: 26007687
07-01-2012, 08:53 AM
#3
Safety Car
Thread Starter
Where are you located?
I'd think the ideal way to determine the VATS resistance for the module would be to use a VATS Interrogator and a VATS "work key". The "work key" has no chip and could be cut to match your present key for mechanical operation of the cylinder. Install module and go through the available resistance checks until you acquire "crank"! Get new key cut using the newer determined VATS resistance.
I've access to an interrogator and I believe "Toptech6" does also. I'd maybe do a new post: Who's got a VATS Interrogator? You might find a local locksmith who might rent one for you!
GM # VATS work key: 26007687
I'd think the ideal way to determine the VATS resistance for the module would be to use a VATS Interrogator and a VATS "work key". The "work key" has no chip and could be cut to match your present key for mechanical operation of the cylinder. Install module and go through the available resistance checks until you acquire "crank"! Get new key cut using the newer determined VATS resistance.
I've access to an interrogator and I believe "Toptech6" does also. I'd maybe do a new post: Who's got a VATS Interrogator? You might find a local locksmith who might rent one for you!
GM # VATS work key: 26007687
thats what I was afraid of. I was hoping that the part numbers meant something but appearantly thats not going to ID the code.
I'm in Houston so there is a fair chance that I can find one around here somewhere. I'll just have to beat the bushes and see what comes out.
I can "rig" up a hidden switch for now to make it start. I just have to ground the module during key rotation and its fine. If that is left in place the car can be hot wired and driven away....thats why I want to get this module replaced asap.
07-01-2012, 09:14 AM
#4
Yessir...
thats what I was afraid of. I was hoping that the part numbers meant something but appearantly thats not going to ID the code.
I'm in Houston so there is a fair chance that I can find one around here somewhere. I'll just have to beat the bushes and see what comes out.
I can "rig" up a hidden switch for now to make it start. I just have to ground the module during key rotation and its fine. If that is left in place the car can be hot wired and driven away....thats why I want to get this module replaced asap.
If you've a good relationship with a GM parts/service dept in the area and buy frequently you might be able to originate a deal for use there.
Do the post for "WHO"S GOT A VATS INTERROGATOR ! Houston - good sized market - there could be a few local! I'd try but it wouldn't be a valid request. It would/could be valuable to many in the future though!
I spotted an after-market reader type I've never used today for $125 that usually sells for $200+ but having "no experience" with it I can't recommend it! It appears it would work well possibly!
Last edited by WVZR-1; 07-01-2012 at 11:06 AM.
07-01-2012, 12:27 PM
#5
Safety Car
Thread Starter
Thanks..
I've read what the FSM has to say and it tells you to use the interrogator to find the code of a replacement module while installed...
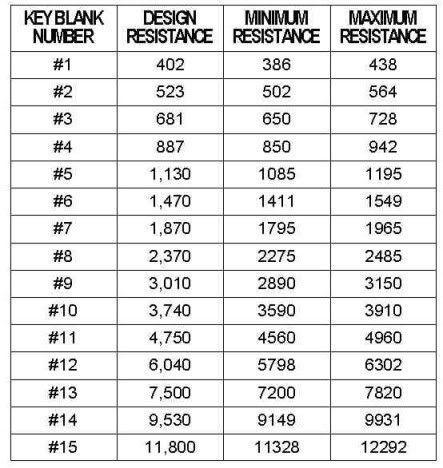
The process is basically trial & error. Try code 1 then wait 4 min then try code 2 and so on...
IF I can find the tables (charts) that show the resistor values for each code then I'll invest $8 in resistors and do the trial & error method at home. Then I can take that info and have a new key cut thats the correct code and fits my lock cyl.
I'll ask the question anyway...and make a few calls monday.
If someone has that chart thats used for making a VATS key bypass, I'd sure like to have a copy !
I've read what the FSM has to say and it tells you to use the interrogator to find the code of a replacement module while installed...
The process is basically trial & error. Try code 1 then wait 4 min then try code 2 and so on...
IF I can find the tables (charts) that show the resistor values for each code then I'll invest $8 in resistors and do the trial & error method at home. Then I can take that info and have a new key cut thats the correct code and fits my lock cyl.
I'll ask the question anyway...and make a few calls monday.
If someone has that chart thats used for making a VATS key bypass, I'd sure like to have a copy !
07-01-2012, 02:32 PM
#6
Advanced


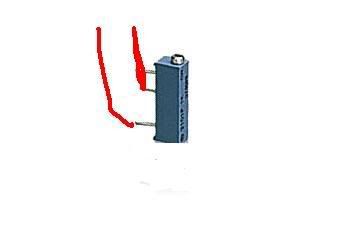
Those vats modules seldom go bad. The much more common cause would be a broken wire at the back side of the ignition lock cylinder. You need to remove the lock cylinder to see the wires. Have you checked those yet?
It was kind of a bad design because the wires have to flex everytime you turn the key and eventually the wires break from the flexing/bending motion they go through.
Sometimes the wire will break inside it's insulation, so the insulation makes it look fine when the metal wire inside is actually broken. The wires are very small, much smaller than any other wire in the car. They are a pair of white wires usually inside an orange tubing/sheething.
The easiest way to check them is with an ohm meter at the bottom of the steering column. You have to disconnect the large connector block where all of the column wiring goes to, then test the continuity (look for orange sheething) between the two tiny white wires (test column side of connector block, not vehicle side). The test must be done with the key in the ignition and test through-out entire rotation of lock cylinder. You should have a steady reading (same as chip in key) no matter what rotational position the lock cylinder is turned to.
Nothing will happen when you turn the key, because the large connector block you disconnect also feeds the starter.
07-01-2012, 04:29 PM
#8
Melting Slicks


Member Since: Aug 1999
Location: Baltimore, MD USA
Posts: 2,240
Likes: 0
Received 34 Likes
on
30 Posts

I've never verified this. 
According to this post the value of R3 will be the value of the
key pellet the module is programmed for.
http://forums.corvetteforum.com/c4-t...schematic.html
Use an ohm meter and measure R3 on your original module.
Compare it with the value of the resistor pellet on the original
key. If they're the same all you need to do is measure the value
of R3 on the replacement module to determine the resistor value
for the new key.
Or purchase a 10k ohm variable resistor from Radio
Shack part #271-343 $3.19.
Set the resistor to the different resistance values
for the key pellets and place it across the leads going
to the decoder module.
This one potentiometer will allow you to test for 14 of the
15 possible resistance values.
Set it for one resistance. If the engine doesn't crank, set
the value to another resistance. Wait 5 minutes and try
again.
07-01-2012, 04:53 PM
#9
Safety Car
Thread Starter
I've never verified this.
According to this post the value of R3 will be the value of the
key pellet the module is programmed for.
http://forums.corvetteforum.com/c4-t...schematic.html
Use an ohm meter and measure R3 on your original module.
Compare it with the value of the resistor pellet on the original
key. If they're the same all you need to do is measure the value
of R3 on the replacement module to determine the resistor value
for the new key.
Or purchase a 10k ohm variable resistor from Radio
Shack part #271-343 $3.19.
Set the resistor to the different resistance values
for the key pellets and place it across the leads going
to the decoder module.
This one potentiometer will allow you to test for 14 of the
15 possible resistance values.
Set it for one resistance. If the engine doesn't crank, set
the value to another resistance. Wait 5 minutes and try
again.
Its appreciated. I will test the old pellet against the old module terminal and see if thats true or not...I have been thinkiing this thru all day and I was thinking that there could be some point in the system that had the module "code" available in a circuit that could be read with a DVM... In my reasoning the opposite side of the key input should have the matching code on the other side of the detector...and your info 'fits' since R is the opposite side of U which is the key side of that circuit.
Sounds good anyway!
Thanks again. I'll definately be getting that potentiometer regardless of how I get the module code...
07-02-2012, 02:24 AM
#10
Race Director

Hi Lee. As I recall you have an '87. The early VATS modules have a resistor inside that is compared to the resistor pellet in the key. You can determine the value by taking the VATS module apart and looking at the resistor. It's between the green fuse and the black diode in this picture (top right), next to the handwritten "W":

It's a 1% resistor value so you need to use the correct color code system to figure out the value. In the picture my resistor is 3.01K or 3010 ohms, which is orange black brown brown brown. That's 3, 0, 1, 1 zero and 1%. Of course, you can just measure it...
It's a 1% resistor value so you need to use the correct color code system to figure out the value. In the picture my resistor is 3.01K or 3010 ohms, which is orange black brown brown brown. That's 3, 0, 1, 1 zero and 1%. Of course, you can just measure it...
07-02-2012, 08:57 AM
#11
Safety Car
Thread Starter
Hi Lee. As I recall you have an '87. The early VATS modules have a resistor inside that is compared to the resistor pellet in the key. You can determine the value by taking the VATS module apart and looking at the resistor. It's between the green fuse and the black diode in this picture (top right), next to the handwritten "W":
It's a 1% resistor value so you need to use the correct color code system to figure out the value. In the picture my resistor is 3.01K or 3010 ohms, which is orange black brown brown brown. That's 3, 0, 1, 1 zero and 1%. Of course, you can just measure it...
It's a 1% resistor value so you need to use the correct color code system to figure out the value. In the picture my resistor is 3.01K or 3010 ohms, which is orange black brown brown brown. That's 3, 0, 1, 1 zero and 1%. Of course, you can just measure it...
Thanks Cliff !
So much good info on this, I'm now wondering why I was not well schooled on the vats prior to this module failure...
Its been a long time coming. Every so often this module would have a tantrum and lock me out every other start and do that for a week. Then it would act right for months...even years. Lately it started again with the extreme heat. Now its dead, at least on the starter side. I've got the module jumped according to the FSM instruction but that does not prevent the tempermental little POS from locking me out with fuel...Its not the relay, but it IS the module at least on the starter enable side.
Replacement en route via FleaBay, should be here by thurs or fri. Spent the weekend taking the rest of the dash apart for cleaning and repair of some broken plastic mounting tabs with plastic welding and wire mesh impregnation. Painting bezels and ready for reassembly when the module arrives..Amazing how much dirt and crap collect under trim panels and behind things...nasty back there. And under the trans cover plate....wow! talk about nasty. If there was any module expected to fail it would be the one on the shifter that has to wear coffee and whatever else gets spilled there.. I recall a rule when I got a NEW car...no food or drinks in there. That went on for a yr or two....I wonder what made me weak and allowed this mess to happen inside from spilled stuff? Anyway, it was time to pull some interior apart and do the housework,. I'd rather have done it at my convenience but the VATS module motivated me to enter the realm of bezels and trim.
Thanks again for the info. My next search will be for the closest raddio shock store...
Last edited by leesvet; 07-02-2012 at 09:16 AM.
07-03-2012, 03:11 AM
#12
Race Director
The main VATS mystery for me is exactly how long the delay between bad key pellet readings is. I have heard everything from 6 minutes to 30 minutes. I think the year matters on that. I didn't want to mess with my module while I had it apart because if I zapped something I'd be walking...
I had a bad contact in my ignition switch (one was bent over). There was a recall on the switch for '86 (I don't know about other years) and I got a new switch and a longer key, which solved all my VATS problems. It has never failed since I replaced the switch about 15 years ago.
I had a bad contact in my ignition switch (one was bent over). There was a recall on the switch for '86 (I don't know about other years) and I got a new switch and a longer key, which solved all my VATS problems. It has never failed since I replaced the switch about 15 years ago.
07-03-2012, 04:03 AM
#13
The main VATS mystery for me is exactly how long the delay between bad key pellet readings is. I have heard everything from 6 minutes to 30 minutes. I think the year matters on that. I didn't want to mess with my module while I had it apart because if I zapped something I'd be walking...
I had a bad contact in my ignition switch (one was bent over). There was a recall on the switch for '86 (I don't know about other years) and I got a new switch and a longer key, which solved all my VATS problems. It has never failed since I replaced the switch about 15 years ago.
I had a bad contact in my ignition switch (one was bent over). There was a recall on the switch for '86 (I don't know about other years) and I got a new switch and a longer key, which solved all my VATS problems. It has never failed since I replaced the switch about 15 years ago.
07-03-2012, 07:58 AM
#14
 07-20-2012, 08:21 PM
#15
Slingshot

What is the part number for the VATS module?
Also, is there a seperate module for each of the 15 key codes or does the new module read the first key code entered and then save it to memory?
Also, is there a seperate module for each of the 15 key codes or does the new module read the first key code entered and then save it to memory?
07-20-2012, 08:33 PM
#16
I was originally under the assumption they learned the first key presented but that's in error regarding the early Corvettes.
If this is regarding your current problem it sure didn't sound like a VATS issue because you had activity at the starter motor. You did mention it "buzzed" I believe so who really knows. VATS module was originally a 1228548 I believe.
Last edited by WVZR-1; 07-20-2012 at 08:43 PM.
07-21-2012, 03:56 AM
#17
Race Director
My VATS module is 16045121.
There "was" a site called http://www.vatssucks.com that had a lot of information on how VATS works and how to bypass it. I said "was", because it doesn't want to load for me right now. That's too bad. There was a lot of good information there.
The author changed his hosting site to:
http://www.joestradingpost.com/vats/
Last edited by Cliff Harris; 10-26-2013 at 01:55 AM. Reason: Changed to new working link.
07-21-2012, 05:06 AM
#18
I've never seen this before but here's a solution that seems reasonably priced and it seems he understands what he's got. I've confirmed the part #'s noted in his description as being correct '86 - '88 (1228548/1227760). Both #'s appear in GM-SPO information in publications through '92.
http://www.ebay.com/itm/ws/eBayISAPI...sid=p2992.m753
http://www.ebay.com/itm/ws/eBayISAPI...sid=p2992.m753
Last edited by WVZR-1; 07-21-2012 at 05:39 AM.
07-21-2012, 09:10 AM
#19
Safety Car
Thread Starter
This brought me to think this thru and come up with the question....
IF the module has a resistor that CAN be read or known by the color ID bands on the resistor, then how is it possible for the module to be "blank" from the factory waiting for the first key insertion to register a code?
So, I guess it can't. Of the 2 part numbers that you guys have discovered and listed, my replacement module is different. I believe my failed module IS one of the 2 you listed. So, each yr has 15 possible different modules that have to be stocked or ordered as needed. (were)....
Back to reading the color coded resistor to determine the value and get the code.
I haven't had time to mess with that portion...been chasing down a parrallel problem with a failing starter solenoid...from heat soak. Gets hot then won;t do crap till it cools off. I wonder how many times VATS got blamed for this???
I DO know that the starter enable side of the VATS module is faulty, and it is bypassed for now. The replacement starter (a new LT or mini) will solve the problem of heat soak since its 1/2 the size of the delco cinder block and it won;t be laying on the collector pipe...
Once thats done, THEN I'll go the rattio shock and buy a variable resistor and some other stuff and figure out the VATS module and get that right.
It DID occur to me that installing a starter button under the carpet somewhere that held the VATS enable ground path....would be a VERY acceptable theft deterrant besides the fuel inj disable that still works. If nothing happened when the key was turned, just like a VATS episode, the car stays and the thief goes...
An old style starter button or horn button placed under the brake pedal carpet that you have to press with your foot as you rotate the key...I can see the valets and car wash insanity starting all over again.
Read posts 8 - 12 in this thread. It seems the early VATS modules were serviced with a resistance already "set". You needed to cut a new key with the correct resistance to the original mechanical cut.
I was originally under the assumption they learned the first key presented but that's in error regarding the early Corvettes.
If this is regarding your current problem it sure didn't sound like a VATS issue because you had activity at the starter motor. You did mention it "buzzed" I believe so who really knows. VATS module was originally a 1228548 I believe.
07-21-2012, 09:46 AM
#20
I researched further and Cliff's module that he ID'd as a 16045121 would be correct and possibly an original production number.
The progression seems to go 16045121 > 1227760 > 1228548. The 16080151 that the eBay auction references is also a part number that changes to a service number of 1228548 which is what the "seller" is selling.
What is the part # on the module that you've purchased?
The progression seems to go 16045121 > 1227760 > 1228548. The 16080151 that the eBay auction references is also a part number that changes to a service number of 1228548 which is what the "seller" is selling.
What is the part # on the module that you've purchased?
Last edited by WVZR-1; 07-21-2012 at 10:03 AM.