1985 rear hub and u-joint replacement
 03-27-2012, 11:50 PM
#1
Pro

Thread Starter

Member Since: Nov 2005
Location: North Bay Ontario
Posts: 602
Likes: 0
Received 0 Likes
on
0 Posts

Hi all, (This is a relatively long post - posted here for general information if you're thinking of tackling some rear hubs/bearings and u-joints...)
I just spent a few good hours of quality time with my '85 in my garage over the past few days and thought I'd share in case others are planning to do similar work on their cars. I usually like to take on at least one project a year prior to the summer season and this spring it was the rear wheel bearings and possibly the u-joints....depending what I found. I don't race or autocross the car, but I knew that the driver's side rear wheel bearing was on it's way out as it had some pretty good play when torqued at 6 and 12 (or 3 & 9) o'clock positions. I also had the annoying clink when putting it into drive or reverse, so I had previously picked up the teflon washers from the dealership. Not knowing if/when the rear end fluid had been changed, that was on the to do list too. Thought I'd post a few details and things that I learned along the way.
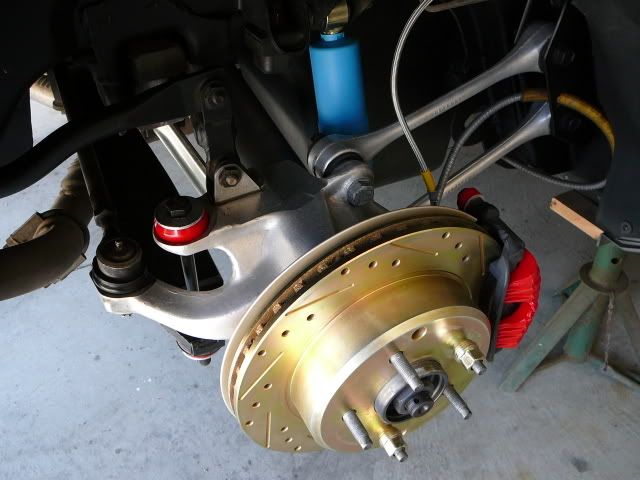
First - if your wheel bearing haven't been changed in 27 years - you might not be able to loosen the three #55 torx studs with the knuckle in place. I tried and without success in loosening a single one, so I pulled the whole knuckle off. Even with a breaker bar and a powerful impact wrench one of the studs would not come loose until I put the heat to it. Keep the heat on the bearing casting and not the aluminum. Once the hubs were removed, re-installation is simple. Bevelled edge of the teflon washer goes against the hub.
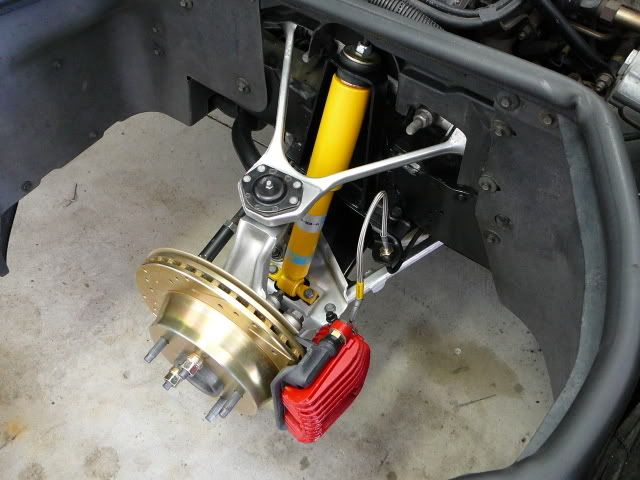
Checked the half-shaft universal joints and one side had greaseable u-joints and other side didn't. Of course the non-greaseable u-joints were all but seized so I was into the u-joints now. Since they're relatively inexpensive - I replaced all 4 on the half-shafts. With the choice of non-greaseable, greaseable with the fitting on the trunion or greaseable with the fitting on the cap - I opted for greaseable with the fitting on the trunion (that's what was installed on the one side). In hindsight, I should have opted for the non-greaseable ones, or the Spicer brand with the fitting on the cap. But after pressing the first u-joint in (Zerk fitting toward the shaft!!) I decided that there was no turning back...all the while worrying whether I would be able to get a grease gun nozzle on them once they were in there. I wasn't sure if the old greaseable u-joints had ever seen a grease gun since they were installed - certainly not by me! Also - the greaseable u-joints are messy. Once I had the half shafts re-installed and the knuckles with new hubs loosely re-attached, I checked to see if I would ever be able to grease these u-joints and the anwer is YES...However, in order to get to them, I'm going to have to jack the rear-end, remove the rear wheels in order to spin the shafts to just the right position and to be able to reach the u-joint at the differential.
Bottom line - be wary of those who say the hubs can be R&R'd in an hours or so...be prepared to remove the knuckle to get at them. If replacing the u-joints...I'd recommend going with a good quality non-greaseable style. It's also a good time to clean and polish all the aluminum in there too. I've got pictures and if it wasn't such a pain to post pictures, I would have. PM me if you would like to see pictures.
Things are now nice and tight, turning freely and no more "clink"...ready for the open road!!
I just spent a few good hours of quality time with my '85 in my garage over the past few days and thought I'd share in case others are planning to do similar work on their cars. I usually like to take on at least one project a year prior to the summer season and this spring it was the rear wheel bearings and possibly the u-joints....depending what I found. I don't race or autocross the car, but I knew that the driver's side rear wheel bearing was on it's way out as it had some pretty good play when torqued at 6 and 12 (or 3 & 9) o'clock positions. I also had the annoying clink when putting it into drive or reverse, so I had previously picked up the teflon washers from the dealership. Not knowing if/when the rear end fluid had been changed, that was on the to do list too. Thought I'd post a few details and things that I learned along the way.
First - if your wheel bearing haven't been changed in 27 years - you might not be able to loosen the three #55 torx studs with the knuckle in place. I tried and without success in loosening a single one, so I pulled the whole knuckle off. Even with a breaker bar and a powerful impact wrench one of the studs would not come loose until I put the heat to it. Keep the heat on the bearing casting and not the aluminum. Once the hubs were removed, re-installation is simple. Bevelled edge of the teflon washer goes against the hub.
Checked the half-shaft universal joints and one side had greaseable u-joints and other side didn't. Of course the non-greaseable u-joints were all but seized so I was into the u-joints now. Since they're relatively inexpensive - I replaced all 4 on the half-shafts. With the choice of non-greaseable, greaseable with the fitting on the trunion or greaseable with the fitting on the cap - I opted for greaseable with the fitting on the trunion (that's what was installed on the one side). In hindsight, I should have opted for the non-greaseable ones, or the Spicer brand with the fitting on the cap. But after pressing the first u-joint in (Zerk fitting toward the shaft!!) I decided that there was no turning back...all the while worrying whether I would be able to get a grease gun nozzle on them once they were in there. I wasn't sure if the old greaseable u-joints had ever seen a grease gun since they were installed - certainly not by me! Also - the greaseable u-joints are messy. Once I had the half shafts re-installed and the knuckles with new hubs loosely re-attached, I checked to see if I would ever be able to grease these u-joints and the anwer is YES...However, in order to get to them, I'm going to have to jack the rear-end, remove the rear wheels in order to spin the shafts to just the right position and to be able to reach the u-joint at the differential.
Bottom line - be wary of those who say the hubs can be R&R'd in an hours or so...be prepared to remove the knuckle to get at them. If replacing the u-joints...I'd recommend going with a good quality non-greaseable style. It's also a good time to clean and polish all the aluminum in there too. I've got pictures and if it wasn't such a pain to post pictures, I would have. PM me if you would like to see pictures.
Things are now nice and tight, turning freely and no more "clink"...ready for the open road!!
 03-28-2012, 12:16 AM
#2
Le Mans Master

The Torx.....You keep the brake in place and break everything loose...
You rotate the hub to the correct position and then set the parking brake. Then using the longest break over bar with a cheater pipe on the end, and all your body weight, the thing will break loose. Then you let the parking brake loose, rotate to the next nut and repeat.
Break the large nut on the hub as well before you remove the brake caliper.
Yes, CentralCoaster and myself did a hub in ~35 minutes......
03-28-2012, 05:36 AM
#3


when i changed out bearing/hubs on my 85, the easiest way for me was to remove the half shaft first, then, i could get in there with my 1/2 drive impact wrench. i did not have to remove the knuckle. overall, a piece of cake, although, there is no way in hell i could do that job in 35 minutes. seems to me it took me 3 weeks (working a couple hours per day) - BUT, i did all 6 u-joints, replaced all four bearing/hub assemblies, rebuilt 4 calipers, and in general, overhauled the complete brake system, including the emergency brake, installed new shocks, and cleaned and detailed the suspension 
Last edited by Joe C; 03-28-2012 at 05:45 AM.
 03-28-2012, 09:41 AM
#5

If you can get under the car, d/c all the jouint straps, and tie rod ends then push outward with your feet against the knuckle and the half shaft drops in your lap. While you are there use the impact and correct extensions and take out the 3 torx for the hub..NaBD at all.
They say that you can service the joints grease zerk with a needle gun, but thats a hassle just trying to get at the fitting, so I too opt for the non-servicable joints.
Takes me maybe 30 min to d/c and realistically 1 hr to reassemble.
They say that you can service the joints grease zerk with a needle gun, but thats a hassle just trying to get at the fitting, so I too opt for the non-servicable joints.
Takes me maybe 30 min to d/c and realistically 1 hr to reassemble.
03-28-2012, 10:05 AM
#6
Slingshot

 03-28-2012, 01:23 PM
#7
well, thanks for the complement! i pretty much use a fine scotch-bright (gray color), first using a mild solvent. that usually cuts through the grease and, then i follow up with a standard household cleaner (fantastic, 409, etc), and the fine scotch-bright. for some stubborn areas, i may hit it with a soft wire brush. it's really labor intensive, and i try to take as many things apart as i can. i may have spent a day at each corner cleaning everything. i love doing stuff like this - i call it mental therapy. for me, it's half the fun of owning a corvette.
Last edited by Joe C; 03-28-2012 at 01:26 PM.
03-28-2012, 01:24 PM
#8
Pro
Thread Starter
Member Since: Nov 2005
Location: North Bay Ontario
Posts: 602
Likes: 0
Received 0 Likes
on
0 Posts
 I can't get the vision of a NASCAR pit crew out of my mind! Gee it took me more than 35 minutes just to get the jack stands under it and the rear wheels removed!
03-28-2012, 02:16 PM
I can't get the vision of a NASCAR pit crew out of my mind! Gee it took me more than 35 minutes just to get the jack stands under it and the rear wheels removed!
03-28-2012, 02:16 PM
#10
Le Mans Master
Then you jack it up take the wheel back off, climb underneath, rotate the hub so that the torx will fit, set the brake and break the first torx, repeat two more times.
Remove the Brake caliper, rotor and the hub falls out......Not sure why folks take the u-joints loose.....
In essence you are loosening 5 lug nuts, a large nut on the outside of the hub, three torx on the inside of the hub and two nuts on the brake caliper....
You need an afternoon to remove a wheel and 6 fasteners of various sizes?
I may over simplify it, but the last time we did it, it was getting dark and really, before I could get Kevins shop lights hooked up and aimed properly, the hub was out....and we where putting in the new one.
The first one I had replaced, the alignment shop did in roughly 15 minutes.....
At first I thought $80 to swap the hub was a great deal....when 15 minutes elapsed and they were lowering my car, I sorta felt like $80 was too much......you tell me.....
03-28-2012, 04:02 PM
#11
Let's see, you take the wheel off.....remove the cap from your wheel and replace it loosely on the studs, let the car down and break the large nut loose...
Then you jack it up take the wheel back off, climb underneath, rotate the hub so that the torx will fit, set the brake and break the first torx, repeat two more times.
Remove the Brake caliper, rotor and the hub falls out......Not sure why folks take the u-joints loose.....
In essence you are loosening 5 lug nuts, a large nut on the outside of the hub, three torx on the inside of the hub and two nuts on the brake caliper....
You need an afternoon to remove a wheel and 6 fasteners of various sizes?
I may over simplify it, but the last time we did it, it was getting dark and really, before I could get Kevins shop lights hooked up and aimed properly, the hub was out....and we where putting in the new one.
The first one I had replaced, the alignment shop did in roughly 15 minutes.....
At first I thought $80 to swap the hub was a great deal....when 15 minutes elapsed and they were lowering my car, I sorta felt like $80 was too much......you tell me.....
 . as far as over simplifying it, you forgot about removing the brake caliper and bracket and rotor. was all that included in your 1/2 hour elapsed time? also on, at least the 85, you have a parking brake assembly to deal with. to answer your question about removing the u-joint/half shaft, it seemed a lot easier to get my 1/2 impact wrench in there for the 3 torx bolts. not saying you didn't do it in 35 minutes or an alignment shop didn't do it in 15 minutes, but personally, i just don't work that fast, and i'd like to see someone do a hub replacement in a half hour - start to finish - beginning to end.
03-28-2012, 04:48 PM
. as far as over simplifying it, you forgot about removing the brake caliper and bracket and rotor. was all that included in your 1/2 hour elapsed time? also on, at least the 85, you have a parking brake assembly to deal with. to answer your question about removing the u-joint/half shaft, it seemed a lot easier to get my 1/2 impact wrench in there for the 3 torx bolts. not saying you didn't do it in 35 minutes or an alignment shop didn't do it in 15 minutes, but personally, i just don't work that fast, and i'd like to see someone do a hub replacement in a half hour - start to finish - beginning to end.
03-28-2012, 04:48 PM
#12
Le Mans Master
I listed brake caliper, rotor.....it's two of the 6 fasteners.....There are only two large bolts holding on the rear caliper.
I said hub but it is bearing hubs.
I guess I should have taken pictures. or a youtube.
I said hub but it is bearing hubs.
I guess I should have taken pictures. or a youtube.
03-28-2012, 04:56 PM
#13
Pro
Thread Starter
Member Since: Nov 2005
Location: North Bay Ontario
Posts: 602
Likes: 0
Received 0 Likes
on
0 Posts
I may over simplify it, but the last time we did it, it was getting dark and really, before I could get Kevins shop lights hooked up and aimed properly, the hub was out....and we where putting in the new one.
The first one I had replaced, the alignment shop did in roughly 15 minutes.....
At first I thought $80 to swap the hub was a great deal....when 15 minutes elapsed and they were lowering my car, I sorta felt like $80 was too much......you tell me.....
The first one I had replaced, the alignment shop did in roughly 15 minutes.....
At first I thought $80 to swap the hub was a great deal....when 15 minutes elapsed and they were lowering my car, I sorta felt like $80 was too much......you tell me.....
 Don't get wound up - I'm just having some fun with ya and not disputing that you didn't do the R&R in 35 minutes.
  If you've done much work on old cars, you know as well as me that the same job can become quite different depending on what you run into. Personally, I'm not being paid by the hour so I have no need to race against the clock and I feel a whole lot better if the job is done right the first time.
03-28-2012, 05:04 PM
If you've done much work on old cars, you know as well as me that the same job can become quite different depending on what you run into. Personally, I'm not being paid by the hour so I have no need to race against the clock and I feel a whole lot better if the job is done right the first time.
03-28-2012, 05:04 PM
#14
Melting Slicks


I did this job, it wasn't as bad as I thought it would be. I searched all the posts on the forum before even ordering the parts.
My battery powered impact gun made short work of the T55 bolts holding the hub. I needed to change the u-joints too and with a frozen one, I couldn't rotote the axle to where I could have enough clearance to drop it out. I removed the knuckle and it made life easy. The hardest part was pressing the old u-joints out of the half shalf. My buddy had to do it on the press. Overall, the job took 3 hours, 1 beer and a cheeseburger.
My battery powered impact gun made short work of the T55 bolts holding the hub. I needed to change the u-joints too and with a frozen one, I couldn't rotote the axle to where I could have enough clearance to drop it out. I removed the knuckle and it made life easy. The hardest part was pressing the old u-joints out of the half shalf. My buddy had to do it on the press. Overall, the job took 3 hours, 1 beer and a cheeseburger.
03-28-2012, 05:04 PM
#15
Le Mans Master
And people ask me why CentralCoaster and others like him don't come here anymore.....
I mean, I have to make a youtube or else "it can't be done"
It's like the #8 spark plug or the digital dash repair.....or the Scissors style regulator or the headlight gears replacement.....or pulling the D36/44 or getting the halfshafts out.....
I've tried to talk folks through those events as well.....some just make it harder than others.....even on this very thread
Blasphemy! it couldn't be that easy......well, yes...yes it is just that easy....Takes about 15 minutes to unhook the components leesvet listed and you push outward with your feet and there you have the halfshaft......And the thing being aluminum all you need is a larger dead blow hammer and the u-joint breaks loose (dissimilar metals bond)....and once the u-joint is loose it is ten times easier to get in and out of an aluminum yoke than a steel yoke.
But hey....what do I know....
I mean, I have to make a youtube or else "it can't be done"
It's like the #8 spark plug or the digital dash repair.....or the Scissors style regulator or the headlight gears replacement.....or pulling the D36/44 or getting the halfshafts out.....
I've tried to talk folks through those events as well.....some just make it harder than others.....even on this very thread
Originally Posted by leesvet
d/c all the jouint straps, and tie rod ends then push outward with your feet against the knuckle and the half shaft drops in your lap.
But hey....what do I know....
03-28-2012, 08:14 PM
#16


 03-29-2012, 03:06 PM
#20

Just to put my 2c out there - as with most time estimates that I've found for jobs they do all assume that fasteners come out reasonably. I'm sure we've all had a bolt that just wont budge or feels the need to break before it turns and its at that point where you have to stop the clock.
Some times the most simple of jobs can turn into a complete nightmare and I believe that's why there is so much variation on the ease of jobs.
Some times the most simple of jobs can turn into a complete nightmare and I believe that's why there is so much variation on the ease of jobs.