Courtesy Light Module Schematic
 12-14-2011, 04:11 PM
#1
Race Director

Thread Starter

While my dash is apart I decided to look at the courtesy light module. I understand that there were three versions of this module used in the '84 to '89 time frame. This is the 14080625 version.
I have seen several threads where the courtesy lights either stayed on all the time or never came on. Frequently the door jamb switches get stuck and cause these problems. I put silicone grease on mine and have never had a problem since then. With this module disconnected my hatch release switches in the doors don't work. The one in the console does.
Anyhow, if in fact the courtesy light module is at fault, it's almost always a problem with Q4. This transistor can be replaced with a MJE3055 or KSE3055 in the TO-220 package. It gets pretty hot when the courtesy lights are on, so putting heat sink compound on it is a good idea.
A picture of the top side of the module (Q4 heat sink removed):

A picture of the bottom side of the module:

The schematic:

I have seen a schematic of this module elsewhere. It is very poorly drawn and has many obvious errors. That was the main reason I wanted to look at this module myself.
I have seen several threads where the courtesy lights either stayed on all the time or never came on. Frequently the door jamb switches get stuck and cause these problems. I put silicone grease on mine and have never had a problem since then. With this module disconnected my hatch release switches in the doors don't work. The one in the console does.
Anyhow, if in fact the courtesy light module is at fault, it's almost always a problem with Q4. This transistor can be replaced with a MJE3055 or KSE3055 in the TO-220 package. It gets pretty hot when the courtesy lights are on, so putting heat sink compound on it is a good idea.
A picture of the top side of the module (Q4 heat sink removed):
A picture of the bottom side of the module:
The schematic:
I have seen a schematic of this module elsewhere. It is very poorly drawn and has many obvious errors. That was the main reason I wanted to look at this module myself.
Last edited by Cliff Harris; 12-17-2011 at 03:10 PM. Reason: Corrected Q4 part numbers.
 12-16-2011, 11:04 AM
#2
Slingshot


Cliff:
Attached is a write-up which I compiled from several different sources. The document gives a pretty complete overview of the Courtesy Light Delay Module. The document includes several schematics and a component repair chart.
Also, you can get a replacement circuit board for the module from either Wilcox or Ecklers for about $40.
Once I replaced my failed module my consol hatch button, door hatch buttons and courtesy lights all worked as originally designed.
FWIW,
P.
12-16-2011, 11:13 AM
#3
Drifting


Dang....what a forum. Ask for anything and it magically appears thanks to the insight, research and work of others.
Does anyone have a long legged, big, boobied, double jointed blond that likes bridles, saddles and cattle prods?? Yee-Haw. Help a brother out??
Does anyone have a long legged, big, boobied, double jointed blond that likes bridles, saddles and cattle prods?? Yee-Haw. Help a brother out??
12-17-2011, 03:16 PM
#4
Race Director
Thread Starter
pmihaltian: I didn't know about your writeup. Nice work.
I did know about the Willcox replacements. They are sold by many Corvette vendors. There are two versions of these, one with the original functionality and another that bypasses the delay.
I did know about the Willcox replacements. They are sold by many Corvette vendors. There are two versions of these, one with the original functionality and another that bypasses the delay.
03-25-2014, 06:59 AM
#5
Intermediate

Member Since: Jan 2014
Posts: 32
Likes: 0
Received 0 Likes
on
0 Posts
While my dash is apart I decided to look at the courtesy light module. I understand that there were three versions of this module used in the '84 to '89 time frame. This is the 14080625 version.
I have seen several threads where the courtesy lights either stayed on all the time or never came on. Frequently the door jamb switches get stuck and cause these problems. I put silicone grease on mine and have never had a problem since then. With this module disconnected my hatch release switches in the doors don't work. The one in the console does.
Anyhow, if in fact the courtesy light module is at fault, it's almost always a problem with Q4. This transistor can be replaced with a MJE3055 or KSE3055 in the TO-220 package. It gets pretty hot when the courtesy lights are on, so putting heat sink compound on it is a good idea.
A picture of the top side of the module (Q4 heat sink removed):
A picture of the bottom side of the module:
The schematic:
I have seen a schematic of this module elsewhere. It is very poorly drawn and has many obvious errors. That was the main reason I wanted to look at this module myself.
03-26-2014, 05:40 AM
#6
Race Director
Thread Starter
First you need to identify the various leads on the transistor (Base, Collector and Emitter). This can be tricky because there are some transistors that are not connected internally in the standard way. MOST of them are like this (lower left corner):
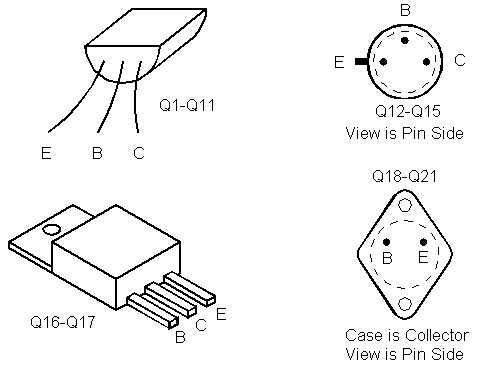
The connections inside the transistor act like two diodes, one connected from Base to Emitter and the other from the Base to Collector. You need to put your meter in DIODE mode. There should be a diode symbol on your meter (it usually also has a little speaker symbol). Usually it's next to the lowest resistance range, normally 200 ohms. The resistance modes do not supply enough current to turn on the diode junction.
You test the diode junctions by probing with the meter leads in two polarities. One will forward bias the junction and turn it on. The opposite polarity won't do that. Put your red lead (assuming it is plugged into the "+" jack on your meter) on the Base. Then touch the black probe to the Emitter (note the reading) and then on the Collector (note the reading). Now reverse the leads (black on the Base) and do the same thing.
With one polarity (forward biased) you should see about 0.6 to 0.7 on both Emitter and Collector. That is the junction voltage. With the opposite polarity you should see a much higher reading (both Emitter and Collector). The exact number depends on the transistor type.
The tricky part is obviously when the transistor is bad. Then you will not see 0.6 to 0.7 on both the Emitter and Collector. One could be much higher (open) or zero (shorted). When the polarity is reversed then the most likely fault will be a low reading (shorted).
Now things get even trickier. If there are other components in the circuit connected to the transistor that have low resistance it will mess up the readings on the transistor (like the 330 ohm resistor in the base-to-emitter circuit).
Last edited by Cliff Harris; 05-20-2017 at 03:47 AM. Reason: Original image disappeared.
03-31-2014, 07:19 PM
#7
7th Gear

Member Since: Mar 2014
Posts: 7
Likes: 0
Received 0 Likes
on
0 Posts
[IMG]Ctsy Lt Circuit Board[/IMG]
I purchased this C4 Courtesy Light Circuit Board from Ecklers. There are a lot less electrical parts on mine than the one shown by Cliff Harris. Is there something wrong before I try to install it?
I purchased this C4 Courtesy Light Circuit Board from Ecklers. There are a lot less electrical parts on mine than the one shown by Cliff Harris. Is there something wrong before I try to install it?
03-31-2014, 10:46 PM
#8
Intermediate
Member Since: Jan 2014
Posts: 32
Likes: 0
Received 0 Likes
on
0 Posts
what year do you have ? but it should still work if it is a c4
03-31-2014, 11:01 PM
#9
Intermediate
Member Since: Jan 2014
Posts: 32
Likes: 0
Received 0 Likes
on
0 Posts
First you need to identify the various leads on the transistor (Base, Collector and Emitter). This can be tricky because there are some transistors that are not connected internally in the standard way. MOST of them are like this:

The connections inside the transistor act like two diodes, one connected from Base to Emitter and the other from the Base to Collector. You need to put your meter in DIODE mode. There should be a diode symbol on your meter (it usually also has a little speaker symbol). Usually it's next to the lowest resistance range, normally 200 ohms. The resistance modes do not supply enough current to turn on the diode junction.
You test the diode junctions by probing with the meter leads in two polarities. One will forward bias the junction and turn it on. The opposite polarity won't do that. Put your red lead (assuming it is plugged into the "+" jack on your meter) on the Base. Then touch the black probe to the Emitter (note the reading) and then on the Collector (note the reading). Now reverse the leads (black on the Base) and do the same thing.
With one polarity (forward biased) you should see about 0.6 to 0.7 on both Emitter and Collector. That is the junction voltage. With the opposite polarity you should see a much higher reading (both Emitter and Collector). The exact number depends on the transistor type.
The tricky part is obviously when the transistor is bad. Then you will not see 0.6 to 0.7 on both the Emitter and Collector. One could be much higher (open) or zero (shorted). When the polarity is reversed then the most likely fault will be a low reading (shorted).
Now things get even trickier. If there are other components in the circuit connected to the transistor that have low resistance it will mess up the readings on the transistor (like the 330 ohm resistor in the base-to-emitter circuit).
04-01-2014, 03:01 AM
#10
Race Director
Thread Starter
Willcox makes two versions of that board. One is a copy of the original. The other one eliminates the delay feature. The interior lights turn off immediately when you close the door. Obviously it needs fewer components to do less...
04-01-2014, 03:02 AM
#11
Race Director
Thread Starter
Cliff I took my meter to heat sink chip like the one in this pic above , as you said when I prob B and e in ethere polary i get the same reading 327.5 ohm but when I prob it B to C or to C to E I get ol (over lode ) so then I probed C to the metal tab on the chip and my meter rings . Any advice? I think it may be bad but want to know for sure befor I buy an other one.
04-01-2014, 09:42 AM
#12
7th Gear
Member Since: Mar 2014
Posts: 7
Likes: 0
Received 0 Likes
on
0 Posts
04-01-2014, 10:15 AM
#13
Intermediate
Member Since: Jan 2014
Posts: 32
Likes: 0
Received 0 Likes
on
0 Posts
yea you realy don't have to tear it all apart just remove the black cover under the dash on passengers side two maybe three screws and look up it's right there taped to the harness eazy job realy
04-01-2014, 05:26 PM
#14
7th Gear
Member Since: Mar 2014
Posts: 7
Likes: 0
Received 0 Likes
on
0 Posts
mrcedy, I took off the black cover and there is a big, black plastic, for want of a better term, box, preventing me from even seeing the wall. There is also a wiring harness going into something. I wish I could take a picture to show u, but I do not have enough room to get a phone camera in there.
04-01-2014, 06:15 PM
#15
Racer
Member Since: Aug 2013
Posts: 301
Likes: 0
Received 0 Likes
on
0 Posts
I don't know if it happens a lot, but I thought I would mention this since it happened to me - My interior lights were working intermittently, and would work if I tapped on the module. What it turned out to be was wear on the contacts of the circuit board from the connector, and all it took to fix it was re-flowing the solder on the traces with a soldering iron so the connector could make good contact again.
04-01-2014, 06:44 PM
#16
Intermediate
Member Since: Jan 2014
Posts: 32
Likes: 0
Received 0 Likes
on
0 Posts
mrcedy, I took off the black cover and there is a big, black plastic, for want of a better term, box, preventing me from even seeing the wall. There is also a wiring harness going into something. I wish I could take a picture to show u, but I do not have enough room to get a phone camera in there.
04-02-2014, 04:42 PM
#17
7th Gear
Member Since: Mar 2014
Posts: 7
Likes: 0
Received 0 Likes
on
0 Posts
I finally got it. It was difficult to reach behind the security box near the Electronic Control Module. Once I got to it, then it became easy. Thank you mrcedy, Cliff Harris and John for your assistance.

