Another "Push-to-Start" Installation
 10-19-2011, 03:29 PM
#1
Le Mans Master

Thread Starter

Folks,
Some of you may recall my installation review of the StarDrive Push-to-Start 'system' I previously did, here is that thread:
http://forums.corvetteforum.com/c4-t...rt-review.html
The Star-Drive product was terrible, and another form member (ndanl) pointed me to a newer system that although expensive, seemed like it would be a significant improvement. The system is made by a Korean company called Wooiel Inc, but is available on Flea Bay and Alibaba also.
http://www.woorielinc.com/shop/produ...?id_product=16
Be aware there are two versions of this system. One has remote start capability with two way communications (what I got) and a simpler system with a fob. Be aware that the system I ordered, the ST960, only comes with a single remote, and extra remotes are $150!
So I bought this system to replace the prior piece of crap system that I could not stand any longer.
The final results
My first comments is that the documentation is rather poorly translated, and there are few mistakes in it, but professional in appearance. The vendor provides good support, and answers emails on weekends which helps.
I wanted to thank member Hooked on Vettes who without his help this install would not have been possible at all. He helped me get the door lock working easily.
My install was on a 90 vert, but I think it would be similar on the earlier cars and somewhat similar on the later ones but the wiring colors will be different. Mine was an auto and there is other hookup for manuals.
First, you need to realize that this is not for the faint of heart as you will sacrifice some security. At a minimum, you will need to:
1. If you get rid of the factory ignition key as I did you will need to install some sort of VATS eliminator. But this system (unlike the prior one) will support the factory lock staying in the car. Early C4 models can use the resister, but later ones need a module to fool the CCM. I got mine from Mid America: http://www.mamotorworks.com/corvette...s%20eliminator It is a simple plug and play.
2. You need to do something with the lock on the steering wheel; else you really have to leave the key in the ignition to unlock the column. I removed the lock on mine. This disables the steering column lock and the (auto) transmission shift lock too. You will need to remove the air bag (if so equipped), steering wheel, and ignition lock. For those you that have telescopic steering wheels, getting it back together is no fun. You will need a steering wheel puller, and lock plate removal tool. You can get them for about $15 each from your local parts store, and I understand some parts store will loan them.
But the good news is that this system can co-exist with the key and all you need to do is leave the key in the lock with it on “unlock”. It may be possible to use the “key chime” so that the system can monitor if the key is in, but I did not do this.
3. I highly recommend that you get a large assortment of “posi-lock” connectors. There are invaluable at hooking the alarm to the car temporarily without unnecessarily tearing up your harness. You will need a bunch (at least 4) of the 10 gauge tap for permanent install and a bunch of the smaller 18-20 gauge to make sure you got the connections right before soldering. I left the large ones in that tap into the steering column connectors. You can reuse these connectors and it will save you tearing up your harness something awful. These are reusable so they are a great investment.
4. If you eliminate the lock totally, you are going to need to do something with the cable that runs from your shifter (auto) to the steering wheel. At a minimum you will need to disconnect the locking mechanism by leaving the steering wheel lock in the unlocked position. I am tried to adapt a BTSI (Brake Transmission Shift Interlock) solenoid out of a C5/C6 to lock the shifter, but I was not skilled enough to adapt it to work. I would recommend for safety to not lock the steering wheel.
5. If you have an existing aftermarket alarm, plan on ripping it out. Who knows what little gems you will find if you have an aftermarket system installed. Be prepared to do a lot of wiring chasing.
6. Do not try this unless you have the factory Helms service manual. Without the wiring diagrams, you are doomed.
The good
Unlike the prior system I had, this system:
• Two way remote capability. Manufacturer says 300 meter range. The range of this unit is far superior to the prior one I had. There is no false arming of the system.
• The smart remote is rechargeable.
• Remote Start
• Lots of programmable features
• Push to Start
• RFID unlocks car as you approach and locks it when you walk away
• Touch sensitive remote can disarm the system so you can drive the car if you lose the remote.
• Valet Mode, and lots of customization possible via soft programming.
The problems
The system only comes with one remote, and an extra remote is $150!
Part of the documentation did not use good English, which made it hard to understand. The vendor was very good at answering question even on the weekend. The quality of the product is very good, the connectors all use unique wiring colors, and are ruggedly constructed.
One thing I noted that this system does not have is a “Ground When Armed” lead. This is needed by certail alarm accessories, like proximity and warn away sensors. However, it may be possible to use the door lock and unlock leads with a latching relay to provide this. However, if you do you will loose the ability of the system to lock the doors at speed. However, I could not make this programmable function work anyway.
The Steps
I did the work in several phases. Since much of the work was done installing the prior system, I’ll include the complete list here.
1. Homework study the documentation
2. Tear down, getting the car to start
3. Initial hook up to the door locks
4. Hooked up the remainder of the alarm wires.
5. Test and Confirm: Remove Posi-locks and solder all leads
6. Mount the Push to Start button, LED status indicator, and shock sensor.
7. Clifford Dual Zone Proximity Sensor
8. Transmission shifter work
9. Remove the old lock cylinder.
Phase 1 – Homework.
Unlike the prior system, the unit is ready to use and all you need to do is carefully read over the installation instructions and compare against the diagrams in the field service manual. No harness preparation was necessary.
A set of relays were needed to interface this unit to the 90 5 wire reversal rest at ground system that manages the door locks. Here is the configuration of these relays:
http://www.the12volt.com/relays/relaydiagram3.html
Thanks to Hooked on Vettes for figuring the wiring out for this.
After all research, here are connections I found to be needed.
Harness CN1:
Green Wire (IG-1 + 12V Output) is crank and run to C2-c Pink
White Wire (IG_1 +12V Output) is run to C1-A – Orange
Blue Wire (IG_1 +12V Output) is ACC to C2-E Brown
Yellow Wire (Start +12V Output) is Crank to C2-A-Yellow
Red Wire B+1 and Orange Wire B+2 (B+12V Power Line) (both wires) is Constant +12V to C2-D Red
Harness CN2:
Black wire (2 of them) to two different ground points
One of two Purple Color Wires – to parking lights
Harness CN11:
Green wire (Key Insertion Input) – to constant +12V if you remove the factory lock, otherwise you will need to connect it to the key chime system somehow.
Light blue (L Terminal Detection) – the best option is to hook it to the “L” terminal of the alternator but for some reason mine did not put out +14V when the engine is running (even though it is supposed to) so instead I hooked it up to the same +12V constant lead. It senses when the engine starts the increased voltage so it will not grind your starter when the engine is running.
Grey Wire (whole door ground detection – goes to the door adjar sensor lead
Red Wire (Parking ground lead) goes into the Yellow/Black lead on the auto tramission switch.
Brown Wire (Brake detection) goes to the brake pedal switch
Green/Black (speed + detection) goes to the VSS lead out of the ECM, but I am not sure if the system understands how to correctly monitor GM pulses.
Phase 2 – Tear down, getting the car to start.
Here I removed the driver’s side hush panel, and plate, cut all the tie wraps holding the harnesses under there and connecting up the CN1 ignition portion only. Install the VATS bypass. My goal was to just get the car started using the system. This took me about 4 hours.
Remove the hush panel, and the aluminum knee support underneath (4 x 10mm bolts. Cut all the tier wraps so you can get to the needed harnesses. The C1 and C2 connectors are on top the steering column. No need to disconnect them. I used 10 Gauge Posi-lock tappers for permanent installation without mutilating your harness.
Connect the VATs eliminator which is just a plug and play into a two led connector that comes out of the column. WARNING: If you have an air bag, the air bag has yellow wires and don’t touch this connector or you might get a blow job. I tie wrapped the module next to the starter relay near the top. You can put the key in the lock and move it to the unlocked position to test the system. You will need to provide the ground and power to both modules, and connect the wires coming out of the StarDrive module – wires 1-13 on H1, and H2 leads 9,18,15,14, 10. Plug in the antennas and the push button.
You should be able to turn on the fob, hold down the brake pedal, and push the start button and your engine should crank if you ground CN11 Red lead, and apply +12V constant to both CN11 blue and Light blue leads at least temporarily. To stop the engine, you must release the brake pedal and DO NOT press it again to stop it. If you press the brake pedal and try to stop the engine and all the leads are not hooked up right you may grind your starter!
Phase 3 -Door Locks
This is the wiring needed to make the door locks work properly. Use the Hooked on Vette instruction below. They work perfectly. In my case, because I had an aftermarket alarm, I had problems and had to rip out all their crap. This took me about 8 hours. Should have taken about 4 if you don’t have a tinkered with aftermarket alarm.
Supplied courtesy of Hook-on-Vettes!
Light Blue wire is for Door Unlock
Black wire is for Door Lock
In the schematic is a Light Blue wire going from the Left hand door lock switch
(Driver side)to the Right hand door lock switch (Passenger side). You cut the Light Blue wire.
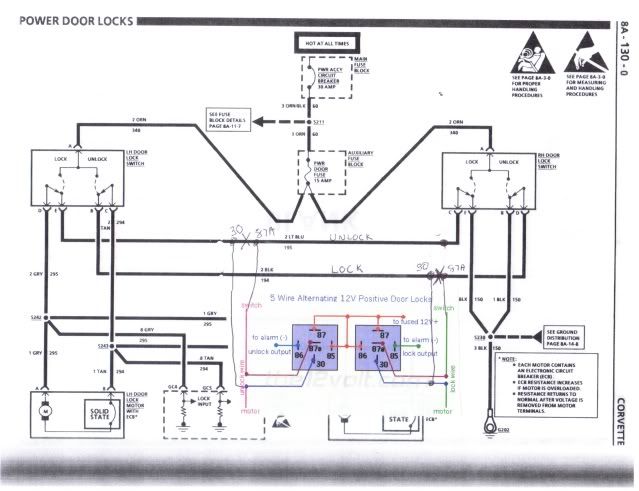
Make sure you cut the correct Light Blue and Black wire coming from the Driver side door switch.
You may find wires with the same color in the same bundle of wires.
It's called a 5 wire reversal rest at ground system.
Phase 4 - Hook up the remainder of the alarm wires.
I had problems again because of the aftermarket alarm. Should have taken about 2 hours, but another 6 hours spent tracing everything, neaten up things, and removing all the crapola.
Phase 5 - Test and Confirm
Remove Posi-locks and solder all leads. Only do this after you have tested all the alarm functions. Loom up all the harness and tuck them away.
Phase 6 - Mount the Push to Start button, and shock sensor.
I was told the best location for the antenna was inside the driver's side door pillar. Since I have a vert, I put the RFID antenea and the other antenna both inside the black plastic cover for the top of the windshield (near the rear view mirror).
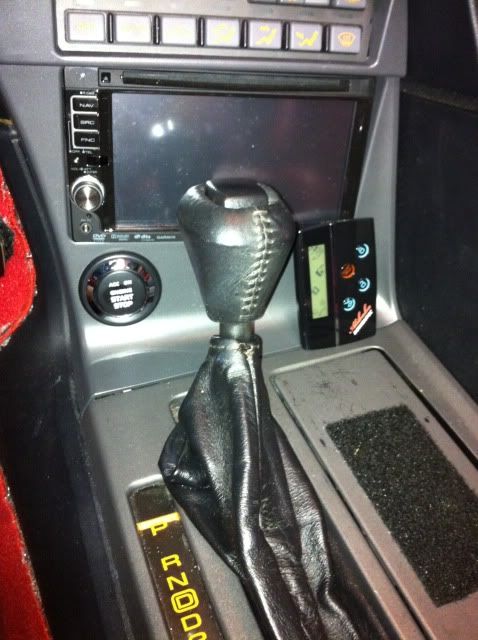
Since you have to remove the center console, this is also a good time to deal with the automatic shifter cable and to attach the CN11 red lead to the tranny shifter switch. The start button needs a small hole to get the ribbon cable though for the Push-to-Start button. I mounted mine on the radio bezel on the left side under the radio. Also, don’t slip and make a nasty scratch on your nice interior.
Phase 7 - Accessories
I decided that since my old system had a Clifford Dual Zone Proximity Sensor, to try and integrate it into the new system. It can be hooked into the provided shock sensor. Just tie the Orange wire coming out of the Clifford to the white lead of the shock sensor. Your Clifford also needs ground and +12V.
Keep in mind that since this new system does not have "Ground When Armed" there is no "warn away" capability for the proximity sensor. However, it does work effectively with the system armed and it does beep you on the remote letting you know that someone is patchaking around with your ride.
Phase 8 – Transmission Shifter
Remove the center console cover. There are two 7mm screws under the center console lid, and one under the front cup holder. You will need to remove the shift lock button on the shifter and underneath you will find a lock ring. Remove it using snap ring pliers. Make sure you have a set that are very thin, as GM used a special lock ring with smaller holes and it is a PITA to remove it with screwdrivers. Then remove the shifter, it pulls straight up. You will need to disconnect the interior shifter light and cig lighter socket to get the cover off. Once off, you will notice a substantial cable that goes toward the front of the car that interlocks your steering wheel column so that you cannot take the car out of park when the column is locked. To prevent accidently steering column locking, I removed the clip that holds this cable onto the shift mechanism and tied the cable towards the rear of the car using some wire and tying it off to one of the available 7mm screws towards the rear of the shifter compartment. When the cable is extended, only �” towards the read, the steering column can never lock. Thus there is no possibility that when you are driving the column will lock up. Replace the center console, remembering to align the little drive indicator into the guide so you can tell what gear you are in, reconnect the cig lighter and the light for the gear indicator. Put back your shifter **** with a fresh lock ring.
Phase 9 - Remove the old lock cylinder
Optional. This took me about 4 hours to complete. You will need a set of metric hex wrenches to remove the two hex screws that hold on the air bag. Start by disconnecting the battery. Working with the airbag is dangerous and no one wanted it to deploy in your face. You will also need a steering wheel puller and a steering column lock plate compressor. Both are inexpensive at your local parts store and some stores will loan them out for free I understand.
1. Start by disconnecting the battery.
2. Remove the two hex screws that hold the air bag on the wheel.
3. Remove the bag and pull out the yellow connector gently from the bag and put the bag (front facing up) on a clean static free surface.
4. Remove the nut from the steering wheel. Easies to do why wheel is locked.
5. There is a ground wire that is spring attached into a hole. Gently pull the wire out with the spring attached.
6. Use your steering wheel puller to remove the wheel.
7. Use you lock plate compression tool to compress the coil plate. You will then see a c-clip. The snaps ring tool I had had too large of a end to go into the holes of the GM c-clip, so I use some small screw drivers and bent the crap out of it. I had a replacement so you might want to make sure you have a good assortment on hand.
8. You then can pull off the coil that sets off the air bag. The coil just come up off the column, and can hang by the cord with no problems.
9. Underneath that you will find a ‘wave’ washer, set aside.
10. Next setup your lock plate compression tool again and compress the metal column lock ring. When you do you will see a strong, but thing wire clip that holds the metal column locking ring on. That thing is a PITA to get off. It took me an hour and I found a small thin screwdriver was good to get it from the ridge, and then use a larger screwdriver to hold it out. Move the little screw driver around and work the ring out. It is frustrating PITA as it will snap back in. Don’t destroy it as I am not sure where you could find that ring.
11. One you get it out of the channel use a screwdriver and pliers to work it up off the column. Don’t try opening it enough to get off the column or you won’t be able to reuse it.
12. The steering arm lock plate will then slip off. Note the orientation of the plastic cam. The plastic cam assembly will then slip off. Underneath there is a spring that will slip off
13. You can then remove the two silver screws that hold the turn signal cam to the turn signal arm and the cam will come out. Note the large screw goes on the top and the shorter on one the bottom.
14. Remove the Phillips screw that hold in the hazard signal button. The whole button then comes off the column.
15. You can then remove the three screws that hold in the electrical assembly. No need to remove the connectors, just get it far enough out of the way so you can go a behind it.
16. Next you will see a silver torx screw and two black torx screws that hold the lock in. Stick the key in and move the lock to unlock (not run). Pull the lock out. I just cut the VATS lead and taped them up. You can also remove the switch that is for the key buzzard since you won’t need that anymore.
17. Put back the silver torx screw, and the two black torx screws.
18. Put back the three screws that hold in the electrical assembly.
19. Put back the hazard lights button.
20. Put back the turn signal cam, and lossly attach the screws. The little screw goes on the bottom and the bigger one on top. Make sure it engages the turn signal lever and it works. Then tighten the two silver screws.
21. Put back the spring over the column.
22. Put back the plastic cam, making sure it was in the orientation as originally.
23. Put back the steering wheel locking cam, but do not yet put back the snap ring. Reconnect the battery and test if your signals and hazard lights work properly first! Then disconnect battery again.
24. If everything works, use the lock plate compressor and put back the snap ring.
25. Remove the lock plate compressor.
26. Put the coil back on. Make sure the coil is oriented correctly. There is a grove at the top so it will not rotate, and the hole must align up. Put your lock plate compress back on.
27. Use a new c-clip. And remove the lock plate compressor.
28. Put the steering wheel back on. Tighten down the nut.
29. Put the ground wire for the horm with the spring attached into the hole. Make sure the wires are held down by the little platic guides on the back of the wheel.
30. Reconnect your air bag and replace. Tighten down the two hex nuts.
31. Use a piece of black plastic or paint metal to make a cover for the old lock. I glued mine in place.
32. You may have set a code 35 INFL REST as a result of this procedure. To get rid of this code, use this process:
a. Turn ignition off
b. Connect K lead of ALDL to ALDL lead A
c. Turn on ignition
d. wait for code to start flashing
e. Disconnect K lead of ALDL from ALDL lead A for 3 secs
f. Reconnect K lead of ALDL to ALDL lead A for 3 secs
g. Disconnect K lead of ALDL from ALDL lead A and wait 10 seconds and code should disappear
A couple of features I liked personally included:
1. You have to hold down the brake so that the car will crank.
2. To shut off the engine, you must hold down the brake and then hit the start button.
3. Doors will automatically lock when you release the brake after starting the engine.
4. Doors will automatically unlock when you release the brake after shutting off the engine.
5. Car will automatically go into accessory mode when the engine is shutoff. If you press the start button again without holding the brake, it will go to lock and accessories will turn off. If you don't do anything, accessories will turn off a few minutes later by themselves.
Other Accessories
Since the new system has two Aux channels, I was able to integrate the DEI Auto Windows up/down modules to be able to open and close my windows via the remote, which is handy when you want to put your vert top up or done and you don't want to bother starting up the ignition.
It also has a trunk channel so it is possible to hook up your rear hatch release (or convert top release) but I did not do so.
Other comments
Since I had a prior aftermarket Push-to-Start system, it was not too terrible an install since I already had found all the leads and just had to really reconnect them to the new system. However, I did have to replace my radio bezel because not only was the hole for the old Push-to-Start button too large for the new button, but I had a nasty gouge in it because I did not take my time when I was cutting the hole for the prior system.
Some of you may recall my installation review of the StarDrive Push-to-Start 'system' I previously did, here is that thread:
http://forums.corvetteforum.com/c4-t...rt-review.html
The Star-Drive product was terrible, and another form member (ndanl) pointed me to a newer system that although expensive, seemed like it would be a significant improvement. The system is made by a Korean company called Wooiel Inc, but is available on Flea Bay and Alibaba also.
http://www.woorielinc.com/shop/produ...?id_product=16
Be aware there are two versions of this system. One has remote start capability with two way communications (what I got) and a simpler system with a fob. Be aware that the system I ordered, the ST960, only comes with a single remote, and extra remotes are $150!
So I bought this system to replace the prior piece of crap system that I could not stand any longer.
The final results
My first comments is that the documentation is rather poorly translated, and there are few mistakes in it, but professional in appearance. The vendor provides good support, and answers emails on weekends which helps.
I wanted to thank member Hooked on Vettes who without his help this install would not have been possible at all. He helped me get the door lock working easily.
My install was on a 90 vert, but I think it would be similar on the earlier cars and somewhat similar on the later ones but the wiring colors will be different. Mine was an auto and there is other hookup for manuals.
First, you need to realize that this is not for the faint of heart as you will sacrifice some security. At a minimum, you will need to:
1. If you get rid of the factory ignition key as I did you will need to install some sort of VATS eliminator. But this system (unlike the prior one) will support the factory lock staying in the car. Early C4 models can use the resister, but later ones need a module to fool the CCM. I got mine from Mid America: http://www.mamotorworks.com/corvette...s%20eliminator It is a simple plug and play.
2. You need to do something with the lock on the steering wheel; else you really have to leave the key in the ignition to unlock the column. I removed the lock on mine. This disables the steering column lock and the (auto) transmission shift lock too. You will need to remove the air bag (if so equipped), steering wheel, and ignition lock. For those you that have telescopic steering wheels, getting it back together is no fun. You will need a steering wheel puller, and lock plate removal tool. You can get them for about $15 each from your local parts store, and I understand some parts store will loan them.
But the good news is that this system can co-exist with the key and all you need to do is leave the key in the lock with it on “unlock”. It may be possible to use the “key chime” so that the system can monitor if the key is in, but I did not do this.
3. I highly recommend that you get a large assortment of “posi-lock” connectors. There are invaluable at hooking the alarm to the car temporarily without unnecessarily tearing up your harness. You will need a bunch (at least 4) of the 10 gauge tap for permanent install and a bunch of the smaller 18-20 gauge to make sure you got the connections right before soldering. I left the large ones in that tap into the steering column connectors. You can reuse these connectors and it will save you tearing up your harness something awful. These are reusable so they are a great investment.
4. If you eliminate the lock totally, you are going to need to do something with the cable that runs from your shifter (auto) to the steering wheel. At a minimum you will need to disconnect the locking mechanism by leaving the steering wheel lock in the unlocked position. I am tried to adapt a BTSI (Brake Transmission Shift Interlock) solenoid out of a C5/C6 to lock the shifter, but I was not skilled enough to adapt it to work. I would recommend for safety to not lock the steering wheel.
5. If you have an existing aftermarket alarm, plan on ripping it out. Who knows what little gems you will find if you have an aftermarket system installed. Be prepared to do a lot of wiring chasing.
6. Do not try this unless you have the factory Helms service manual. Without the wiring diagrams, you are doomed.
The good
Unlike the prior system I had, this system:
• Two way remote capability. Manufacturer says 300 meter range. The range of this unit is far superior to the prior one I had. There is no false arming of the system.
• The smart remote is rechargeable.
• Remote Start
• Lots of programmable features
• Push to Start
• RFID unlocks car as you approach and locks it when you walk away
• Touch sensitive remote can disarm the system so you can drive the car if you lose the remote.
• Valet Mode, and lots of customization possible via soft programming.
The problems
The system only comes with one remote, and an extra remote is $150!
Part of the documentation did not use good English, which made it hard to understand. The vendor was very good at answering question even on the weekend. The quality of the product is very good, the connectors all use unique wiring colors, and are ruggedly constructed.
One thing I noted that this system does not have is a “Ground When Armed” lead. This is needed by certail alarm accessories, like proximity and warn away sensors. However, it may be possible to use the door lock and unlock leads with a latching relay to provide this. However, if you do you will loose the ability of the system to lock the doors at speed. However, I could not make this programmable function work anyway.
The Steps
I did the work in several phases. Since much of the work was done installing the prior system, I’ll include the complete list here.
1. Homework study the documentation
2. Tear down, getting the car to start
3. Initial hook up to the door locks
4. Hooked up the remainder of the alarm wires.
5. Test and Confirm: Remove Posi-locks and solder all leads
6. Mount the Push to Start button, LED status indicator, and shock sensor.
7. Clifford Dual Zone Proximity Sensor
8. Transmission shifter work
9. Remove the old lock cylinder.
Phase 1 – Homework.
Unlike the prior system, the unit is ready to use and all you need to do is carefully read over the installation instructions and compare against the diagrams in the field service manual. No harness preparation was necessary.
A set of relays were needed to interface this unit to the 90 5 wire reversal rest at ground system that manages the door locks. Here is the configuration of these relays:
http://www.the12volt.com/relays/relaydiagram3.html
Thanks to Hooked on Vettes for figuring the wiring out for this.
After all research, here are connections I found to be needed.
Harness CN1:
Green Wire (IG-1 + 12V Output) is crank and run to C2-c Pink
White Wire (IG_1 +12V Output) is run to C1-A – Orange
Blue Wire (IG_1 +12V Output) is ACC to C2-E Brown
Yellow Wire (Start +12V Output) is Crank to C2-A-Yellow
Red Wire B+1 and Orange Wire B+2 (B+12V Power Line) (both wires) is Constant +12V to C2-D Red
Harness CN2:
Black wire (2 of them) to two different ground points
One of two Purple Color Wires – to parking lights
Harness CN11:
Green wire (Key Insertion Input) – to constant +12V if you remove the factory lock, otherwise you will need to connect it to the key chime system somehow.
Light blue (L Terminal Detection) – the best option is to hook it to the “L” terminal of the alternator but for some reason mine did not put out +14V when the engine is running (even though it is supposed to) so instead I hooked it up to the same +12V constant lead. It senses when the engine starts the increased voltage so it will not grind your starter when the engine is running.
Grey Wire (whole door ground detection – goes to the door adjar sensor lead
Red Wire (Parking ground lead) goes into the Yellow/Black lead on the auto tramission switch.
Brown Wire (Brake detection) goes to the brake pedal switch
Green/Black (speed + detection) goes to the VSS lead out of the ECM, but I am not sure if the system understands how to correctly monitor GM pulses.
Phase 2 – Tear down, getting the car to start.
Here I removed the driver’s side hush panel, and plate, cut all the tie wraps holding the harnesses under there and connecting up the CN1 ignition portion only. Install the VATS bypass. My goal was to just get the car started using the system. This took me about 4 hours.
Remove the hush panel, and the aluminum knee support underneath (4 x 10mm bolts. Cut all the tier wraps so you can get to the needed harnesses. The C1 and C2 connectors are on top the steering column. No need to disconnect them. I used 10 Gauge Posi-lock tappers for permanent installation without mutilating your harness.
Connect the VATs eliminator which is just a plug and play into a two led connector that comes out of the column. WARNING: If you have an air bag, the air bag has yellow wires and don’t touch this connector or you might get a blow job. I tie wrapped the module next to the starter relay near the top. You can put the key in the lock and move it to the unlocked position to test the system. You will need to provide the ground and power to both modules, and connect the wires coming out of the StarDrive module – wires 1-13 on H1, and H2 leads 9,18,15,14, 10. Plug in the antennas and the push button.
You should be able to turn on the fob, hold down the brake pedal, and push the start button and your engine should crank if you ground CN11 Red lead, and apply +12V constant to both CN11 blue and Light blue leads at least temporarily. To stop the engine, you must release the brake pedal and DO NOT press it again to stop it. If you press the brake pedal and try to stop the engine and all the leads are not hooked up right you may grind your starter!
Phase 3 -Door Locks
This is the wiring needed to make the door locks work properly. Use the Hooked on Vette instruction below. They work perfectly. In my case, because I had an aftermarket alarm, I had problems and had to rip out all their crap. This took me about 8 hours. Should have taken about 4 if you don’t have a tinkered with aftermarket alarm.
Supplied courtesy of Hook-on-Vettes!
Light Blue wire is for Door Unlock
Black wire is for Door Lock
In the schematic is a Light Blue wire going from the Left hand door lock switch
(Driver side)to the Right hand door lock switch (Passenger side). You cut the Light Blue wire.
Make sure you cut the correct Light Blue and Black wire coming from the Driver side door switch.
You may find wires with the same color in the same bundle of wires.
It's called a 5 wire reversal rest at ground system.
Phase 4 - Hook up the remainder of the alarm wires.
I had problems again because of the aftermarket alarm. Should have taken about 2 hours, but another 6 hours spent tracing everything, neaten up things, and removing all the crapola.
Phase 5 - Test and Confirm
Remove Posi-locks and solder all leads. Only do this after you have tested all the alarm functions. Loom up all the harness and tuck them away.
Phase 6 - Mount the Push to Start button, and shock sensor.
I was told the best location for the antenna was inside the driver's side door pillar. Since I have a vert, I put the RFID antenea and the other antenna both inside the black plastic cover for the top of the windshield (near the rear view mirror).
Since you have to remove the center console, this is also a good time to deal with the automatic shifter cable and to attach the CN11 red lead to the tranny shifter switch. The start button needs a small hole to get the ribbon cable though for the Push-to-Start button. I mounted mine on the radio bezel on the left side under the radio. Also, don’t slip and make a nasty scratch on your nice interior.
Phase 7 - Accessories
I decided that since my old system had a Clifford Dual Zone Proximity Sensor, to try and integrate it into the new system. It can be hooked into the provided shock sensor. Just tie the Orange wire coming out of the Clifford to the white lead of the shock sensor. Your Clifford also needs ground and +12V.
Keep in mind that since this new system does not have "Ground When Armed" there is no "warn away" capability for the proximity sensor. However, it does work effectively with the system armed and it does beep you on the remote letting you know that someone is patchaking around with your ride.
Phase 8 – Transmission Shifter
Remove the center console cover. There are two 7mm screws under the center console lid, and one under the front cup holder. You will need to remove the shift lock button on the shifter and underneath you will find a lock ring. Remove it using snap ring pliers. Make sure you have a set that are very thin, as GM used a special lock ring with smaller holes and it is a PITA to remove it with screwdrivers. Then remove the shifter, it pulls straight up. You will need to disconnect the interior shifter light and cig lighter socket to get the cover off. Once off, you will notice a substantial cable that goes toward the front of the car that interlocks your steering wheel column so that you cannot take the car out of park when the column is locked. To prevent accidently steering column locking, I removed the clip that holds this cable onto the shift mechanism and tied the cable towards the rear of the car using some wire and tying it off to one of the available 7mm screws towards the rear of the shifter compartment. When the cable is extended, only �” towards the read, the steering column can never lock. Thus there is no possibility that when you are driving the column will lock up. Replace the center console, remembering to align the little drive indicator into the guide so you can tell what gear you are in, reconnect the cig lighter and the light for the gear indicator. Put back your shifter **** with a fresh lock ring.
Phase 9 - Remove the old lock cylinder
Optional. This took me about 4 hours to complete. You will need a set of metric hex wrenches to remove the two hex screws that hold on the air bag. Start by disconnecting the battery. Working with the airbag is dangerous and no one wanted it to deploy in your face. You will also need a steering wheel puller and a steering column lock plate compressor. Both are inexpensive at your local parts store and some stores will loan them out for free I understand.
1. Start by disconnecting the battery.
2. Remove the two hex screws that hold the air bag on the wheel.
3. Remove the bag and pull out the yellow connector gently from the bag and put the bag (front facing up) on a clean static free surface.
4. Remove the nut from the steering wheel. Easies to do why wheel is locked.
5. There is a ground wire that is spring attached into a hole. Gently pull the wire out with the spring attached.
6. Use your steering wheel puller to remove the wheel.
7. Use you lock plate compression tool to compress the coil plate. You will then see a c-clip. The snaps ring tool I had had too large of a end to go into the holes of the GM c-clip, so I use some small screw drivers and bent the crap out of it. I had a replacement so you might want to make sure you have a good assortment on hand.
8. You then can pull off the coil that sets off the air bag. The coil just come up off the column, and can hang by the cord with no problems.
9. Underneath that you will find a ‘wave’ washer, set aside.
10. Next setup your lock plate compression tool again and compress the metal column lock ring. When you do you will see a strong, but thing wire clip that holds the metal column locking ring on. That thing is a PITA to get off. It took me an hour and I found a small thin screwdriver was good to get it from the ridge, and then use a larger screwdriver to hold it out. Move the little screw driver around and work the ring out. It is frustrating PITA as it will snap back in. Don’t destroy it as I am not sure where you could find that ring.
11. One you get it out of the channel use a screwdriver and pliers to work it up off the column. Don’t try opening it enough to get off the column or you won’t be able to reuse it.
12. The steering arm lock plate will then slip off. Note the orientation of the plastic cam. The plastic cam assembly will then slip off. Underneath there is a spring that will slip off
13. You can then remove the two silver screws that hold the turn signal cam to the turn signal arm and the cam will come out. Note the large screw goes on the top and the shorter on one the bottom.
14. Remove the Phillips screw that hold in the hazard signal button. The whole button then comes off the column.
15. You can then remove the three screws that hold in the electrical assembly. No need to remove the connectors, just get it far enough out of the way so you can go a behind it.
16. Next you will see a silver torx screw and two black torx screws that hold the lock in. Stick the key in and move the lock to unlock (not run). Pull the lock out. I just cut the VATS lead and taped them up. You can also remove the switch that is for the key buzzard since you won’t need that anymore.
17. Put back the silver torx screw, and the two black torx screws.
18. Put back the three screws that hold in the electrical assembly.
19. Put back the hazard lights button.
20. Put back the turn signal cam, and lossly attach the screws. The little screw goes on the bottom and the bigger one on top. Make sure it engages the turn signal lever and it works. Then tighten the two silver screws.
21. Put back the spring over the column.
22. Put back the plastic cam, making sure it was in the orientation as originally.
23. Put back the steering wheel locking cam, but do not yet put back the snap ring. Reconnect the battery and test if your signals and hazard lights work properly first! Then disconnect battery again.
24. If everything works, use the lock plate compressor and put back the snap ring.
25. Remove the lock plate compressor.
26. Put the coil back on. Make sure the coil is oriented correctly. There is a grove at the top so it will not rotate, and the hole must align up. Put your lock plate compress back on.
27. Use a new c-clip. And remove the lock plate compressor.
28. Put the steering wheel back on. Tighten down the nut.
29. Put the ground wire for the horm with the spring attached into the hole. Make sure the wires are held down by the little platic guides on the back of the wheel.
30. Reconnect your air bag and replace. Tighten down the two hex nuts.
31. Use a piece of black plastic or paint metal to make a cover for the old lock. I glued mine in place.
32. You may have set a code 35 INFL REST as a result of this procedure. To get rid of this code, use this process:
a. Turn ignition off
b. Connect K lead of ALDL to ALDL lead A
c. Turn on ignition
d. wait for code to start flashing
e. Disconnect K lead of ALDL from ALDL lead A for 3 secs
f. Reconnect K lead of ALDL to ALDL lead A for 3 secs
g. Disconnect K lead of ALDL from ALDL lead A and wait 10 seconds and code should disappear
A couple of features I liked personally included:
1. You have to hold down the brake so that the car will crank.
2. To shut off the engine, you must hold down the brake and then hit the start button.
3. Doors will automatically lock when you release the brake after starting the engine.
4. Doors will automatically unlock when you release the brake after shutting off the engine.
5. Car will automatically go into accessory mode when the engine is shutoff. If you press the start button again without holding the brake, it will go to lock and accessories will turn off. If you don't do anything, accessories will turn off a few minutes later by themselves.
Other Accessories
Since the new system has two Aux channels, I was able to integrate the DEI Auto Windows up/down modules to be able to open and close my windows via the remote, which is handy when you want to put your vert top up or done and you don't want to bother starting up the ignition.
It also has a trunk channel so it is possible to hook up your rear hatch release (or convert top release) but I did not do so.
Other comments
Since I had a prior aftermarket Push-to-Start system, it was not too terrible an install since I already had found all the leads and just had to really reconnect them to the new system. However, I did have to replace my radio bezel because not only was the hole for the old Push-to-Start button too large for the new button, but I had a nasty gouge in it because I did not take my time when I was cutting the hole for the prior system.
Last edited by Flame Red; 10-19-2011 at 04:38 PM.


 10-20-2011, 06:51 AM
#3
Drifting


That's a cool sounding system but did I read that you have to leave the key in the ignition.....in a Vert? Wouldn't that just be inviting some ill intentioned person to just cut the top and hop in. He wouldn't know that it had a "push to start" until after the damage was done.
10-20-2011, 08:50 AM
#4
Le Mans Master
Thread Starter
That's a cool sounding system but did I read that you have to leave the key in the ignition.....in a Vert? Wouldn't that just be inviting some ill intentioned person to just cut the top and hop in. He wouldn't know that it had a "push to start" until after the damage was done.
 10-30-2011, 07:23 PM
#6
Pro


 12-16-2011, 11:54 AM
#7
Le Mans Master
Thread Starter
I wanted to post a two month follow up on this system.
Per my above post, the only "feature" that I still find missing from this system is a Ground When Armed lead so that you can activate any other external accessories when the system is armed/disarmed.
I have found that the battery for the remote works for about two weeks without recharging, however, after about a week there is a noticeable decrease in the two way range of the remote. Another point is that if you do not follow proper procedures in charging the remote battery (let it completely discharge), the battery may develop a memory and these batteries are not replaceable. I have not dissected a remote yet to see what it takes to remove and replace a battery.
What I most enjoy after two months is the "valet mode" where you can leave the car parked in the garage and not worry about the alarm going off or locking and unlocking all the time while working on it. This is settable both on the remote and the windshield input.
I also enjoy that the accessories like the radio can be left on until you open the door to leave the car. This was a feature not stock on the early C4's.
Of course I like the windshield key part of the system so you operate the car if you loose the remote.
The only thing I have still not figured out is how to make the system automatically lock the doors when the car is started or starts to move. This is a programmable feature of the system and I have the leads hooked up so in theory it should work, but I cannot seem to make this programmable feature work.
I still have not worked out a steering wheel locking solution or shifter locking solution. For now, for safety sake, I have disabled the steering wheel lock completely so that the wheel cannot accidentally lock while I'm driving the car. Important safety note! I got a tranny shifter out of a 95 from a nice forum member that has the solenoid to lock the shifter till the parking brake is pressed. However, that solenoid will have to be electrically charged the entire time with the system off to lock the shifter and so it would be a giant battery drain. I have not been able to figure out how to modify it so that it would lock by default and unlock while energized which is really what I need.
I have noticed that the system has come down in price also.
Last edited by Flame Red; 12-16-2011 at 12:00 PM.