C4 Corvette Headlight Options! A must read for C4 drivers.
 04-14-2011, 11:42 AM
#1
Race Director

Thread Starter

Let's face it, even the newest C4 Corvettes are now 15 years old, the oldest are 27 years old. To make matters worse, the headlight design wasn't exactly state of the art when these cars were new. The end result is a lighting system that was inadequate when the cars were made and continues to be inadequate today. The purpose of this article is to discuss some of the options that we have as C4 owners to improve our headlights while maintaining a factory look, at least to the most casual observer.
Before one can begin to fix any problem, it must be clearly defined. In other words, we must understand what makes the headlights so poor in order to fix them! For decades cars sold in America were all cursed with pathetic headlights. The problem isn't entirely a matter of light output, brighter lights certainly exist. The problem lies with what the DOT finds to be an acceptable light pattern. A standard DOT spec headlight beam pattern throws light in a fairly non distinct blob that scatters in all directions, including into the eyes of other drivers, and very little actually ends up on the road in front of you where you need it. Because of the scattered beam pattern, actual light output must be reduced to so as to not completely blind oncoming traffic. The result is that any light that would be bright enough to effectively light the road in front of the vehicle produces so much glare that they are not considered legal. As a side note, ever wonder why fog lights on US vehicles are a joke? The reason is actually very simple. US headlights are so poor that people with real fog lights tended to use them all the time. Because this would again cause glare to oncoming traffic, DOT mandates that fog light output be minimal, making them little more than decorations. Rather than go back and fix the root of the problem, DOT attempts to just patch over it by making compromises!
Now that the problem is clearly defined, we can begin to come up with solutions. The seemingly most obvious solution would be a costly retrofit to a new style of projector beam headlights. The trouble is that for the C4 there are really only 2 options, either replace the flip up mechanism altogether, or a projector beam system that has somehow been cludged together to fit inside a standard sealed beam housing. The problem with these systems is that they are both costly and destroy the factory look of the car OR they provide only one projector that allows for low beams only. Now at this point some people will argue that projector low beams are so good that high beams aren't needed. Personally I thinks this is absurd. ALL low beams are a compromise to keep light out of the eyes of oncoming traffic. For open road driving at night with no oncoming traffic, you are doing yourself a great dis-service by eliminating high beam functionality. So what do we need to do? Go to Europe of course.
Don't get me wrong, I love my country, but the fact is that we have become as a whole a group of lazy people who are willing to accept compromise. We think driving is a God given right to be abused. We talk on cell phones, we eat, and do anything while we are driving EXCEPT actually concentrate on driving. You want proof, look at Germany. How can a highway system have no speed limit and still have an acceptable accident rate? The answer is simple. People actually pay attention when they are driving and when there is a problem, rather than compromise they actually work to find a solution!
The European answer to the headlight problem is delightfully simple. Rather than reduce light output, they changed the beam pattern. They discovered that by using the same physical size housing but changing the properties of the lens, light could be directed where it needs to be instead of straight into the eyes of oncoming traffic. Hence the E-spec, or E-code headlight pattern. Any headlight system that uses this beam pattern will keep light directed low and out of oncoming traffic, flipping up on the right to illuminate road signs. E-code lights have a VERY distinct and very sharp vertical cutoff. Without even a picture you can visualize it with the keyboard. Think of a beam pattern like this ___/ What a novel idea, light is kept out of oncoming traffic, directed in front where you need it, and manages to hit road signs and objects on the right so you can see them at much greater distances. The best part is that these lights retain high beam functionality and due to better engineered lenses, these high beams blow DOT lights clean out of the water.
Now somebody is probably saying WAIT A MINUTE, that can't be DOT legal, how can you get by with using them? The answer is fairly well cut and dry. For states that have vehicle inspections, you don't. For states that do NOT have vehicle inspections you install them and drive. Nobody will ever give you a second look with an E-spec light because you are not blinding them as you drive by.
So where can I acquire these magical lights you ask? Simple, with the wonders of the internet you can find them anywhere. There do exist e-spec sealed beam headlights that are a bolt in replacement for factory DOT lights. Just a word of warning, MAKE SURE THE LIGHTS YOU BUY ARE FOR A LEFT HAND DRIVE CAR (meaning you actually drive on the right)! If you get E-code lights for a right hand drive car, the beam pattern will be reversed and the flip up will be on the left, blinding oncoming traffic like no other!
That would seem to be the end of the story, but wait, it gets better. Sure you could buy an E-spec sealed beam upgrade and you would certainly immediately notice an improvement, but what if you could take that a step further? Enter the sealed beam conversion housing. Once upon a time, somebody noticed that the wiring pin-out and plug configuration for a sealed beam is exactly the same as that for a standard H4/9003 high/low bulb. If you've ever looked for headlights you will notice that there are tons of choices for H4/9003 bulbs whereas there are only a very few for sealed beams. Somebody figured out then that you can manufacture a housing that fits in place of a sealed beam but will accept any H4/9003 bulb. This provides people who normally run sealed beams the option of running different bulbs, such as higher wattages or so called "cool blue" or Sylvania Silverstars. Before you say "but Sylvania makes a Silverstar sealed beam," hear me out. Sylvania does make a Silverstar sealed beam, but it has the DOT beam pattern. What if you could run a Silverstar bulb with an E-code housing? Not only would you have better light output, you'd have a better light pattern! The result is a very noticeable increase in headlight performance. Best of all, it's a bolt in replacement and still looks 100% factory stock!
So where do I get these magical E-code housings you ask? I know for a fact that both Hella and Valeo make them. For the sake of the forum I will not list specific vendors, but they can be found fairly easily. One final tip on the E-code housings.... make sure they are aligned properly! It would be absurd to think that a nearly 30 year old car will have perfectly aligned lights by default. The whole vehicle moves and rattles, headlight alignment changes! Aim those lights properly and you'll be doing yourself and everybody else on the road a great favor.
All of the above is a great start, and a great improvement. You could stop right there and be happy, but just hang on, it gets better. What if you could step that light up another notch? Even the BEST halogen lights are nothing compared to a new set of HID lights. What if I told you could install HID lights in your Corvette and STILL maintain the factory appearance? Now somebody out there is already complaining. What's that you say, it's not legal to install HID's in anything but a projector beam housing? Yes, I agree, technically, but I see a loophole. Why is it illegal to install HID's in standard housings, any guesses? It all goes back to that standard DOT beam pattern! If you install HID lights into a DOT housing, you are absolutely correct, it will result in a noticeable increase in glare to oncoming traffic. If this glare is bad enough to get you in trouble or not depends entirely on your local law enforcement. I know in KY there are so many people driving around with poorly aimed headlights (because we have no vehicle inspections) that a set of properly aimed HID's even in DOT housings is not that much worse than the glare caused by most un-aligned lights.
Now consider placing that HID into an E-code housing. The light is already directed away from oncoming traffic and where you need it. Technically it's probably not legal, but will you get in trouble for it? Again it depends on local law enforcement but where I live the answer is a very sound, no.
Now you're asking, I'll risk it, what do I need to do? Well if you've been reading so far you know that you first need to get a set of E-code housings and align them properly! Most of these housing kits come with bulbs that will let you nail down the alignment. After you've got that done you need to find an HID kit. These come in a wide variety of choices and can range anywhere from $500 to $50. Why the price range? Because people are un-educated. My HID kit cost me $79 and I can assure you they are 100% real genuine HID bulbs with 100% real genuine HID ballasts and they put out 100% real genuine HID light. The trouble is when HID kits first hit the market they cost a ton of money. Some people plunked down the money for them, and were well pleased with the results. Once these lower cost kits came about, they were immediately looked down upon by the people who paid $500. My opinion you ask? The people who spent $500 have to justify themselves so they are going to talk down on anything that cost less than $500. I can personally guarantee that 99.9% of the people who call the low cost HID kits "cheap" or "fake" have never even seen one of the low cost kits, if they had they would realize that it is the EXACT SAME THING they paid $500 for!
So you're now looking for an HID kit and you're confused. There are 35 watt and 55 watt. There are standard kits and there are slimline ballast kits. And there are color temperatures that range from 3000k to 15000k. How do you make sense of it all? Well it's really very simple. 35 watt kits are not as bright as 55 watt kits and correspondingly they cost less. Standard kits are larger than slimline ballast kits, and correspondingly they cost less. Color temperature is simply a matter of personal preference but you need to not be stupid. 3000k light is yellow, not the best for headlights. 15000k is so blue that it takes on a purple hue. Actual light input increases from 3000k to around 4300k and then begins to decrease. 5000k is generally regarded as hyper white with only an ever so slight blue tint to it. 6000k has a slightly decreased light output but has a slightly deeper blue tint to it. Also keep in mind that for any given color temp, a 55 watt kit will seem "whiter" than a corresponding 35 watt kit. Anything above 6000k and your light output begins to decline dramatically and the color change is extremely noticeable.
Remember the goal here is LIGHT, not drawing attention to ourselves from law enforcement! My personal preference is the 6000k 55 watt standard ballast kit. My reasoning is that at 55 watts, the 6000k bulbs still appear extremely white. They have enough of a blue tint to get "style points" in my book but they are not so blue that they attract extra attention or significantly decrease light output. While shopping you will notice that most vendors provide the option for a relay harness that will allow the lights to draw power directly from the battery and not the factory switch. The reasoning is logical enough. Although once operating, HID lights require less power than halogens, they do have a high initial start-up current which is very hard on switch components, 55 watt kits being worse than 35 watt kits of course. As it turns out, don't concern yourself too much with the relay harness. The fact is that if you buy a hi/lo kit, which will allow you to maintain your hi and low beam functionality (and I HIGHLY recommend), these kits all come with a relay harness by default.
Now you've got your E-code housings and your HID headlight kit and you run into a problem. The Corvette has flip up headlights and there is seemingly no way to make the wiring work. Where there is a will there is a way, but you will have to immediately modify your brand new HID ballasts and relay harness which will no doubt instantly void the warranty. Now aren't you glad you didn't buy a $500 kit? The solution is really very simple, it just requires a few tools and a little bit of time. Working with a friend I was able to install the HID kit in my Corvette in approximately 5 hours. It should be noted, however, that we were both very tired as this installation took place from 10p.m. to 3a.m.! It might would have gone a little faster had we gotten a fresh morning start. In any case the job was not difficult, just time consuming.
First you need to lay out your kit. The kit requires power and ground, directly from the battery or as close to the battery as you can make it. Personally I hate tying a hundred different things directly to the battery, I think it looks very tacky. There is actually a positive terminal located directly behind the battery (yes you have to remove the "gill" to get to it, get over it) that is ideal. The trouble is the wiring harness isn't long enough to reach this and still reach the headlights. So the first cut and splice must be made.
Start by finding a place up front where you can mount the relay and hi/low control box. I would recommend mounting in such a way that the wires and connections are pointed down. This is to help make sure water does not run into the control box just in case it isn't quite as waterproof as it is supposed to be. Be sure to mount the relay in such a way that the passenger side harness will reach reasonably close to the passenger side! Once the box is mounted you can cut the ring terminal off the positive side of the wiring harness and extend it to reach the battery. Personally I like to use un-insulated butt connectors with an AMP ratcheting crimp tool and heat shrink tubing. This results in a very solid connection that is weatherproof. Trouble is the AMP crimp tool costs $150 used (I just borrow dad's, it's older than I am but it works great) and the lugs aren't the easiest to find.
Standard insulated lugs work but they don't look as clean. Solder always works as well. Whatever your method, make sure the connections are very good. Once you have the positive side connected, you'll need to work on the ground. Some kits have individual grounds at each ballast, some have a single ground. Either method works and you'll just need to figure out how to do it best based on your particular car and your particular kit. If you can't figure out how to make a solid ground, you really don't need to be attempting this install!
Once you have the wiring harness connected to power and ground, you need to figure out a way to wire up the lights. Each bulb requires 4 wires. 2 for the light itself and 2 for the hi/lo mechanism. There is only so much room for wires to pass through the flip up grommet so you will first have to remove the factory 3 wire harness going to the lights. If you feel so inclined and wish to take the time, you can remove the entire headlight assembly and carefully un-pin the headlight socket and carefully remove the wires. The other option is just to cut the wires and leave a long enough pigtail that you can splice them back together once removed from the bucket.
Once the factory harness is out of the bucket, connect one factory headlight socket (most likely the driver's side) to the supplied connector on the relay harness. This will now serve as the trigger for the relay harness. The other factory headlight connector will remain un-used. I recommend taping it up so it will not collect dirt and grime and then carefully moving it so it won't get tangled in the moving lights. At this point the relay harness is wired up for power and it is triggered by the factory harness. All that is left to do is mount the ballasts and wire up the lights.
The ballasts can be mounted anywhere and might could even fit in the buckets with the bulbs. Any way you look at it, there will be cutting and splicing. I opted to mount the ballasts stationary underneath the headlight buckets. Some kits come with brackets, others don't. I could not really see a good place to use a bracket so I just stuck the ballasts in place using double stick tape. I positioned the ballasts where I could plug them directly in from the wiring harness.
The last thing to do is actually wire up the lights. There are two ways to do this. You can either extend the wires on the harness and ballast so they meet the bulbs in the bucket, or you can extend the wires on the bulb so that they meet the ballast and harness. Either way will work and it is a matter of personal preference. I opted to extend the wires on the ballast and harness and make the connections in the bucket. I chose to do this so that on the off chance I ever do have to replace a bulb, I can simply disconnect the bulb and replace it. Otherwise I would have to cut and re-splice everything if I got a new bulb. I liked the plug and play solution. I used #14 wire to extend the ballasts. The wire on the ballasts looks like 12 or even 10, but it is 99% insulation, the actual conductor is very small. I used #18 for the hi/lo mechanism.
Ok, so I lied, that wasn't the last thing to do. The very last thing to do is to check and make sure that all of your wiring is tied up and out of the way. Having one of the headlights snag on a loose wire when it tries to flip around is no good at all! Once you are convinced that the wires are clear, turn on the lights and verify hi/lo functionality. If you un-mounted the buckets, be sure to verify your alignment! These lights are BRIGHT! Even an E-code housing can't keep the light out of the other lane if the lights are pointed that way!
That's it for now. When I get my fog light upgrade I will discuss it as well. Enjoy, I hope you found this helpful and informative. If there is enough interest maybe we could make this thread a sticky. My wife's sister has the good digital camera currently so pictures will have to wait. Right now all I have is a cell phone picture.
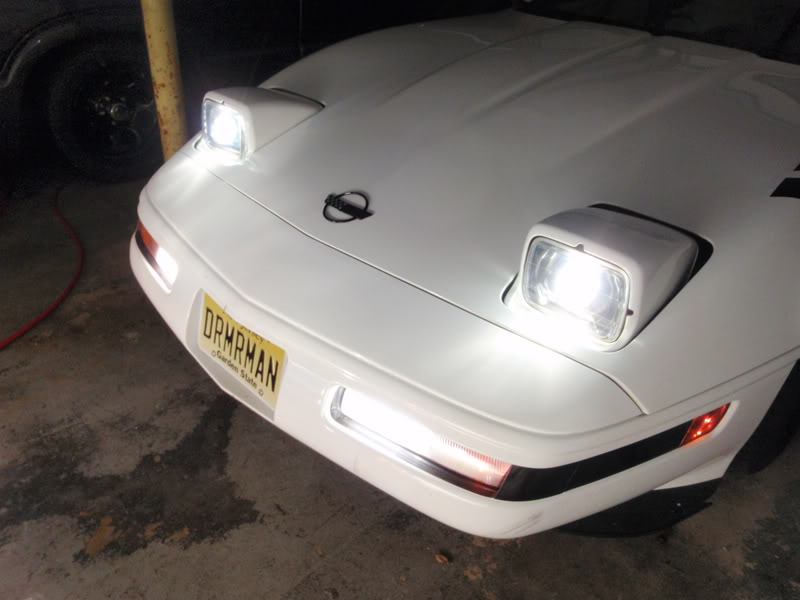
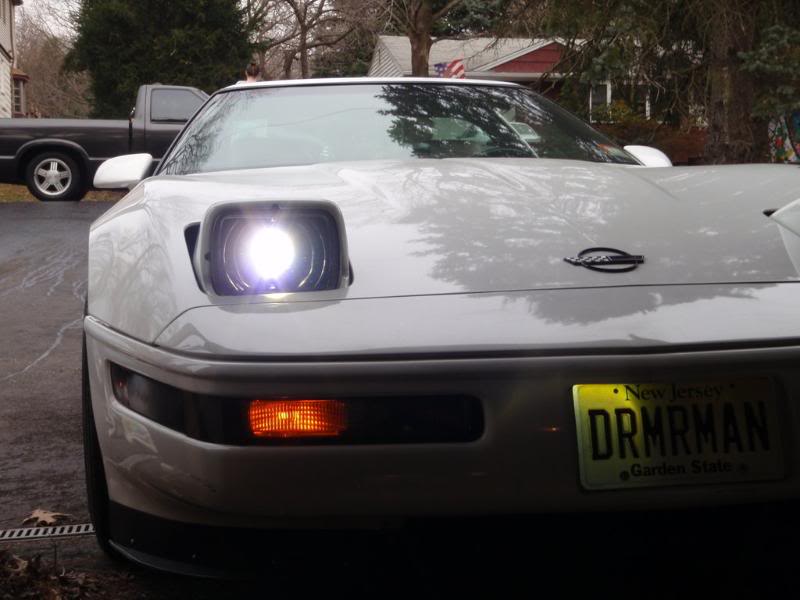
One of these 1992 Corvettes has HID bulbs in E-code housings and are properly aligned. The other has poorly aligned factory stock sealed beams from 1992. Can you guess which is which? Now which would you rather be driving?

Below are some pictures to illustrate the difference between the low and high beams. Notice the brightness of the light does not change but rather the focus. Low beams are on the left, highs on the right.


Update:
My fog lights finally arrived and I was able to get them installed. Using a 55w kit did blow the original 15amp tail lamp fuse, no big shocker there. I MIGHT could have gotten by by simply upgrading the fuse but I don't like that idea. I made a relay harness instead in an effort to save the factory wiring.

Before one can begin to fix any problem, it must be clearly defined. In other words, we must understand what makes the headlights so poor in order to fix them! For decades cars sold in America were all cursed with pathetic headlights. The problem isn't entirely a matter of light output, brighter lights certainly exist. The problem lies with what the DOT finds to be an acceptable light pattern. A standard DOT spec headlight beam pattern throws light in a fairly non distinct blob that scatters in all directions, including into the eyes of other drivers, and very little actually ends up on the road in front of you where you need it. Because of the scattered beam pattern, actual light output must be reduced to so as to not completely blind oncoming traffic. The result is that any light that would be bright enough to effectively light the road in front of the vehicle produces so much glare that they are not considered legal. As a side note, ever wonder why fog lights on US vehicles are a joke? The reason is actually very simple. US headlights are so poor that people with real fog lights tended to use them all the time. Because this would again cause glare to oncoming traffic, DOT mandates that fog light output be minimal, making them little more than decorations. Rather than go back and fix the root of the problem, DOT attempts to just patch over it by making compromises!
Now that the problem is clearly defined, we can begin to come up with solutions. The seemingly most obvious solution would be a costly retrofit to a new style of projector beam headlights. The trouble is that for the C4 there are really only 2 options, either replace the flip up mechanism altogether, or a projector beam system that has somehow been cludged together to fit inside a standard sealed beam housing. The problem with these systems is that they are both costly and destroy the factory look of the car OR they provide only one projector that allows for low beams only. Now at this point some people will argue that projector low beams are so good that high beams aren't needed. Personally I thinks this is absurd. ALL low beams are a compromise to keep light out of the eyes of oncoming traffic. For open road driving at night with no oncoming traffic, you are doing yourself a great dis-service by eliminating high beam functionality. So what do we need to do? Go to Europe of course.
Don't get me wrong, I love my country, but the fact is that we have become as a whole a group of lazy people who are willing to accept compromise. We think driving is a God given right to be abused. We talk on cell phones, we eat, and do anything while we are driving EXCEPT actually concentrate on driving. You want proof, look at Germany. How can a highway system have no speed limit and still have an acceptable accident rate? The answer is simple. People actually pay attention when they are driving and when there is a problem, rather than compromise they actually work to find a solution!
The European answer to the headlight problem is delightfully simple. Rather than reduce light output, they changed the beam pattern. They discovered that by using the same physical size housing but changing the properties of the lens, light could be directed where it needs to be instead of straight into the eyes of oncoming traffic. Hence the E-spec, or E-code headlight pattern. Any headlight system that uses this beam pattern will keep light directed low and out of oncoming traffic, flipping up on the right to illuminate road signs. E-code lights have a VERY distinct and very sharp vertical cutoff. Without even a picture you can visualize it with the keyboard. Think of a beam pattern like this ___/ What a novel idea, light is kept out of oncoming traffic, directed in front where you need it, and manages to hit road signs and objects on the right so you can see them at much greater distances. The best part is that these lights retain high beam functionality and due to better engineered lenses, these high beams blow DOT lights clean out of the water.
Now somebody is probably saying WAIT A MINUTE, that can't be DOT legal, how can you get by with using them? The answer is fairly well cut and dry. For states that have vehicle inspections, you don't. For states that do NOT have vehicle inspections you install them and drive. Nobody will ever give you a second look with an E-spec light because you are not blinding them as you drive by.
So where can I acquire these magical lights you ask? Simple, with the wonders of the internet you can find them anywhere. There do exist e-spec sealed beam headlights that are a bolt in replacement for factory DOT lights. Just a word of warning, MAKE SURE THE LIGHTS YOU BUY ARE FOR A LEFT HAND DRIVE CAR (meaning you actually drive on the right)! If you get E-code lights for a right hand drive car, the beam pattern will be reversed and the flip up will be on the left, blinding oncoming traffic like no other!
That would seem to be the end of the story, but wait, it gets better. Sure you could buy an E-spec sealed beam upgrade and you would certainly immediately notice an improvement, but what if you could take that a step further? Enter the sealed beam conversion housing. Once upon a time, somebody noticed that the wiring pin-out and plug configuration for a sealed beam is exactly the same as that for a standard H4/9003 high/low bulb. If you've ever looked for headlights you will notice that there are tons of choices for H4/9003 bulbs whereas there are only a very few for sealed beams. Somebody figured out then that you can manufacture a housing that fits in place of a sealed beam but will accept any H4/9003 bulb. This provides people who normally run sealed beams the option of running different bulbs, such as higher wattages or so called "cool blue" or Sylvania Silverstars. Before you say "but Sylvania makes a Silverstar sealed beam," hear me out. Sylvania does make a Silverstar sealed beam, but it has the DOT beam pattern. What if you could run a Silverstar bulb with an E-code housing? Not only would you have better light output, you'd have a better light pattern! The result is a very noticeable increase in headlight performance. Best of all, it's a bolt in replacement and still looks 100% factory stock!
So where do I get these magical E-code housings you ask? I know for a fact that both Hella and Valeo make them. For the sake of the forum I will not list specific vendors, but they can be found fairly easily. One final tip on the E-code housings.... make sure they are aligned properly! It would be absurd to think that a nearly 30 year old car will have perfectly aligned lights by default. The whole vehicle moves and rattles, headlight alignment changes! Aim those lights properly and you'll be doing yourself and everybody else on the road a great favor.
All of the above is a great start, and a great improvement. You could stop right there and be happy, but just hang on, it gets better. What if you could step that light up another notch? Even the BEST halogen lights are nothing compared to a new set of HID lights. What if I told you could install HID lights in your Corvette and STILL maintain the factory appearance? Now somebody out there is already complaining. What's that you say, it's not legal to install HID's in anything but a projector beam housing? Yes, I agree, technically, but I see a loophole. Why is it illegal to install HID's in standard housings, any guesses? It all goes back to that standard DOT beam pattern! If you install HID lights into a DOT housing, you are absolutely correct, it will result in a noticeable increase in glare to oncoming traffic. If this glare is bad enough to get you in trouble or not depends entirely on your local law enforcement. I know in KY there are so many people driving around with poorly aimed headlights (because we have no vehicle inspections) that a set of properly aimed HID's even in DOT housings is not that much worse than the glare caused by most un-aligned lights.
Now consider placing that HID into an E-code housing. The light is already directed away from oncoming traffic and where you need it. Technically it's probably not legal, but will you get in trouble for it? Again it depends on local law enforcement but where I live the answer is a very sound, no.
Now you're asking, I'll risk it, what do I need to do? Well if you've been reading so far you know that you first need to get a set of E-code housings and align them properly! Most of these housing kits come with bulbs that will let you nail down the alignment. After you've got that done you need to find an HID kit. These come in a wide variety of choices and can range anywhere from $500 to $50. Why the price range? Because people are un-educated. My HID kit cost me $79 and I can assure you they are 100% real genuine HID bulbs with 100% real genuine HID ballasts and they put out 100% real genuine HID light. The trouble is when HID kits first hit the market they cost a ton of money. Some people plunked down the money for them, and were well pleased with the results. Once these lower cost kits came about, they were immediately looked down upon by the people who paid $500. My opinion you ask? The people who spent $500 have to justify themselves so they are going to talk down on anything that cost less than $500. I can personally guarantee that 99.9% of the people who call the low cost HID kits "cheap" or "fake" have never even seen one of the low cost kits, if they had they would realize that it is the EXACT SAME THING they paid $500 for!
So you're now looking for an HID kit and you're confused. There are 35 watt and 55 watt. There are standard kits and there are slimline ballast kits. And there are color temperatures that range from 3000k to 15000k. How do you make sense of it all? Well it's really very simple. 35 watt kits are not as bright as 55 watt kits and correspondingly they cost less. Standard kits are larger than slimline ballast kits, and correspondingly they cost less. Color temperature is simply a matter of personal preference but you need to not be stupid. 3000k light is yellow, not the best for headlights. 15000k is so blue that it takes on a purple hue. Actual light input increases from 3000k to around 4300k and then begins to decrease. 5000k is generally regarded as hyper white with only an ever so slight blue tint to it. 6000k has a slightly decreased light output but has a slightly deeper blue tint to it. Also keep in mind that for any given color temp, a 55 watt kit will seem "whiter" than a corresponding 35 watt kit. Anything above 6000k and your light output begins to decline dramatically and the color change is extremely noticeable.
Remember the goal here is LIGHT, not drawing attention to ourselves from law enforcement! My personal preference is the 6000k 55 watt standard ballast kit. My reasoning is that at 55 watts, the 6000k bulbs still appear extremely white. They have enough of a blue tint to get "style points" in my book but they are not so blue that they attract extra attention or significantly decrease light output. While shopping you will notice that most vendors provide the option for a relay harness that will allow the lights to draw power directly from the battery and not the factory switch. The reasoning is logical enough. Although once operating, HID lights require less power than halogens, they do have a high initial start-up current which is very hard on switch components, 55 watt kits being worse than 35 watt kits of course. As it turns out, don't concern yourself too much with the relay harness. The fact is that if you buy a hi/lo kit, which will allow you to maintain your hi and low beam functionality (and I HIGHLY recommend), these kits all come with a relay harness by default.
Now you've got your E-code housings and your HID headlight kit and you run into a problem. The Corvette has flip up headlights and there is seemingly no way to make the wiring work. Where there is a will there is a way, but you will have to immediately modify your brand new HID ballasts and relay harness which will no doubt instantly void the warranty. Now aren't you glad you didn't buy a $500 kit? The solution is really very simple, it just requires a few tools and a little bit of time. Working with a friend I was able to install the HID kit in my Corvette in approximately 5 hours. It should be noted, however, that we were both very tired as this installation took place from 10p.m. to 3a.m.! It might would have gone a little faster had we gotten a fresh morning start. In any case the job was not difficult, just time consuming.
First you need to lay out your kit. The kit requires power and ground, directly from the battery or as close to the battery as you can make it. Personally I hate tying a hundred different things directly to the battery, I think it looks very tacky. There is actually a positive terminal located directly behind the battery (yes you have to remove the "gill" to get to it, get over it) that is ideal. The trouble is the wiring harness isn't long enough to reach this and still reach the headlights. So the first cut and splice must be made.
Start by finding a place up front where you can mount the relay and hi/low control box. I would recommend mounting in such a way that the wires and connections are pointed down. This is to help make sure water does not run into the control box just in case it isn't quite as waterproof as it is supposed to be. Be sure to mount the relay in such a way that the passenger side harness will reach reasonably close to the passenger side! Once the box is mounted you can cut the ring terminal off the positive side of the wiring harness and extend it to reach the battery. Personally I like to use un-insulated butt connectors with an AMP ratcheting crimp tool and heat shrink tubing. This results in a very solid connection that is weatherproof. Trouble is the AMP crimp tool costs $150 used (I just borrow dad's, it's older than I am but it works great) and the lugs aren't the easiest to find.
Standard insulated lugs work but they don't look as clean. Solder always works as well. Whatever your method, make sure the connections are very good. Once you have the positive side connected, you'll need to work on the ground. Some kits have individual grounds at each ballast, some have a single ground. Either method works and you'll just need to figure out how to do it best based on your particular car and your particular kit. If you can't figure out how to make a solid ground, you really don't need to be attempting this install!
Once you have the wiring harness connected to power and ground, you need to figure out a way to wire up the lights. Each bulb requires 4 wires. 2 for the light itself and 2 for the hi/lo mechanism. There is only so much room for wires to pass through the flip up grommet so you will first have to remove the factory 3 wire harness going to the lights. If you feel so inclined and wish to take the time, you can remove the entire headlight assembly and carefully un-pin the headlight socket and carefully remove the wires. The other option is just to cut the wires and leave a long enough pigtail that you can splice them back together once removed from the bucket.
Once the factory harness is out of the bucket, connect one factory headlight socket (most likely the driver's side) to the supplied connector on the relay harness. This will now serve as the trigger for the relay harness. The other factory headlight connector will remain un-used. I recommend taping it up so it will not collect dirt and grime and then carefully moving it so it won't get tangled in the moving lights. At this point the relay harness is wired up for power and it is triggered by the factory harness. All that is left to do is mount the ballasts and wire up the lights.
The ballasts can be mounted anywhere and might could even fit in the buckets with the bulbs. Any way you look at it, there will be cutting and splicing. I opted to mount the ballasts stationary underneath the headlight buckets. Some kits come with brackets, others don't. I could not really see a good place to use a bracket so I just stuck the ballasts in place using double stick tape. I positioned the ballasts where I could plug them directly in from the wiring harness.
The last thing to do is actually wire up the lights. There are two ways to do this. You can either extend the wires on the harness and ballast so they meet the bulbs in the bucket, or you can extend the wires on the bulb so that they meet the ballast and harness. Either way will work and it is a matter of personal preference. I opted to extend the wires on the ballast and harness and make the connections in the bucket. I chose to do this so that on the off chance I ever do have to replace a bulb, I can simply disconnect the bulb and replace it. Otherwise I would have to cut and re-splice everything if I got a new bulb. I liked the plug and play solution. I used #14 wire to extend the ballasts. The wire on the ballasts looks like 12 or even 10, but it is 99% insulation, the actual conductor is very small. I used #18 for the hi/lo mechanism.
Ok, so I lied, that wasn't the last thing to do. The very last thing to do is to check and make sure that all of your wiring is tied up and out of the way. Having one of the headlights snag on a loose wire when it tries to flip around is no good at all! Once you are convinced that the wires are clear, turn on the lights and verify hi/lo functionality. If you un-mounted the buckets, be sure to verify your alignment! These lights are BRIGHT! Even an E-code housing can't keep the light out of the other lane if the lights are pointed that way!
That's it for now. When I get my fog light upgrade I will discuss it as well. Enjoy, I hope you found this helpful and informative. If there is enough interest maybe we could make this thread a sticky. My wife's sister has the good digital camera currently so pictures will have to wait. Right now all I have is a cell phone picture.
One of these 1992 Corvettes has HID bulbs in E-code housings and are properly aligned. The other has poorly aligned factory stock sealed beams from 1992. Can you guess which is which? Now which would you rather be driving?
Below are some pictures to illustrate the difference between the low and high beams. Notice the brightness of the light does not change but rather the focus. Low beams are on the left, highs on the right.
Update:
My fog lights finally arrived and I was able to get them installed. Using a 55w kit did blow the original 15amp tail lamp fuse, no big shocker there. I MIGHT could have gotten by by simply upgrading the fuse but I don't like that idea. I made a relay harness instead in an effort to save the factory wiring.
Last edited by Nathan Plemons; 04-26-2011 at 11:51 AM.
 04-14-2011, 04:21 PM
#2
Burning Brakes


phew, just read all that. great write up! couple questions if you dont mind my asking as i am an amateur at wiring, ive done a couple radios but thats about it, and i want to try this on my 89 as i have fairly bad night blindness and feel this will help. one, can you post a picture of the amp ratcheting tool and maybe a link of where to get it? i googled it but got a ton of different results at a ton of different prices, but i want to do cleaner wiring than the $15 home depot crimper and insulated lugs ive been using. also, can you go into detail into how to un-pin a connector? i like to keep things clean =). thanks for your time and again great write up!
04-14-2011, 05:02 PM
#3
Race Director
Thread Starter
Currently all I have is the lousy camera on my cell phone but maybe you can get the picture.

Here we have an Amp crimp tool, a butt connector, a pair of strippers and 2 pieces of wire.

Here we have a close up view of the crimp jaws.

Here is the crimp tool in use.

Here is the finished joint. Notice it is is not much larger than the insulation on the wire. Add a little bit of heat shrink tubing and you've got a very solid fairly weatherproof connector.
As far as the tool, GOOD LUCK! Here is a website that has ONE tool available and used, it is $155 http://store.crimptools.com/product.php?id_product=744
Just search for TYPE W crimp tool and TYPE W lugs. Here is another set, much cheaper. They have longer handles which gives more leverage but is less handy for tight spaces. http://cgi.ebay.com/AMP-22-10-TYPE-W...-/300480187085
What I really like about this tool is that it ratchets. Once you start down on a lug, the ONLY way it will release is to squeeze the handles all the way. Being said DO NOT monkey around with it. The tool doesn't know the difference between a lug and your fingers.
Here we have an Amp crimp tool, a butt connector, a pair of strippers and 2 pieces of wire.
Here we have a close up view of the crimp jaws.
Here is the crimp tool in use.
Here is the finished joint. Notice it is is not much larger than the insulation on the wire. Add a little bit of heat shrink tubing and you've got a very solid fairly weatherproof connector.
As far as the tool, GOOD LUCK! Here is a website that has ONE tool available and used, it is $155 http://store.crimptools.com/product.php?id_product=744
Just search for TYPE W crimp tool and TYPE W lugs. Here is another set, much cheaper. They have longer handles which gives more leverage but is less handy for tight spaces. http://cgi.ebay.com/AMP-22-10-TYPE-W...-/300480187085
What I really like about this tool is that it ratchets. Once you start down on a lug, the ONLY way it will release is to squeeze the handles all the way. Being said DO NOT monkey around with it. The tool doesn't know the difference between a lug and your fingers.


 04-14-2011, 06:49 PM
#5
Melting Slicks

I recently installed HID 's in the fog lights with 5000k bulbs (love 'em) and Hella E-code headlamps with 60/55 watt xenon bulbs.
I was wondering how well the HID bulbs would work in the E-code lamps so THANKS for the write up. There is so much ambiguous information out there.
I was wondering how well the HID bulbs would work in the E-code lamps so THANKS for the write up. There is so much ambiguous information out there.
04-14-2011, 10:55 PM
#6
Race Director
Thread Starter
Those ratcheting crimpers will work for a little while but I wouldn't really call them a quality tool. My father has a set of Panduit brand ratcheting crimpers that LOOK to be the same thing (longer handles with interchangeable dies), except they cost some $300. The difference? His 10 year old Panduit crimpers still work. My friend, on the other hand, has the exact same crimpers pictured above and after about a year the ratchet feature doesn't really work and they are sloppy as hell. Yes they will technically get the job done, but it's not exactly what I would call a quality tool. Your set may differ, but my friend's set also only contains dies for crimping insulated lugs which are usually quite large and far from what I would consider truly weatherproof.
04-14-2011, 11:03 PM
#7
Safety Car


 04-14-2011, 11:34 PM
#8
I hear you Nathan and agree. They are not what I consider a quality tool either but like many others in the forum I refuse to pay $155 bucks for a crimper I'm going to use once a year. Just thought I'd let people see a decent option to get a tight crimp for a reasonable price. Hell we both know most people use pliers or vice-grips anyway lol.
04-15-2011, 08:20 AM
#9
Burning Brakes
Member Since: Dec 2008
Location: Morgan Hill and Marina California
Posts: 1,021
Likes: 0
Received 6 Likes
on
5 Posts
If you want truly weatherproof, visit a ships chandlery
(West Marine is the best know name). A company called
Ancor make crimps where the insulation is heat shrink
lined with hot melt glue. You crimp, then heat, and it
shrinks down and glues itself to the wire insulation.
Ancor also makes hot melt glue lined heat shrink in a
variety of sizes. And the Ancor crimps are much better
made than the junk from the HW store or auto parts
store.
The following users liked this post:
ras61 (12-31-2023)
04-15-2011, 10:27 AM
#10

Great write up
 ) just solder the joint and use heat shrink.
04-15-2011, 02:03 PM
) just solder the joint and use heat shrink.
04-15-2011, 02:03 PM
#12
Le Mans Master

Member Since: Aug 2004
Location: Metairie Louisiana
Posts: 5,141
Likes: 0
Received 4 Likes
on
4 Posts

I also went to seperate housings with an H4 bulb, then to an HID setup, then back to H4.
I made the mistake of buy plastic housings at first to save some weight and take an extra load off of the headlight motors. That was a mistake. The reflective material on the plastic housings will fade over time and wear away. I'm now ordering the Hlla E-Spec.
I also switched to an HID Hi/Lo setup with ballasts and bulbs. The wiring was not a problem at all, even for the flip up headlights. I got the ones with mini ballasts. The bulbs constantly had problems switching from hi to lo beam. Sometimes the lights would not come on until I flipped them off and on again. sometimes I had to open the whole light assembly and mess with it to get it to come on. After about a year or two one of the ballasts started puffing white smoke out of my hood one night. There are crappy HID's out there so be carefull what you get.
I'm now going to the glass E-Spec housings and regular H4 bulbs with a higher wattage.
Here's the two part numbers I found for the Hellas. The E-Spec is first. I didnt see any right or left driver option.???
003427811
ECE (aka E-Spec)
European not US DOT approved
200mm (Will fit C4 Corvettes)
Better Lighting
Headlight Kit - Contains two cassings and 60/55w H4 bulbs
003427291
SAE
US DOT approved
200mm (Will fit C4 Corvettes)
Lighting not as good
Single Headlight - Uses 9003 Bulb but H4 will also fit
Last edited by rickneworleansla; 04-16-2011 at 08:58 PM.
04-15-2011, 02:30 PM
#13
Melting Slicks
If you want truly weatherproof, visit a ships chandlery
(West Marine is the best know name). A company called
Ancor make crimps where the insulation is heat shrink
lined with hot melt glue. You crimp, then heat, and it
shrinks down and glues itself to the wire insulation.
Ancor also makes hot melt glue lined heat shrink in a
variety of sizes. And the Ancor crimps are much better
made than the junk from the HW store or auto parts
store.
(West Marine is the best know name). A company called
Ancor make crimps where the insulation is heat shrink
lined with hot melt glue. You crimp, then heat, and it
shrinks down and glues itself to the wire insulation.
Ancor also makes hot melt glue lined heat shrink in a
variety of sizes. And the Ancor crimps are much better
made than the junk from the HW store or auto parts
store.
I use them on all my projects
 04-15-2011, 03:15 PM
#14
Drifting


I agree with the suggestion to solder & heat shrink the wire splices. It's fairly easy to solder the joint as long as the wires are clean, clean, clean. Did I say "clean"? Yes, making sure that everything is clean, including the solder, makes for a good soldering job with no hassles.
 04-15-2011, 09:19 PM
#16
Race Director
Thread Starter
You wanna go really sweet you can get those type W crimp lugs that have holes in the top so that after you crimp them you can heat them up and run solder into them as well. Now THAT is a solid connection.

 Looks like another project for my Vettes.
 04-20-2011, 09:59 PM
#20
Melting Slicks
Scattered light in an H4 housing is no fun for on coming drivers... I went with the only proper way to install HID bulbs. Projector head lamps. And I believe this is "legal" where as installing HID bulbs into an H4 style housing is "illegal" but laws may differ from state to state...

Last edited by drmrman; 04-20-2011 at 10:01 PM.

