Dex Cool Sludge
 03-16-2011, 10:49 PM
#1
Advanced

Thread Starter

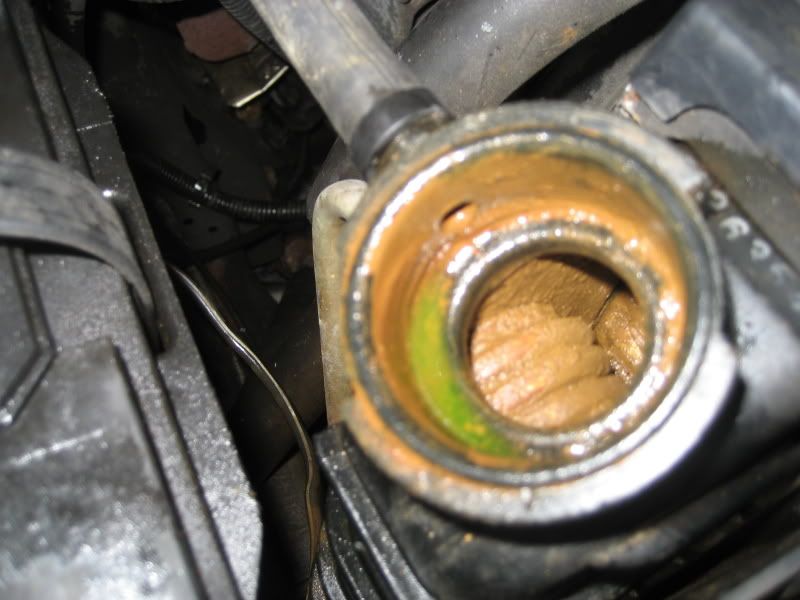
I have been battling with the cooling system for a while now, but after some searching on the web I think I have diagnosed my issue as Dex-Coolant Sludge/Mud. It has the brownish/dark orange color and it is pretty muddy on the radiator cap. I bought this car in bad shape last summer and have been working on it since. It runs well now and it does not have any cooling problems. However, its never a good feeling to open your radiator cap and see a brownish mud deposits.
Sooo I have flushed it with the prestone kit, tried the vinegar, and even the dishwasher detergent. It has gotten a LOT better, but it is still not where I want it.
Does anyone have an answer to this? What solvent or flush chemical should I use to really get this stuff out. Its nasty.
Here is a picture I found off the web. My situation is not NEARLY as bad, but you can get the idea.
 03-16-2011, 11:16 PM
#2
Burning Brakes

03-17-2011, 12:48 AM
#3
Team Owner


Member Since: Aug 2005
Location: Riverside County Southern California
Posts: 34,988
Received 501 Likes
on
342 Posts
Co-winner 2020 C4 of the Year - Modified
2018 Corvette of Year Finalist
2017 C4 of Year
2016 C7 of Year Finalist
St. Jude Donor '09-'10-'11-'12-'13-'14-'15-'16-'17-'18-'19-'20


You are saying DexCool but, the radiator neck has green coolant on it.
DexCool is orange. You are not supposed to mix them.
I dont know is Lime Away would damage the cooling system or block, Lime Away would remove all that junk.
DexCool is orange. You are not supposed to mix them.
I dont know is Lime Away would damage the cooling system or block, Lime Away would remove all that junk.
03-17-2011, 07:06 AM
#4
Le Mans Master

I have been very, very lucky. I changed to Dexicool when I replaced the radiator and water pump and I guess I throughly managed to flush the old green stuff out as I had no sludge in the Vettte.
I was not so lucky with my truck and sometime later it looked just like that. As I recall I flushed it with the Prestone coolant flush and then repeated with water several time over a period of days. It did seem to be rid of it after that. I replaced it with the green stuff. Lesson learned.
I was not so lucky with my truck and sometime later it looked just like that. As I recall I flushed it with the Prestone coolant flush and then repeated with water several time over a period of days. It did seem to be rid of it after that. I replaced it with the green stuff. Lesson learned.


 03-17-2011, 11:11 AM
#7
Team Owner
Member Since: Aug 2005
Location: Riverside County Southern California
Posts: 34,988
Received 501 Likes
on
342 Posts
Co-winner 2020 C4 of the Year - Modified
2018 Corvette of Year Finalist
2017 C4 of Year
2016 C7 of Year Finalist
St. Jude Donor '09-'10-'11-'12-'13-'14-'15-'16-'17-'18-'19-'20
 . They dont even entirely flushed the cleaning agent. The rad is maybe 20% of the cooling system.
03-17-2011, 12:27 PM
. They dont even entirely flushed the cleaning agent. The rad is maybe 20% of the cooling system.
03-17-2011, 12:27 PM
#8
Race Director

The new bottled cleaners available aren't nearly as good as the older stuff since the EPA got involved.
Here is a pic of a C3 engine that was cleaned with the old GM stuff, note the inside of the cylinder wasll, bare casting, can't get any better than that.
And yes, it's important to use the 2nd part, neutralizer, and to also use the block drains to drain the block completely.
Also remember to never put cold water in a hot block.
Once you get it super clean, don't flush, but replace all of your coolant with new once a year and use distilled water to mix. Well worth 20 bucks and 30 minutes.

Prestone used to make a cleaner for GM P/N 12346500.
It was also sold under Prestone P/N AS100 Heavy Duty Cooling System Cleaner
Here is the GM TSB and Instructions #99-06-02-012D (Online or at a GM dealer)
It is not made anymore but these are the components.
9 dry oz of Oxalic Acid (DAP Wood Bleach)
2 dry oz of Sodium Carbonate (Arm & Hammer Super Washing Soda)
http://www.dap.com/product_details.a...55&SubcatID=24
http://www.armandhammer.com/fabric-c...t-booster.aspx
Here's tsb 99-06-02-012D ... yes it works VERY well ... use it as a guide & per NOONIE, sub wood bleach (oxalic acid) & washing soda (neutralizer) for the 2-part AS100 canister.
Subject: Rust in Cooling System, Heater Inoperative, Blows Cold Air, Engine Overheats (Flush Cooling System) #99-06-02-012D - (04/09/2002)
Models: 1996-2000 Chevrolet and GMC S/T Models (Blazer, Jimmy, Sonoma, S10 Pickup)
1998-2000 GMC Envoy
1996-2000 Oldsmobile Bravada
with 4.3L V6 Engine (VINs W, X -- RPOs L35, LF6)
--------------------------------------------------------------------------------
This bulletin is being revised to include additional model years. Please discard Corporate Bulletin Number 99-06-02-012C (Section 06 -- Engine).
--------------------------------------------------------------------------------
Condition
Some customers may comment that the heater is inoperative, blows cold air, engine may exhibit an overheat condition or the coolant reservoir has rust in it.
Cause
Vehicles equipped with DEX-COOL� coolant, which may have been operated for extended periods of time with a low coolant level, usually in excess of 32,000 km (20,000 mi), may be susceptible to the formation of a rust-like material in the cooling system.
Correction
Flush the cooling system using the repair procedures that follow.
Parts and equipment required/suggested for this correction are listed below.
� 1 each *Prestone� Flush and Fill Kit #AF-KITP U.S. (#00050 in Canada). This kit can be obtained from your local parts supplier and can be used on all vehicles repaired under this procedure. Save it after performing the repair, as it is reusable.
� 1 each *Prestone� Heavy Duty Cooling System Cleaner, GM P/N 12346500 - 1 per vehicle. This cleaner is in powder form and contains a neutralizer. Do not substitute other cleaners. The diluted cleaners that are available in liquid form are not recommended for this repair.
� 5.7 L (6 qt) of 100% (non-diluted) DEX-COOL� coolant (GM Spec 6277M).
� 1 each new thermostat, GM P/N 12563335.
� 2 each new radiator cap, GM P/N 15075565.
� 1 each *Prestone� yellow funnel. This funnel can also be obtained from your local parts supplier. It fits snugly into the radiator opening for an easy fill and is reusable.
*We believe this source and their products to be reliable. There may be additional manufacturers of such products. General Motors does not endorse, indicate any preference for or assume any responsibility for the products from this firm or for any such items which may be available from other sources.
Important: Verify the fuel level in the fuel tank. The fuel level should be above � tank before this procedure is started.
As a precaution, verify the oil level in the crankcase. Add the amount required to bring the oil level into the normal range.
It is recommended the vehicle be placed in a position so that the following are available:
� A sanitary sewer -- not a storm drain, etc
� A monoxivent system (if the outside temperature is less than 10�C (50�F)).
� Hot running water
Notice: Due to the complexity of these procedures, the following repair steps must be strictly adhered to in order to achieve the intended results. Any deviation or substitution may result in sub-standard cleaning/flushing results or system damage.
Diagnostic Procedure
Install the Scan Tool. This will allow monitoring of the coolant temperature throughout the procedure.
Caution: As long as there is pressure in the cooling system, the temperature can be considerably higher than the boiling temperature of the solution in the radiator without causing the solution to boil. Removal of the radiator cap while the engine is hot and pressure is high will cause the solution to boil instantaneously - possibly with explosive force - spewing the solution over the engine, fenders and the person removing the cap. Under some conditions, the engine coolant is combustible.
Important: � The installation of a NEW radiator cap at the beginning of this procedure and the second new cap at the end of the repair procedure is necessary in order for the correct pressure to be achieved and for the repair to be completed successfully.
� The radiator cap is NOT a good indicator of the general condition of the cooling system. Typically the underside of the radiator cap will exhibit a greater amount of contamination than the rest of the system. It is important to evaluate the condition of the cooling system by checking the following before beginning the repair procedure:
Remove the radiator cap. Install a new radiator cap, GM P/N 15075565. A properly operating radiator cap is essential for this procedure to work properly. Be sure to wipe off all radiator cap sealing surfaces prior to installation.
Start the engine.
Using a flashlight or lead light, look into the radiator. From the right side of the vehicle, peer into the radiator toward the left side of the vehicle. Observe the top three rows (or tubes) of the radiator. (It may be necessary to drain off some of the coolant to see the top three rows of the radiator).
If it appears the coolant is able to flow through the third row down from the top, the vehicle should be repaired using Procedure A. If it appears the coolant is NOT able to flow through the third row down from the top, then the vehicle should be repaired using Procedure B.
Stop the engine.
Repair Procedure A & B
Important: � If available, use coolant exchanger Pro-Fill 42-75100-KM, Power Flush 211-07601/DEX (available through the GM Dealer Equipment program), or equivalent to evacuate the system of coolant. Follow the manufacturer's instructions for exchanging used coolant with new coolant. However, for this procedure, use water in place of new coolant. Be sure to exchange 1� times the cooling system capacity of the vehicle with water. This will ensure that only water remains within the cooling system. Once the coolant has been displaced with water, drain the water from the radiator.
� If you are located within an area which regulates the disposal of used coolant (check with your local water treatment facility), all coolant and coolant/water mixture must be captured until the water runs clear of coolant. Use a clean 208 L (55 gal) drum or similar to contain the waste coolant. Refer to Corporate Bulletin Number 00-06-02-006 for information on coolant recycling and removal services.
Drain and properly dispose of the coolant.
Caution: Any obstructions in the hoses to or from the coolant recovery bottle may cause over-pressurization of the cooling system. This over-pressurization could result in serious personal injury.
Inspect the following hoses in order to assure there are no obstructions and the coolant is able to flow freely: � The hose to the coolant recovery bottle.
� The relief hose from the coolant recovery bottle.
Disconnect both coolant hoses to the heater core from the engine.
Back flush the heater core for 5 minutes after clear water is present. Pressurized water not to exceed 345 Kpa (50 psi), may be used.
Reinstall the heater return hose to the engine.
Install the radiator cap and properly tighten.
Install the "T" from the flush and fill kit to a 25.4 cm (10 in) piece of 19 mm (� in) heater hose. Tighten the clamp.
Install the hose to the engine. Tighten the clamp.
Install the other end of the "T" in the heater core inlet hose. Tighten the clamp.
Disconnect the upper radiator hose from the radiator. Properly position the hose, so the accessory drive belt or any pulley/belt cannot touch the hose.
If you used coolant exchange equipment, disconnect it.
Attach a garden hose to the "T" of the flush and fill kit. Turn on the water and back flush the cooling system for at least two minutes after the water runs clear.
Start the engine and continue back flushing the cooling system for five additional minutes.
Turn the engine "OFF".
Turn the water "OFF".
Re-attach the upper radiator hose to the radiator.
Open the radiator drain and drain all water from the radiator.
Remove the lower left water pump crossover bolt. This allows lowering the water level in the left side of the engine.
After the water stops running from the water pump bolt hole, reinstall the bolt.
Close the radiator drain.
Mix the Prestone� Heavy Duty Cooling System Cleaner, GM P/N 12346500, in approximately 3 L (3 qt) of warm water. Pour the mixture into the radiator. Top off the system with plain water and reinstall the radiator cap.
Run the engine at 1600 to 1800 RPM with the air conditioning in the maximum cool position.
To achieve the 1600 to 1800 RPM, place a dime between the closed throttle stop and the screw. This screw should never be adjusted, under any circumstance. Its only purpose is to keep the throttle plate from sticking in the bore when the throttle is slammed shut. It is not a minimum idle (RPM) control adjustment screw.
Important: It is imperative that all air pockets have been removed from the cooling system in order for the cleaning procedure to be effective.
Service Procedure A
For Service Procedure A, the cleaner should be left in the system for three hours (after normal operating temperature of the cooling system has been achieved). Normal operating temperature is when the coolant temperature stabilizes around 98�C (200�F). The best results are obtained when the coolant temperature is between 98�C (200�F) and 110�C (230�F). DO NOT EXCEED 113�C (235�F). Use the Scan Tool to determine when this point has been reached. When this temperature has been reached, start the clock. Periodically (every twenty minutes or so), monitor the coolant temperature and engine during the three hour run time. A half hour has been built into the actual labor time to cover for the time spent monitoring the engine, etc.
In order to achieve a constant temperature of 98�C (200�F) to 110�C (230�F) during this procedure, maintain the idle speed, turn on the A/C or partially close the hood.
Service Procedure B
For Service Procedure B, the cleaner should be left in the system for two and a half hours (after normal operating temperature of the cooling system has been achieved). Normal operating temperature is when the coolant temperature stabilizes around 98�C (200�F). The best results are obtained when the coolant temperature is between 98�C (200�F) and 110�C (230�F). DO NOT EXCEED 113�C (235�F). Use the Scan Tool to determine when this point has been reached. When this temperature has been reached, start the clock. Periodically (every twenty minutes or so), monitor the coolant temperature and engine during the two and a half hour run time. A half hour has been built into the actual labor time to cover for the time spent monitoring the engine, etc.
In order to achieve a constant temperature of 98�C (200�F) to 110�C (230�F) during this procedure, maintain the idle speed, turn on the A/C or partially close the hood.
Important: The vehicle should not be left idling outdoors when the ambient temperature is below 10�C (50�F). The flushing procedure relies on heat as a catalyst in order to be effective. Ambient temperatures below 10�C (50�F) do not allow sufficient cycling of the thermostat to effectively clean the cooling system.
Turn off the engine.
Remove the dime from the closed throttle stop screw. Do NOT remove the radiator cap. Following the procedure listed below will assist you in draining the cooling system thoroughly. � Place a drain pan under the radiator drain hose.
Caution: The cooling system and coolant are hot and under pressure. Loosen only the radiator drain until the pressure has been released from the cooling system and follow the procedures exactly in this bulletin, using normal safety precautions to avoid being injured by the hot coolant mixture.
� Loosen the radiator drain. Drain approximately 1 L (1 qt) of liquid from the system.
� After the pressure has been released from the cooling system, slowly loosen the radiator cap to the safety stop. Do not remove the cap (This releases the spring pressure on the secondary seal while retaining the primary seal to the top of the filler neck and will allow the coolant reservoir to be evacuated).
� When the coolant reservoir is empty, re-tighten the radiator cap fully.
� Remove the cap from the flush and fill "T". This will allow the coolant to be siphoned from the heater core and the engine block.
� When the water has stopped coming out of the radiator drain hose, close the radiator drain. Do not place the cap on the "T".
Using Prestone� Heavy Duty Cooling System Cleaner, GM P/N 12346500, mix the neutralizer (from the bottom of the can) with approximately 3 L (3 qt) of warm (shower temperature) water.
Notice: Do not put cold water into a hot engine as engine damage may occur.
Under no circumstances should the neutralizer be left in the cooling system for any longer than ten minutes once the vehicle has reached operating temperature (thermostat open). The neutralizer is corrosive to aluminum and will damage system components if it is left in the cooling system for longer than ten minutes.
Pour the mixture from the step above into the radiator.
Completely refill the cooling system with warm to hot water through the "T". When the radiator is full, install the radiator cap to the safety catch. Continue to fill until the overflow reservoir is filled to the hot line on the reservoir.
Remove the fill hose and install the cap on the "T" and the radiator fully.
Important: It is imperative that all air pockets have been removed in order for the procedure to be effective.
Start the engine. After engine speed stabilizes, reinstall the dime between the closed throttle stop and the screw. With the A/C on, bring the cooling system back to normal operating temperature and follow the directions on the can.
Turn off the engine.
Remove the dime from the closed throttle stop and the screw.
Caution: As long as there is pressure in the cooling system, the temperature can be considerably higher than the boiling temperature of the solution in the radiator without causing the solution to boil. Removal of the radiator cap while the engine is hot and pressure is high will cause the solution to boil instantaneously - possibly with explosive force - spewing the solution over the engine, fenders and the person removing the cap.
Drain the cooling system, following the procedure listed in Step 24 above.
Do not close the radiator drain. Leave it open.
Disconnect the upper radiator hose from the radiator. Properly position the hose, so the accessory drive belt or any pulley/belt cannot touch the hose.
Attach a garden hose to the "T" of the flush and fill kit. Turn on the water and back flush the cooling system for at least two minutes after the water runs clear.
Start the engine and continue back flushing the cooling system for five additional minutes.
Turn the engine "OFF".
Turn the water "OFF".
Close the radiator drain.
Important: If the repair is a Procedure A, go to Step 40.
If the repair is a Procedure B, remove the radiator and have it recorded and steam clean the end tanks. After reinstalling the radiator, continue to Step 40.
Remove the air cleaner housing and tube assembly from the throttle body.
Remove the two nuts holding the throttle cable bracket to the throttle body and position the bracket and the cables out of the way.
Remove the thermostat.
Remove the previously installed flush kit "T" and hose. Save for future use on other vehicles.
Install the heater inlet hose to the intake manifold and secure with the original spring clamp.
Inspect the thermostat opening and cover for foreign material. Clean if necessary.
Remove the left lower water pump crossover bolt to drain the left side of the block and the left cylinder head.
Install sealant to the bolt threads, using GM P/N 12346004 (Canada GM P/N 10953480), or equivalent and reinstall the water pump crossover bolt.
Tighten
Tighten the bolt to 41 N�m (30 lb ft).
If available, use coolant exchanger Pro-Fill, Power Flush, or equivalent to fill the system with 50/50 DEX-COOL� coolant. If a coolant exchanger is not available, proceed to the next step now. Follow the manufacturer's instructions for system fill/coolant exchange. If you are using coolant exchange equipment, you will need to install a new thermostat, GM P/N 12563335 and top off the system with clean drinkable water prior to exchanging. After exchanging, install the upper radiator hose and clean out the coolant recovery bottle. Proceed to Step 56.
Pour 5.6784 L (6 qts) of 100% (not pre-mixed) DEX-COOL� coolant into a clean container.
Using a clean funnel, pour as much of the 100% DEX-COOL� coolant that you can into the engine through the thermostat opening.
Install a new thermostat, GM P/N 12563335.
Tighten
Tighten the bolt to the specified torque of 19 N�m (14 lb ft).
Hold the upper radiator hose in the straight up position and pour 0.473 L (1 pint) of the 100% DEX-COOL� coolant into the hose.
Install the upper radiator hose to the radiator and properly position the clamp.
Flush the coolant recovery bottle thoroughly.
Complete the fill of the cooling system with the balance of the 5.7 L (6 qt) of 100% DEX-COOL� coolant and top off with plain water. If the water is not drinkable, do not use. Water must be clean and fresh.
Important: The second new radiator cap must be installed at this point of the procedure. It is possible that small contaminants may have become lodged in portions of the first cap during the cleaning procedure.
Clean the radiator cap sealing surfaces on the radiator. Install the radiator cap, GM P/N 15075565.
Important: It is imperative that all air pockets have been removed in order for the cooling system to function properly.
Run the engine to operating temperature with the air conditioning in the maximum cool position for ten minutes.
Caution: As long as there is pressure in the cooling system, the temperature can be considerably higher than the boiling temperature of the solution in the radiator without causing the solution to boil. Removal of the radiator cap while the engine is hot and pressure is high will cause the solution to boil instantaneously - possibly with explosive force - spewing the solution over the engine, fenders and the person removing the cap. Under some conditions, the engine coolant is combustible.
Turn the engine "OFF" and let it cool.
Check the coolant concentration for a 50/50 mix, using refractometer J 26568 (Centigrade scale) or J 23688 (Fahrenheit scale). Follow the manufacturer's directions for using the coolant tester. Unless your coolant tester has a provision for temperature correction, it is imperative that the correct coolant temperature is achieved when testing the coolant. If the coolant is warmer or cooler, the reading may be incorrect.
Top off the radiator and fill the coolant recovery bottle to 2.54 cm (1 in) above the full hot mark on the coolant reservoir. Add the appropriate coolant mixture to come to a 50/50 mix of the DEX-COOL� coolant.
Important: To assure intended system performance, inform the customer that the cooling system MUST be maintained in a completely full condition.
Parts Information
Part Number
Description
12346500
Prestone� Heavy Duty Cooling System Cleaner
12563335
Thermostat
15075565
Radiator Cap
Parts are currently available from GMSPO. AFAIK, GM 12346500 (aka Prestone AS100) no longer available ... exchange wood bleach & washing soda as NOONIE advises in previous post
Here is a pic of a C3 engine that was cleaned with the old GM stuff, note the inside of the cylinder wasll, bare casting, can't get any better than that.
And yes, it's important to use the 2nd part, neutralizer, and to also use the block drains to drain the block completely.
Also remember to never put cold water in a hot block.
Once you get it super clean, don't flush, but replace all of your coolant with new once a year and use distilled water to mix. Well worth 20 bucks and 30 minutes.
Prestone used to make a cleaner for GM P/N 12346500.
It was also sold under Prestone P/N AS100 Heavy Duty Cooling System Cleaner
Here is the GM TSB and Instructions #99-06-02-012D (Online or at a GM dealer)
It is not made anymore but these are the components.
9 dry oz of Oxalic Acid (DAP Wood Bleach)
2 dry oz of Sodium Carbonate (Arm & Hammer Super Washing Soda)
http://www.dap.com/product_details.a...55&SubcatID=24
http://www.armandhammer.com/fabric-c...t-booster.aspx
Here's tsb 99-06-02-012D ... yes it works VERY well ... use it as a guide & per NOONIE, sub wood bleach (oxalic acid) & washing soda (neutralizer) for the 2-part AS100 canister.
Subject: Rust in Cooling System, Heater Inoperative, Blows Cold Air, Engine Overheats (Flush Cooling System) #99-06-02-012D - (04/09/2002)
Models: 1996-2000 Chevrolet and GMC S/T Models (Blazer, Jimmy, Sonoma, S10 Pickup)
1998-2000 GMC Envoy
1996-2000 Oldsmobile Bravada
with 4.3L V6 Engine (VINs W, X -- RPOs L35, LF6)
--------------------------------------------------------------------------------
This bulletin is being revised to include additional model years. Please discard Corporate Bulletin Number 99-06-02-012C (Section 06 -- Engine).
--------------------------------------------------------------------------------
Condition
Some customers may comment that the heater is inoperative, blows cold air, engine may exhibit an overheat condition or the coolant reservoir has rust in it.
Cause
Vehicles equipped with DEX-COOL� coolant, which may have been operated for extended periods of time with a low coolant level, usually in excess of 32,000 km (20,000 mi), may be susceptible to the formation of a rust-like material in the cooling system.
Correction
Flush the cooling system using the repair procedures that follow.
Parts and equipment required/suggested for this correction are listed below.
� 1 each *Prestone� Flush and Fill Kit #AF-KITP U.S. (#00050 in Canada). This kit can be obtained from your local parts supplier and can be used on all vehicles repaired under this procedure. Save it after performing the repair, as it is reusable.
� 1 each *Prestone� Heavy Duty Cooling System Cleaner, GM P/N 12346500 - 1 per vehicle. This cleaner is in powder form and contains a neutralizer. Do not substitute other cleaners. The diluted cleaners that are available in liquid form are not recommended for this repair.
� 5.7 L (6 qt) of 100% (non-diluted) DEX-COOL� coolant (GM Spec 6277M).
� 1 each new thermostat, GM P/N 12563335.
� 2 each new radiator cap, GM P/N 15075565.
� 1 each *Prestone� yellow funnel. This funnel can also be obtained from your local parts supplier. It fits snugly into the radiator opening for an easy fill and is reusable.
*We believe this source and their products to be reliable. There may be additional manufacturers of such products. General Motors does not endorse, indicate any preference for or assume any responsibility for the products from this firm or for any such items which may be available from other sources.
Important: Verify the fuel level in the fuel tank. The fuel level should be above � tank before this procedure is started.
As a precaution, verify the oil level in the crankcase. Add the amount required to bring the oil level into the normal range.
It is recommended the vehicle be placed in a position so that the following are available:
� A sanitary sewer -- not a storm drain, etc
� A monoxivent system (if the outside temperature is less than 10�C (50�F)).
� Hot running water
Notice: Due to the complexity of these procedures, the following repair steps must be strictly adhered to in order to achieve the intended results. Any deviation or substitution may result in sub-standard cleaning/flushing results or system damage.
Diagnostic Procedure
Install the Scan Tool. This will allow monitoring of the coolant temperature throughout the procedure.
Caution: As long as there is pressure in the cooling system, the temperature can be considerably higher than the boiling temperature of the solution in the radiator without causing the solution to boil. Removal of the radiator cap while the engine is hot and pressure is high will cause the solution to boil instantaneously - possibly with explosive force - spewing the solution over the engine, fenders and the person removing the cap. Under some conditions, the engine coolant is combustible.
Important: � The installation of a NEW radiator cap at the beginning of this procedure and the second new cap at the end of the repair procedure is necessary in order for the correct pressure to be achieved and for the repair to be completed successfully.
� The radiator cap is NOT a good indicator of the general condition of the cooling system. Typically the underside of the radiator cap will exhibit a greater amount of contamination than the rest of the system. It is important to evaluate the condition of the cooling system by checking the following before beginning the repair procedure:
Remove the radiator cap. Install a new radiator cap, GM P/N 15075565. A properly operating radiator cap is essential for this procedure to work properly. Be sure to wipe off all radiator cap sealing surfaces prior to installation.
Start the engine.
Using a flashlight or lead light, look into the radiator. From the right side of the vehicle, peer into the radiator toward the left side of the vehicle. Observe the top three rows (or tubes) of the radiator. (It may be necessary to drain off some of the coolant to see the top three rows of the radiator).
If it appears the coolant is able to flow through the third row down from the top, the vehicle should be repaired using Procedure A. If it appears the coolant is NOT able to flow through the third row down from the top, then the vehicle should be repaired using Procedure B.
Stop the engine.
Repair Procedure A & B
Important: � If available, use coolant exchanger Pro-Fill 42-75100-KM, Power Flush 211-07601/DEX (available through the GM Dealer Equipment program), or equivalent to evacuate the system of coolant. Follow the manufacturer's instructions for exchanging used coolant with new coolant. However, for this procedure, use water in place of new coolant. Be sure to exchange 1� times the cooling system capacity of the vehicle with water. This will ensure that only water remains within the cooling system. Once the coolant has been displaced with water, drain the water from the radiator.
� If you are located within an area which regulates the disposal of used coolant (check with your local water treatment facility), all coolant and coolant/water mixture must be captured until the water runs clear of coolant. Use a clean 208 L (55 gal) drum or similar to contain the waste coolant. Refer to Corporate Bulletin Number 00-06-02-006 for information on coolant recycling and removal services.
Drain and properly dispose of the coolant.
Caution: Any obstructions in the hoses to or from the coolant recovery bottle may cause over-pressurization of the cooling system. This over-pressurization could result in serious personal injury.
Inspect the following hoses in order to assure there are no obstructions and the coolant is able to flow freely: � The hose to the coolant recovery bottle.
� The relief hose from the coolant recovery bottle.
Disconnect both coolant hoses to the heater core from the engine.
Back flush the heater core for 5 minutes after clear water is present. Pressurized water not to exceed 345 Kpa (50 psi), may be used.
Reinstall the heater return hose to the engine.
Install the radiator cap and properly tighten.
Install the "T" from the flush and fill kit to a 25.4 cm (10 in) piece of 19 mm (� in) heater hose. Tighten the clamp.
Install the hose to the engine. Tighten the clamp.
Install the other end of the "T" in the heater core inlet hose. Tighten the clamp.
Disconnect the upper radiator hose from the radiator. Properly position the hose, so the accessory drive belt or any pulley/belt cannot touch the hose.
If you used coolant exchange equipment, disconnect it.
Attach a garden hose to the "T" of the flush and fill kit. Turn on the water and back flush the cooling system for at least two minutes after the water runs clear.
Start the engine and continue back flushing the cooling system for five additional minutes.
Turn the engine "OFF".
Turn the water "OFF".
Re-attach the upper radiator hose to the radiator.
Open the radiator drain and drain all water from the radiator.
Remove the lower left water pump crossover bolt. This allows lowering the water level in the left side of the engine.
After the water stops running from the water pump bolt hole, reinstall the bolt.
Close the radiator drain.
Mix the Prestone� Heavy Duty Cooling System Cleaner, GM P/N 12346500, in approximately 3 L (3 qt) of warm water. Pour the mixture into the radiator. Top off the system with plain water and reinstall the radiator cap.
Run the engine at 1600 to 1800 RPM with the air conditioning in the maximum cool position.
To achieve the 1600 to 1800 RPM, place a dime between the closed throttle stop and the screw. This screw should never be adjusted, under any circumstance. Its only purpose is to keep the throttle plate from sticking in the bore when the throttle is slammed shut. It is not a minimum idle (RPM) control adjustment screw.
Important: It is imperative that all air pockets have been removed from the cooling system in order for the cleaning procedure to be effective.
Service Procedure A
For Service Procedure A, the cleaner should be left in the system for three hours (after normal operating temperature of the cooling system has been achieved). Normal operating temperature is when the coolant temperature stabilizes around 98�C (200�F). The best results are obtained when the coolant temperature is between 98�C (200�F) and 110�C (230�F). DO NOT EXCEED 113�C (235�F). Use the Scan Tool to determine when this point has been reached. When this temperature has been reached, start the clock. Periodically (every twenty minutes or so), monitor the coolant temperature and engine during the three hour run time. A half hour has been built into the actual labor time to cover for the time spent monitoring the engine, etc.
In order to achieve a constant temperature of 98�C (200�F) to 110�C (230�F) during this procedure, maintain the idle speed, turn on the A/C or partially close the hood.
Service Procedure B
For Service Procedure B, the cleaner should be left in the system for two and a half hours (after normal operating temperature of the cooling system has been achieved). Normal operating temperature is when the coolant temperature stabilizes around 98�C (200�F). The best results are obtained when the coolant temperature is between 98�C (200�F) and 110�C (230�F). DO NOT EXCEED 113�C (235�F). Use the Scan Tool to determine when this point has been reached. When this temperature has been reached, start the clock. Periodically (every twenty minutes or so), monitor the coolant temperature and engine during the two and a half hour run time. A half hour has been built into the actual labor time to cover for the time spent monitoring the engine, etc.
In order to achieve a constant temperature of 98�C (200�F) to 110�C (230�F) during this procedure, maintain the idle speed, turn on the A/C or partially close the hood.
Important: The vehicle should not be left idling outdoors when the ambient temperature is below 10�C (50�F). The flushing procedure relies on heat as a catalyst in order to be effective. Ambient temperatures below 10�C (50�F) do not allow sufficient cycling of the thermostat to effectively clean the cooling system.
Turn off the engine.
Remove the dime from the closed throttle stop screw. Do NOT remove the radiator cap. Following the procedure listed below will assist you in draining the cooling system thoroughly. � Place a drain pan under the radiator drain hose.
Caution: The cooling system and coolant are hot and under pressure. Loosen only the radiator drain until the pressure has been released from the cooling system and follow the procedures exactly in this bulletin, using normal safety precautions to avoid being injured by the hot coolant mixture.
� Loosen the radiator drain. Drain approximately 1 L (1 qt) of liquid from the system.
� After the pressure has been released from the cooling system, slowly loosen the radiator cap to the safety stop. Do not remove the cap (This releases the spring pressure on the secondary seal while retaining the primary seal to the top of the filler neck and will allow the coolant reservoir to be evacuated).
� When the coolant reservoir is empty, re-tighten the radiator cap fully.
� Remove the cap from the flush and fill "T". This will allow the coolant to be siphoned from the heater core and the engine block.
� When the water has stopped coming out of the radiator drain hose, close the radiator drain. Do not place the cap on the "T".
Using Prestone� Heavy Duty Cooling System Cleaner, GM P/N 12346500, mix the neutralizer (from the bottom of the can) with approximately 3 L (3 qt) of warm (shower temperature) water.
Notice: Do not put cold water into a hot engine as engine damage may occur.
Under no circumstances should the neutralizer be left in the cooling system for any longer than ten minutes once the vehicle has reached operating temperature (thermostat open). The neutralizer is corrosive to aluminum and will damage system components if it is left in the cooling system for longer than ten minutes.
Pour the mixture from the step above into the radiator.
Completely refill the cooling system with warm to hot water through the "T". When the radiator is full, install the radiator cap to the safety catch. Continue to fill until the overflow reservoir is filled to the hot line on the reservoir.
Remove the fill hose and install the cap on the "T" and the radiator fully.
Important: It is imperative that all air pockets have been removed in order for the procedure to be effective.
Start the engine. After engine speed stabilizes, reinstall the dime between the closed throttle stop and the screw. With the A/C on, bring the cooling system back to normal operating temperature and follow the directions on the can.
Turn off the engine.
Remove the dime from the closed throttle stop and the screw.
Caution: As long as there is pressure in the cooling system, the temperature can be considerably higher than the boiling temperature of the solution in the radiator without causing the solution to boil. Removal of the radiator cap while the engine is hot and pressure is high will cause the solution to boil instantaneously - possibly with explosive force - spewing the solution over the engine, fenders and the person removing the cap.
Drain the cooling system, following the procedure listed in Step 24 above.
Do not close the radiator drain. Leave it open.
Disconnect the upper radiator hose from the radiator. Properly position the hose, so the accessory drive belt or any pulley/belt cannot touch the hose.
Attach a garden hose to the "T" of the flush and fill kit. Turn on the water and back flush the cooling system for at least two minutes after the water runs clear.
Start the engine and continue back flushing the cooling system for five additional minutes.
Turn the engine "OFF".
Turn the water "OFF".
Close the radiator drain.
Important: If the repair is a Procedure A, go to Step 40.
If the repair is a Procedure B, remove the radiator and have it recorded and steam clean the end tanks. After reinstalling the radiator, continue to Step 40.
Remove the air cleaner housing and tube assembly from the throttle body.
Remove the two nuts holding the throttle cable bracket to the throttle body and position the bracket and the cables out of the way.
Remove the thermostat.
Remove the previously installed flush kit "T" and hose. Save for future use on other vehicles.
Install the heater inlet hose to the intake manifold and secure with the original spring clamp.
Inspect the thermostat opening and cover for foreign material. Clean if necessary.
Remove the left lower water pump crossover bolt to drain the left side of the block and the left cylinder head.
Install sealant to the bolt threads, using GM P/N 12346004 (Canada GM P/N 10953480), or equivalent and reinstall the water pump crossover bolt.
Tighten
Tighten the bolt to 41 N�m (30 lb ft).
If available, use coolant exchanger Pro-Fill, Power Flush, or equivalent to fill the system with 50/50 DEX-COOL� coolant. If a coolant exchanger is not available, proceed to the next step now. Follow the manufacturer's instructions for system fill/coolant exchange. If you are using coolant exchange equipment, you will need to install a new thermostat, GM P/N 12563335 and top off the system with clean drinkable water prior to exchanging. After exchanging, install the upper radiator hose and clean out the coolant recovery bottle. Proceed to Step 56.
Pour 5.6784 L (6 qts) of 100% (not pre-mixed) DEX-COOL� coolant into a clean container.
Using a clean funnel, pour as much of the 100% DEX-COOL� coolant that you can into the engine through the thermostat opening.
Install a new thermostat, GM P/N 12563335.
Tighten
Tighten the bolt to the specified torque of 19 N�m (14 lb ft).
Hold the upper radiator hose in the straight up position and pour 0.473 L (1 pint) of the 100% DEX-COOL� coolant into the hose.
Install the upper radiator hose to the radiator and properly position the clamp.
Flush the coolant recovery bottle thoroughly.
Complete the fill of the cooling system with the balance of the 5.7 L (6 qt) of 100% DEX-COOL� coolant and top off with plain water. If the water is not drinkable, do not use. Water must be clean and fresh.
Important: The second new radiator cap must be installed at this point of the procedure. It is possible that small contaminants may have become lodged in portions of the first cap during the cleaning procedure.
Clean the radiator cap sealing surfaces on the radiator. Install the radiator cap, GM P/N 15075565.
Important: It is imperative that all air pockets have been removed in order for the cooling system to function properly.
Run the engine to operating temperature with the air conditioning in the maximum cool position for ten minutes.
Caution: As long as there is pressure in the cooling system, the temperature can be considerably higher than the boiling temperature of the solution in the radiator without causing the solution to boil. Removal of the radiator cap while the engine is hot and pressure is high will cause the solution to boil instantaneously - possibly with explosive force - spewing the solution over the engine, fenders and the person removing the cap. Under some conditions, the engine coolant is combustible.
Turn the engine "OFF" and let it cool.
Check the coolant concentration for a 50/50 mix, using refractometer J 26568 (Centigrade scale) or J 23688 (Fahrenheit scale). Follow the manufacturer's directions for using the coolant tester. Unless your coolant tester has a provision for temperature correction, it is imperative that the correct coolant temperature is achieved when testing the coolant. If the coolant is warmer or cooler, the reading may be incorrect.
Top off the radiator and fill the coolant recovery bottle to 2.54 cm (1 in) above the full hot mark on the coolant reservoir. Add the appropriate coolant mixture to come to a 50/50 mix of the DEX-COOL� coolant.
Important: To assure intended system performance, inform the customer that the cooling system MUST be maintained in a completely full condition.
Parts Information
Part Number
Description
12346500
Prestone� Heavy Duty Cooling System Cleaner
12563335
Thermostat
15075565
Radiator Cap
Parts are currently available from GMSPO. AFAIK, GM 12346500 (aka Prestone AS100) no longer available ... exchange wood bleach & washing soda as NOONIE advises in previous post
03-17-2011, 05:55 PM
#9
Race Director
You didn't say what year your car is, but only the '96 came from the factory with DexCool.
If your car is not a '96 and you have DexCool in it now,someone has changed to it.
And as PLRX stated, DexCool and the old style coolants do not mix well.
Air in your cooling system, along with poor maintenance will also cause the brown sludge (even without DexCool).
So, don't blame DexCool for issues cause by lack of maintenance.
03-18-2011, 10:19 AM
#10
Safety Car

Your statement there has more to do with your problems than DexCool.
You didn't say what year your car is, but only the '96 came from the factory with DexCool.
If your car is not a '96 and you have DexCool in it now,someone has changed to it.
And as PLRX stated, DexCool and the old style coolants do not mix well.
Air in your cooling system, along with poor maintenance will also cause the brown sludge (even without DexCool).
So, don't blame DexCool for issues cause by lack of maintenance.
03-18-2011, 12:07 PM
#11
Race Director
My 97 camaro had this orange death stuff in it. At maybe 50k miles my radiator looked like the O/P's radiator and this was a dealer serviced car and all service intervals met. This orange stuff is garbage simple as that. My car has since had radiator replaced and entire cooling system flushed chemically and the green stuff put back in and the cooling system always looks great! This is a 3.8 V-6 car with no leaks no mixing of coolants etc. etc that everyone claims is the heart of the problem.
DexCool did not "cause" the problems. It is/was a well known issue on those V6 cars, but it was the gaskets they used and not the coolant.
There are hundreds of thousands of cars on the road using DexCool without any issues at all. I have 3 of them, all with over 100K miles and no issues using DexCool.
And by the way, the picture posted by the OP shows a radiator NOT using DexCool. Look at the green coolant in the neck.
Classic case of lack of proper maintenance.
03-18-2011, 12:33 PM
#12
Team Owner
Member Since: Aug 2005
Location: Riverside County Southern California
Posts: 34,988
Received 501 Likes
on
342 Posts
Co-winner 2020 C4 of the Year - Modified
2018 Corvette of Year Finalist
2017 C4 of Year
2016 C7 of Year Finalist
St. Jude Donor '09-'10-'11-'12-'13-'14-'15-'16-'17-'18-'19-'20
My 97 camaro had this orange death stuff in it. At maybe 50k miles my radiator looked like the O/P's radiator and this was a dealer serviced car and all service intervals met. This orange stuff is garbage simple as that. My car has since had radiator replaced and entire cooling system flushed chemically and the green stuff put back in and the cooling system always looks great! This is a 3.8 V-6 car with no leaks no mixing of coolants etc. etc that everyone claims is the heart of the problem.
 , just like in my DD and "The Dealer" mixed green with Zerexand they know the car came with Zerex. I noticed and I made the dealer flush the cooling system, a week later I saw the Zerex looking weird so I did a 100% flush.
I bet the dealer mess it up for you not the Dexcool. I've been using Dexcool since 2001. You cant mix them; do you pour axle oil in the engine?
03-18-2011, 12:48 PM
#13
Race Director
It's pretty clear that Dexcool caused issues, documented not only by several GM TSB's, but also by class action suits resulting in GM's admission and settlements.
Doesn't matter what coolant is used, it's smart to have a clean system and keep it clean. A good initial flush and regular coolant changes thereafter.
Doesn't matter what coolant is used, it's smart to have a clean system and keep it clean. A good initial flush and regular coolant changes thereafter.
The lawsuits were filed on behalf of owners of General Motors vehicles, which were factory-filled with "Dex-Cool" coolant. In summary, the lawsuits alleged that Dex-Cool degraded certain vehicles� intake manifold gaskets and other engine sealability components, and that in certain other vehicles, Dex-Cool formed a rusty sludge, clogging the vehicles� cooling systems and causing vehicles to overheat.
The settlement, which covers dozens of GM vehicle platforms spanning ten model years, provides $50 to $800 in cash reimbursement for class members who paid for a covered repair by May 30, 2008, and submitted a claim form by October 27, 2008
The settlement, which covers dozens of GM vehicle platforms spanning ten model years, provides $50 to $800 in cash reimbursement for class members who paid for a covered repair by May 30, 2008, and submitted a claim form by October 27, 2008
03-18-2011, 01:32 PM
#14

Dex Junk!!!!!! even by it self... flushed washed whatever IS extremely Corrosive and junk!!!! you people that promote the GM disaster concoction!!!!
do you get paid for mentioning the Trade mark name
DONT USE THE STUFF!!!!!!
>>>>>especially <<<<if you mixed the Two together like the OP
do you get paid for mentioning the Trade mark name
DONT USE THE STUFF!!!!!!
>>>>>especially <<<<if you mixed the Two together like the OP
03-18-2011, 04:14 PM
#15
Race Director
I am not promoting DexCool at all. But once an internet rumor gets started, it's pretty hard to stop.
Yes, GM had some problems. But it's never been proven to be caused by DexCool.
Every one of those cases involved the GM V6 engine.
As I said in my previous post, there are hundreds of thousands (if not millions) of vehicles on the road using DexCool without any issues at all.
I personally have 3 vehicles with over 100K miles using the stuff. Not a single problem.
Once again, any issues with the cooling system (and I sure don't deny there were issues) were not "caused" by DexCool.
If they were, how come it didn't affect all engines?
It only affected certain ones with a certain type of gasket material or lack of proper maintenance.
My '96 came from the factory with DexCool, and I still use it.
Class action lawsuits don't "prove" anything. The lawyers all got together and "settled".
But the affected vehicles were by far in the minority.
03-18-2011, 08:40 PM
#16
Le Mans Master
If you check his profile it shows the car is a 1986 model. The reason the green coolant as pointed out is on the radiator neck is because green antifreeze goes in it. There's no hard proof that Dex-cool was ever in it, that was an opinion or assumption.
If I had to make a quick guess I would almost think it could be a stop leak product or something along those lines. Could have had a bad radiator or leaking pump and they dumped some kind of stuff in to sell it.
Of course just brain storming on this. Maybe even could be a rust build up due to low or no antifreeze and never changed.
Got my 01 Silverado in 03. Been changing the Dex-cool every 2 years, all is good so far. Don�t think previous owner ever changed it. I'm hoping all will stay good as long as I keep up with it.
03-18-2011, 08:46 PM
#17
Team Owner

Member Since: Oct 2004
Location: altered state
Posts: 81,242
Received 3,043 Likes
on
2,602 Posts
St. Jude Donor '05
The only way I got rid of that crud was to take it into Jiffy Lube and do that flush machine thing. Worked
On water, very important.
Most recent build I tore it apart with only 60miles on it, radiator I put in was straight from the shop so it was mint.
In 2 mos time had already gotten calcium buildup in it (have hard water in my area) so distilled water is something to really consider.
I was very surprised to see that in such short a period of time.
04-23-2013, 06:41 PM
#18
Le Mans Master

Member Since: Feb 2001
Location: Grapevine Tx
Posts: 7,968
Received 774 Likes
on
468 Posts
2018 C3 of Year Finalist
2016 C3 of the Year Finalist

You guys need to brush up on your reading comprehension. This is what was posted just above the photo in the OP:
"Here is a picture I found off the web. My situation is not NEARLY as bad, but you can get the idea."
That's not his radiator.
"Here is a picture I found off the web. My situation is not NEARLY as bad, but you can get the idea."
That's not his radiator.
 04-23-2013, 07:28 PM
#19
Drifting

He probably fixed it in the 2 years since the original post...
04-23-2013, 07:38 PM
#20
Team Owner
Member Since: Aug 2005
Location: Riverside County Southern California
Posts: 34,988
Received 501 Likes
on
342 Posts
Co-winner 2020 C4 of the Year - Modified
2018 Corvette of Year Finalist
2017 C4 of Year
2016 C7 of Year Finalist
St. Jude Donor '09-'10-'11-'12-'13-'14-'15-'16-'17-'18-'19-'20