I need help with crankshaft pulley LT1
 08-16-2010, 07:18 PM
#21
Le Mans Master


NO angle guys. Do not hit on only one side of the balancer. Has to come off as straight as you can. Otherwise, if it's very slightly cocked to one side, that'll cause it to bind even more.
A couple/few of good hits (testosterone, length of wood and heavy headed hammer) on one side, then same thing 180* opposite; repeat until it drops right off.
You can even leave one of the three bolts threaded on - couple of threads is all you'll need - which'll serve to 'catch' the damper once is comes free.
Sure, you can use Blaster or some other kind of rust dissolver if you'd like. You can also borrow or buy a 'speciale' tool and go through what's called for to use it. I never had to resort to those though even on 100K+ engines.
Leave the timidity in your storage locker; FEARLESSNESS wins the day. EL WHACKO!!
Jake
 08-16-2010, 07:46 PM
#22
Drifting

Thread Starter
NO angle guys. Do not hit on only one side of the balancer. Has to come off as straight as you can. Otherwise, if it's very slightly cocked to one side, that'll cause it to bind even more.
A couple/few of good hits (testosterone, length of wood and heavy headed hammer) on one side, then same thing 180* opposite; repeat until it drops right off.
You can even leave one of the three bolts threaded on - couple of threads is all you'll need - which'll serve to 'catch' the damper once is comes free.
Sure, you can use Blaster or some other kind of rust dissolver if you'd like. You can also borrow or buy a 'speciale' tool and go through what's called for to use it. I never had to resort to those though even on 100K+ engines.
Leave the timidity in your storage locker; FEARLESSNESS wins the day. EL WHACKO!!
Jake
A couple/few of good hits (testosterone, length of wood and heavy headed hammer) on one side, then same thing 180* opposite; repeat until it drops right off.
You can even leave one of the three bolts threaded on - couple of threads is all you'll need - which'll serve to 'catch' the damper once is comes free.
Sure, you can use Blaster or some other kind of rust dissolver if you'd like. You can also borrow or buy a 'speciale' tool and go through what's called for to use it. I never had to resort to those though even on 100K+ engines.
Leave the timidity in your storage locker; FEARLESSNESS wins the day. EL WHACKO!!
Jake
also will PB blaster damage my crankshaft seal??? I syre hope not
this is one sorry design,I cant even change the w/p seal without removing the opti.Why didn't they put a radius at the top of the opti so you could replace that if you were in there.
Last edited by tblt44; 08-16-2010 at 08:17 PM.
08-16-2010, 10:49 PM
#23
Instructor

Ok I was reading not to use a puller that pulls from the outside or it culd damage the dampner.
I was hitting the outside edges with a long 24 " socket and a hemmer.
How can I check for damage that is not visual if I ever get this thing off.
A new balancer?pulley is 65 bucks at rock auto
I was hitting the outside edges with a long 24 " socket and a hemmer.
How can I check for damage that is not visual if I ever get this thing off.
A new balancer?pulley is 65 bucks at rock auto
PS.... Lose the socket extension and get something much longer with more gurth..... trust me, you will have it off if under 5 minutes. You want something that is long enough so that you are positioned just behind the passenger side wheel.
Last edited by Al Borman; 08-16-2010 at 10:53 PM.
08-17-2010, 04:52 PM
#24
Drifting
Thread Starter
Well I started hitting it on the outside and I have small marks on it.I hope I didn't damage it.Never hit it really hard in my opinion.I will check it when/if I get it back together.I just got a heavy duty 4'" 3 jaw puller today.I will get it off with this,I will cut and modify it as needed for this job,just in case I have to do it all over again one day.I could do this in less than an hour if I had the corvette tools needed.As stated before I'm not replacing anything but the 2 top timing cover seals and hoping the crankshaft seal is not leaking.
If I could have replaced the w/p seal without pulling the opti I would have just sioped and done that.
If I could have replaced the w/p seal without pulling the opti I would have just sioped and done that.
08-17-2010, 05:34 PM
#25
Drifting
Thread Starter
Well got a puller $25 today.
I will post picks of how I get it off with this puller,no more banging on this thing.I probley will need to modify it a little but what ever it takes to make it work.I'm going
I just hope my Harmonic balancer is OK
I will post picks of how I get it off with this puller,no more banging on this thing.I probley will need to modify it a little but what ever it takes to make it work.I'm going
I just hope my Harmonic balancer is OK
08-17-2010, 07:30 PM
#26
Instructor
I am not sure what kind of "puller" you bought, but you do not want to pull the pully/balancer from the outer lips as shown in this photo, as this could also distort/displace the rubber ring that attaches the 2 pully pieces. If your pully/balancer is really seized badly to the crank snout, this method could also dent the pully where the puller prongs are positioned.
The method in this picture is not recommended for removing a badly seized pully/balancer:
.

The method in this picture is not recommended for removing a badly seized pully/balancer:
.
08-17-2010, 08:27 PM
#27
Drifting
Thread Starter
This is how Im going to it,I just have to modify the puuler I bought because it is too big.
I think I'm going to make new short fingers for it
http://shbox.com/1/pull_pulley.jpg
If not is this new one anygood
http://www.rockauto.com/catalog/moreinfo.php?pk=390117
Only if I damage mine to get it off
I think I'm going to make new short fingers for it
http://shbox.com/1/pull_pulley.jpg
If not is this new one anygood
http://www.rockauto.com/catalog/moreinfo.php?pk=390117
Only if I damage mine to get it off
Last edited by tblt44; 08-17-2010 at 09:02 PM.
08-18-2010, 07:13 PM
#28

All that whacking didn't work for me either when I pulled mine. I used this puller from O'Rilley auto parts, you can rent it. See this link; http://www.amazon.com/Lisle-Harmonic...sr=8-3-catcorr
I had to loosen and lift the steering rack just a little too. Good luck.
I had to loosen and lift the steering rack just a little too. Good luck.
08-18-2010, 09:07 PM
#29
Drifting
Thread Starter
All that whacking didn't work for me either when I pulled mine. I used this puller from O'Rilley auto parts, you can rent it. See this link; http://www.amazon.com/Lisle-Harmonic...sr=8-3-catcorr
I had to loosen and lift the steering rack just a little too. Good luck.
I had to loosen and lift the steering rack just a little too. Good luck.
Did you damage your pulley or was it ok????
If mine doesn't work I will order that one asap.
08-19-2010, 07:55 PM
#31
Drifting
Thread Starter
Got it,I modified my puller to get the pulley off.It took all of minutes when I finally got my puller riged.I will post pics later.
Opti is out and I found the leak.It was leaking behind the opti.Now I just got to clean it all up buy some new hoses seals and put it all back together.Thats the easy part.I am bypassing my throtle body also.
How much play should my opti bearing have in it?????
Opti is out and I found the leak.It was leaking behind the opti.Now I just got to clean it all up buy some new hoses seals and put it all back together.Thats the easy part.I am bypassing my throtle body also.
How much play should my opti bearing have in it?????
08-19-2010, 08:14 PM
#32
Le Mans Master
Got it,I modified my puller to get the pulley off.It took all of minutes when I finally got my puller riged.I will post pics later.
Opti is out and I found the leak.It was leaking behind the opti.Now I just got to clean it all up buy some new hoses seals and put it all back together.Thats the easy part.I am bypassing my throtle body also.
How much play should my opti bearing have in it?????
Opti is out and I found the leak.It was leaking behind the opti.Now I just got to clean it all up buy some new hoses seals and put it all back together.Thats the easy part.I am bypassing my throtle body also.
How much play should my opti bearing have in it?????
Are you re-using the stock balancer?
Jake
08-19-2010, 08:25 PM
#33
Drifting
Thread Starter
Here are some pics of my wrench and my timming cover,looks like my leak is behind my opti,what do you all think???
As you can see I took a puller and cut it off then redrilled new bolt hols so it would work.
This will be an easy job next time.In 1 hour I could have everthing off


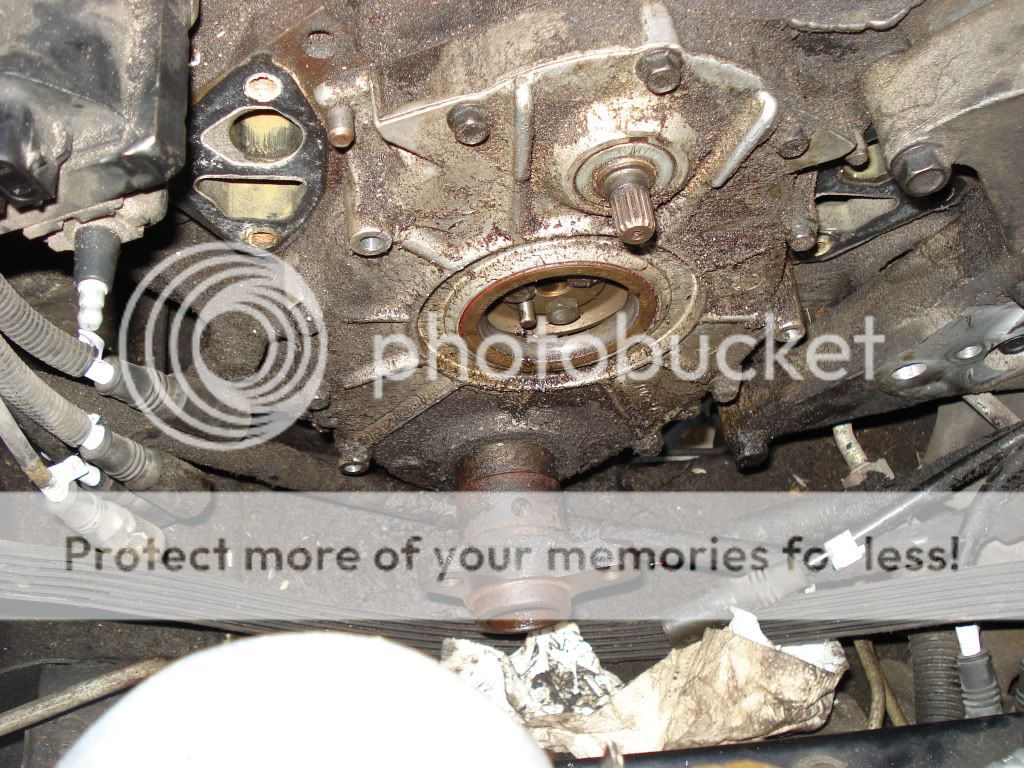
As you can see I took a puller and cut it off then redrilled new bolt hols so it would work.
This will be an easy job next time.In 1 hour I could have everthing off
Last edited by tblt44; 08-19-2010 at 08:29 PM.
08-19-2010, 11:27 PM
#34
Racer
Member Since: Apr 2010
Location: New York
Posts: 409
Likes: 0
Received 0 Likes
on
0 Posts
Dude you are the man. Happy for ya. Next time you wont need the pully. Just sand down the crack a little and the damper and put antiseiz all over it and it will actually fall off next time. Nice pully you made there. Im slowly zeroing on my problem
08-20-2010, 09:16 AM
#35
Team Owner

Member Since: Oct 2000
Location: Fort Knox, KY
Posts: 96,443
Likes: 0
Received 8 Likes
on
8 Posts
Cruise-In IV Veteran
Cruise-In VI Veteran
Cruise-In VII Veteran
Cruise-In VIII Veteran

Good job. From the looks of those plug wires, it's time to swap those jokers out, too. Ditto for the plugs. Might as well while you're in the midst of such a labor-intensive job.
08-20-2010, 04:57 PM
#36
Drifting
Thread Starter
08-20-2010, 08:47 PM
#37
Burning Brakes


Member Since: Oct 2009
Location: Minneapolis MN
Posts: 773
Likes: 0
Received 0 Likes
on
0 Posts
If replacing the waterpump seal you will need a special tool otherwise you may damage the seal upon install.Like I said no hammer on engine parts-there is a time & place for using a hammer,just not on engine stuff.Good job.Working on cars nowadays takes patience.
08-20-2010, 08:59 PM
#38
Drifting
Thread Starter
for the opti seal I guess I just got to tap it in
cant really tell but it looks like my leak was from the opti seal so Im not doing the crank seal.
doing the wp and opti seal only
tooooooo many special tools for these cars
Last edited by tblt44; 08-20-2010 at 09:01 PM.
08-20-2010, 09:33 PM
#39
Le Mans Master
08-21-2010, 07:58 AM
#40
Melting Slicks


Member Since: Nov 2005
Location: Green Valley Arizona
Posts: 3,185
Likes: 0
Received 106 Likes
on
71 Posts

from what people say you can use a sharpie pen cap.
for the opti seal I guess I just got to tap it in
cant really tell but it looks like my leak was from the opti seal so Im not doing the crank seal.
doing the wp and opti seal only
tooooooo many special tools for these cars
for the opti seal I guess I just got to tap it in
cant really tell but it looks like my leak was from the opti seal so Im not doing the crank seal.
doing the wp and opti seal only
tooooooo many special tools for these cars
If memory serves me, the remaining part on the crank nose will have to come off in order to get the timing cover off to replace those seals. I just cannot remember at this time what it is called. It will also require a puller, but you use the three bolts to attach the puller to instead of jaws. There is no key way or alignment on this...but good idea to mark-it so to be able to put it back in the same spot.
I would suggest replacing the front seal as well.
The Sharpie cap works great on the wp drive seal...have one sitting in the drawer right here.