How much time to modify an LT1 intake for an L98?
 02-17-2008, 06:04 PM
#1
Drifting

Thread Starter
Member Since: May 2004
Location: Port McNicoll Ontario
Posts: 1,747
Likes: 0
Received 0 Likes
on
0 Posts
I'm just curious if anyone knows how long it should take to do the modifications to an LT1 intake so that it will fit an L98.
A friend is doing mine for me and seems to think it will take 6-8 hours.
I didn't think it would take that long.
He's a tool and die guy and will be doing it at work on his own time.
He's also not charging me for it so I'm trying to figure out how big of a favour I will owe him. LOL.
Thanks.
A friend is doing mine for me and seems to think it will take 6-8 hours.
I didn't think it would take that long.
He's a tool and die guy and will be doing it at work on his own time.
He's also not charging me for it so I'm trying to figure out how big of a favour I will owe him. LOL.
Thanks.


 02-17-2008, 10:52 PM
#5
Drifting
Thread Starter
Member Since: May 2004
Location: Port McNicoll Ontario
Posts: 1,747
Likes: 0
Received 0 Likes
on
0 Posts
Thanks Ken,
A lot longer or a little longer?
Either way, it looks like I'm going to owe him a good size favour.
Do you have any pictures?
I always like to see all the different options for fuel lines and cooling hose routing.
A lot longer or a little longer?
Either way, it looks like I'm going to owe him a good size favour.
Do you have any pictures?
I always like to see all the different options for fuel lines and cooling hose routing.
02-18-2008, 07:53 AM
#7
Drifting
Member Since: Nov 2005
Location: Downriver Mi.
Posts: 1,361
Likes: 0
Received 0 Likes
on
0 Posts
Check with Redrose he may be able to help you,if so you will be pleased with his work,he hooked me up,has a bad *** reinforcing plate(spacer) for the dizzy quality stuff.Good luck.
02-18-2008, 08:14 AM
#8
Drifting
Thread Starter
Member Since: May 2004
Location: Port McNicoll Ontario
Posts: 1,747
Likes: 0
Received 0 Likes
on
0 Posts
I'm just looking for ideas as far as how to make the finished product look.
Thanks.
02-18-2008, 01:40 PM
#9
Safety Car

02-18-2008, 02:01 PM
#10
Drifting
Thread Starter
Member Since: May 2004
Location: Port McNicoll Ontario
Posts: 1,747
Likes: 0
Received 0 Likes
on
0 Posts
It turns out that the friend who was going to do it for me isn't doing it any more.
He's working late everyday lately so adding this to his pile isn't very appealing.
Oh well, back to the drawing board.
Need to find a machine shop or attempt it myslef.
Maybe a little bit of both.
02-19-2008, 12:36 PM
#11
Drifting
Member Since: Nov 2005
Location: Downriver Mi.
Posts: 1,361
Likes: 0
Received 0 Likes
on
0 Posts
Thanks I appreciate it.
It turns out that the friend who was going to do it for me isn't doing it any more.
He's working late everyday lately so adding this to his pile isn't very appealing.
Oh well, back to the drawing board.
Need to find a machine shop or attempt it myslef.
Maybe a little bit of both.
It turns out that the friend who was going to do it for me isn't doing it any more.
He's working late everyday lately so adding this to his pile isn't very appealing.
Oh well, back to the drawing board.
Need to find a machine shop or attempt it myslef.
Maybe a little bit of both.
Last edited by MR NICE; 02-19-2008 at 12:38 PM.
02-19-2008, 12:55 PM
#12
Drifting
Thread Starter
Member Since: May 2004
Location: Port McNicoll Ontario
Posts: 1,747
Likes: 0
Received 0 Likes
on
0 Posts
Hi,are you running early style heads?it is better to use 87 and up style heads because of the bolt angles,but can be done on early heads get ready to file some holes to get it to fit and maybe add material to the intake at 4 corner water jackets JB WELD WORKS GREAT,also some bi-level washers to get a flush bolt fit with the intake or machine intake for proper fit.,if your running a auto you will need to fab a bracket to run stock tv/throt cables.i mounted the remote water outlet under the MAF with a bracket off the top of water pump.Had to rotate MAF 180* to get clearence for outlet,can send you pics. if you want.
I also picked up an 93 camaro bracket for my tv and throttle cables.
I should be able to mount my remote t-stat outlet to my camber brace but I need to double check to make sure it's not too high.
I also picked up a swivel waterneck so I have more options with angles.
Kensv80 sent me some great pictures. One has a closeup of the tv and throttle cable bracket so I can see how it has to be modified slightly.
Shouldn't be a big deal with a dremel.
I shouldn't have too much trouble drilling all the holes but threading them for the screws for the dizzy plate and the NPT fittings for cooling is a little intimidating.
Cutting the EGR bosses off the back could be interesting as well. I'm not sure what I should use for that. I think it was redrose (But I'm not certain) who showed me or told me about a plug that can be used to fill the hole. I'll figure that out later.
I bought a bunch of hard line and a bender to run the fuel lines. This could be interesting but it's cheap so if it takes me a few tries so what.
I have the JB Weld to fill the old holes I'm not using.
The way I see it, I will attempt it and if I get stuck I find a machine shop that can bail me out.
If I get 75% of it done it shouldn't cost much for them to finish it.
oh, I almost forgot Mr Nice, any or all pictures are welcome. I'll PM you my email address.
Thanks.
02-19-2008, 02:51 PM
#13
Melting Slicks


Member Since: Feb 2006
Location: backwoods upstate ny
Posts: 2,753
Likes: 0
Received 12 Likes
on
10 Posts

when tapping the new threads for the dizzy plate and water outlets, use WD-40 for "cutting oil", apply often as it evaporates...the dizzy plate mounting screw holes (countersunk ones) come with a #7 drill hole (14-20 tap size), position the dizzy plate per pic below and match drill and tap ONE mounting screw,enlarge that one hole to 1/4'', install that screw and then drill/tap the other two mounting screws and the one 3/8-16 dizzy clamp tapping that is over the manifold...if you don't have a 1.375'' hole saw to cut the dizzy hole into the manifold, drill a "circle" of small holes just inside the dizzy plate hole and then "wobble'' the small bit to "connect the dots" till the "center" falls out and finish with a round file (manifold is thin in this area, cuts ez)

when chopping off the egr mount for dizzy clearance, do NOT cut lower than abt 1/4'' ABOVE the lowest mounting hole for the exhaust transfer pipe flange on the pass side rear of the manifold or you will open a large hole on the left side...chop can be done with a hacksaw and lots of elbow grease if better equipment is not available...leave a "fillet" at the intersect point of the vertical and horizontal cuts for strength.
plug for the exposed transfer port can be made from a 1-3/4'' expanding rubber "freeze plug" repair plug (cut/grind rubber and metal end plates to opening shape while in non-compressed position, coat with RTV prior to final install)
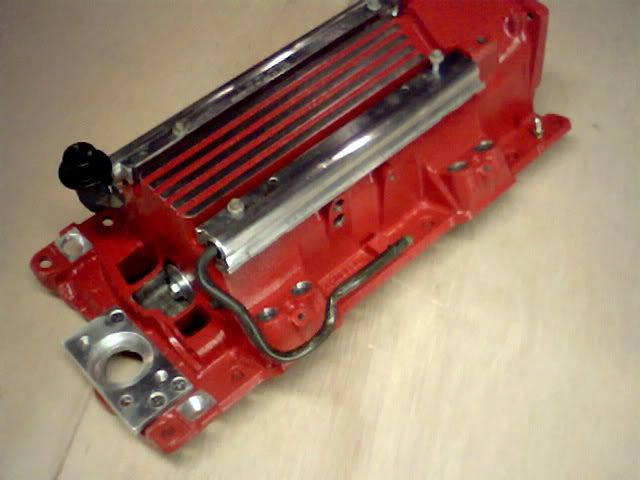
dizzy plate edge toward pass side should be parallel to manifold casting relief edge altho this pic looks weird.
when chopping off the egr mount for dizzy clearance, do NOT cut lower than abt 1/4'' ABOVE the lowest mounting hole for the exhaust transfer pipe flange on the pass side rear of the manifold or you will open a large hole on the left side...chop can be done with a hacksaw and lots of elbow grease if better equipment is not available...leave a "fillet" at the intersect point of the vertical and horizontal cuts for strength.
plug for the exposed transfer port can be made from a 1-3/4'' expanding rubber "freeze plug" repair plug (cut/grind rubber and metal end plates to opening shape while in non-compressed position, coat with RTV prior to final install)
dizzy plate edge toward pass side should be parallel to manifold casting relief edge altho this pic looks weird.
Last edited by redrose; 02-19-2008 at 03:00 PM.
The following users liked this post:
yakmastermax (03-21-2023)
02-19-2008, 03:05 PM
#14
Drifting
Thread Starter
Member Since: May 2004
Location: Port McNicoll Ontario
Posts: 1,747
Likes: 0
Received 0 Likes
on
0 Posts
Thanks Redrose,
I still have all that information saved from the last time you gave it to me. (year-year and a half ago)
It's going to finally come in handy.
I'm pretty sure I have a hole saw that will work...but I think it's meant for wood. Oh well, I'm sure it will work but won't be worth much when i'm done.
Looks like I did remember it correctly who told me about the plug to fill the dizzy hole.
...and I get to use my new hack saw. I see lots of breaks and a few beers in my future.
Would it be best to use a drill press for these holes or would a hand drill work? i could likely use the drill press at work.
02-19-2008, 03:12 PM
#15
Drifting
Thread Starter
Member Since: May 2004
Location: Port McNicoll Ontario
Posts: 1,747
Likes: 0
Received 0 Likes
on
0 Posts
02-19-2008, 03:52 PM
#16
Drifting
Member Since: Nov 2005
Location: Downriver Mi.
Posts: 1,361
Likes: 0
Received 0 Likes
on
0 Posts
The 93 bracket will work but you will have to mess with the cables,I fabed one up so cables are in the same geometry as the stock tpi,that way I can use stock cables without cutting them,I was woried about the TV cable being in the exzact location as stock.93 bracket puts it on a bad angle also,you will find this out soon enough.
02-19-2008, 05:21 PM
#17
Drifting
Member Since: Nov 2005
Location: Downriver Mi.
Posts: 1,361
Likes: 0
Received 0 Likes
on
0 Posts
I'm running the patriot freedom 190 heads so the holes shouldn't be a big deal.
I also picked up an 93 camaro bracket for my tv and throttle cables.
I should be able to mount my remote t-stat outlet to my camber brace but I need to double check to make sure it's not too high.
I also picked up a swivel waterneck so I have more options with angles.
Kensv80 sent me some great pictures. One has a closeup of the tv and throttle cable bracket so I can see how it has to be modified slightly.
Shouldn't be a big deal with a dremel.
I shouldn't have too much trouble drilling all the holes but threading them for the screws for the dizzy plate and the NPT fittings for cooling is a little intimidating.
Cutting the EGR bosses off the back could be interesting as well. I'm not sure what I should use for that. I think it was redrose (But I'm not certain) who showed me or told me about a plug that can be used to fill the hole. I'll figure that out later.
I bought a bunch of hard line and a bender to run the fuel lines. This could be interesting but it's cheap so if it takes me a few tries so what.
I have the JB Weld to fill the old holes I'm not using.
The way I see it, I will attempt it and if I get stuck I find a machine shop that can bail me out.
If I get 75% of it done it shouldn't cost much for them to finish it.
oh, I almost forgot Mr Nice, any or all pictures are welcome. I'll PM you my email address.
Thanks.
 What size distributor are you running?Fuel pressure reg setup?
Last edited by MR NICE; 02-19-2008 at 05:30 PM.
02-19-2008, 07:57 PM
#18
Instructor


Member Since: Sep 2006
Location: Mt Pleasant Michigan
Posts: 133
Likes: 0
Received 0 Likes
on
0 Posts
87 Rag, I hate to bring this up, I understand that the Patriot head has a tall intake port, requires a Felpro 1206 gasket, will the LT 1 intake cover and seal on the 1206 gasket, might want to check if somebody here doesn't know. I hope it will work, my understanding on the LT 1 is that you use a 1205.
Red Rose, did I read correct that you sell the Dizzy shim if so send me a PM as to the price (if you don't mind) and where to send the green
Mr Nice, you have mail (PM)(Guess not, oops)
Joe
Red Rose, did I read correct that you sell the Dizzy shim if so send me a PM as to the price (if you don't mind) and where to send the green
Mr Nice, you have mail (PM)(Guess not, oops)
Joe
Last edited by mgbss; 02-19-2008 at 08:25 PM.
02-19-2008, 08:12 PM
#19
Melting Slicks
The Felpro 1206 gasket will not work. I have read a couple of posts on this from a different forum. You can't get it to seal as the opening is too long.
02-19-2008, 08:25 PM
#20
Drifting
Thread Starter
Member Since: May 2004
Location: Port McNicoll Ontario
Posts: 1,747
Likes: 0
Received 0 Likes
on
0 Posts
I've read so much about the gaskets that I don't know what to expect.
For that reason I have a set of 1205 gaskets and a set of 1206 gaskets.
The heads do take a 1205 gasket and I believe the 1205 works for the intake and if the intake ports are a little smaller than the head ports we are fine.
As long as there is enough material to cover the head ports and still seal that is.
I will make a post of whatever I find to help the next guy.