headlight repair w/pic...
 06-21-2011, 09:08 PM
#121
Intermediate


Member Since: Jan 2011
Posts: 26
Likes: 0
Received 0 Likes
on
0 Posts

Schrade: Thanks for taking the time to do this post. I have been having a problem with the right headllight on my 89 and finally she just stopped staying closed. I used the GM Helms manual and your write up to remove the light assembly. I had one "mell of a time" getting the little metal clip that holds both the light and the motor power lead to the edge of the hood.
You asked for suggestions to improve this and here they are:
1. Make a photo of the fasteners you have to remove to get the assembly off the hood.
2. The first step would be to move the roll pin (using the 5/32 punch) while the assembly is attached to the hood. You can manually move the light assy (using the **** on top of the motor) to allow easy removal of the roll pin. I had problems holding the assembly on a table while removing the roll pin. Do this while it is attached to the hood!
3. Make a photo of the fasteners you need to remove to free the motor.
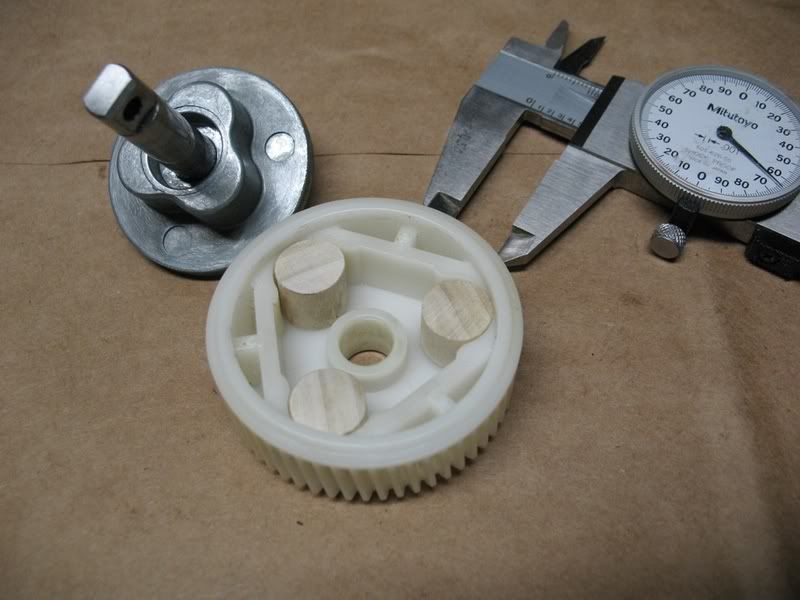
4. Here is something that no one has mentioned or suggested! Instead of paying $2 each for three little plastic parts (these cannot cost more than $.03 to $.04 each to make......and Ecklers charges $6 for three small pins???), you can make 'em out of hardwood dowel. Get some 1/2 inch hardwood dowel from Homer Depot and cut the dowell lenght to 3/8 -7/16 in length. Do not exceed 15/32 in length as this is the height of the cavity for the three pins. I put three wooden dowels in my right light and she works like a charm. Here is a photo of the dowels in the gear if anyone is interested.
5. I highly recommend that you lubricate each bronze bearing with a few drops of motor oil as you re-assemble the motor.
The fishing line trick for the brushes is pure genius
Ole Sam
You asked for suggestions to improve this and here they are:
1. Make a photo of the fasteners you have to remove to get the assembly off the hood.
2. The first step would be to move the roll pin (using the 5/32 punch) while the assembly is attached to the hood. You can manually move the light assy (using the **** on top of the motor) to allow easy removal of the roll pin. I had problems holding the assembly on a table while removing the roll pin. Do this while it is attached to the hood!
3. Make a photo of the fasteners you need to remove to free the motor.
4. Here is something that no one has mentioned or suggested! Instead of paying $2 each for three little plastic parts (these cannot cost more than $.03 to $.04 each to make......and Ecklers charges $6 for three small pins???), you can make 'em out of hardwood dowel. Get some 1/2 inch hardwood dowel from Homer Depot and cut the dowell lenght to 3/8 -7/16 in length. Do not exceed 15/32 in length as this is the height of the cavity for the three pins. I put three wooden dowels in my right light and she works like a charm. Here is a photo of the dowels in the gear if anyone is interested.
5. I highly recommend that you lubricate each bronze bearing with a few drops of motor oil as you re-assemble the motor.
The fishing line trick for the brushes is pure genius
Ole Sam
Back in October of 2007, schrade did a "sticky" on C4 headlight repair with pictures. The pictures are unfortunately gone so I can't tell about the fishing line trick for the brushes. Since you commented on it and schrade is no longer with the forum, can you please tell me about it if you remember? Thanks in advance.
Karen
 06-22-2011, 08:58 AM
#122
Melting Slicks

Member Since: Apr 2002
Location: St. Charles, MO Route 66 Corvette Club
Posts: 2,118
Likes: 0
Received 0 Likes
on
0 Posts

Good morning Karen:
It is amazing that 4 years have gone by since repairing the headlight motors on my 89 garage queen. I searched for any info that I may have saved on this procedure and could not find it.
I am not sure how much you know about DC (direct current) motors as the design of the motors dictates the need for the fishing line procedure. The DC motor in your headlight assembly has two carbon brushes that are spring loaded and contact the communtator of the rotor. As you disassemble the motor, the two carbon brushes will simply slip off the communtator and become loose in the endcap of the motor. That is the easy part.
The need for the fishing line will be realized when you attempt to assemble the motor endcap (with the two spring loaded brushes inside) to the motor frame. It is impossible to hold (using your fingers) the two spring loaded brushes away from the communtator as you assemble the endcap. The fishing line along with three hands will make this task relatively simple.
You take a length of monofiliment line about 18 inches in length and insert one end of the line onto the carbon brush. Then take that end of the line and place it with the other end of the line. While holding both ends of the line, you are able to retract and hold the carbon brush such that you are able to insert the cap onto the motor frame. After the cap is properly aligned to the motor frame, turn loose of one end of the line and simply pull the line out of the motor. Do this before you tighten the endcap to the motor.
Having said all of this, you have to retract and hold BOTH carbon brushes while assemblying the end cap to the motor. This takes three hands.
This is about all I can remember and I hope you find this information helpful.
Ole Sam
Last edited by Sam Lam; 06-22-2011 at 09:01 AM. Reason: clarify comments
08-01-2011, 12:44 PM
#124
Advanced

Member Since: Jul 2011
Posts: 80
Likes: 0
Received 0 Likes
on
0 Posts
I have been working on replacing the bushings in one headlight motor and find no cotter pin/roll pin installed and suspect this could be why this headlight was not coming up into position. Is this a correct assumption? I guess I'll replace the bushings since I'm this far into it. Thanks in advance for any help on this.
03-27-2012, 03:21 PM
#125
Racer

Member Since: Oct 2005
Location: Marlow OK
Posts: 430
Likes: 0
Received 0 Likes
on
0 Posts
Noted all the great info in the previous 124 posts!! My 1993 driver side headlight is stuck in the vertical (open) position. The manual twist **** will not lower it (not sure if its supposed to). Been making the clunk-clunk-clunk noise for several years..... obviously the bushings need replaced on both sides. Anything else I need to look for? Headlight motor gone bad?
03-28-2012, 02:20 AM
#126

original roll pin:
brittle, fractured upon removal. stainless steel replacement obtained from Brownell's.

temp cotter pin:
cotter pin used while waiting for replacement stainless steel roll pin to arrive in the mail.

brittle, fractured upon removal. stainless steel replacement obtained from Brownell's.
temp cotter pin:
cotter pin used while waiting for replacement stainless steel roll pin to arrive in the mail.
03-31-2012, 06:00 PM
#127
Burning Brakes

If you decide to leave the cotter pin in there, the only down side is that it isn't 'original.'
 03-31-2012, 06:56 PM
#128
the thing that worried me about the cotter pin is that it has a tapered shape, whereas the roll pin is straight. I was worried about the tapered pin causing the hole to flare a little at the fat end, thereby reducing the compression grip for if-and-when you revert back to a roll pin.
but that's just me and my runaway imagination & paranoia. you could argue that the stainless steel block that the pin sits in, is hard enough to resist deformation... even after several hundred cycles of slamming the headlight open and shut.
but that's just me and my runaway imagination & paranoia. you could argue that the stainless steel block that the pin sits in, is hard enough to resist deformation... even after several hundred cycles of slamming the headlight open and shut.
07-20-2012, 12:56 AM
#129
Heel & Toe

Member Since: May 2012
Posts: 15
Likes: 0
Received 0 Likes
on
0 Posts
I pulled the 3 inch plastic gear out along with the shaft. The shaft slid out of the gear but entirely. It has some groves which seem to be somewhat shaved off. Do I need a new shaft?
Thanks,
Chris
Thanks,
Chris
08-19-2012, 12:21 AM
#130
1st Gear

Member Since: Aug 2012
Posts: 1
Likes: 0
Received 0 Likes
on
0 Posts
I just did my 95's passenger side headlight door gear replacement this evening and after finished turned on the headlights but was surprized to see the one I just repaired ran backwards (out when lights turned off, stowed when lights turned on. I looked at lots of threads and etc but found the answer to be simply turning the motor housing (that attaches to the gear housing with two 1/4" head screws) 180 degrees. Don't know why that caused the motor to run backwards but works perfectly now. Did not even have to take the headlight assembly off the car again to turn the motor housing around to get it working correctly.
 11-08-2012, 10:10 PM
#133
Former Vendor
Member Since: Aug 2006
Location: Jeffersonville Indiana 812-288-7103
Posts: 76,656
Received 1,813 Likes
on
1,458 Posts
St. Jude Donor '08-'09-'10-'11-'12-'13-'14-'15

It's not a Pita.. watch the video Greg posted above. It's actually very easy. 
Willcox
Willcox
11-09-2012, 12:44 PM
#134
Safety Car

Here is a simple how to video the I made which goes through all of the steps:
http://www.youtube.com/watch?v=sPj1kJm4AnU
http://www.youtube.com/watch?v=sPj1kJm4AnU
09-08-2013, 02:57 PM
#135
Advanced

Member Since: May 2007
Posts: 75
Likes: 0
Received 0 Likes
on
0 Posts
Just finish helping my friend do his 89 right side. We could not figure how to drop in the new gear to get pass the worm gear on the bottom. We just took a hacksaw and cut small groves where it fit over the top of the worm gear. Sure glad my 90 was not like that, it was drop and bolt up and we were finish.
09-12-2013, 12:34 PM
#136
Advanced
Member Since: May 2007
Posts: 75
Likes: 0
Received 0 Likes
on
0 Posts
I would like to know how did they get the gear out of (right headlight) the motor, without taking the motor apart. As you read my last post, we had to cut small groves to fit over the worm drive. I sure would like someone to chime in on this one. I would be embrace telling you how we got the old one out.
09-12-2013, 07:01 PM
#137
Burning Brakes
I would like to know how did they get the gear out of (right headlight) the motor, without taking the motor apart. As you read my last post, we had to cut small groves to fit over the worm drive. I sure would like someone to chime in on this one. I would be embrace telling you how we got the old one out.
I didnt need to do it for mine, but see if it might have helped with yours.
(Mine has those plastic 'pills' that deteriorate over time and keep the gears from getting damaged. Don't know when they started using those).
Hope this helps.
03-29-2014, 07:55 PM
#138
After going through this whole thread, I found some conflicting information, so here's a summary of what worked for me:
The original poster has been banned from the forum, and deleted the pictures, so the original pictures are gone, it's not you.
84-87 are different from 88-96. But they are sort of close. (I have a 1996)
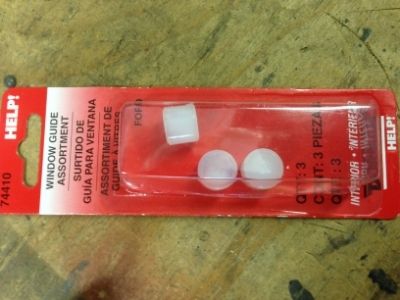
Don't use hardwood dowels rods, they may not last. Instead auto part stores carry HELP brand part number 74410.
It's about $7.99 in 2014.
The package says it's for a FORD window regulator or something, but it works.
Maybe you can find something at Home Depot I didn't look. It seems to be about 1/2" diameter, 1/2" height cylinder, but some sanding may be required - the HELP parts I got required no sanding.
I just replaced these "bushings" nothing else, they are really just plastic cylinders.
Useful links (youtube video did not look exactly like my '96, but close enough):
http://www.corvetteclub.org.uk/files...ght_motors.pdf
http://home.comcast.net/~zrjuan/headlight.html
The original poster has been banned from the forum, and deleted the pictures, so the original pictures are gone, it's not you.
84-87 are different from 88-96. But they are sort of close. (I have a 1996)
Don't use hardwood dowels rods, they may not last. Instead auto part stores carry HELP brand part number 74410.
It's about $7.99 in 2014.
The package says it's for a FORD window regulator or something, but it works.
Maybe you can find something at Home Depot I didn't look. It seems to be about 1/2" diameter, 1/2" height cylinder, but some sanding may be required - the HELP parts I got required no sanding.
I just replaced these "bushings" nothing else, they are really just plastic cylinders.
Useful links (youtube video did not look exactly like my '96, but close enough):
http://www.corvetteclub.org.uk/files...ght_motors.pdf
http://home.comcast.net/~zrjuan/headlight.html
Last edited by dknowles67; 03-29-2014 at 08:16 PM.
The following users liked this post:
Bumpnrun (11-26-2016)
11-29-2014, 04:36 PM
#139
Thought I'd add some to this thread.
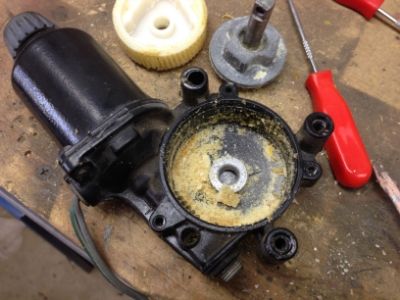
I bought some motors out of a wreak just in case I might need them for my '93. The previous own said they had the metal gear. Only one did, oh well. Fast forward and now I had the ratcheting noise from the drivers side. So as I was preparing to do the change I read a lot of threads here. I had the metal gear so no problem, right?
Well this is what I found when I opened it up.
And the metal gear;
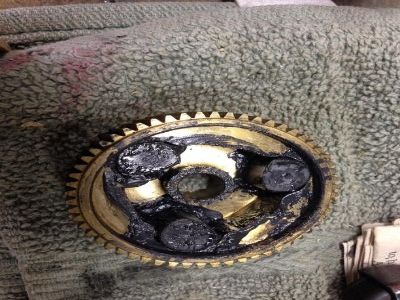
And the bushings after how long I don't know.
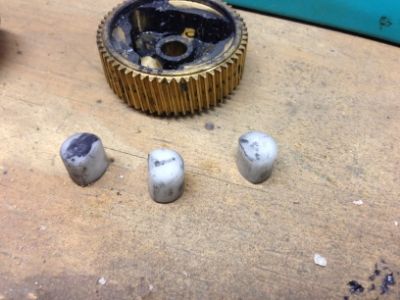
So I decided to try reusing the plastic gear and just replacing the bushings. I used the bushing mentioned earlier, HELP brand part number 74410. Tight fit but squeezing with both hands worked.
I got everything button up, if you take it easy you should be able to reuse the original gasket. Reinstalled the light and tested it. Works like it should, no more ratcheting sound.
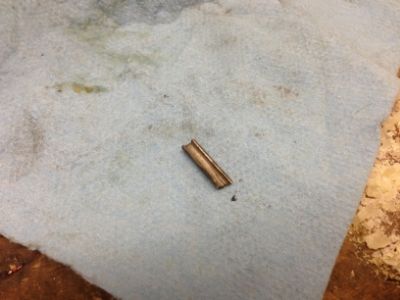
Oh, the broken roll pin or half of half of one end.
Some useful links I found in this thread and elsewhere,
http://www.corvettemagazine.com/tech...-installation/
https://www.corvetteforum.com/forums...r-w-pic-6.html
I bought some motors out of a wreak just in case I might need them for my '93. The previous own said they had the metal gear. Only one did, oh well. Fast forward and now I had the ratcheting noise from the drivers side. So as I was preparing to do the change I read a lot of threads here. I had the metal gear so no problem, right?
Well this is what I found when I opened it up.
And the metal gear;
And the bushings after how long I don't know.
So I decided to try reusing the plastic gear and just replacing the bushings. I used the bushing mentioned earlier, HELP brand part number 74410. Tight fit but squeezing with both hands worked.
I got everything button up, if you take it easy you should be able to reuse the original gasket. Reinstalled the light and tested it. Works like it should, no more ratcheting sound.
Oh, the broken roll pin or half of half of one end.
Some useful links I found in this thread and elsewhere,
http://www.corvettemagazine.com/tech...-installation/
https://www.corvetteforum.com/forums...r-w-pic-6.html