headlight repair w/pic...
 09-24-2009, 02:51 AM
#81


you mean it goes clack-clack-clack-clack... and/or the motor continues running for a while even after it's up or down?
i had two different symptom, the left had different symptoms from the right, but in both cases it was the disintegration of the nylon bushings. different symptoms, same root cause.
left side was clacking away. once i fixed that so it ran silently, then i was able to hear the right side motor just whizzing away for a spell even after the light was up or down. until i silenced the left side, i didn't know i had a problem on the right side because it seemed to function fine.
but headlight motor run-on is not an okay thing.
nylon bushings on both sides were totally dust.
 09-24-2009, 01:05 PM
#82
Roadster Madness. 😠

Member Since: Sep 2009
Location: Ventura Co Ca
Posts: 5,509
Received 1,526 Likes
on
869 Posts
SoCal Regional Events Coordinator
St. Jude Donor '13, '20-'21

RpoL98, it goes clack-clack-clack-clack. I got the gear, but not the bushing. I will order them. Thanks, you just saved me a lot of time. 
09-24-2009, 06:23 PM
#83
6th Gear


Member Since: Sep 2009
Location: Greenbelt Md
Posts: 6
Likes: 0
Received 0 Likes
on
0 Posts
I posted this on another site a while back, and think it may be of some use here as well. The headlight drive motor bushings are available at your local parts store for about eight bucks. These are of the original material which are designed to slightly cushion the drive system when it reaches the stops.
I have always felt the delrin aftermarket replacements subjected the drive to too much shock. Delrin is a great material as far as plastics go. It is known as an engineering plastic that is strong, non-brittle, can be machined, and is even used frequently on spacecraft. But, a combination of worm drive, nylon gears, loose clackity linkage, and sudden stops have me thinking a bit of cushion here is a good idea. After all, my originals did last twenty years.
Apparently the original bushings were used in window drive motors on Fords up to 2003. If you are interested, look for a parts store that handles the "HELP!" line of aftermarket parts. The part number is 74410 (Window Regulator Gear Plugs) for a package of three. I had just done one of mine with some hard rubber I carved plugs out of (a pita), but bought two packs of three originals for future use anyway.
Sincerely,
Les
09-24-2009, 08:40 PM
#84
Advanced

Member Since: Apr 2005
Location: Santa Clara CA
Posts: 93
Likes: 0
Received 0 Likes
on
0 Posts
Just completed this on my 92 by referrencing three other online sites simultaneously (because pics are missing from this one), as no single referrence was exactly right for my ride. It seems there's a fair amount of variation from year to year and from side to side (driver / passenger). Each site proved valuable, but I think the CorvetteFever tutorial was the best for my purposes:
http://home.comcast.net/~zrjuan/headlight.html
http://www.corvettemagazine.com/2002...hts/light1.asp
http://www.corvettefever.com/howto/33098/index.html
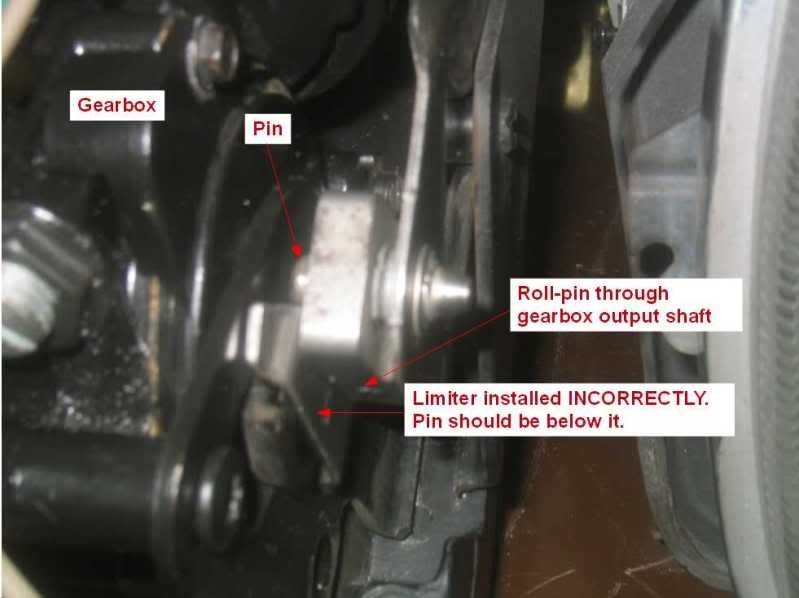
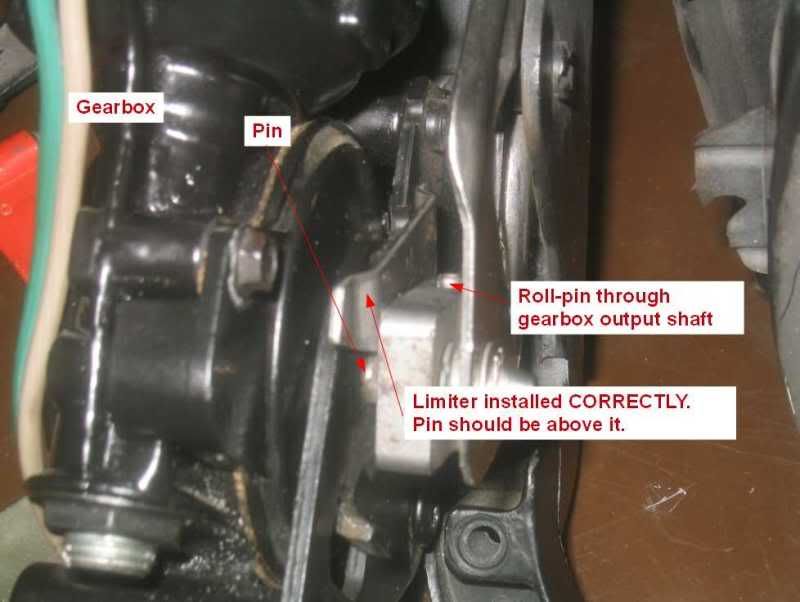
Also, there is a "travel limter" bracket that the shaft of the motor passes through, which can be installed 180-deg out of orientation (guess how I know?). The pics below first show it installed WRONG, then show it installed RIGHT:
http://home.comcast.net/~zrjuan/headlight.html
http://www.corvettemagazine.com/2002...hts/light1.asp
http://www.corvettefever.com/howto/33098/index.html
Also, there is a "travel limter" bracket that the shaft of the motor passes through, which can be installed 180-deg out of orientation (guess how I know?). The pics below first show it installed WRONG, then show it installed RIGHT:
10-02-2009, 08:05 PM
#85
Racer


Great thread!! Took me 2.5 hours to do both. Definately take the full headlight assembly out of the car, much easier then trying to just take the motor off.
Rick L.
Rick L.
10-03-2009, 10:08 PM
#86
Burning Brakes

10-12-2009, 03:26 PM
#87
Roadster Madness. 😠
Member Since: Sep 2009
Location: Ventura Co Ca
Posts: 5,509
Received 1,526 Likes
on
869 Posts
SoCal Regional Events Coordinator
St. Jude Donor '13, '20-'21

Thanks to everyone. I did mine this weekend on my '95 Vert, using Mid America Brass Gear. rpoL98 was right, the bushings were granulated and the nylon gear was fine. I went ahead and replaced it with the brass gear. The gear and the bushings would not fit on the shaft together. I ended up taking a little off the bushings with a Dremel Tool and press fitting the whole thing together. It worked fine afterwards. The only problem I had was getting the electrical connector off of a part that connected to it underneath like this ] [. I do not know if this is particular to the �95, but you have to push it off towards the firewall to get it off this part. It was also the devil to get it back on it. I ended up using thin long nose pliers and squeezed the legs together. I then pulled it out. I put it on the electrical connector and pushed the whole unit into the hole. Easy once you figure it out!
11-11-2009, 02:56 PM
#88
Instructor

Member Since: Jul 2004
Posts: 111
Likes: 0
Received 0 Likes
on
0 Posts
Hey guys.
You don't fight a roll pin with a pair of pliers. You drive it into the hole with a hammer. Once it's all the way into the hole, you use a drill bit as the right sized punch to continue hammering it out through the other side.
A roll pin is a spring. It's forced into the hole and it holds itself in there.
I've done 4 headlights. So satisfying. $1.67 in parts.
I can see again!
Last edited by Clark Bente; 11-12-2009 at 06:25 PM.
11-12-2009, 07:12 PM
#90
Roadster Madness. 😠
Member Since: Sep 2009
Location: Ventura Co Ca
Posts: 5,509
Received 1,526 Likes
on
869 Posts
SoCal Regional Events Coordinator
St. Jude Donor '13, '20-'21
I used a roll pin punch. They are cheap and they do not flatten the pin and leave the center hole intact .
11-26-2009, 12:36 AM
#91
Instructor

I just purchased a low mileage white on red 84. All original w 104k miles. I know it is the redheaded step child of the Corvette universe but the price was less than I have seen decent Fieros going for. Nice paint new tires serviceable interior, runs smooth, cold air and a working dig dash no less. It is a BLAST!
My only prob is the headlights. Neither are working. One makes a gravel sound when plugged in and wont respond to the manual retract ****. (NEEDS A new GEAR?) The other will manually move but there is no response when putting power to it. Any Thoughts?
My only prob is the headlights. Neither are working. One makes a gravel sound when plugged in and wont respond to the manual retract ****. (NEEDS A new GEAR?) The other will manually move but there is no response when putting power to it. Any Thoughts?
11-26-2009, 12:22 PM
#92
Le Mans Master

I just purchased a low mileage white on red 84. All original w 104k miles. I know it is the redheaded step child of the Corvette universe but the price was less than I have seen decent Fieros going for. Nice paint new tires serviceable interior, runs smooth, cold air and a working dig dash no less. It is a BLAST!
My only prob is the headlights. Neither are working. One makes a gravel sound when plugged in and wont respond to the manual retract ****. (NEEDS A new GEAR?) The other will manually move but there is no response when putting power to it. Any Thoughts?
My only prob is the headlights. Neither are working. One makes a gravel sound when plugged in and wont respond to the manual retract ****. (NEEDS A new GEAR?) The other will manually move but there is no response when putting power to it. Any Thoughts?
The second one may need motor work. Find a local Motor winding outfit near you and take it to them to see if a repair would be pragmatic. Other wise you may try to do the brushes yourself......other otherwise you may want to source another motor.
BUT buy gears for both. Mid America sells a kit....but you don't need the smaller black gear, you only need the larger white gear....sells for ~$23 by itself.
01-22-2010, 02:03 PM
#93

There used to be a link to an 84-87 headlight fix page, from zip-corvette I believe, that had pix and everything on these headlights. It used to be in this sticky. Is it gone, and if so, does anyone remember what the link is? It works great for us 84-87 guys.
01-25-2010, 03:57 PM
#94
Burning Brakes
Member Since: Jan 2007
Location: Spring City Tn
Posts: 1,093
Likes: 0
Received 0 Likes
on
0 Posts
 02-07-2010, 05:20 AM
#96
Le Mans Master
The problem with this thread is that we have people taking about 84-87 units interchangeably with the 88 and later with no good photos, as if they where the same creating confusion amongs readers who don't know the difference.
84-87 units are way different and do not have the same components as the 88 and newer. For one, the bushings and gears are totally different.
People talking about "roll pins" and stuff like that which doesn't apply to the early units. I guess I should have taken some good pictures when I had mine appart and made my own "84-87 headlight motor repair" thread to sort this mess out.
02-08-2010, 10:54 PM
#98
Le Mans Master
02-13-2010, 06:25 PM
#99
Drifting

I just did both my motors.None of the profesional write ups tell you about the ball bearings on the end.
You must reinstall this and bring the end bolt up to touch to help suport hee worn gear.
I also broke a bolt in the motor off so I hd to drill it out and put a bolt with a nut on it,
It tikk about five hrs from strt to finish with lunch in there too.
You must reinstall this and bring the end bolt up to touch to help suport hee worn gear.
I also broke a bolt in the motor off so I hd to drill it out and put a bolt with a nut on it,
It tikk about five hrs from strt to finish with lunch in there too.