Tool mods for Half Shaft U-Joint repairs
 04-14-2014, 06:50 AM
#1
Safety Car

Thread Starter

I just did the U-joints on my half shafts on Saturday, I made a mod to one tool and made another and both simplified the job.
First up is Gadgetman's Jack Adapter. It either sits on the cup of a floor jack, or you replace the cup with an sleeve on the bottom of the adapter.
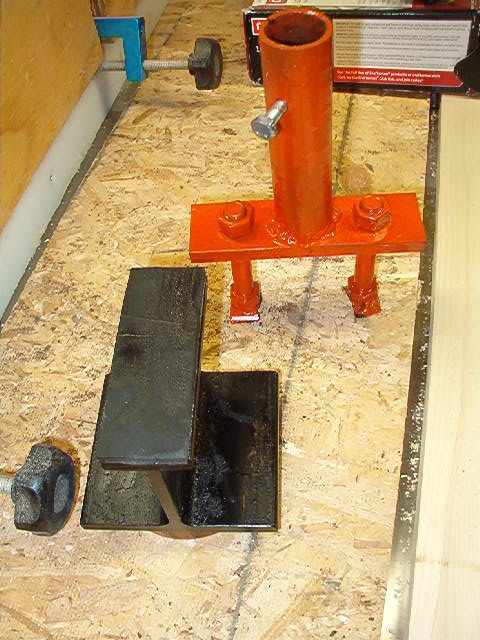
I didn't want it to slide off the cup and the sleeve was bigger than the hole in my jack. Instead I got a round piece of 1/2" steel, drilled a hole in it and cut a recess for the bolt head. Now you just sit it in the cup of the jack and it's not going to slide etc when putting it under the car or jacking it

Next up is a way to press out the U-Joints using a hydraulic press and only put pressure on one side of the Yoke during removal of the old U-joint. I took a piece of 1" I.D. steel tubing slightly shorter than the length of the ram of the press. I drilled it for a set screw and it eventually was welded onto a piece of 3/8" steel after the two holes are drilled. The steel has two 1/2" holes as wide as the caps of a U-Joint. On the ends of the bolts, I welded on some pieces of steel tube with a 1 1/4" I.D. Those curved pieces center anything round under it on the center of the bolts (caps or shafts of the old U-Joint) so they press out straight.


This way when you press the old U-Joints out, if there's anything binding between the U-joint and the shaft, you only put pressure on one side, so less likely to damage the yoke of the half shaft


You just press the cap down, then grab it with a vice grips and pull it out.
When assembling the new U-Joint, sometimes it's tight. Just lay the shaft on some cardboard, lay a little tape on the new caps and using the tool and a piece of heavy steel rod, set it on the caps and using the steel rod like a tamper by hand, just smack down through the hole where the ram fits a couple of times. Next flip it over and do it to the other side and the U-Joint is loose as it should.
I did my 86 last weekend and it worked out great. Did everything it should and cost me about $10-$15 (being I already had a hydraulic press) and a little time to put it together. This definitely cost a lot less than buying a Tiger Tool U-Joint remover for 4 U-Joints and worked as well once the half shafts were out of the car.
Hope you like my tool mods and makes someone's life a little easier.
Paul
Last edited by hcbph; 04-14-2014 at 07:01 AM.


 04-15-2014, 07:17 AM
#4
Safety Car
Thread Starter
Thanks for the complements.
I took her out last night for the first time since replacing the half shaft U-joints and replacing those Teflon washers between the spindle shaft shoulder and the hubs. The results - absolutely quiet and drove like I hoped it would. I had some cyclic noise out of the rear end before fixing it, noticed it shortly after buying it last year right before putting it away for the winter and now it's gone.
The U-joints were rusty and almost impossible to move the outside ones once I got the half shafts out of the car, now they're smooth as silk!
I don't know if the washers really had to be replaced, but being I had most all of it open anyway, decided to do those Teflon washers too. It was so easy pulling the inner u-joint and bringing the axel shaft out with it so it was all available.
Funny thing is this one only has 78K on the odometer and it looks like the u-joints were replaced previously (Spicer's) and they were full of rust. Some of the needle bearing were MIA when I pulled the old ones apart.
Glad it's done and now I can hit the road with it and feel fairly sure I'll get where I'm going. Under the same circumstances, I'd do it again.

 04-16-2014, 07:23 AM
#6
Safety Car
Thread Starter
40+ years ago, I did it that way or used a vice or even an arbor press on steel driveshafts and haven't done any myself since. Unfortunately one time we had one cap bind up and bent the yoke on one driveshaft yoke using the arbor press. I hadn't changed a u-joint in years and was a little nervous with the aluminum half shafts and figured there had to be a way to reduce the chance of accidentally bending something plus I had no idea how long those u-joints had been in there. Being I already had the hydraulic press, it only cost another $10-$15 to make the u-joint tool and the thing worked exactly as I'd hoped even with the aluminum shafts. With some of these parts getting harder and harder to find, I didn't want to risk anything more than I had to. I'm pleased how well it worked along with how well the car now drives and how that annoying rearend noise is gone.