Re-did my interior trim with hydrographics
 01-31-2014, 09:48 PM
#1
Burning Brakes

Thread Starter

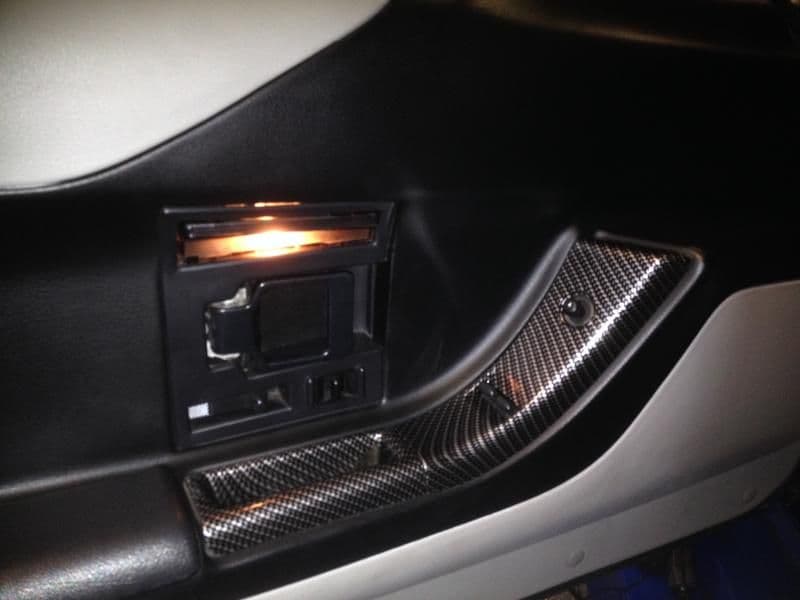
I took advantage of the cold weather and re-did my interior trim pieces with a carbon fiber hydrographics treatment. Not too expensive, ... I think it came out pretty good and is a big difference over the original dulso stuff...


 01-31-2014, 11:28 PM
#3
Burning Brakes
Thread Starter
 02-01-2014, 10:45 PM
#6
Safety Car

Member Since: Mar 2005
Location: Fredonia WI
Posts: 3,562
Received 480 Likes
on
388 Posts
2023 C4 of the Year Finalist- Modified
Finalist 2020 C4 of the Year - Modified
C4 of Year Finalist (performance mods) 2019
2018 C4 of Year Finalist

Nice 
How did you do the graphics? (eg, around the light switch)
How did you do the graphics? (eg, around the light switch)


 02-03-2014, 01:33 PM
#9
Team Owner


Member Since: May 2000
Location: Plantation Florida USAF(Retired) 1966-1990
Posts: 47,850
Received 4,499 Likes
on
3,586 Posts
U.S. Air Force
St. Jude Donor '05-'06-'07-'08-'09-'10-'11-'12-'13-'14-'15-'16-'17-'18-'19-'20-'21-'22-'23-'24
NCM Sinkhole Donor

 Outstanding!

 02-03-2014, 07:23 PM
#11
Burning Brakes
Thread Starter
Thanks!
I picked up a spare set of trim so I could save my originals. So it was all OEM pieces , just not my own. I removed the dulso (or whatever the heck the name of that rubbery stuff is) and disassembled the parts before handing them over for the dip. I wanted to maintain the lighted graphics so I masked off the portions the best I could. The light switch graphics were maintained by using a circle just big enough to let them show. Since the original surface was black and I used the silver/black graphite look, it blended in well enough. I couldn't keep some of the graphics like the dimmer line or the power mirror graphcis on the door. I couldn't find a way to mask them and still have them look decent. I had hoped that maybe the hydrogrpahics might be thin enough to let the light shine through at night, but no dice. The fog light and traction control buttons were easy because they were recessed, so I just cut away the graphics up to the edge of the recessed area.
Cost was around $500 or so for it all (could've added the intrument cluster surround too), so compared to some of the pricing I was seeing at the other shops it was well worth it...
02-04-2014, 12:19 PM
#12
Racer

Member Since: Oct 2010
Location: Providence RI
Posts: 499
Likes: 0
Received 0 Likes
on
0 Posts
Just went to YouTube and educated myself on this process..wow!...times are a changin'
very cool process and amazing production, see the videos, it's very impressive.
Best, Derek.
very cool process and amazing production, see the videos, it's very impressive.
Best, Derek.
Last edited by Docderek05; 02-04-2014 at 01:02 PM.