Build thread vT HokieVette
 04-13-2013, 08:16 AM
#1
Racer


Thread Starter
Member Since: Oct 2011
Location: Blacksburg Virginia
Posts: 417
Likes: 0
Received 0 Likes
on
0 Posts

Originally this was a stock 84...the first year of the c4 corvette.
The car was silver originally, and then a minor fender bender....it was changed to the later style 1996 body panels with blue paint and square tail lights.
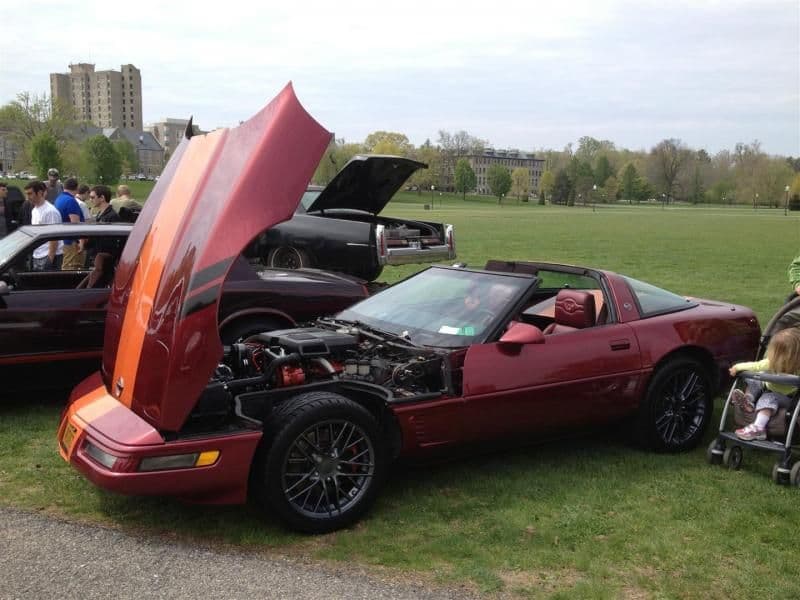
When I got it last year it needed new clear coat......but I decided it needed new everything...so I painted it maroon and orange...Grand Sport style.

Before:


List of mods:
New carpet installed by me.
Covered seats with custom orange and maroon VT seat covers.

New stereo, new speakers.
Replaced top with custom painted targa top.
Re-wired the digital dash so the auto dimming feature was disabled, because it was too dark at night.
Upgraded all dash bulbs with LED
Replaced exterior emblems and other bling.
Replaced original brakes with c5 brakes including making my own adapter brackets from 316 stainless.

Removed anything to do with emissions....lost about 30 lbs between EGR and AIR pump.
New vacuum lines.
New electrical connections (too many to list).
Replaced some wire looms with dark red wire looms tied up with orange zip ties (I've been told everyone has a ricer moment)
New higher psi fuel pump for more flow
Added a custom fuel pressure gauge between the two throttle bodies.
Upgraded timing chain to dual chain design and added chrome cover.

New distributer, rotor, plugs, and wires
Bored throttle bodies from 1 3/8" to 2" openings to allow new air. Added new butterfly valves and added bronze bushings for smoother openings.
Took aluminum burr grinder to the intake manifold and port matched the intake to allow for much more airflow. The typical HP gain for this is over 25 HP(according to corvette forum)

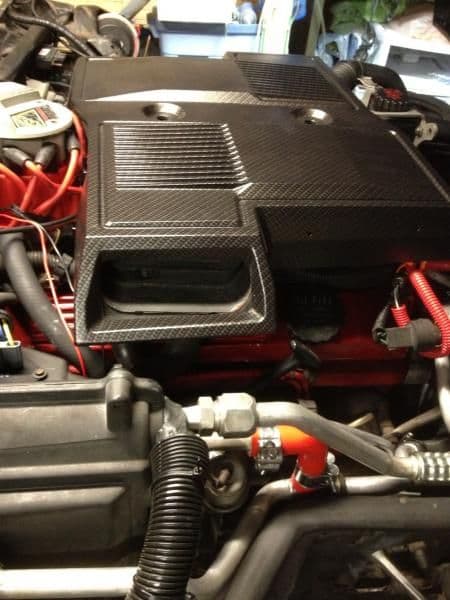
Had the old magnesium air filter cover sand blasted, and hydro dipped in carbon fiber and matte clear coat.
Dyed door panels maroon.
Replaced thermostat with 160f thermo and new hoses.
Added Hypertech performance chip.
Removed all suspension from the car...cleaned it until the aluminum shined.
Replaced all front and rear rubber bushings with red prothane bushings.
 .
. 
Replaced tie rods, bearings, and other wear parts of suspension.
Replaced OE shocks with new KYB on all 4 corners.
Repaired non-functioning AC with new hoses, new accumulator and new condenser and new compressor. Switched to r-134
Power bled brakes and replaced fluid with new dot4 when I updated rotors.
Added Doug ripple motors brake bias spring to balance brakes better.
This week I am ordering new Nitto tires for the rear end and a new set of comp grey 18x10 wheels for the back and new 17x8.5s for the front. Hope to have installed by car show, else I will be using my Sawblades.
With the exception of sewing the seat covers and painting the outside...I did all the work with the help of my Internet friends.
Here was final crossfire pic...
The car was silver originally, and then a minor fender bender....it was changed to the later style 1996 body panels with blue paint and square tail lights.
When I got it last year it needed new clear coat......but I decided it needed new everything...so I painted it maroon and orange...Grand Sport style.
Before:
List of mods:
New carpet installed by me.
Covered seats with custom orange and maroon VT seat covers.
New stereo, new speakers.
Replaced top with custom painted targa top.
Re-wired the digital dash so the auto dimming feature was disabled, because it was too dark at night.
Upgraded all dash bulbs with LED
Replaced exterior emblems and other bling.
Replaced original brakes with c5 brakes including making my own adapter brackets from 316 stainless.
Removed anything to do with emissions....lost about 30 lbs between EGR and AIR pump.
New vacuum lines.
New electrical connections (too many to list).
Replaced some wire looms with dark red wire looms tied up with orange zip ties (I've been told everyone has a ricer moment)
New higher psi fuel pump for more flow
Added a custom fuel pressure gauge between the two throttle bodies.
Upgraded timing chain to dual chain design and added chrome cover.
New distributer, rotor, plugs, and wires
Bored throttle bodies from 1 3/8" to 2" openings to allow new air. Added new butterfly valves and added bronze bushings for smoother openings.
Took aluminum burr grinder to the intake manifold and port matched the intake to allow for much more airflow. The typical HP gain for this is over 25 HP(according to corvette forum)
Had the old magnesium air filter cover sand blasted, and hydro dipped in carbon fiber and matte clear coat.
Dyed door panels maroon.
Replaced thermostat with 160f thermo and new hoses.
Added Hypertech performance chip.
Removed all suspension from the car...cleaned it until the aluminum shined.
Replaced all front and rear rubber bushings with red prothane bushings.
Replaced tie rods, bearings, and other wear parts of suspension.
Replaced OE shocks with new KYB on all 4 corners.
Repaired non-functioning AC with new hoses, new accumulator and new condenser and new compressor. Switched to r-134
Power bled brakes and replaced fluid with new dot4 when I updated rotors.
Added Doug ripple motors brake bias spring to balance brakes better.
This week I am ordering new Nitto tires for the rear end and a new set of comp grey 18x10 wheels for the back and new 17x8.5s for the front. Hope to have installed by car show, else I will be using my Sawblades.
With the exception of sewing the seat covers and painting the outside...I did all the work with the help of my Internet friends.
Here was final crossfire pic...
Last edited by The Plastic Lizard; 03-12-2014 at 08:59 PM.
 03-12-2014, 08:54 PM
#2
Racer
Thread Starter
Member Since: Oct 2011
Location: Blacksburg Virginia
Posts: 417
Likes: 0
Received 0 Likes
on
0 Posts
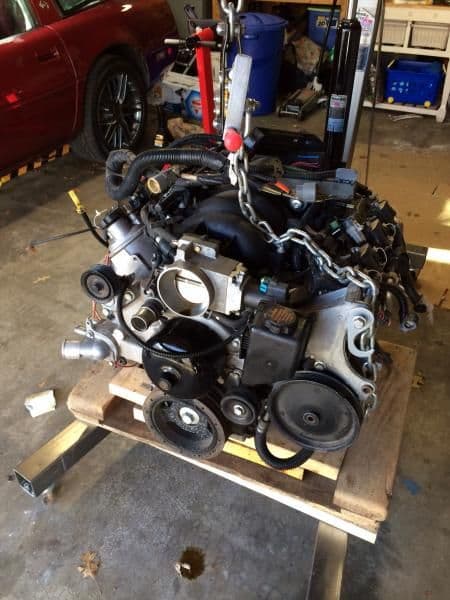
....and now for the fun part......LS update
1.Purchased 2002 LS with 32k miles....complete with computer, harness, all accessories and brackets....$2500+ $200 delivery charge.
2.Purchased 4L60e with 40k miles....from 2002 Pontiac firebird/trans-am something...$400
3.Drive by wire pedal...new $70
4.TAC module from 2001 C5...$200...., didn't count on having to do this...missing from harness and ECM package.
5.misc gaskets from autozone....basically replaced everything that could possibly need replacing in next 30k miles while engine was on stand....broke two bolts during gasket work....damn metric bolts are tiny and take little torque...so I snapped a couple in my zeal.
6. Dirty Dingo engine mount adapter plates.

7. Lots of rags, and cat litter to clean up my mess,engine is clean enough to eat off of...
8. New harmonic balancer and timing cover seal
9. Kicked wife's van out of garage, placed scissor lift in middle of garage, said a prayer, backed Vette onto the lift, drank a beer.
At this point I've done just about everything I can before pulling the old engine....so that's next. L83 will come out this weekend.....more to follow.
1.Purchased 2002 LS with 32k miles....complete with computer, harness, all accessories and brackets....$2500+ $200 delivery charge.
2.Purchased 4L60e with 40k miles....from 2002 Pontiac firebird/trans-am something...$400
3.Drive by wire pedal...new $70
4.TAC module from 2001 C5...$200...., didn't count on having to do this...missing from harness and ECM package.
5.misc gaskets from autozone....basically replaced everything that could possibly need replacing in next 30k miles while engine was on stand....broke two bolts during gasket work....damn metric bolts are tiny and take little torque...so I snapped a couple in my zeal.
6. Dirty Dingo engine mount adapter plates.
7. Lots of rags, and cat litter to clean up my mess,engine is clean enough to eat off of...
8. New harmonic balancer and timing cover seal
9. Kicked wife's van out of garage, placed scissor lift in middle of garage, said a prayer, backed Vette onto the lift, drank a beer.
At this point I've done just about everything I can before pulling the old engine....so that's next. L83 will come out this weekend.....more to follow.
Last edited by The Plastic Lizard; 03-12-2014 at 09:06 PM.
 03-12-2014, 10:02 PM
#5
Racer
Thread Starter
Member Since: Oct 2011
Location: Blacksburg Virginia
Posts: 417
Likes: 0
Received 0 Likes
on
0 Posts
Already had the dbw throttle body and my cruise control had a problem in the vacuum. Figured this way I can fix both by converting to electric.
Bought pedal before I realized how damn expensive the TAC was. Figured the TB from a camaro and a bracket for the wires was going to be close to the price of the dbw setup....probably lost 50 bucks due to high TAC costs...but that's life.
Anyway...either way would work.
Bought pedal before I realized how damn expensive the TAC was. Figured the TB from a camaro and a bracket for the wires was going to be close to the price of the dbw setup....probably lost 50 bucks due to high TAC costs...but that's life.
Anyway...either way would work.
 03-12-2014, 11:16 PM
#7
Le Mans Master

Already had the dbw throttle body and my cruise control had a problem in the vacuum. Figured this way I can fix both by converting to electric.
Bought pedal before I realized how damn expensive the TAC was. Figured the TB from a camaro and a bracket for the wires was going to be close to the price of the dbw setup....probably lost 50 bucks due to high TAC costs...but that's life.
Anyway...either way would work.
Bought pedal before I realized how damn expensive the TAC was. Figured the TB from a camaro and a bracket for the wires was going to be close to the price of the dbw setup....probably lost 50 bucks due to high TAC costs...but that's life.
Anyway...either way would work.
 03-13-2014, 11:34 PM
#8
Racer
Thread Starter
Member Since: Oct 2011
Location: Blacksburg Virginia
Posts: 417
Likes: 0
Received 0 Likes
on
0 Posts
Ok, everything pulled on front of engine....electrical, fuel, ps,Hvac, removed.
37 of 62 steps complete to remove engine.....

37 of 62 steps complete to remove engine.....
Last edited by The Plastic Lizard; 03-17-2014 at 09:51 PM.
03-17-2014, 03:14 PM
#9
Racer
Thread Starter
Member Since: Oct 2011
Location: Blacksburg Virginia
Posts: 417
Likes: 0
Received 0 Likes
on
0 Posts
After one long weekend the engine and transmission are out.
I swear everything was easy until I tried getting the bellhousing bolts out. The two at the top were very stuborn. I had to get the wire harness out of the way so I could undo them from the top.
But the engine and trans are out.
Next step: cleaning the engine bay.
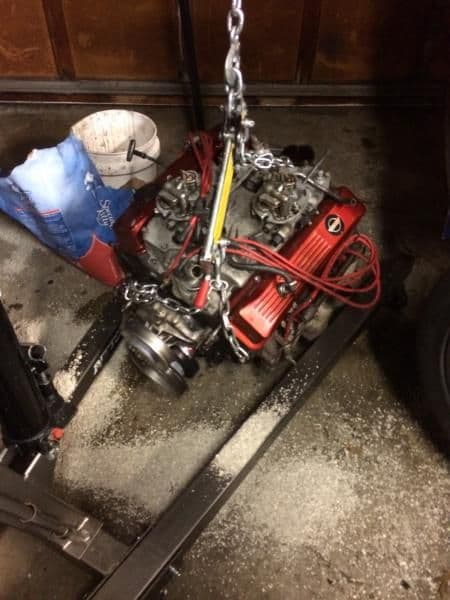
I swear everything was easy until I tried getting the bellhousing bolts out. The two at the top were very stuborn. I had to get the wire harness out of the way so I could undo them from the top.
But the engine and trans are out.
Next step: cleaning the engine bay.
03-17-2014, 04:49 PM
#10
Drifting

Nice! I love your car and can't wait to see how it turns out. VT was my top choice, but I dicked around too much in high school so I'm at ODU now. Anyways, can't wait to see how that turns out!
 03-17-2014, 07:34 PM
#13
Race Director


Amazing make over! Nice job.
03-21-2014, 08:34 PM
#15
Racer
Thread Starter
Member Since: Oct 2011
Location: Blacksburg Virginia
Posts: 417
Likes: 0
Received 0 Likes
on
0 Posts
Ok, so I needed to get an adapter for the tail housing. I ordered one from summit auto. It fills the 1 5/8 gap from the tailshaft differences.
I also need to figure out the speed sensors and speedometer for the 84 dash.
...research project for the evenings.
I also need to figure out the speed sensors and speedometer for the 84 dash.
...research project for the evenings.
03-21-2014, 08:38 PM
#16
Racer
Thread Starter
Member Since: Oct 2011
Location: Blacksburg Virginia
Posts: 417
Likes: 0
Received 0 Likes
on
0 Posts
Ok...so my turn for a question......
Do I remove the entire 84 engine harness and ECM? What do I need it for if I have removed the engine and transmission from the 84 ?
Do I remove the entire 84 engine harness and ECM? What do I need it for if I have removed the engine and transmission from the 84 ?
 03-22-2014, 04:46 PM
#18
Le Mans Master
I have not put my 91 ECM back in yet and everything works. My ABS even came on the other day. You don't need it if don't have a CCM. I may put mine back just to keep it happy and I believe I need it for My A/C to function properly but I'm not sure about that.
03-22-2014, 04:53 PM
#19
Le Mans Master
Here are some of my wiring quotes form this thread .. it's cleaner than the one here.
http://ls1tech.com/forums/conversion...l#post14754412
http://ls1tech.com/forums/conversion...l#post14754412
I have been working on the harness. I need to order some wire and terminals. Looks like I will be adding length to the pass side. it's all routed and mocked up now. The Camaro harness really only had two connectors I did not need. The AIR and EGR.
Now that I have the PCM connectors off I need to sort through whats left. I have identified the 12V switched wires and plan on hooking them some where fused. The ignition and coil wired share a common 12v wire. I believe I will hook these up to inj1 and inj2 in the fuse panel.
Here is whats left.
Red Connector
9 DK/GRN FUEL PUMP RELAY CONTROL = FP
10 WHT ENG SPEED (TACH) = goes to Tach
13 CRUISE ENABLE= not needed
17 DRK GRN/WHT A/C REQUEST SIGNAL = not sure
30 VDT FUEL ENABLE = VATTS
33 DK BLUE ENG COOLING FAN RELAY 2&3 CONTROL = to cooling fan relay 2
34 EVAP PURGE VALVE CONTROL= not needed
36 AIR PUMP RELAY CONTROL= not needed
37 DK GRN CRUISE CONTROL INHIBIT= not needed
43 DK GRN/WHT A/C CLUTCH RELAY RELAY CONTROL=not sure
45 WHT EVAP CANISTER VENT VALVE CONTROL= not needed
46 BRN/WHT MALFUNCTION INDICATOR LIGHT CONTROL= MIL ck eng light
50 DK GRN/WHT VEHICLE SPEED OUTPUT CIRCUIT= to speedo
17 DRK GRN/WHT A/C REQUEST SIGNAL=not sure
53 GRA/BLK SPARK RETARD CONTROL=not sure
54 PPL FUEL LEVEL SENSOR SIGNAL= not needed
64 DK GREEN FUEL TANK PRESSURE SENSOR= not needed
Blue Connector
19 PNK IGNITION POS VOLT= to switched 12v
20 ORG BAT POS VOLT=to 12v
23 GRA FUEL SENSOR /FUEL TANK SENDER GROUND== not needed
33 PPL TCC BRAKE SWITCH= to brake switch
34 ORG/BLK PNP WITCH= to park neutral safety switch
42 COOLING FAN RELAY CONTROL= Cooling fan relay
I worked on the TPI harness today. Here is what I did. I deleted the what is marked with an X and labeled everything else accordingly. I was very surprised when I pulled what I though was a bulkhead to find a pass through. Now I'm wondering whether I should follow the wires in the dash and take them out of their respective connectors or just leave them where they are.
DO not Delete B8 its feeds the VSS signal to the PCM .. you need this.
DO not Delete B8 its feeds the VSS signal to the PCM .. you need this.

