c4 ring and pinion change
 02-18-2013, 09:34 AM
#1
Advanced

Thread Starter
Member Since: Jul 2012
Location: Burlington West Virginia
Posts: 81
Likes: 0
Received 0 Likes
on
0 Posts
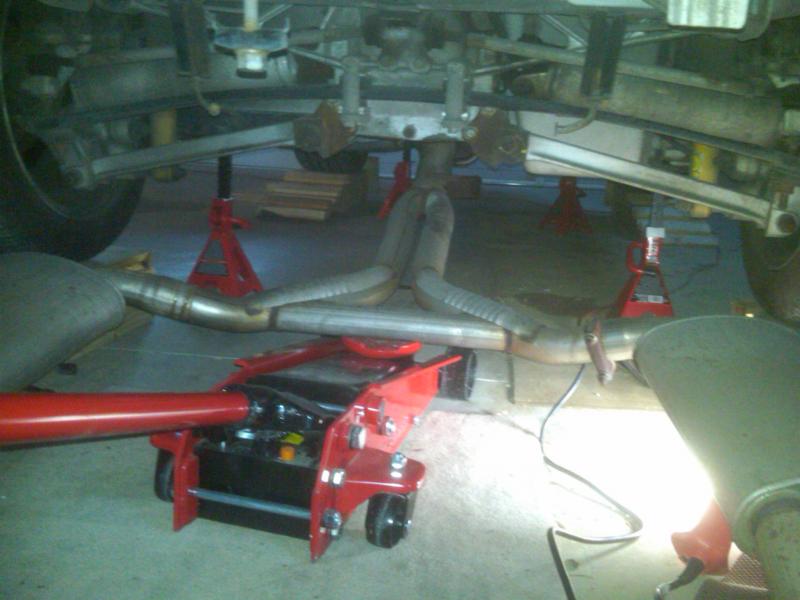
Hello guys,,,, well, it have my car all jacked up and got the exhaust off, and preparing change the gears from 2.59 to 3.54,,,, i have seen the link where they take the complete bat wing out and do it that way
but in looking at it under the car, it looks like maybe it can be done without removing the spring or the batwing. Have any of you guys done it that way and is there any hitches in doing it that way?
Thanks
but in looking at it under the car, it looks like maybe it can be done without removing the spring or the batwing. Have any of you guys done it that way and is there any hitches in doing it that way?
Thanks
 02-18-2013, 10:06 AM
#2
Race Director


No, just drop it out with the spring and the batwing. Disconnect the C-beam, drive shaft, side shafts and lower strut arms. Be very carefull remounting the spring when re-assembling, and remember the shim position. If everything is not correct you will snap the spring "L" bracket.
02-18-2013, 10:12 AM
#3
Advanced
Thread Starter
Member Since: Jul 2012
Location: Burlington West Virginia
Posts: 81
Likes: 0
Received 0 Likes
on
0 Posts
is there not enough clearance to take the diff housing out, without taking all that apart? it appears that there is room to do so.
Thanks
Thanks
02-18-2013, 10:41 AM
#4


You're very close to having everything removed to allow for the removal of the entire assembly and that can be a substantially less "messy" operation BUT there's no reason not to just remove the differential if it looks like the "appropriate" maneuver. Mine was done removing just the differential like you mention and it wasn't "messy" either!
If you do just the differential you might want to consider studs for the differential which would make the assembly a much easier task. The original hardware I believe is "tri-obal" or what-ever which is "self-tapping" for the assembly line build.
Chase all the threads and use conventional automotive hardware for the cover to differential. Measure your bolts and post back. I mentioned last week 4 - M8 X 1.25 X 30 and 2 - M8 X 1.25 X 75 for bolts. I'd be interested that I passed on correct information!
Last edited by WVZR-1; 02-18-2013 at 10:44 AM.
02-18-2013, 11:27 AM
#5
Advanced
Thread Starter
Member Since: Jul 2012
Location: Burlington West Virginia
Posts: 81
Likes: 0
Received 0 Likes
on
0 Posts
 good deal,,,, next question, I am assuming that the drive shaft will slide into the trans far
enough to allow removal of the diff.? And do i need to remove the support that goes between the trans and diff ? When i disconnect the dog bones from the diff housing, with the spring still attached is anything going to fly and kill me ? haha
Thanks for your help !!!
02-18-2013, 12:37 PM
#6
Instructor
Attachment 47718452good deal,,,, next question, I am assuming that the drive shaft will slide into the trans far
enough to allow removal of the diff.? And do i need to remove the support that goes between the trans and diff ? When i disconnect the dog bones from the diff housing, with the spring still attached is anything going to fly and kill me ? haha
Thanks for your help !!!
enough to allow removal of the diff.? And do i need to remove the support that goes between the trans and diff ? When i disconnect the dog bones from the diff housing, with the spring still attached is anything going to fly and kill me ? haha
Thanks for your help !!!
02-18-2013, 02:11 PM
#8
Instructor
You wont have any trouble with the spring or need that tool. Leave the spring attached to the 2 L-brackets that hold it by the center. Put the jack on the side of the spring on one end close to where the long bolt goes through. Use a block of wood and some rags to protect the spring. You don't want to scratch or nick it in any way. I put the wood so half of the wood is on the metal plate that covers the end of the spring. Just raise the jack up slightly so that you take the pressure off the long bolts. Then remove the Nut off the bottom and slowly lower the jack. Repeat on the other side. Then remove the center brackets, making note on how the shims are located. I've found that the rear spring dosn't curl, or curve a whole lot once you remove the bolt and lower the jack. Also measure how much thread extends past the large nut before you take it off. Write it down. When you re-install the spring tighten the nut untill the same amount of thread is extending past the threads so your ride height won't change.
02-18-2013, 02:20 PM
#9
Instructor
To me the hardest part of the job is removing the support between the nose of the differential housing and the tailhousing on the transmission (the c-beam) the bolts are hard to get a wrench on and can be on pretty good if they havn't been touched in a while. I think I lowered the entire diff assemble with the bat wing on a jack couple inches to get at it better.
02-18-2013, 03:24 PM
#10
Advanced
Thread Starter
Member Since: Jul 2012
Location: Burlington West Virginia
Posts: 81
Likes: 0
Received 0 Likes
on
0 Posts
ok,,,, i think now i have a plan, Thanks for the help.
i will proceed with this after i get home. if i have any problems, i will post a picture.
Thanks again
i will proceed with this after i get home. if i have any problems, i will post a picture.
Thanks again
02-18-2013, 06:02 PM
#11


 02-18-2013, 06:10 PM
#12

Why are you removing the dog bones?
You either drop the diffhead out the front as you originally proposed
or the more popular method of dropping the batwing / diffhead combo leaving all the outer suspension in place.
https://www.corvetteforum.com/techti...=218&TopicID=2
02-19-2013, 07:16 AM
#13
Advanced
Thread Starter
Member Since: Jul 2012
Location: Burlington West Virginia
Posts: 81
Likes: 0
Received 0 Likes
on
0 Posts
in looking at that link it looked like the dog bones had to be remove to allow the knuckles to be swung outward to get the axel shaft u joints out of their sockets ?
Maybe there is enough play in the axel shafts to pop them out, I dont know.
Thats why i was asking you all.
Thanks
Maybe there is enough play in the axel shafts to pop them out, I dont know.
Thats why i was asking you all.
Thanks
02-19-2013, 07:20 AM
#14
Advanced
Thread Starter
Member Since: Jul 2012
Location: Burlington West Virginia
Posts: 81
Likes: 0
Received 0 Likes
on
0 Posts
also, the bolts that holds the dog bone to the diff housing go through the batwing and diff
housing, so the bolts have to come out to get the diff out, either way i do it,,,, looks to me anyway.
Thanks
housing, so the bolts have to come out to get the diff out, either way i do it,,,, looks to me anyway.
Thanks
02-19-2013, 01:58 PM
#15
Race Director
Just a brief description.
I have done this a number of times and made up a braket that attaches to my floor jack. This allows me to support the diff while everything is removed.
1. Drop exhaust
2. Remove wheels
3. Have another jack ready to support the trans because you going to lower everything a few inches at the diff later on.
4. Pivot the camber rods down out of your way. ( 4 big bolts on diff )
4. Remove half shafts.
5. Loosen spring all the way and remove
6. Remove rear C beam bolts and driveshaft
7. Support diff
8 Remove batwing bolts
9 Let the diff down evenly with the trans supported at the same time until the batwing clears the body / frame mounts.
You should be able to slide the diff out past the C beam.
I may have missed something here... got to go... be back later
02-19-2013, 02:28 PM
#16
Advanced
Thread Starter
Member Since: Jul 2012
Location: Burlington West Virginia
Posts: 81
Likes: 0
Received 0 Likes
on
0 Posts
Thanks,,, the whole project is probably easier than I am thinking, just like to know what to expect and be ready for everything. All the info that you guys have given me will make the project go pretty smooth,,,,, the next questions will be when i start taking the diff apart and ordering parts. Our machinest at work says he can make me the spreader tool for the diff case, so that will help.
02-19-2013, 02:32 PM
#17
Thanks,,, the whole project is probably easier than I am thinking, just like to know what to expect and be ready for everything. All the info that you guys have given me will make the project go pretty smooth,,,,, the next questions will be when i start taking the diff apart and ordering parts. Our machinest at work says he can make me the spreader tool for the diff case, so that will help.
02-19-2013, 02:36 PM
#18
Advanced
Thread Starter
Member Since: Jul 2012
Location: Burlington West Virginia
Posts: 81
Likes: 0
Received 0 Likes
on
0 Posts
I have not bought any parts yet, I want to wait and see just what i need and get them all at once,,,,, I am located in Burlington, Wv not too far from you !
02-19-2013, 10:35 PM
#19
Instructor
When I did mine it was just one modifications of many I was doing. I bought a 3:75 to one ring and pinion set from eclers corvette to change out the original 3:07 to one gears and a rebuild kit with all the seals. I just dropped it off to a guy I know that builds race transmissions for a living who switched it out for $150 while I proceded with the rest of the project. Turned out one of the bearings was cracked and I had to purchase a new Dana44 housing for several hundred dollars.
02-19-2013, 10:42 PM
#20
The dog bones are the links that go forward from the spindle to the chassis