Late C4 door panel fix
 07-26-2010, 03:04 PM
#1
Le Mans Master

Thread Starter

I've seen a lot of threads on this, including repair on the broken ribs. Allow me to add my take on this problem. My 95' had both door panels loose on the top, since I purchased it six months or so ago. I finally decided to fix it last weekend. I didn't have a computer available, so I had to use the 'direct observation' or head scratching way of figuring it out. The ribs weren't broken either, so no problem there.
The biggest problem is the design. The outer edge of the door panel is supposed to hook over the inner edge of the door. It is held in place by a half dozen plastic fasterners.
Those plastic (and pliable) fasteners along the bottom are the only thing holding the door panel in place. But the biggest problem, that I saw was the weather stripping on either end at the top of the door.
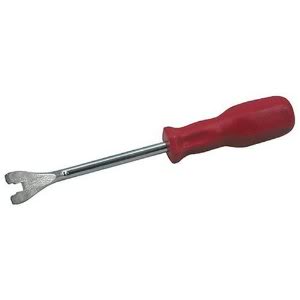
This is a huge 3/4 inch thick foam rubber on each end that pushes the door panel upwards against those little fasteners on the bottom! No wonder the door panel can't seat at the top. Now to remove the door panel. The right tool really helps and I used a Lisle Door Upholstery Remover, with the fork shape and wide face. It is thin and doesn't damage the fasteners or the door panels. Well worth the $10-$12 on a $600 door panel. They pop right out.
So I eyeballed the weather stripping right where the door panel sat on both the front end of the door and the back end of the door and marked it. Then I took a sharp, short knife and carved just about all of it, leaving only a 1/4 inch for cushioning the door panel against the top of the door.
Now the door panel sits with a lot less resistance than before, but it would still easily pop out. I figured out, what many others had figured out and eyed the large and unused 'tab' that stuck out the back side of the structure of the inner door itself, about half way down. Why, a screw could go there and hold it down in place, easily. Got a wide head black sheet metal screw and while pushing the door down with one hand and putting the knee to the door panel and pushing it inward, I drilled a small hole through the back of the door panel and through the tab.
Then I put in the screw and by golly, it worked and you couldn't tell it wasn't factory. No more ugly gap, loose panel, nor funny looks when a passenger got in. No rattles either and I did it to the drivers side, without having to remove the door panel at all. Just bend it back real nice like, cut the foam away, leaving just a little for 'cush' and put the screw in. The biggest detractor from my Corvette's appearance is now gone.
The biggest problem is the design. The outer edge of the door panel is supposed to hook over the inner edge of the door. It is held in place by a half dozen plastic fasterners.
Those plastic (and pliable) fasteners along the bottom are the only thing holding the door panel in place. But the biggest problem, that I saw was the weather stripping on either end at the top of the door.
This is a huge 3/4 inch thick foam rubber on each end that pushes the door panel upwards against those little fasteners on the bottom! No wonder the door panel can't seat at the top. Now to remove the door panel. The right tool really helps and I used a Lisle Door Upholstery Remover, with the fork shape and wide face. It is thin and doesn't damage the fasteners or the door panels. Well worth the $10-$12 on a $600 door panel. They pop right out.
So I eyeballed the weather stripping right where the door panel sat on both the front end of the door and the back end of the door and marked it. Then I took a sharp, short knife and carved just about all of it, leaving only a 1/4 inch for cushioning the door panel against the top of the door.
Now the door panel sits with a lot less resistance than before, but it would still easily pop out. I figured out, what many others had figured out and eyed the large and unused 'tab' that stuck out the back side of the structure of the inner door itself, about half way down. Why, a screw could go there and hold it down in place, easily. Got a wide head black sheet metal screw and while pushing the door down with one hand and putting the knee to the door panel and pushing it inward, I drilled a small hole through the back of the door panel and through the tab.
Then I put in the screw and by golly, it worked and you couldn't tell it wasn't factory. No more ugly gap, loose panel, nor funny looks when a passenger got in. No rattles either and I did it to the drivers side, without having to remove the door panel at all. Just bend it back real nice like, cut the foam away, leaving just a little for 'cush' and put the screw in. The biggest detractor from my Corvette's appearance is now gone.

The following users liked this post:
thunder1951 (03-04-2016)


 07-26-2010, 05:01 PM
#5
Le Mans Master
Thread Starter
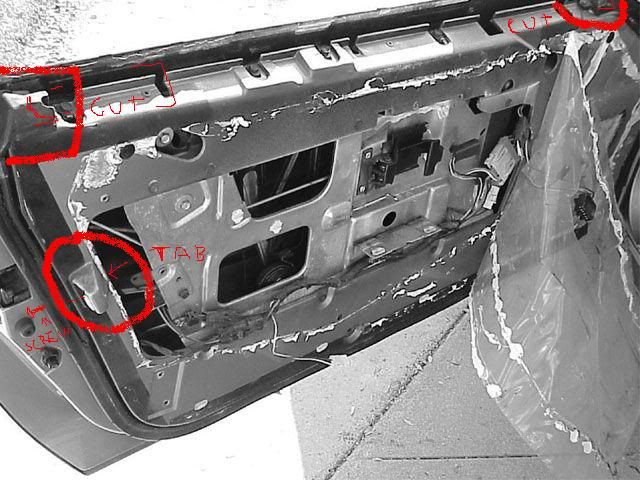
Here it is. It's crude, but you can see how thick the weatherstripping end is on top of the door! It is huge! Then look at the gap that the door panel has to push that rubber down, to mate with the door itself. No wonder it has trouble seating! Don't cut it all away, because that's where it attaches! Leave a little meat on there just because. AND ONLY CUT UNDERNEATH WHERE THE DOOR PANEL MATES TO THE RUBBER!
Then, you can see the 'Tab' on the end of the door. The one in the pic has a screw hole already, but mine didn't. It is fiberglass, so it drills really easily

Then, you can see the 'Tab' on the end of the door. The one in the pic has a screw hole already, but mine didn't. It is fiberglass, so it drills really easily
Last edited by F22; 07-26-2010 at 05:09 PM.
The following users liked this post:
thunder1951 (03-04-2016)
 07-26-2010, 05:12 PM
#7
Le Mans Master
Thread Starter
Final footnote. I removed the passenger side completely, but I was able to get away with not removing the drivers side at all. Just gently pull the door panel back to cut the weatherstrip underneath on both the front and the back of the door. Then drill and apply screw to tab at back of door and door panel for a permanent fix!
YOU DON'T HAVE TO REMOVE THE DOOR PANEL TO FIX THIS! YAAY!
YOU DON'T HAVE TO REMOVE THE DOOR PANEL TO FIX THIS! YAAY!

 07-26-2010, 06:09 PM
#10
Team Owner

Member Since: Aug 2008
Location: Rochester NY
Posts: 31,358
Received 5,008 Likes
on
2,528 Posts
St. Jude Donor '09-'10-'11-'12-'13-'14-'15-'16-'17-'18-�19-'20-'21-'22-'23-'24


Both door panels are giving me problems but I'm going to take them off to see if the ribs are OK or not. If the ribs are all right I'll give your method a try. Thank you, and you'll probably get a PM with some question or other once I get into it!
 07-26-2010, 06:21 PM
#11
Le Mans Master
Thread Starter

Heck, you can even see the door tab without removing the door panel (it was that loose). Mark it with a washable marker and then drill and put in the screw).
07-26-2010, 07:56 PM
#13
Drifting


Member Since: Nov 2009
Posts: 1,884
Likes: 0
Received 0 Likes
on
0 Posts
I did the same thing to my 95 in April with the screws I used 1'' washer head self cutting painted them black to match interior did not cut the weather stripping ,I got the idea here on the fourm about 6 months ago.
07-26-2010, 09:09 PM
#14
Team Owner
Member Since: Aug 2008
Location: Rochester NY
Posts: 31,358
Received 5,008 Likes
on
2,528 Posts
St. Jude Donor '09-'10-'11-'12-'13-'14-'15-'16-'17-'18-�19-'20-'21-'22-'23-'24
One problem I will have to solve at some point - when I took the panels off a year or so ago I took the screw out from the plastic backing by the door handle. There must have been a nut or clip behind there because something dropped and now there is nothing to put a screw back into. So on the passenger side the whole assembly flops around, the light, the lock slide, etc.
At some point I'll haul out the FSM and see what I have to do. And the darn intake manifold still did not replace its own gaskets yet so maybe I'll have to do it myself
At some point I'll haul out the FSM and see what I have to do. And the darn intake manifold still did not replace its own gaskets yet so maybe I'll have to do it myself
07-27-2010, 12:38 AM
#15
Burning Brakes

Here it is. It's crude, but you can see how thick the weatherstripping end is on top of the door! It is huge! Then look at the gap that the door panel has to push that rubber down, to mate with the door itself. No wonder it has trouble seating! Don't cut it all away, because that's where it attaches! Leave a little meat on there just because. AND ONLY CUT UNDERNEATH WHERE THE DOOR PANEL MATES TO THE RUBBER!
Then, you can see the 'Tab' on the end of the door. The one in the pic has a screw hole already, but mine didn't. It is fiberglass, so it drills really easily
Then, you can see the 'Tab' on the end of the door. The one in the pic has a screw hole already, but mine didn't. It is fiberglass, so it drills really easily
Last edited by darkstallion_69; 07-27-2010 at 12:43 AM.
07-27-2010, 08:25 AM
#16
Safety Car

I think that if you put a screw in the end of the panel, you'll want to use one of these in the slot on the door:
http://www.parts123.com/parts123/yb....5Z5Z50000050F#
http://www.parts123.com/parts123/yb....5Z5Z50000050F#
07-27-2010, 11:28 AM
#17
Le Mans Master
Thread Starter
I think that if you put a screw in the end of the panel, you'll want to use one of these in the slot on the door:
http://www.parts123.com/parts123/yb....5Z5Z50000050F#
http://www.parts123.com/parts123/yb....5Z5Z50000050F#
07-28-2010, 06:38 AM
#18
I think that if you put a screw in the end of the panel, you'll want to use one of these in the slot on the door:
http://www.parts123.com/parts123/yb....5Z5Z50000050F#
http://www.parts123.com/parts123/yb....5Z5Z50000050F#
07-28-2010, 09:12 AM
#19
Burning Brakes
Member Since: Aug 2004
Location: Washington District of Columbia
Posts: 771
Likes: 0
Received 0 Likes
on
0 Posts

I've seen a lot of threads on this, including repair on the broken ribs. Allow me to add my take on this problem. My 95' had both door panels loose on the top, since I purchased it six months or so ago. I finally decided to fix it last weekend. I didn't have a computer available, so I had to use the 'direct observation' or head scratching way of figuring it out. The ribs weren't broken either, so no problem there.
The biggest problem is the design. The outer edge of the door panel is supposed to hook over the inner edge of the door. It is held in place by a half dozen plastic fasterners.
Those plastic (and pliable) fasteners along the bottom are the only thing holding the door panel in place. But the biggest problem, that I saw was the weather stripping on either end at the top of the door.
This is a huge 3/4 inch thick foam rubber on each end that pushes the door panel upwards against those little fasteners on the bottom! No wonder the door panel can't seat at the top. Now to remove the door panel. The right tool really helps and I used a Lisle Door Upholstery Remover, with the fork shape and wide face. It is thin and doesn't damage the fasteners or the door panels. Well worth the $10-$12 on a $600 door panel. They pop right out.
So I eyeballed the weather stripping right where the door panel sat on both the front end of the door and the back end of the door and marked it. Then I took a sharp, short knife and carved just about all of it, leaving only a 1/4 inch for cushioning the door panel against the top of the door.
Now the door panel sits with a lot less resistance than before, but it would still easily pop out. I figured out, what many others had figured out and eyed the large and unused 'tab' that stuck out the back side of the structure of the inner door itself, about half way down. Why, a screw could go there and hold it down in place, easily. Got a wide head black sheet metal screw and while pushing the door down with one hand and putting the knee to the door panel and pushing it inward, I drilled a small hole through the back of the door panel and through the tab.
Then I put in the screw and by golly, it worked and you couldn't tell it wasn't factory. No more ugly gap, loose panel, nor funny looks when a passenger got in. No rattles either and I did it to the drivers side, without having to remove the door panel at all. Just bend it back real nice like, cut the foam away, leaving just a little for 'cush' and put the screw in. The biggest detractor from my Corvette's appearance is now gone.
panel. I'm not understanding your procedure fully. Sorry. Thanks
07-28-2010, 11:00 AM
#20
Le Mans Master
Thread Starter
I removed the passenger door so that I could find the root cause of the problem. Once I did that, I found that I could repair the driver door side without removing it at all, as the panel has enough flex, so that you may pull it back and cut the excess foam underneath. Also, you can sight the door tab as well, so that you can drill and install a screw on the side of the door panel itself. Hope this clears things up!

