Effective, permanent fix to sagging door trim panels, using wire ties
 07-29-2007, 02:56 PM
#1
Drifting

Thread Starter

Nearly every C4 has had this problem by now. The rubbery door trim panels degrade over time, and the constant stretching force that is applied fractures the ribbed structure inside the panel, causing the panel to pull out of its slot along the top of the door and to flop loosely.
What I have found is an incredibly easy way to 100% fix to this. Remove the trim panel, and pull out the weatherstrip along the top to reveal the place where you will poke two holes. Feed some sturdy wire ties through these holes and through the largest rib on the trim panel. Now, while pulling the wire ties tight with pliers, firmly squeeze the trim panel until the cracked ribs are brought mostly back together. Once the wire ties are tight, the rib will no longer be able to stretch its cracks open any farther.
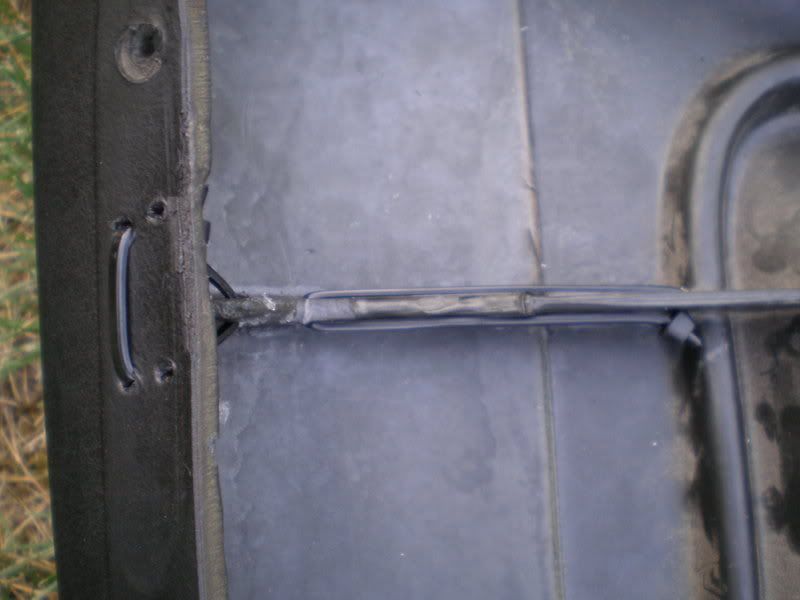
Insert the wire ties in exactly the direction shown to make for easiest tightening.
You can see a few "mistake" holes that I poked through that were so close to the edge that they either cracked or broke their way out the rest of the way. Keep the holes away from the edges and try not to do this.
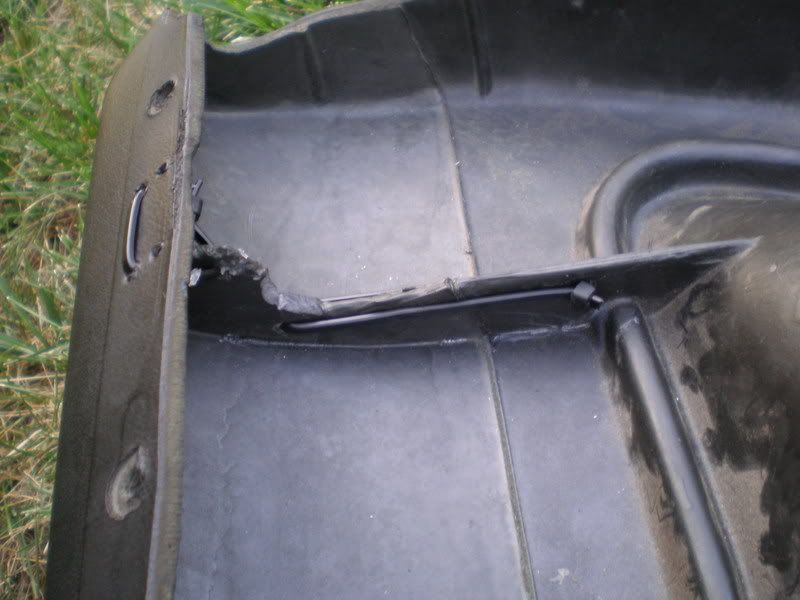
Reinforcing the one largest rib on each door is enough to secure the entire panel, even if all the other ribs are cracked, because the one super-reinforced rib will now hold all the other ribs' cracks shut.
Even if the wire ties take up space that was not previously occupied by the ribs, there is plenty of room between the trim panel and the door innards, and the wire ties will not affect fitting the door whatsoever.
When you're done, hook the weatherstrip back on to completely cover up the repair. Now, hook the trim panel back onto its slot along the top of the door, and pack it down in there hard. You'll find that it's pretty sturdy. It will be even more sturdy when the door is fully assembled. Visually there is no sign that anything was done because it's all underneath the weatherstrip and inside the door.
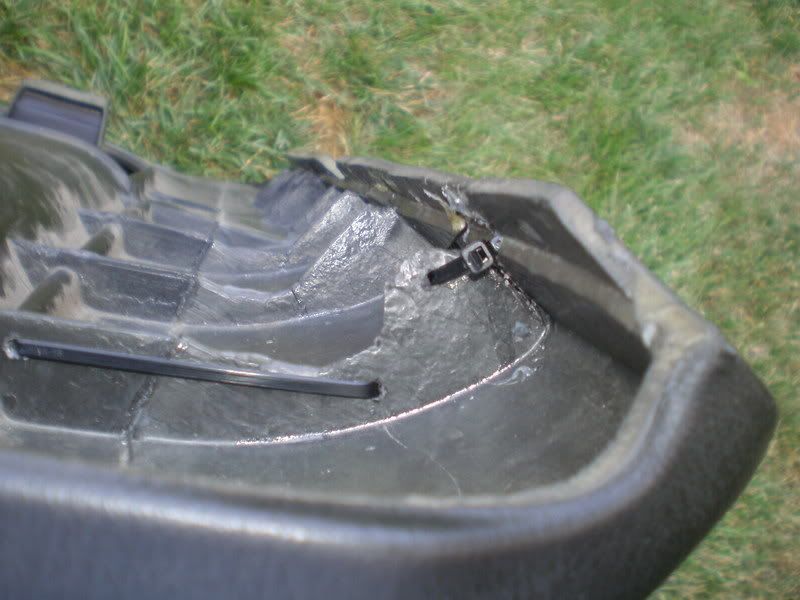
Even with the ribs secured and all panel fasteners in place, the trim panel might still lift up and unhook itself when you close the door if a certain screw is not in place. The location of the screw is shown below:
I'm not sure if this screw is a factory stock item or if it was added later, so hopefully someone can clear that up for me. I had one on my driver's side but not the passenger side. The passenger side trim does not have this problem of unhooking itself when the door is closed.
The screw is inserted through a hole poked through the side of the door trim panel. It threads through a small metal bracket inserted through a slot in the fiberglass bump shown in the picture. The hole in the trim panel is offset upwards just a bit, such that the trim panel must be stretched downwards to get the screw to thread into the bracket. This constant downward force applied by the screw is enough to keep the panel from lifting up and unhooking.
All this is easily a fifteen minute job once the trim panels are off, and taking those off is also a 10-15 minute job if you know what to do. My trim panels are now sturdy and strong as a rock and will never flop again.
What I have found is an incredibly easy way to 100% fix to this. Remove the trim panel, and pull out the weatherstrip along the top to reveal the place where you will poke two holes. Feed some sturdy wire ties through these holes and through the largest rib on the trim panel. Now, while pulling the wire ties tight with pliers, firmly squeeze the trim panel until the cracked ribs are brought mostly back together. Once the wire ties are tight, the rib will no longer be able to stretch its cracks open any farther.
Insert the wire ties in exactly the direction shown to make for easiest tightening.
You can see a few "mistake" holes that I poked through that were so close to the edge that they either cracked or broke their way out the rest of the way. Keep the holes away from the edges and try not to do this.
Reinforcing the one largest rib on each door is enough to secure the entire panel, even if all the other ribs are cracked, because the one super-reinforced rib will now hold all the other ribs' cracks shut.
Even if the wire ties take up space that was not previously occupied by the ribs, there is plenty of room between the trim panel and the door innards, and the wire ties will not affect fitting the door whatsoever.
When you're done, hook the weatherstrip back on to completely cover up the repair. Now, hook the trim panel back onto its slot along the top of the door, and pack it down in there hard. You'll find that it's pretty sturdy. It will be even more sturdy when the door is fully assembled. Visually there is no sign that anything was done because it's all underneath the weatherstrip and inside the door.
Even with the ribs secured and all panel fasteners in place, the trim panel might still lift up and unhook itself when you close the door if a certain screw is not in place. The location of the screw is shown below:
I'm not sure if this screw is a factory stock item or if it was added later, so hopefully someone can clear that up for me. I had one on my driver's side but not the passenger side. The passenger side trim does not have this problem of unhooking itself when the door is closed.
The screw is inserted through a hole poked through the side of the door trim panel. It threads through a small metal bracket inserted through a slot in the fiberglass bump shown in the picture. The hole in the trim panel is offset upwards just a bit, such that the trim panel must be stretched downwards to get the screw to thread into the bracket. This constant downward force applied by the screw is enough to keep the panel from lifting up and unhooking.
All this is easily a fifteen minute job once the trim panels are off, and taking those off is also a 10-15 minute job if you know what to do. My trim panels are now sturdy and strong as a rock and will never flop again.
Last edited by LouisvilleLT4; 07-29-2007 at 03:12 PM.
 07-29-2007, 03:08 PM
#2
Drifting
Thread Starter
If anyone feels like fixing their door sag but is afraid of taking the trim panel apart, I can provide instructions if requested. It's not difficult.
Edit: Instructions are posted below.
Edit: Instructions are posted below.
Last edited by LouisvilleLT4; 07-30-2007 at 10:23 PM.
The following users liked this post:
gman35 (05-06-2021)
 07-29-2007, 03:34 PM
#4
Racer


Member Since: May 2003
Location: Sacramento California
Posts: 273
Likes: 0
Received 0 Likes
on
0 Posts
Could you email me those instructions for removing the front door panel? i have to repair both front doors
my email address is: marvinbbriggs@softcom.net
thanks boonie
my email address is: marvinbbriggs@softcom.net
thanks boonie
07-29-2007, 03:52 PM
#5
Drifting
Thread Starter
Could you email me those instructions for removing the front door panel? i have to repair both front doors
my email address is: marvinbbriggs@softcom.net
thanks boonie
my email address is: marvinbbriggs@softcom.net
thanks boonie
07-29-2007, 06:50 PM
#6
Drifting
Thread Starter
I don't have the scanned FSM pages on me right now, so I'll do my best to explain how to get the door panels off. This is for the late model C4's only; I think they went to the final trim panels in '94 or so (please correct me if I'm wrong). There are similarities to the earlier models, though, and it's not really difficult for any of them.
I've done this about a dozen times now and it can be done really fast (maybe 5 minutes) if you know what to expect, but still I may have missed something so let me know.
- If it's the driver's side door, open the door and look for that screw on the side of the trim panel that I mentioned above. If it's there, come back to this thread and post "yes the screw is a factory-installed part of '95-'96 corvettes," so that that information can be in this thread. Unscrew it.
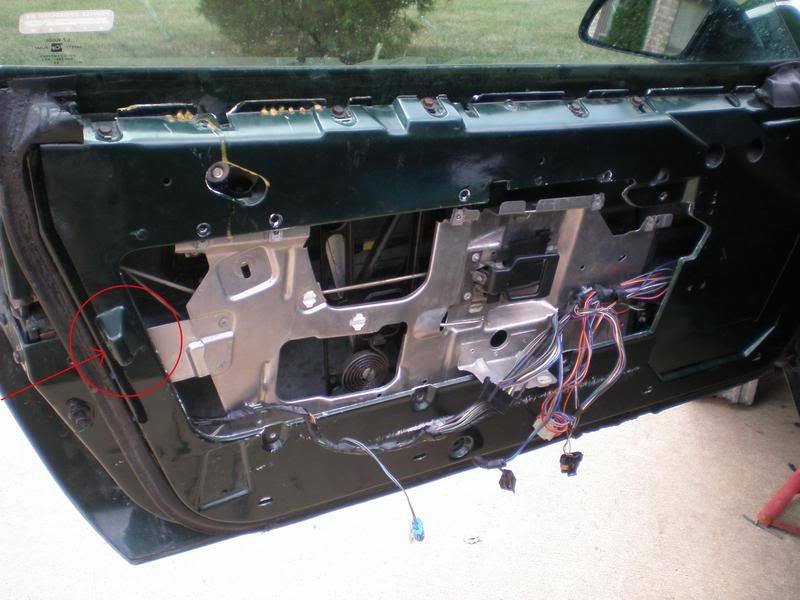
- The rectangular plastic bezel that surrounds the inside handle and courtesy light is screwed firmly to that aluminum sheet in the picture above, and it helps hold the trim panel in place. You must remove it. That's what the next few steps will be.
-Take a hooked tool and insert it behind the moving lock rod, and pull on it from the back. The plastic portion will pop off of the metal rod.
-Next, take a flathead screwdriver or something wider and flatter if you've got it, and press it in on top of the courtesy light that's above the handle. On the left and right sides on top of the light are plastic locking tabs; to release them, use your tool to pry the top of the light outward and downward at both of these points (left and right). Don't worry, the light is not glass and it is really durable. When the light is freed, pull it out and let it hang by the wire.
-Remove the screws holding the bezel to the door. If it's the driver's side, there should be a screw in plain sight behind the handle, and the other two would have been hidden behind where you removed the courtesy light and the lock rod. I think the passenger side uses less screws. Don't try to remove the bezel yet.
- Remove the ashtray below the bezel. It's got two screws. On the passenger side, you must remove it to be able to remove the bezel at all; on both sides it's screwed into a tab on that aluminum sheet, so on both sides it has to come out for the trim panel to be removed. Don't drop anything down that hole that it leaves, because if it ends up behind that aluminum sheet you almost always have to remove the sheet to get it no matter where exactly it lands. Hopefully the black sheet of padding in front of the aluminum sheet will block anything that falls.
-The bezel is free to come out now. Pry outward on it while opening the door handle to try to get it out. As you do this, the lock rod will get in the way, so move the lock rod to the "locked" position and from there push it upward through an opening right above it and it should clear the bezel. Lastly, pull out the courtesy lamp's wire until you find the connector along this wire about 7 inches down its length. Unplug the connector, and pry the power-lock control's whitish connector loose as well (it's got five electrical prongs stuck through its holes that hold pretty tight, you'll see what I mean). The bezel is out now. Set it, the courtesy light, the plastic end of the lock rod, and the screws aside.
- On the driver's side, you must now pry the top of the window/mirror control unit outwards to free it from its spring-loaded tab. Unplug both connectors going into it. They have locking tabs and are a pain. Even after completely breaking the tabs off they still hold pretty firm.
- Now that the rest of the trim panel is loose, take your flat tool and insert it along the bottom of the trim panel. Pry outwards next to each of the big black circular plastic fasteners and they'll pop out. If you lose anything, don't loose these; they're critical to the appearance of the door.
- To remove the trim panel, pull upwards on it to "unhook it" from the top of the door. Don't set it down! There are still wires connected to it. On the driver's side, this includes the hatch release switch on the side of the door. On the passenger side, it will be the oddly-placed window switch. Unplug the plastic connectors that exist along both of these wires; pull the wire out a little farther if you don't see the connector.
Now the trim panel can come off. Don't set it face down or you will scratch it. To remove the strip of weatherstrip along the top, just fold down each of its tabs that penetrate the trim panel so they can pull through their slots. To reinstall the door trim, first reread these steps and that should jar your memory enough as to what each part is. Installation is the reverse of removal.
Once again, do not drop anything into the door when you're working on it!!! Unless you're like me and have removed it, there should be a sheet of sound deadening in front of the aluminum sheet that might prevent things from falling behind the metal sheet, but just in case don't drop anything.
I've done this about a dozen times now and it can be done really fast (maybe 5 minutes) if you know what to expect, but still I may have missed something so let me know.
- If it's the driver's side door, open the door and look for that screw on the side of the trim panel that I mentioned above. If it's there, come back to this thread and post "yes the screw is a factory-installed part of '95-'96 corvettes," so that that information can be in this thread. Unscrew it.
- The rectangular plastic bezel that surrounds the inside handle and courtesy light is screwed firmly to that aluminum sheet in the picture above, and it helps hold the trim panel in place. You must remove it. That's what the next few steps will be.
-Take a hooked tool and insert it behind the moving lock rod, and pull on it from the back. The plastic portion will pop off of the metal rod.
-Next, take a flathead screwdriver or something wider and flatter if you've got it, and press it in on top of the courtesy light that's above the handle. On the left and right sides on top of the light are plastic locking tabs; to release them, use your tool to pry the top of the light outward and downward at both of these points (left and right). Don't worry, the light is not glass and it is really durable. When the light is freed, pull it out and let it hang by the wire.
-Remove the screws holding the bezel to the door. If it's the driver's side, there should be a screw in plain sight behind the handle, and the other two would have been hidden behind where you removed the courtesy light and the lock rod. I think the passenger side uses less screws. Don't try to remove the bezel yet.
- Remove the ashtray below the bezel. It's got two screws. On the passenger side, you must remove it to be able to remove the bezel at all; on both sides it's screwed into a tab on that aluminum sheet, so on both sides it has to come out for the trim panel to be removed. Don't drop anything down that hole that it leaves, because if it ends up behind that aluminum sheet you almost always have to remove the sheet to get it no matter where exactly it lands. Hopefully the black sheet of padding in front of the aluminum sheet will block anything that falls.
-The bezel is free to come out now. Pry outward on it while opening the door handle to try to get it out. As you do this, the lock rod will get in the way, so move the lock rod to the "locked" position and from there push it upward through an opening right above it and it should clear the bezel. Lastly, pull out the courtesy lamp's wire until you find the connector along this wire about 7 inches down its length. Unplug the connector, and pry the power-lock control's whitish connector loose as well (it's got five electrical prongs stuck through its holes that hold pretty tight, you'll see what I mean). The bezel is out now. Set it, the courtesy light, the plastic end of the lock rod, and the screws aside.
- On the driver's side, you must now pry the top of the window/mirror control unit outwards to free it from its spring-loaded tab. Unplug both connectors going into it. They have locking tabs and are a pain. Even after completely breaking the tabs off they still hold pretty firm.
- Now that the rest of the trim panel is loose, take your flat tool and insert it along the bottom of the trim panel. Pry outwards next to each of the big black circular plastic fasteners and they'll pop out. If you lose anything, don't loose these; they're critical to the appearance of the door.
- To remove the trim panel, pull upwards on it to "unhook it" from the top of the door. Don't set it down! There are still wires connected to it. On the driver's side, this includes the hatch release switch on the side of the door. On the passenger side, it will be the oddly-placed window switch. Unplug the plastic connectors that exist along both of these wires; pull the wire out a little farther if you don't see the connector.
Now the trim panel can come off. Don't set it face down or you will scratch it. To remove the strip of weatherstrip along the top, just fold down each of its tabs that penetrate the trim panel so they can pull through their slots. To reinstall the door trim, first reread these steps and that should jar your memory enough as to what each part is. Installation is the reverse of removal.
Once again, do not drop anything into the door when you're working on it!!! Unless you're like me and have removed it, there should be a sheet of sound deadening in front of the aluminum sheet that might prevent things from falling behind the metal sheet, but just in case don't drop anything.
Last edited by LouisvilleLT4; 07-31-2007 at 12:45 PM.
07-30-2007, 10:07 PM
#7
Drifting
Thread Starter
This is way easier than the current Tech Tip solution, so how to I go about submitting one of those???
edit: After reading the tech tip again, wow.. this method is WAY WAY easier than what they did, and fixes the problem more directly. I can't believe they went to all that trouble and planning.
edit: After reading the tech tip again, wow.. this method is WAY WAY easier than what they did, and fixes the problem more directly. I can't believe they went to all that trouble and planning.
Last edited by LouisvilleLT4; 07-31-2007 at 12:37 PM.
07-31-2007, 05:51 AM
#8
Team Owner

Member Since: Oct 2000
Location: 63.8% of all statistics are made up on the spot.
Posts: 44,755
Likes: 0
Received 1 Like
on
1 Post
St. Jude Donor '08-'10

It looks like a good fix. Thanks for posting it. Do you think that there would be any gain by adding some fiberglass over the repaired area to enclose the ties and the crack?
07-31-2007, 09:41 AM
#9
Melting Slicks


Member Since: Feb 2007
Location: Indian Rocks Beach FL
Posts: 3,266
Likes: 0
Received 7 Likes
on
7 Posts
St. Jude Donor '08-'09-'10
The screw you refer to was standard until (I believe) '95. There is a plastic insert the goes onto the bracket on the door frame and the screw bites into the insert. My door panels don't have the sag problem but the driver side would become unattached. The screw alone fixed my problem. Passenger side didn't have the problem but only because it gets used so infrequently. I installed the screw in both doors. Highly recommend it.
07-31-2007, 12:34 PM
#11
Drifting
Thread Starter
The screw you refer to was standard until (I believe) '95. There is a plastic insert the goes onto the bracket on the door frame and the screw bites into the insert. My door panels don't have the sag problem but the driver side would become unattached. The screw alone fixed my problem. Passenger side didn't have the problem but only because it gets used so infrequently. I installed the screw in both doors. Highly recommend it.
Last edited by LouisvilleLT4; 07-31-2007 at 12:37 PM.
07-31-2007, 01:37 PM
#12
Melting Slicks
Member Since: Feb 2007
Location: Indian Rocks Beach FL
Posts: 3,266
Likes: 0
Received 7 Likes
on
7 Posts
St. Jude Donor '08-'09-'10
 08-27-2007, 02:02 PM
#13
Team Owner
Member Since: Oct 2000
Location: Fort Knox, KY
Posts: 96,443
Likes: 0
Received 8 Likes
on
8 Posts
Cruise-In IV Veteran
Cruise-In VI Veteran
Cruise-In VII Veteran
Cruise-In VIII Veteran
You can order a Screw & Nylon Door Panel Repair Kit from Mid-America Motorworks that includes all the O.E.M. nylon fasteners and screws to repair one door.
A lot of times, those white, nylon fasteners break from age/fatigue, allowing the door panel to slip off its mounting brackets.
That and Louisville LT4's mod should go a long way toward solving this common problem.
http://www.mamotorworks.com/corvette?frame=3.9539
A lot of times, those white, nylon fasteners break from age/fatigue, allowing the door panel to slip off its mounting brackets.
That and Louisville LT4's mod should go a long way toward solving this common problem.
http://www.mamotorworks.com/corvette?frame=3.9539
Last edited by onedef92; 06-08-2009 at 02:21 PM.
08-27-2007, 03:25 PM
#14
Team Owner

Member Since: May 2000
Location: Plantation Florida USAF(Retired) 1966-1990
Posts: 47,880
Received 4,504 Likes
on
3,589 Posts
U.S. Air Force
St. Jude Donor '05-'06-'07-'08-'09-'10-'11-'12-'13-'14-'15-'16-'17-'18-'19-'20-'21-'22-'23-'24
NCM Sinkhole Donor

GOOD IDEA?
 08-28-2007, 09:42 AM
#15
Team Owner
Member Since: Oct 2000
Location: Fort Knox, KY
Posts: 96,443
Likes: 0
Received 8 Likes
on
8 Posts
Cruise-In IV Veteran
Cruise-In VI Veteran
Cruise-In VII Veteran
Cruise-In VIII Veteran
Louisville LT4, you said "wire ties." You mean nylon zip ties, don't you? What length do you suggest? 12 inches?
08-28-2007, 10:40 AM
#16
Pro

Member Since: Jun 2001
Location: West Dundee IL
Posts: 545
Likes: 0
Received 0 Likes
on
0 Posts
This is a very promising idea! I was going to go the route of the aluminum/j-weld fix which is a lot of work, I think I will give this a shot instead. Thanks very much for posting!
 08-28-2007, 11:41 AM
#18
Cool Hand Luke of W MI


I think we would all like the length you suggest!

Maybe we need to move this thread to OT???
OBTW OP, good tip on this fix!
 08-28-2007, 12:11 PM
#20
Team Owner
Member Since: Oct 2000
Location: Fort Knox, KY
Posts: 96,443
Likes: 0
Received 8 Likes
on
8 Posts
Cruise-In IV Veteran
Cruise-In VI Veteran
Cruise-In VII Veteran
Cruise-In VIII Veteran
Huh? From where I sit, you'd have to have batting-for-the-other-team tendencies from the get-go to even get that impression from my post. Unless you're a female, that is.